Auth task
The problem of authorization in dozens of services was encountered a few years ago - at the beginning of the “ era of sawing a monolith ”. This problem was solved with a new service called Auth. He helped implement seamless authentication across various services and migrate user data to separate databases.
The Auth service has three main tasks:
- Single point of authentication (SSO) for all system services . Services do not store credentials, but trust this to one dedicated service.
- Safe and granular access to resources . Safe because passwords are stored in one place and are as secure as possible. Granular, since service owners can configure access to resources as they want, based on the data that came from the authentication service.
- . , , .
The first version of Auth is part of the monolith. It uses its own protocol for communicating with services. Such a "scheme" was necessary at that moment, but after several years of work problems appeared.
Auth is part of the monolith . Consequently, the service is tied to the release cycle, which makes it impossible for independent development and deployment. In addition, you would have to deploy the entire monolith if you wanted to deploy Auth, for example, when scaling a service.
Dodo IS depends on Auth . In the old implementation, external services call Auth on every user action to validate data about it. This tight binding can cause the entire Dodo IS to stop working if Auth gets stuck for some reason.
Auth depends on Redis... Moreover, it is strong enough - a malfunction of Redis will lead to the fall of Auth. We use Azure Redis, for which the stated SLA is 99.9%. This means that the service can be unavailable for up to 44 minutes per month. Such downtime is not permissible.
The current implementation of Auth uses its own authentication protocol without relying on standards . In most of our services, we use C # (if we are talking about backend) and we have no problems with maintaining the library for our protocol. But if services in Python, Go or Rust suddenly appear, the development and support of libraries for these languages will take additional time and bring additional complexity.
Current Auth uses a Roles Based Access Control scheme which is based on roles... Usually, the role is given full access to a specific service, instead of being tied to specific functionality. For example, in pizzerias there are deputy managers who can lead certain projects: draw up schedules or take into account raw materials. But we do not have the issuance of rights to specific components of the system. You have to give full access to the service so that employees can access the scheduling or settings of any accounting component.
Problems prompted us to design and write a new version of Auth. At the start of the project, we spent 3 weeks just studying the authorization and authentication standards OAuth 2.0 and OpenID Connect 1.0.
Note... Exaggerated, the article is a retelling of the RFC, which had to be re-read several times to understand what was happening around. Here I tried to get away from this complexity and tell everything as simply, structured, concisely and without describing complex things, for example, what characters the service response may contain. Unlike RFC, after reading this once, you can figure everything out. I hope the article will be useful and save time when choosing a solution for implementing an authentication service, or maybe it will make someone think about its need.
What is OAuth2.0?
We decided to start the development of the new Auth by examining the available protocols and technologies. The most common authorization standard is the OAuth2.0 authorization framework.
The standard was adopted in 2012, and over 8 years the protocol has been changed and supplemented. There are so many RFCs that the authors of the original protocol decided to write OAuth 2.1, which would combine all the current changes to OAuth 2.0 in one document. While he is at the draft stage .
The current version of OAuth is described in RFC 6749 . We will analyze it.
OAuth 2.0 is an authorization framework.
It describes how communication between services should be implemented to ensure secure authorization. Many nuances are described in sufficient detail, for example, the flow of interaction between nodes, but some are left to the mercy of a specific implementation.
Features:
- Separating the entity of the user and the application requesting access . Thanks to this separation, we can manage application rights separately from user rights.
- Instead of the usual login and password, which have a certain set of rights and lifetime, we get access to resources using randomly generated strings - tokens .
- You can issue rights as precisely as possible , based on your own wishes, and not on a predetermined set of rights.
Let's take a closer look at the features.
Roles
OAuth 2.0 defines four roles:
- Resource owner is an entity that has access rights to a protected resource. An entity can be an end user or some kind of system. A protected resource is an HTTP endpoint, which can be anything: API endpoint, file on CDN, web service.
- Resource server - a server that stores a protected resource to which the resource owner has access.
- Client . This is an application that requests access to a protected resource on behalf of the resource owner and with his permission - with authorization.
- Authorization server - a server that issues a token to a client to access a protected resource after a successful authorization of the resource owner.
Each participant in the interaction can combine several roles. For example, a client can be a resource owner at the same time and request access to their own resources. Let's consider the interaction scheme further.
Important: the client must be registered with the service in advance. How to do it?
Client registration
You choose the method of client registration, for example, manual or service discovery, depending on the
Redirection URI - the address to which the resource owner will be sent after successful authorization. In addition to authorization, the address is used to confirm that the service that applied for authorization is who it claims to be.
Client type - the type of client that determines how you interact with it. The type of client is determined by its ability to securely store its credentials for authorization - a token. Therefore, there are only 2 types of clients:
- Confidential — , . , web-, backend.
- Public — . , , .
The token in OAuth 2.0 is a string that is not transparent to the client. Usually the string looks like it was randomly generated - its format doesn't matter to the client. A token is a key to access something, for example, to a protected resource (access token) or to a new token (refresh Token).
Each token has its own lifetime . But the refresh token should have more, because it is used to get an access token. For example, if the lifetime of an access token is about an hour, then the refresh token can be left to live for a whole week.
Refresh token is optional and available only for confedential clients... Using the optional token, in some implementations the lifetime of the access token is made very long, and the refresh token is not used at all, so as not to bother with updating. But this is not safe. If the access token has been compromised, it can be reset and the service will receive a new Access token using the refresh token. If there is no refresh token, then you will need to go through the authorization process again.
An access token is assigned a certain set of access rights, which is given to the client during authorization. Let's take a look at what permissions look like in OAuth 2.0.
Access rights
Access rights are issued to the client as scope. Scope is a parameter that consists of space-separated strings - scope-token.
Each of the scope-tokens represents specific rights granted to the client. For example, a scope-token
doc_read can provide read access to a document on a resource server, and employee access to application functionality only for company employees. The final scope might look like this: email doc_read employee.
In OAuth 2.0, we create scope-tokens ourselves, customizing them to fit our needs. Scope-token names are limited only by fantasy and two ASCII characters -
"and \.
At the stage of client registration, in the authorization service settings, the client is given a standard scope by default. But the client can request from the authorization server a scope other than the standard one. Depending on the policies on the authorization server and the choice of resource owner, the resulting scope might look very different. In the future, after the client is authorized, the resource owner can take away some of the rights without re-authorizing the service, but in order to issue additional permissions, re-authorization of the client will be required.
Abstract OAuth 2.0. Flow using Access token
We looked at roles, looked at the types of tokens, and also what the scope looks like. Let's look at the flow of providing access to the service.
Below is an abstract diagram (or flow) of interaction between participants. All steps in this diagram are performed strictly from top to bottom. Let's analyze in more detail.

- Client sends a request to access the required resource owner.
- The resource owner gives back to the client an authorization grant, which confirms the identity of the resource owner and his rights to the resource the client is requesting access to. Depending on the flow, this can be a token or credentials.
- The Client sends the authorization grant obtained in the previous step to the authorization server, expecting an Access token from it to access the protected resource.
- The authorization server makes sure that the authorization grant is valid, and then sends the access token back to the client.
- After receiving the access token, the client requests the protected resource from the resource server.
- The Resource server makes sure that the access token is correct, and then provides access to the protected resource.
The client receives approval from the resource owner, on the basis of which he is granted access to the resource. It's simple. Will it be as easy if we add refresh token to this scheme?
Abstract OAuth 2.0. Flow using Refresh token
The first and second steps are omitted from this diagram - they are no different from the abstract flow diagram above.
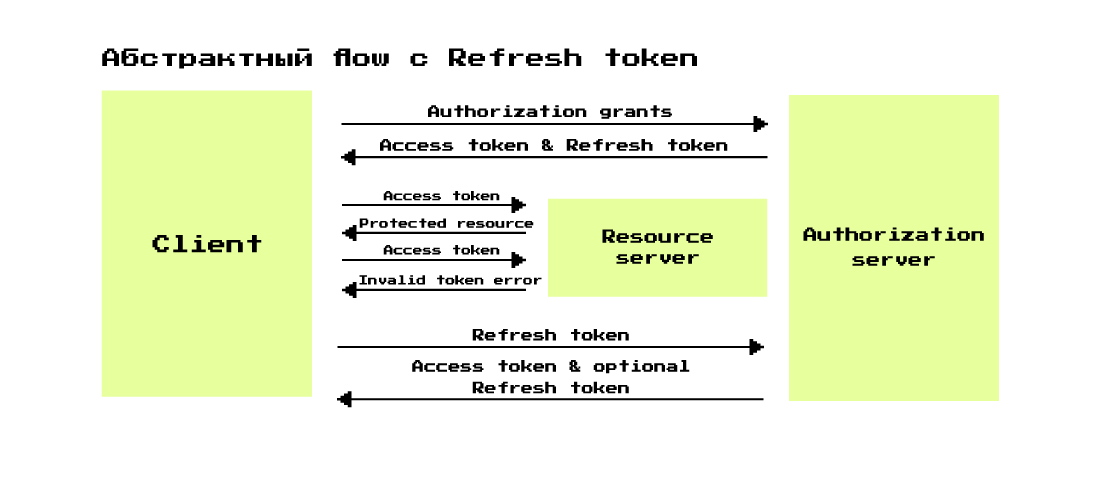
Scheme in more detail:
- The Client comes with an authorization grant to the authorization server and asks to provide it with access token and refresh token.
- Authorization server , authorization grant access token refresh token.
- Client access token , — invalid token error.
- , authorization server refresh token access token .
- access token, refresh token, refresh token.
grant?
Grant is data that represents the successful authorization of the client by the owner of the resource, used by the client to obtain an access token.
For example, when we authenticate with Google somewhere, a notification pops up in front of our eyes. It says that such and such a service wants to access data about you or to your resources (the requested scope-token is displayed). This notification is called "Consent Screen".
At the moment when we click "OK", the same grant gets into the database: data is recorded that such and such a user has given such and such access to such and such a service. The client receives some sort of successful authentication identifier, such as a string, which is associated with the data in the database.
There are 4 + 1 ways to get a grant - grant type:
- Authorization code — confedencial — web-.
- Client credentials — confedential , , .
- Implicit — public-, redirection URI (, ), authorization code grant PKCE (Proof Key for Code Exchange — , , token , . — RFC 7636).
- Resource owner password credentials . In OAuth 2.0 security RFC 6819 , this grant type is considered unreliable. If earlier it was allowed to be used only for migration of services to OAuth 2.0, at the moment it is not allowed to be used at all.
- Device authorization (added in RFC 8628) - used to authorize devices that may not have web browsers, but can work over the Internet. For example, these are console applications, smart devices or Smart TVs.
Only authorization code (with PKCE), client credentials and device authorization grant can be considered relevant , but we will consider everything. We will consider grant in order of increasing complexity of understanding.
Client credentials grant flow
It has the simplest flow, reminiscent of regular authorization on any service. It is performed using the client's credentials, which are the client id and client secret - an analogue of the login and password for the user. Since authentication requires a client secret that must be stored appropriately, only confedential clients can use this flow.

The scheme is simple: the client is authenticated at the authorization server by passing the client id and client secret. In response, it receives an access token, with which it can already access the required service.
This flow is required when a client tries to access its own resources or resources previously agreed with the authorization server. For example, service A needs to go to service B from time to time and update there data on the number of pizzerias in the network.
Resource owner password credentials flow
According to the current security recommendations described in this RFC , this flow is not recommended to be used at all due to obvious security concerns.

In the illustration of this flow, there are two Clients, and in theory there should be a Client and an Authorization Server.
Resource owner transfers his username and password to the client, for example, through forms on the client. The client, in turn, uses it to obtain an access token (and, optionally, a refresh token).
There is a problem here. Resource owner simply takes and gives in clear form his username and password to the client, which is not safe. It was originally made only for clients you trust or those that are part of the operating system. Later, it was allowed only for migration from login and password authentication to OAuth 2.0. Current safety guidelines prohibit its use.
Authorization code
The most common flow at the moment. Mostly used for confidential clients, but with the introduction of additional validation with PKCE, it can also be used for public clients.
In this flow, the client interacts with the resource owner through the user-agent (browser). The user-agent has one requirement: it must be able to work with HTTP redirects. Without this, the resource owner will not be able to get to the authorization server and return back with grant.

This flow is more complicated than the previous ones, so we will analyze it step by step. To begin with, let's imagine that we are a resource owner and went to the page of an online learning service that wants to save the learning results to our cloud. He needs to get access to our resource, for example, a certain directory in the cloud. We click on "Login" and the journey through the Authorization code grant flow begins:
- In the first step, the client redirects the resource owner using the user-agent to the Authorization server authentication page. In the URI, it specifies the client ID and redirection URI. The Redirection URI is used to understand where to return the resource owner after authorization is successful (the resource owner will grant permission to the scope requested by the client).
- user-agent, resource owner .
- Resource owner , consent screen .
- Resource owner user-agent URI, redirection URI. query- authorization code — , , resource owner .
- authorization code , access token ( refresh token, ).
- authorization code, , access token ( refresh token). .
If we imagine us in the place of the resource owner, then we just see a redirect to the authorization server, authenticate, confirm access to the Consent screen and send us to an already running service. For example, we go through this many times when we go to the service with a Google, Facebook or Apple account.
The next flow builds on this.
Implicit grant
This is an optimization of the Authorization code grant flow for public clients who know how to work with redirection URIs. For example, for JavaScript browser applications, or mobile applications. The requirement for the user-agent, through which the client and the resource owner interact, remains: he must be able to work with HTTP redirects.
There is a main difference between authorization code and implicit: instead of receiving authorization code and access token on it, we immediately receive access token after successful authorization of the resource owner. In addition, the client secret is not used here for security reasons - the application can be disassembled and retrieved. The authenticity is checked only by the redirection URI.
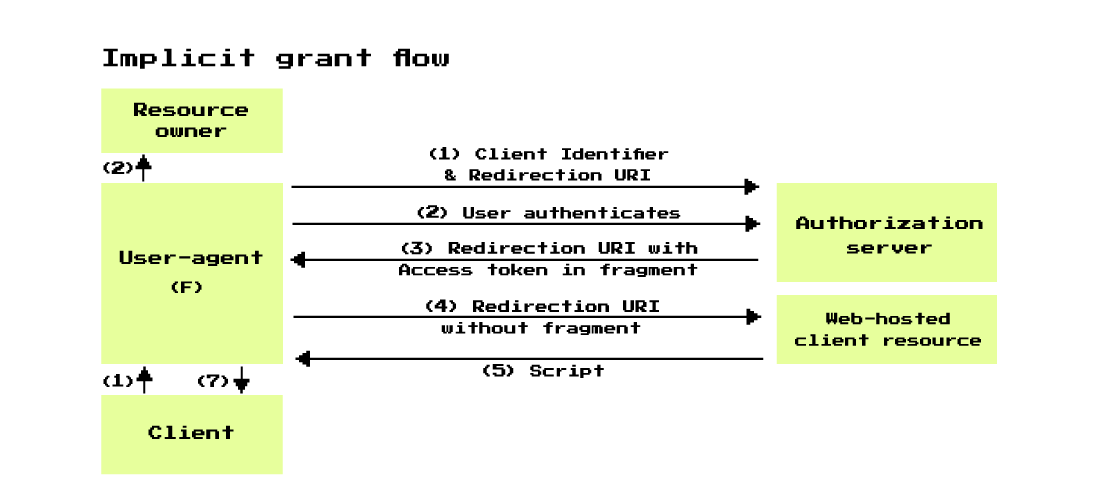
Many steps from this diagram are similar to the steps from the authorization code, but I propose to analyze them in detail as well. Let's imagine that a browser application wants to save its settings in our Git repository. We click "Login to GitHub" and at this stage the Implicit flow begins:
- The client uses the user-agent and an HTTP redirect to redirect the resource owner to the authorization server. In the request parameters, it passes the client ID and redirection URIs that are needed to authenticate the client and then return the resource owner back.
- The resource owner is authenticated by communicating through the user-agent with the authorization server. At the same time, it confirms the issuance of a grant to the client with whose client ID he came.
- grant ( «allow» consent screen), user-agent resource owner redirection URI. , URI fragment access token (URI fragment — , URI ‘#’).
- user-agent. User-agent redirection URI web-, access token . , , , CDN.
- Web- web- ( ), redirection URI, , .
- User-agent , , web-hosted client resource, access token.
- The resulting access token user-agent simply transfers to the client.
This is a complex flow. It has little use in real-world scenarios. But it can still be found in legacy projects.
Device authorization (RFC 8628)
From 2012 to 2019, many smart devices have appeared that are inconvenient to log in. For example, it is inconvenient to enter a complex username and password on the TV every time you open a resource. This is not possible on some devices, such as server OSs without a graphical interface. In August 2019, this flow appeared just for such scenarios.
There are at least 3 requirements for devices in order to work with the Device authoraztion grant flow to be possible:
- The device must be able to make outgoing HTTPS requests.
- The device must be able to display the URI and ID to the user.
- Each authorized device belongs to the resource owner, who, for successful authorization, must have another device with a browser to go to the specified URI and enter the specified code.

Perhaps the scheme seems complicated due to the abundance of arrows. Let's analyze it step by step, as we parsed complex flows before it.
Let's say we are trying to log into a web service using the TV. We see the button "Log in as device" and click. At this moment, our Device flow begins:
- The TV makes a request to the authorization server, giving it its client ID.
- The authorization server verifies that such a client is registered and has the appropriate grant type.
- , Authorization server device code, user code verification URI. Device code — , .
- user code verification URI — resource owner. Redirection URI , QR- — .
- , user code verification URI, .
- resource owner. verification URI, user code, , scope . resource owner .
- All this time, the device (point 3) polled the authorization server about its success. The device once again goes to the authorization server with its device code and client ID in the hope that the authorization has passed this time.
- This time, when the resource owner has confirmed the transfer of the necessary rights to the device, the authorization server returns an access token in response to the request (if provided by the server settings and refresh token). And with the help of the token, the device can already continue to work with the resource.
Despite the apparent complexity with arrows, this flow is also quite simple. If you need to interact with devices (and we have a lot of them: tracker, cash register, storefronts and other devices), then you should use this flow.
Instead of output
In this article, I have omitted many details in order to talk about the most important things in the most simple and accessible way. For example, the types of requests, how and in what form to pass parameters, what characters are allowed as values for that.
If you want to dive into the topic in more detail, then I recommend in RFC 6749 (for OAuth 2.0) and RFC 8628 (for Device Flow). You can also check the OAuth resource for up-to-date RFCs .
If the article was useful and you want more details - write in the comments, and in the next articles I will talk about PKCE, the OpenID Connect 1.0 authentication protocol, our implementation of the authentication server and much more.
Useful links: