
The only article of 2015 on this topic, " Site to Site IPSEC VPN between NSX Edge and Linux strongSwan ", was found on the network .
Unfortunately, it was not possible to use it directly, since I wanted more secure encryption, not a self-signed certificate, and the described config would not work behind NAT.
Therefore, I had to sit down and delve into the documentation.
As a basis, I took a config that I have used for a long time, which allows you to connect from almost any OS, and simply added a piece to it that allows you to connect to the NSX Edge.
Since the installation and full-fledged configuration of the Strongswan server is beyond the scope of this article, I will allow myself to refer to some good material on this topic .
So, let's go directly to the settings.
The connection diagram will look like this:
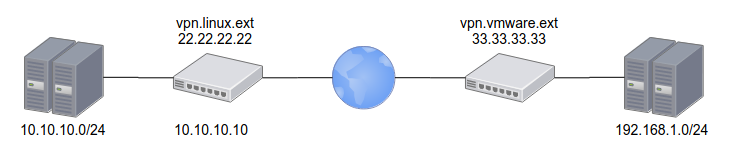
VMWare 33.33.33.33 192.168.1.0/24
Linux 22.22.22.22 10.10.10.0/24
Let's encrypt vpn.linux.ext
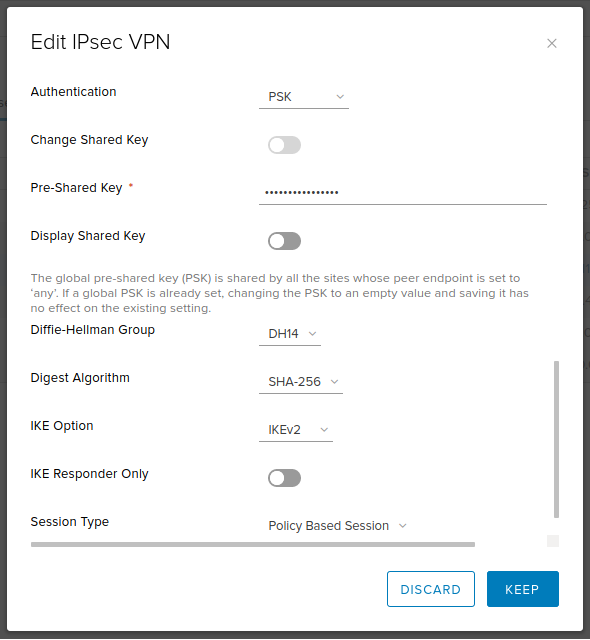
PSK : ChangeMeNow!NSX Edge configuration:
Text
Enabled: yes
Enable perfect forward secrecy (PFS): yes
Name: VPN_strongswan (,   )
Local Id: 33.33.33.33
Local Endpoint: 33.33.33.33
Local Subnets: 192.168.1.0/24
Peer Id: vpn.linux.ext
Peer Endpoint: 22.22.22.22
Peer Subnets: 10.10.10.0/24
Encryption Algorithm: AES256
Authentication: PSK
Pre-Shared Key: ChangeMeNow!
Diffie-Hellman Group: 14 (2048 bit —      .   ,   )
Digest Algorithm: SHA256
IKE Option: IKEv2
IKE Responder Only: no
Session Type: Policy Based Session
Screenshots

Strongswan customization:
ipsec.conf
# /etc/ipsec.conf
config setup

conn %default
	dpdaction=clear
	dpddelay=35s
	dpdtimeout=300s

	fragmentation=yes
	rekey=no

	ike=aes256gcm16-aes256gcm12-aes128gcm16-aes128gcm12-sha256-sha1-modp2048-modp4096-modp1024,aes256-aes128-sha256-sha1-modp2048-modp4096-modp1024,3des-sha1-modp1024!
	esp=aes128gcm12-aes128gcm16-aes256gcm12-aes256gcm16-modp2048-modp4096-modp1024,aes128-aes256-sha1-sha256-modp2048-modp4096-modp1024,aes128-sha1-modp2048,aes128-sha1-modp1024,3des-sha1-modp1024,aes128-aes256-sha1-sha256,aes128-sha1,3des-sha1!

	left=%any
	leftsubnet=10.10.10.0/24
        leftcert=certificate.pem
	leftfirewall=yes
	leftsendcert=always

	right=%any
	rightsourceip=192.168.1.0/24
	rightdns=77.88.8.8,8.8.4.4

	eap_identity=%identity

# IKEv2
conn IPSec-IKEv2
	keyexchange=ikev2
	auto=add

# BlackBerry, Windows, Android
conn IPSec-IKEv2-EAP
	also="IPSec-IKEv2"
	rightauth=eap-mschapv2

# macOS, iOS
conn IKEv2-MSCHAPv2-Apple
	also="IPSec-IKEv2"
	rightauth=eap-mschapv2
	leftid=vpn.linux.ext

# Android IPsec Hybrid RSA
conn IKEv1-Xauth
	keyexchange=ikev1
	rightauth=xauth
	auto=add

# VMWare IPSec VPN
conn linux-nsx-psk
	authby=secret
	auto=start
	leftid=vpn.linux.ext
	left=10.10.10.10
	leftsubnet=10.10.10.0/24
	rightid=33.33.33.33
	right=33.33.33.33
	rightsubnet=192.168.1.0/24
	ikelifetime=28800
	keyexchange=ikev2
	lifebytes=0
	lifepackets=0
	lifetime=1h
ipsec.secret
# /etc/ipsec.secrets
: RSA privkey.pem

# Create VPN users accounts
# !    ,  .

user1 : EAP "stongPass1"
user2 : EAP "stongPass2"
%any 33.33.33.33 : PSK "ChangeMeNow!"
after that, it is enough to re-read the config, start the connection and check that it is established:
ipsec update
ipsec rereadsecrets
ipsec up linux-nsx-psk
ipsec status
I hope this little post will be useful and save someone a couple of hours.