Inspired by the talk, this article presents an approach to simplifying the process of creating operators for Kubernetes and shows how you can make your own using a shell operator with minimal effort.
We present the video with the report (~ 23 minutes in English, much more informative than the article) and the main extract from it in text form. Go!
At Flant, we constantly optimize and automate everything. Today we will talk about another exciting concept. Meet cloud-native shell scripting !
However, let's start with the context in which all of this happens - Kubernetes.
Kubernetes API and Controllers
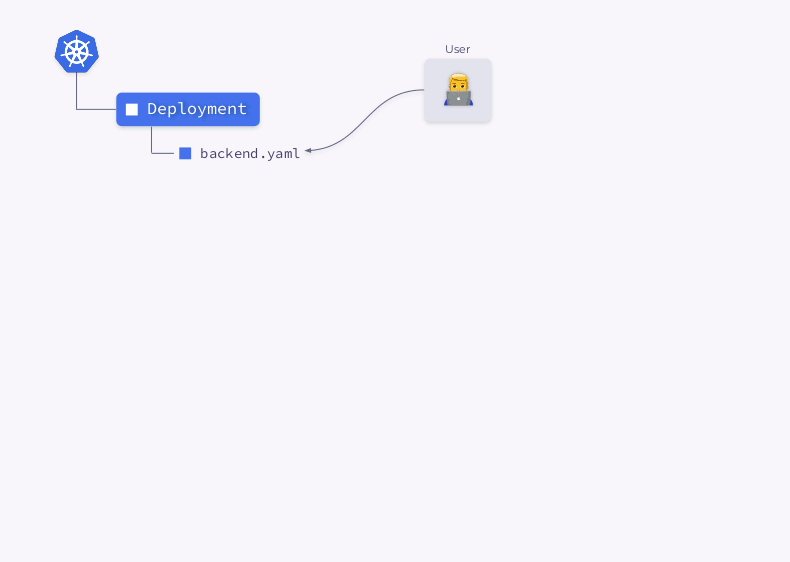
API in Kubernetes can be represented as a kind of file server with directories for each type of object. Objects (resources) on this server are represented by YAML files. In addition, the server has a basic API to do three things:
- get a resource by its kind and name;
- change the resource (in this case, the server stores only "correct" objects - all incorrectly formed or intended for other directories are discarded);
- ( / ).
Thus, Kubernetes acts as a kind of file server (for YAML manifests) with three basic methods (yes, in fact, there are others, but we will omit them for now).

The problem is that the server can only store information. To make it work, you need a controller - the second most important and fundamental concept in the Kubernetes world.
There are two main types of controllers. The first one takes information from Kubernetes, processes it in accordance with the nested logic, and returns it to K8s. The second one takes information from Kubernetes, but, unlike the first type, changes the state of some external resources.
Let's take a closer look at the process of creating a Deployment in Kubernetes:
- The Deployment Controller (included in
kube-controller-manager) receives information about the Deployment and creates a ReplicaSet. - ReplicaSet creates two replicas (two pods) based on this information, but these pods are not scheduled yet.
- The scheduler schedules pods and adds node information to their YAMLs.
- Kubelets make changes to an external resource (say, Docker).
Then this whole sequence is repeated in reverse order: kubelet checks the containers, calculates the status of the pod, and sends it back. The ReplicaSet controller gets the status and updates the status of the replica set. The same thing happens with the Deployment Controller, and the user finally gets an updated (current) status.
Shell-operator
It turns out that Kubernetes is based on the collaboration of various controllers (Kubernetes operators are also controllers). The question arises, how to create your own operator with minimal effort? And here the shell-operator developed by us comes to the rescue . It allows system administrators to create their own statements using familiar methods.

Simple example: copying secrets
Let's take a look at a simple example.
Let's say we have a Kubernetes cluster. It has a namespace
defaultwith some Secret mysecret. In addition, there are other namespaces in the cluster. Some of them have a specific label attached. Our goal is to copy Secret into namespaces with a label.
The task is complicated by the fact that new namespaces may appear in the cluster, and some of them may have this label. On the other hand, when deleting a label, Secret must also be deleted. In addition to everything, the Secret itself can also change: in this case, the new Secret must be copied to all namespaces with labels. If Secret is accidentally deleted in any namespace, our operator should restore it immediately.
Now that the task has been formulated, it's time to start implementing it using the shell-operator. But first, it's worth saying a few words about the shell-operator's itself.
How the shell-operator works
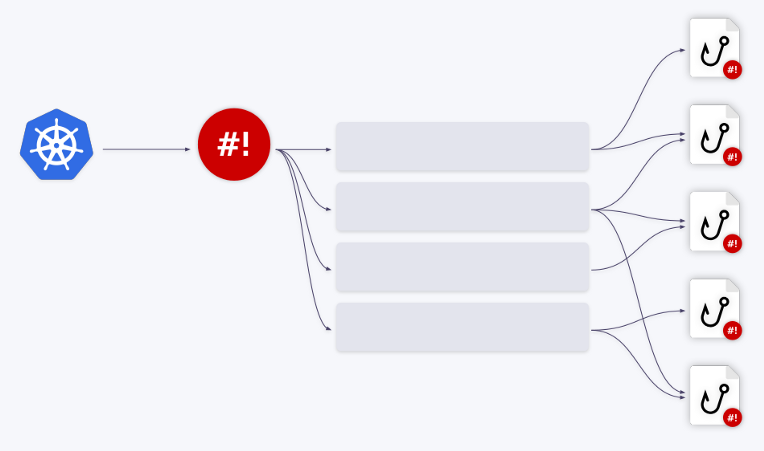
Like other workloads in Kubernetes, the shell-operator runs in its pod. This pod
/hookscontains executable files in the directory . These can be scripts in Bash, Python, Ruby, etc. We call these executables hooks .
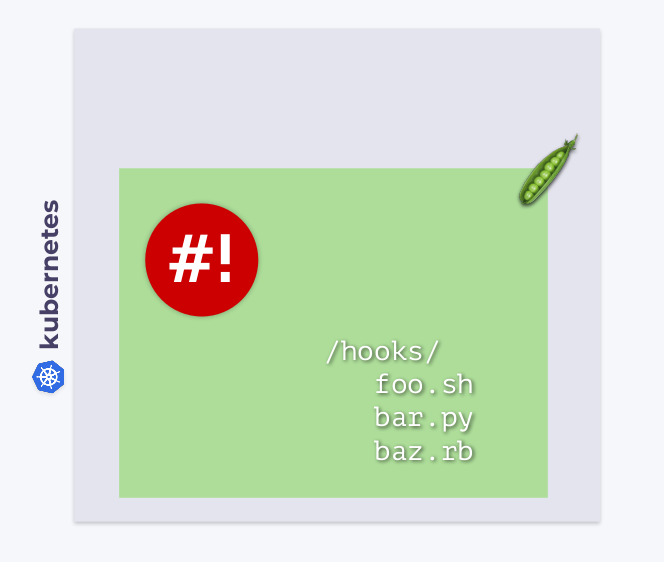
Shell-operator subscribes to Kubernetes events and fires these hooks in response to whatever events we need.

How does the shell-operator know which hook to run and when? The point is that each hook has two stages. At startup, the shell-operator runs all hooks with an argument
--config- this is the configuration stage. And after that, the hooks are launched in the normal way - in response to the events to which they are attached. In the latter case, the hook receives the binding context) - data in JSON format, which we will discuss in more detail below.
Making the operator in Bash
We are now ready for implementation. To do this, we need to write two functions (by the way, we recommend the shell_lib library , which greatly simplifies writing hooks in Bash):
- the first is needed for the configuration stage - it displays the binding context;
- the second contains the main logic of the hook.
#!/bin/bash

source /shell_lib.sh

function __config__() {
  cat << EOF
    configVersion: v1
    # BINDING CONFIGURATION
EOF
}

function __main__() {
  # THE LOGIC
}

hook::run "$@"
The next step is to decide what objects we need. In our case, we need to track:
- secret source for changes;
- all namespaces in the cluster, so that you know which of them the label is attached to;
- target secrets to make sure they are all in sync with the source secret.
Subscribe to a secret source
Binding configuration is pretty simple for him. We indicate that we are interested in Secret with a name
mysecretin the namespace default:

function __config__() {
  cat << EOF
    configVersion: v1
    kubernetes:
    - name: src_secret
      apiVersion: v1
      kind: Secret
      nameSelector:
        matchNames:
        - mysecret
      namespace:
        nameSelector:
          matchNames: ["default"]
      group: main
EOF
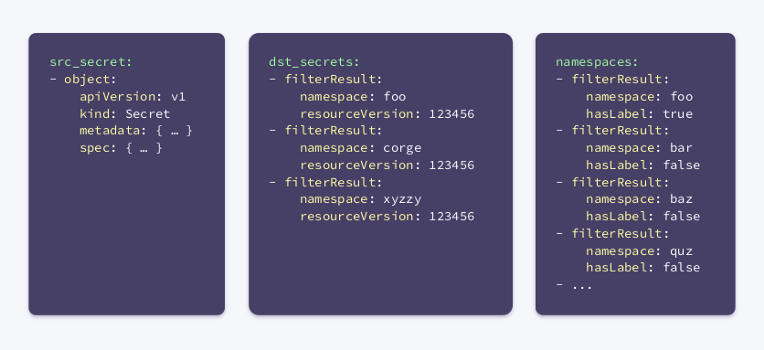
As a result, the hook will run when the source secret (
src_secret) changes and receive the following binding context:

As you can see, it contains the name and the entire object.
Keeping track of namespaces
Now you need to subscribe to namespaces. To do this, we will specify the following binding configuration:
- name: namespaces
  group: main
  apiVersion: v1
  kind: Namespace
  jqFilter: |
    {
      namespace: .metadata.name,
      hasLabel: (
       .metadata.labels // {} |
         contains({"secret": "yes"})
      )
    }
  group: main
  keepFullObjectsInMemory: false
As you can see, a new field named jqFilter has appeared in the configuration . As its name suggests, it
jqFilterfilters out all the unnecessary information and creates a new JSON object with the fields that are of interest to us. A hook with this configuration will receive the following binding context:
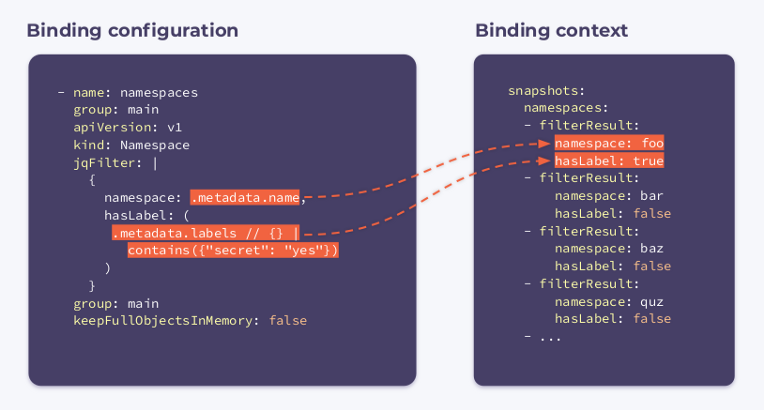
It contains an array
filterResultsfor each namespace in the cluster. A boolean variable hasLabelindicating whether the label is attached to the given namespace. The selector keepFullObjectsInMemory: falsesays that there is no need to keep complete objects in memory.
Tracking secrets-targets
We subscribe to all Secrets that have an annotation
managed-secret: "yes"(these are our target ones dst_secrets):
- name: dst_secrets
  apiVersion: v1
  kind: Secret
  labelSelector:
    matchLabels:
      managed-secret: "yes"
  jqFilter: |
    {
      "namespace":
        .metadata.namespace,
      "resourceVersion":
        .metadata.annotations.resourceVersion
    }
  group: main
  keepFullObjectsInMemory: false
In this case,
jqFilterfilters out all information except for the namespace and parameter resourceVersion. The last parameter was passed to the annotation when creating the secret: it allows you to compare versions of secrets and keep them up to date.
A hook configured in this manner will receive the three binding contexts described above when executed. Think of them as a kind of snapshot of the cluster.
Based on all this information, a basic algorithm can be developed. It iterates over all namespaces and:
- if
hasLabelrelevanttruefor the current namespace:- compares the global secret with the local one:
- if they are the same, it does nothing;
- if they differ, execute
kubectl replaceorcreate;
- compares the global secret with the local one:
- if
hasLabelrelevantfalsefor the current namespace:
- makes sure that Secret is not in the given namespace:
- if local Secret is present, delete it using
kubectl delete; - if no local Secret is found, it does nothing.
- if local Secret is present, delete it using
- makes sure that Secret is not in the given namespace:
You can download the algorithm implementation in Bash in our repository with examples .
This is how we were able to create a simple Kubernetes controller using 35 lines of YAML configs and about the same amount of Bash code! The job of the shell-operator is to string them together.
However, copying secrets is not the only area of application of the utility. Here are a few more examples to show what he is capable of.
Example 1: making changes to ConfigMap
Let's take a look at a three pod Deployment. Pods use ConfigMap to store some configuration. When the pods were launched, ConfigMap was in some state (let's call it v.1). Accordingly, all pods use this particular version of ConfigMap.
Now suppose ConfigMap has changed (v.2). However, pods will use the old version of ConfigMap (v.1):
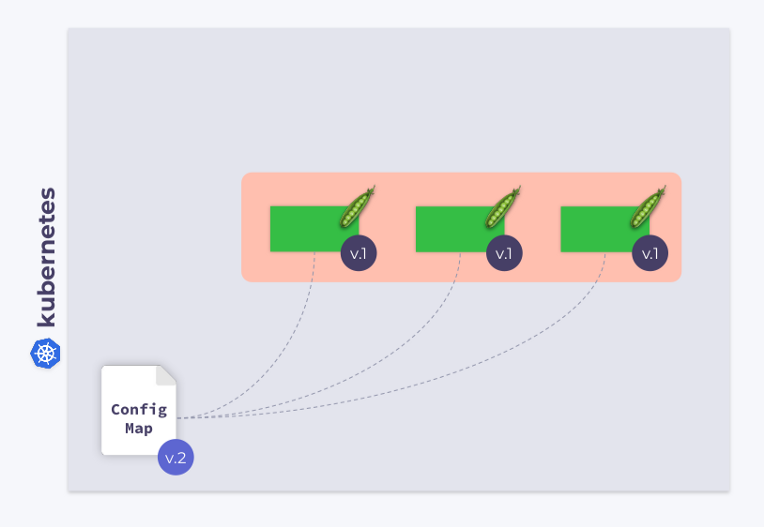
How do I get them to migrate to the new ConfigMap (v.2)? The answer is simple: use template. Let's add a checksum annotation to the
templateDeployment configuration section :

As a result, this checksum will be registered in all pods, and it will be the same as in Deployment. Now you just need to update the annotation when ConfigMap changes. And the shell-operator comes in handy in this case. All you need to do is program a hook that will subscribe to ConfigMap and update the checksum .
If the user makes changes to the ConfigMap, the shell-operator will notice them and recalculate the checksum. Then the magic of Kubernetes comes into play: the orchestrator will kill the pod, create a new one, wait for it to become
Ready, and move on to the next. As a result, the Deployment will sync and migrate to the new version of ConfigMap.
Example 2: Working with Custom Resource Definitions
As you know, Kubernetes allows you to create custom types (kinds) of objects. For example, you can create kind
MysqlDatabase. Let's say this type has two metadata parameters: nameandnamespace.
apiVersion: example.com/v1alpha1
kind: MysqlDatabase
metadata:
  name: foo
  namespace: bar
We have a Kubernetes cluster with different namespaces in which we can create MySQL databases. In this case, the shell-operator can be used to track resources
MysqlDatabase, connect them to the MySQL server, and synchronize the desired and observed states of the cluster.

Example 3: monitoring a cluster network
As you know, using ping is the simplest way to monitor a network. In this example, we will show how to implement such monitoring using the shell operator.
First of all, you need to subscribe to the nodes. The shell operator needs the name and IP address of each node. With their help, it will ping these nodes.
configVersion: v1
kubernetes:
- name: nodes
  apiVersion: v1
  kind: Node
  jqFilter: |
    {
      name: .metadata.name,
      ip: (
       .status.addresses[] |
        select(.type == "InternalIP") |
        .address
      )
    }
  group: main
  keepFullObjectsInMemory: false
  executeHookOnEvent: []
schedule:
- name: every_minute
  group: main
  crontab: "* * * * *"
The parameter
executeHookOnEvent: []prevents the launch of the hook in response to any event (that is, in response to changes, additions, deletions of nodes). However, it will run (and update the host list) on a schedule - every minute, as the field dictates schedule.
Now the question arises, how exactly do we know about problems like packet loss? Let's take a look at the code:
function __main__() {
  for i in $(seq 0 "$(context::jq -r '(.snapshots.nodes | length) - 1')"); do
    node_name="$(context::jq -r '.snapshots.nodes['"$i"'].filterResult.name')"
    node_ip="$(context::jq -r '.snapshots.nodes['"$i"'].filterResult.ip')"
    packets_lost=0
    if ! ping -c 1 "$node_ip" -t 1 ; then
      packets_lost=1
    fi
    cat >> "$METRICS_PATH" <<END
      {
        "name": "node_packets_lost",
        "add": $packets_lost,
        "labels": {
          "node": "$node_name"
        }
      }
END
  done
}
We iterate over the list of nodes, get their names and IP addresses, ping and send the results to Prometheus. Shell-operator can export metrics to Prometheus , saving them to a file located according to the path specified in the environment variable
$METRICS_PATH.
This is how you can do an operator for simple network monitoring in a cluster.
Queue mechanism
This article would be incomplete without describing another important mechanism built into the shell operator. Imagine that it executes a hook in response to an event in the cluster.
- What happens if another event occurs in the cluster at the same time ?
- Will the shell-operator start another instance of the hook?
- But what if, say, five events immediately occur in the cluster?
- Will the shell-operator handle them in parallel?
- What about consumed resources like memory and CPU?
Fortunately, the shell-operator has a built-in queuing mechanism. All events are queued and processed sequentially.
Let us illustrate this with examples. Let's say we have two hooks. The first event goes to the first hook. After its processing is complete, the queue advances. The next three events are redirected to the second hook - they are removed from the queue and fed into it in a "batch". That is, the hook receives an array of events - or more accurately, an array of binding contexts.
Also, these events can be combined into one big one . A parameter
groupin the binding configuration is responsible for this .
You can create any number of queues / hooks and their various combinations. For example, one queue can work with two hooks, or vice versa.
All you need to do is adjust the field accordingly
queuein the binding configuration. If no queue name is specified, the hook runs on the default queue ( default). This queuing mechanism allows you to completely solve all resource management problems when working with hooks.
Conclusion
We talked about what a shell-operator is, showed how it can be used to quickly and effortlessly create Kubernetes operators, and gave several examples of its use.
Detailed information about the shell-operator, as well as a quick guide to using it, are available in the corresponding repository on GitHub . Do not hesitate to contact us with questions: you can discuss them in a special Telegram group (in Russian) or in this forum (in English).
And if you liked it, we are always glad to new issues / PR / stars on GitHub, where, by the way, you can find other interesting projects . Among them, it is worth highlighting the addon-operator , which is the older brother of the shell-operator... This utility uses Helm charts to install add-ons, is able to deliver updates and monitor various chart parameters / values, controls the chart installation process, and can also modify them in response to events in the cluster.

Videos and slides
Video from the performance (~ 23 minutes):
Presentation of the report:
PS
Read also on our blog:
- " Simple creation of Kubernetes operators with a shell operator: project progress in a year ";
- " Introducing the shell-operator: creating operators for Kubernetes just got easier ";
- “ Is it easy and convenient to prepare a Kubernetes cluster? We announce addon-operator ";
- " Expanding and complementing Kubernetes" (review and video of the report) .