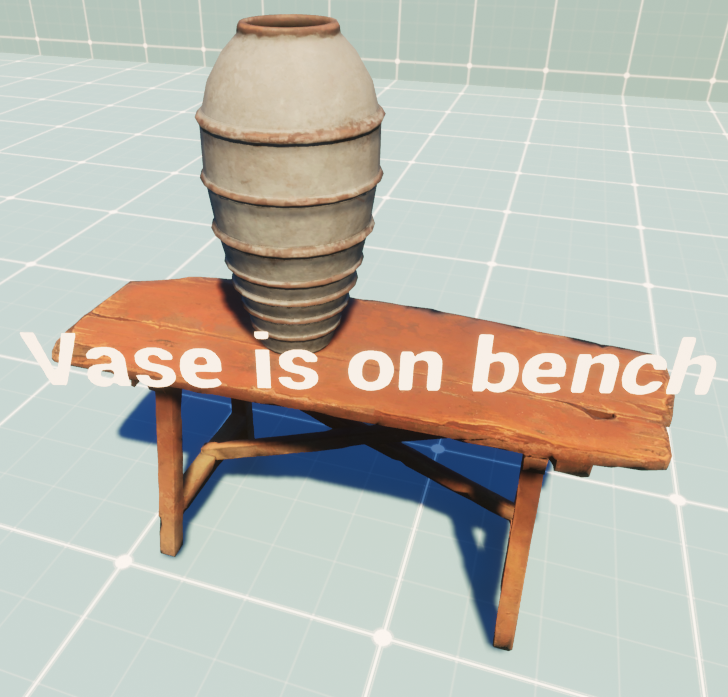
Modern games are becoming more realistic, and one way to achieve this is to create destructible environments. Plus, smashing furniture, plants, walls, buildings, and entire cities is just fun.
The most striking examples of games with good destructibility are Red Fraction: Guerrilla, with its ability to tunnel through Mars, Battlefield: Bad Company 2, where you can turn the entire server into ashes if you want, and Control with its procedural destruction of everything that catches your eye.
In 2019, Epic Games unveiled a demo of Unreal's new high-performance physics and destruction system, Chaos . The new system allows you to create destruction of different scales, has support for the Niagara effect editor, and at the same time is distinguished by an economical use of resources.
In the meantime, Chaos is in beta testing, let's talk about alternative approaches to creating destructible objects in Unreal Engine 4. In this article, we will describe one of them in detail.
Requirements
Let's start by listing what we would like to achieve:
- Artistic control. We want our artists to be able to create destructible objects as they please.
- Destruction that does not affect gameplay. They should be purely visual, not disturbing anything related to the gameplay.
- Optimization. We want to have complete control over performance and not let the CPU go down.
- Easy to install. Setting up the configuration of such objects should be understandable to artists, therefore it is necessary that it includes only the necessary minimum of steps.
The destructible environments from Dark Souls 3 and Bloodborne were taken as a reference in this article.

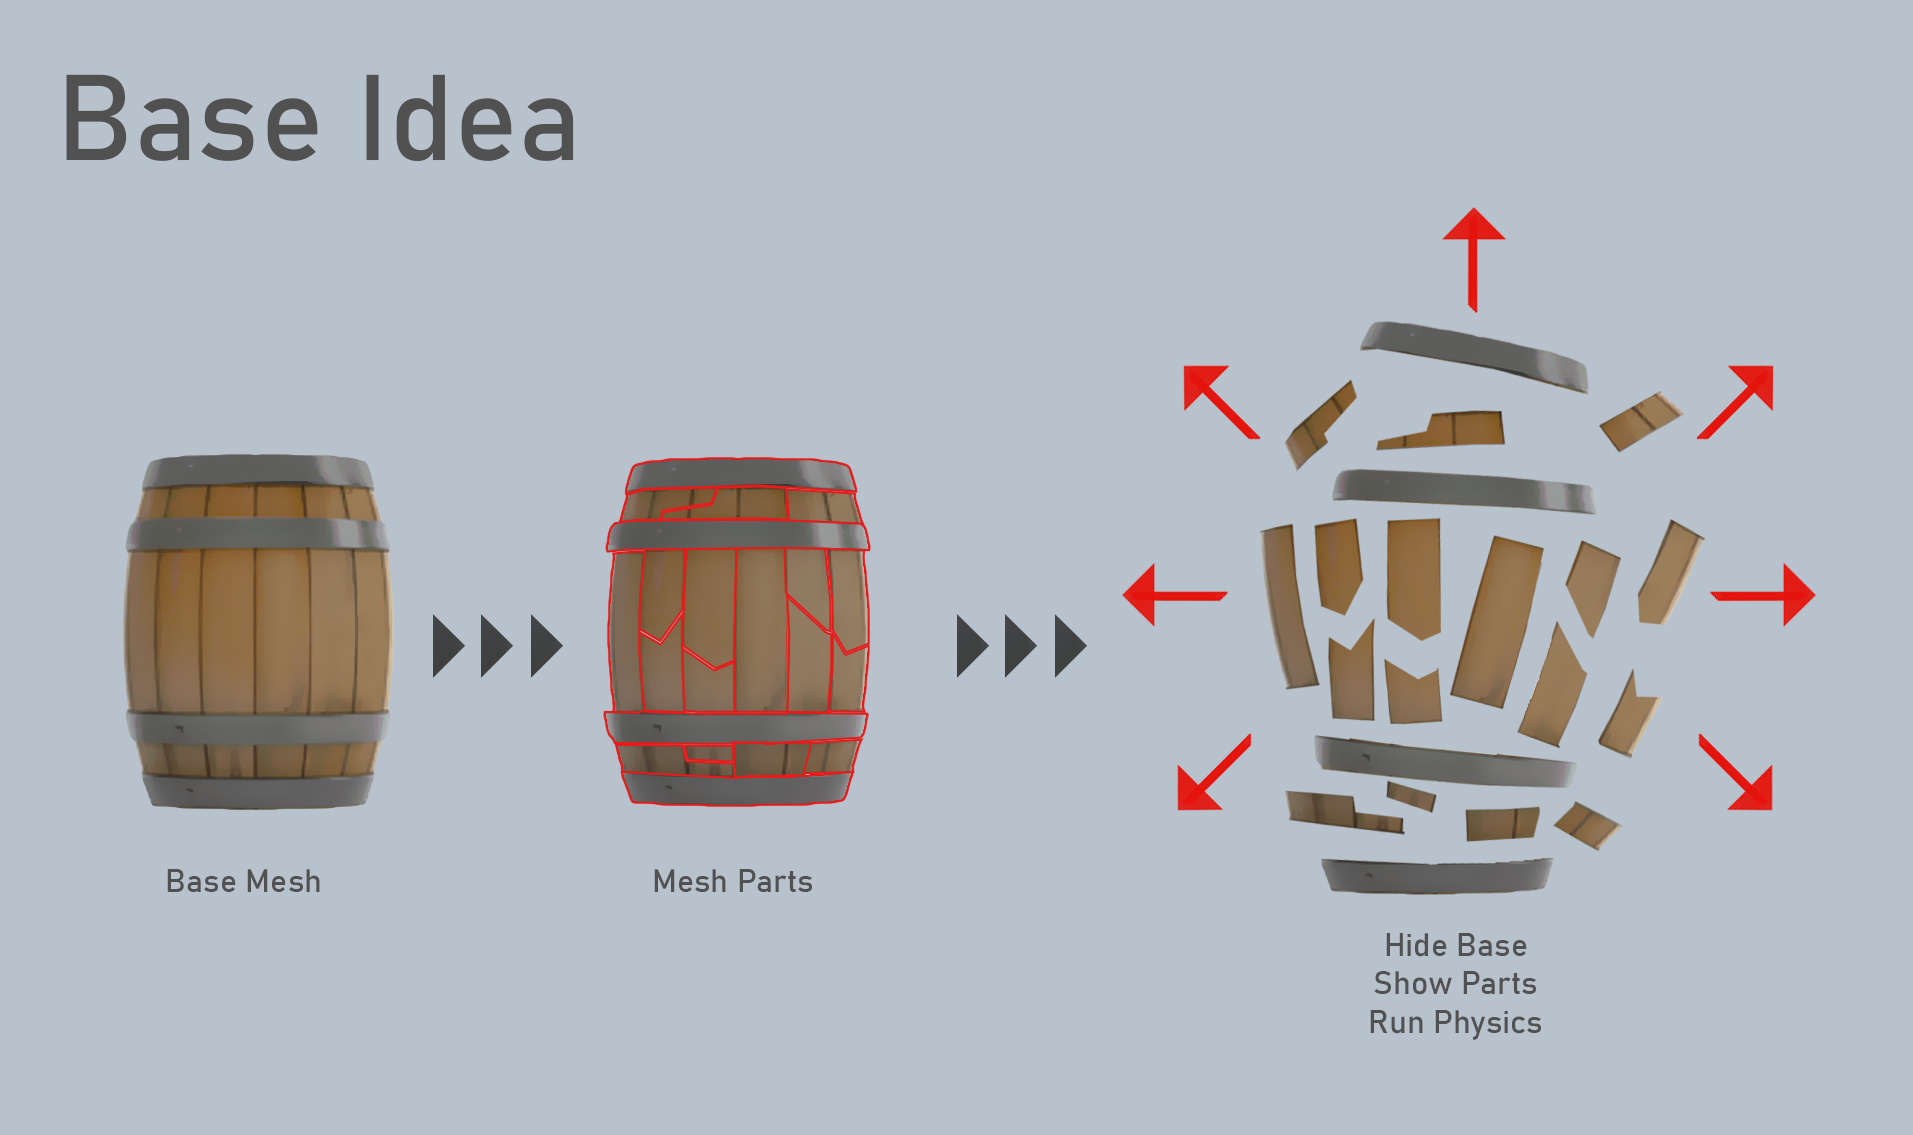
main idea
In fact, the idea is simple:
- Create a visible baseline mesh
- Add hidden parts of the mesh;
- On destruction: hide the base mesh -> show its parts -> start physics.

Preparing assets
We will use Blender to prepare objects. To create a mesh along which they will collapse, we use a Blender add-on called Cell Fracture.
Enabling the addon
First we need to enable the addon as it is disabled by default. Enabling Cell Fracture addon

Search addon (F3)
Then enable the addon on the selected grid.
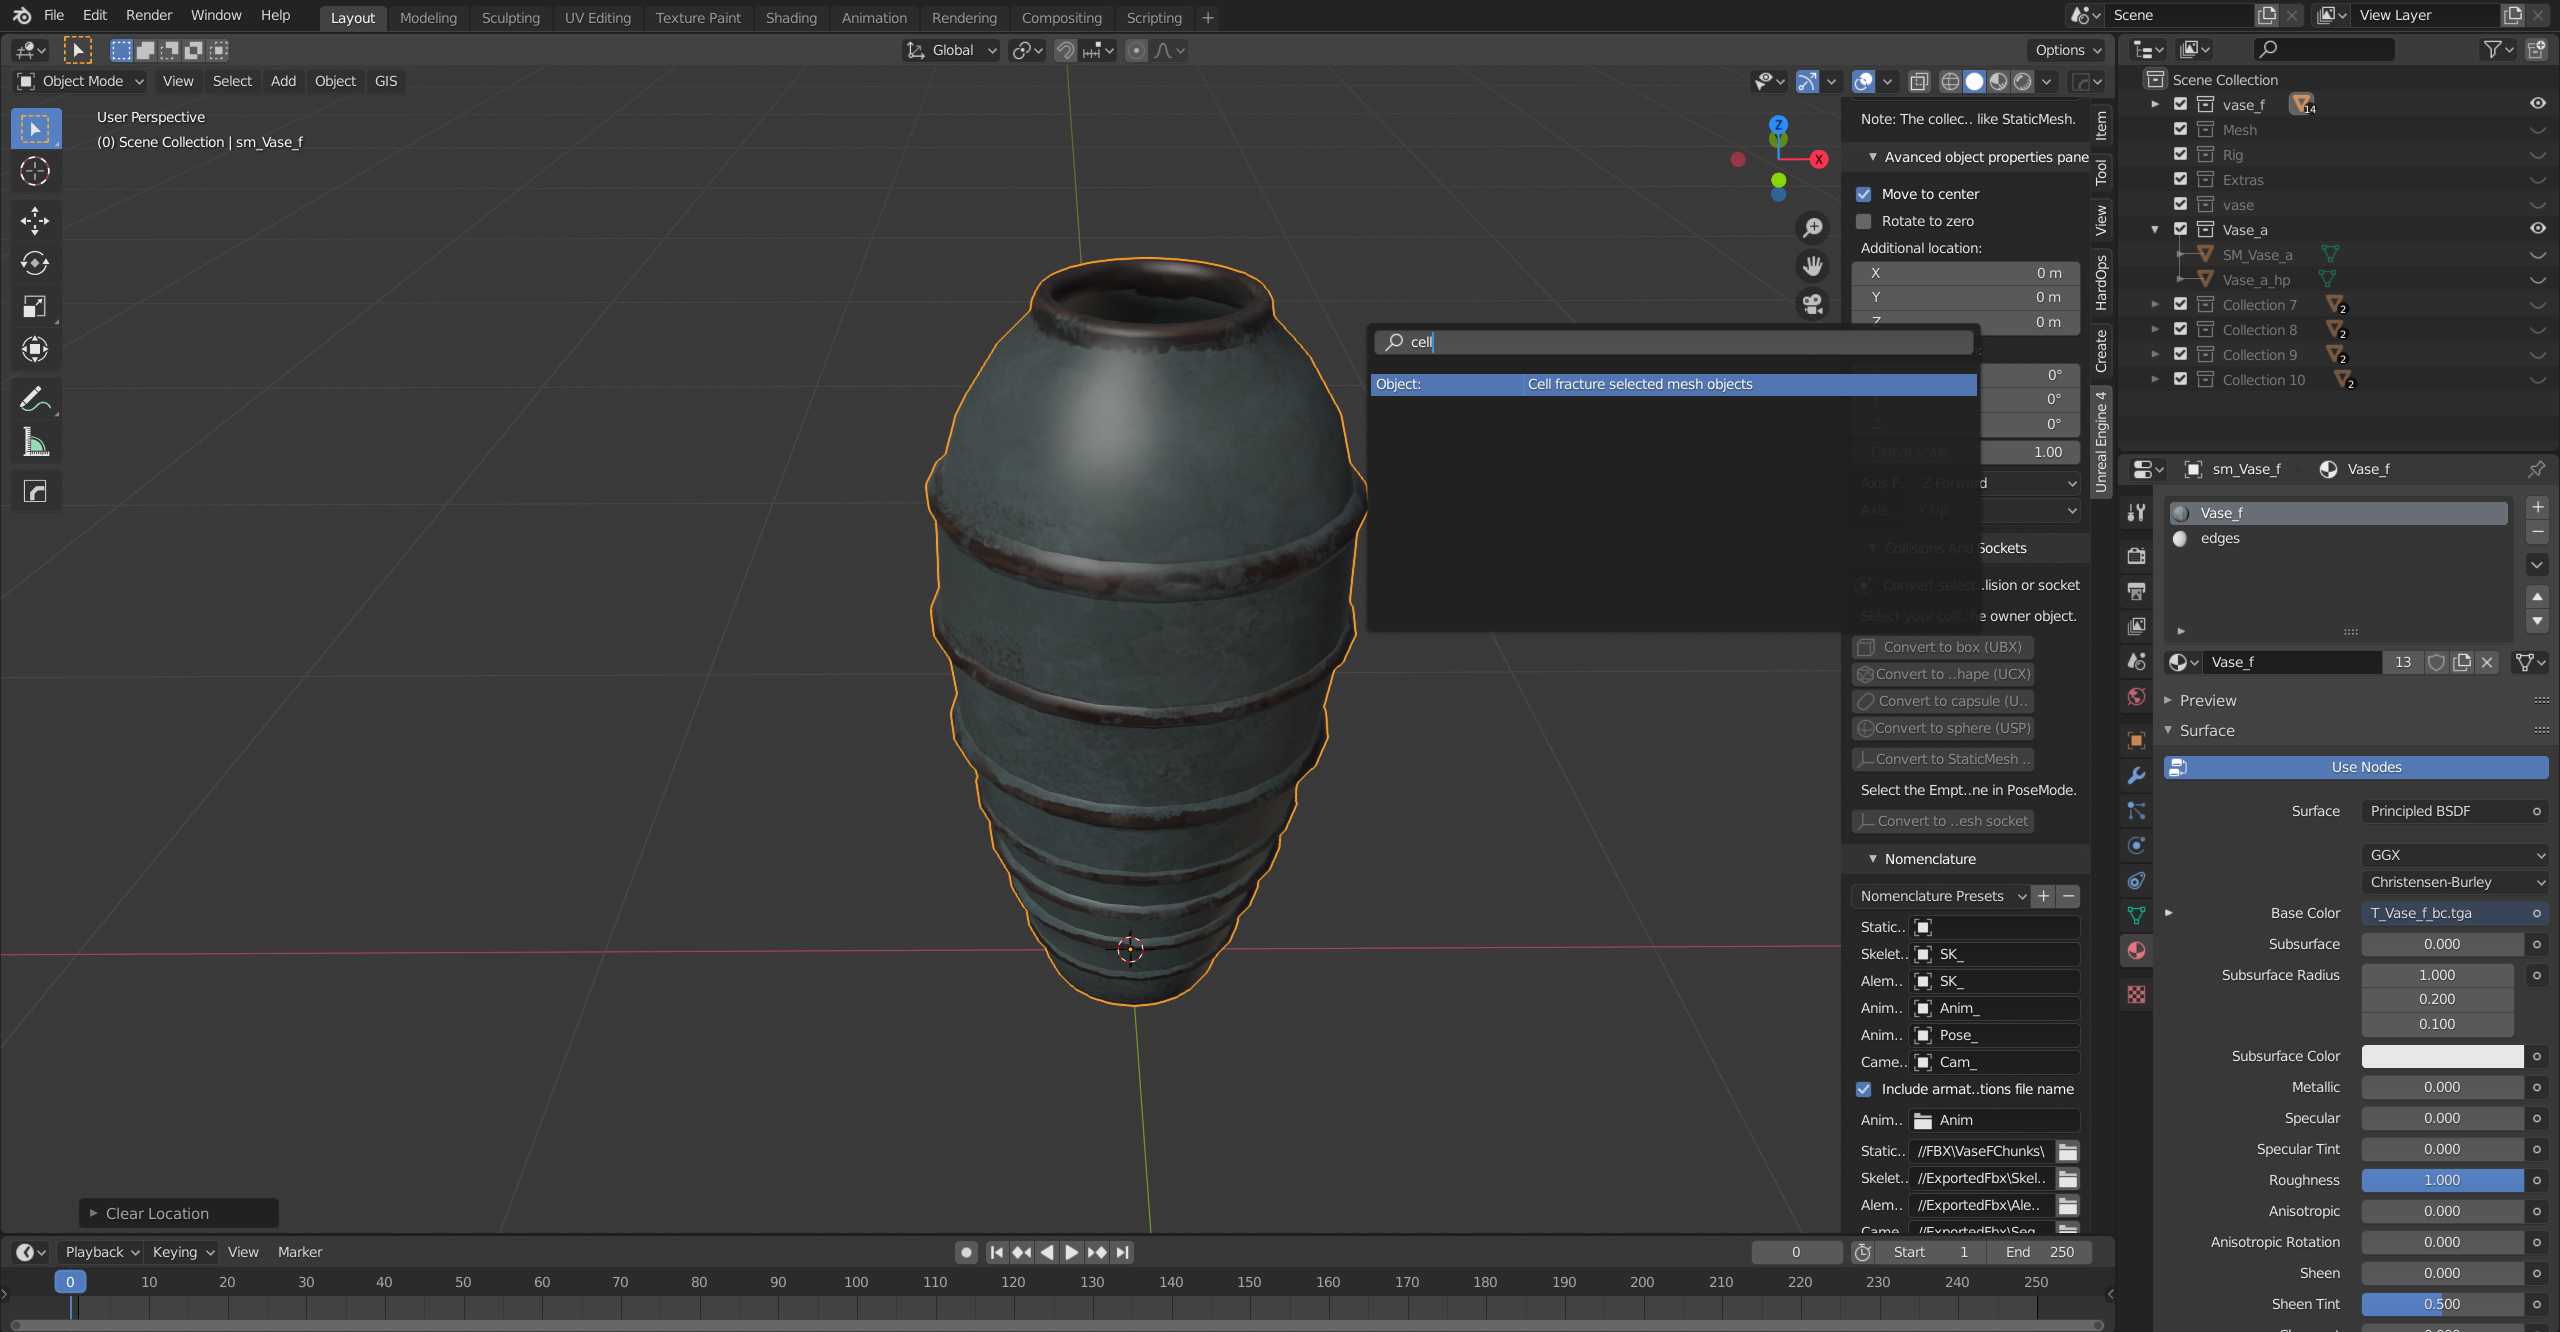
Configuration settings

Addon launch
Watch the video, check the settings from there. Make sure you set up your materials correctly.
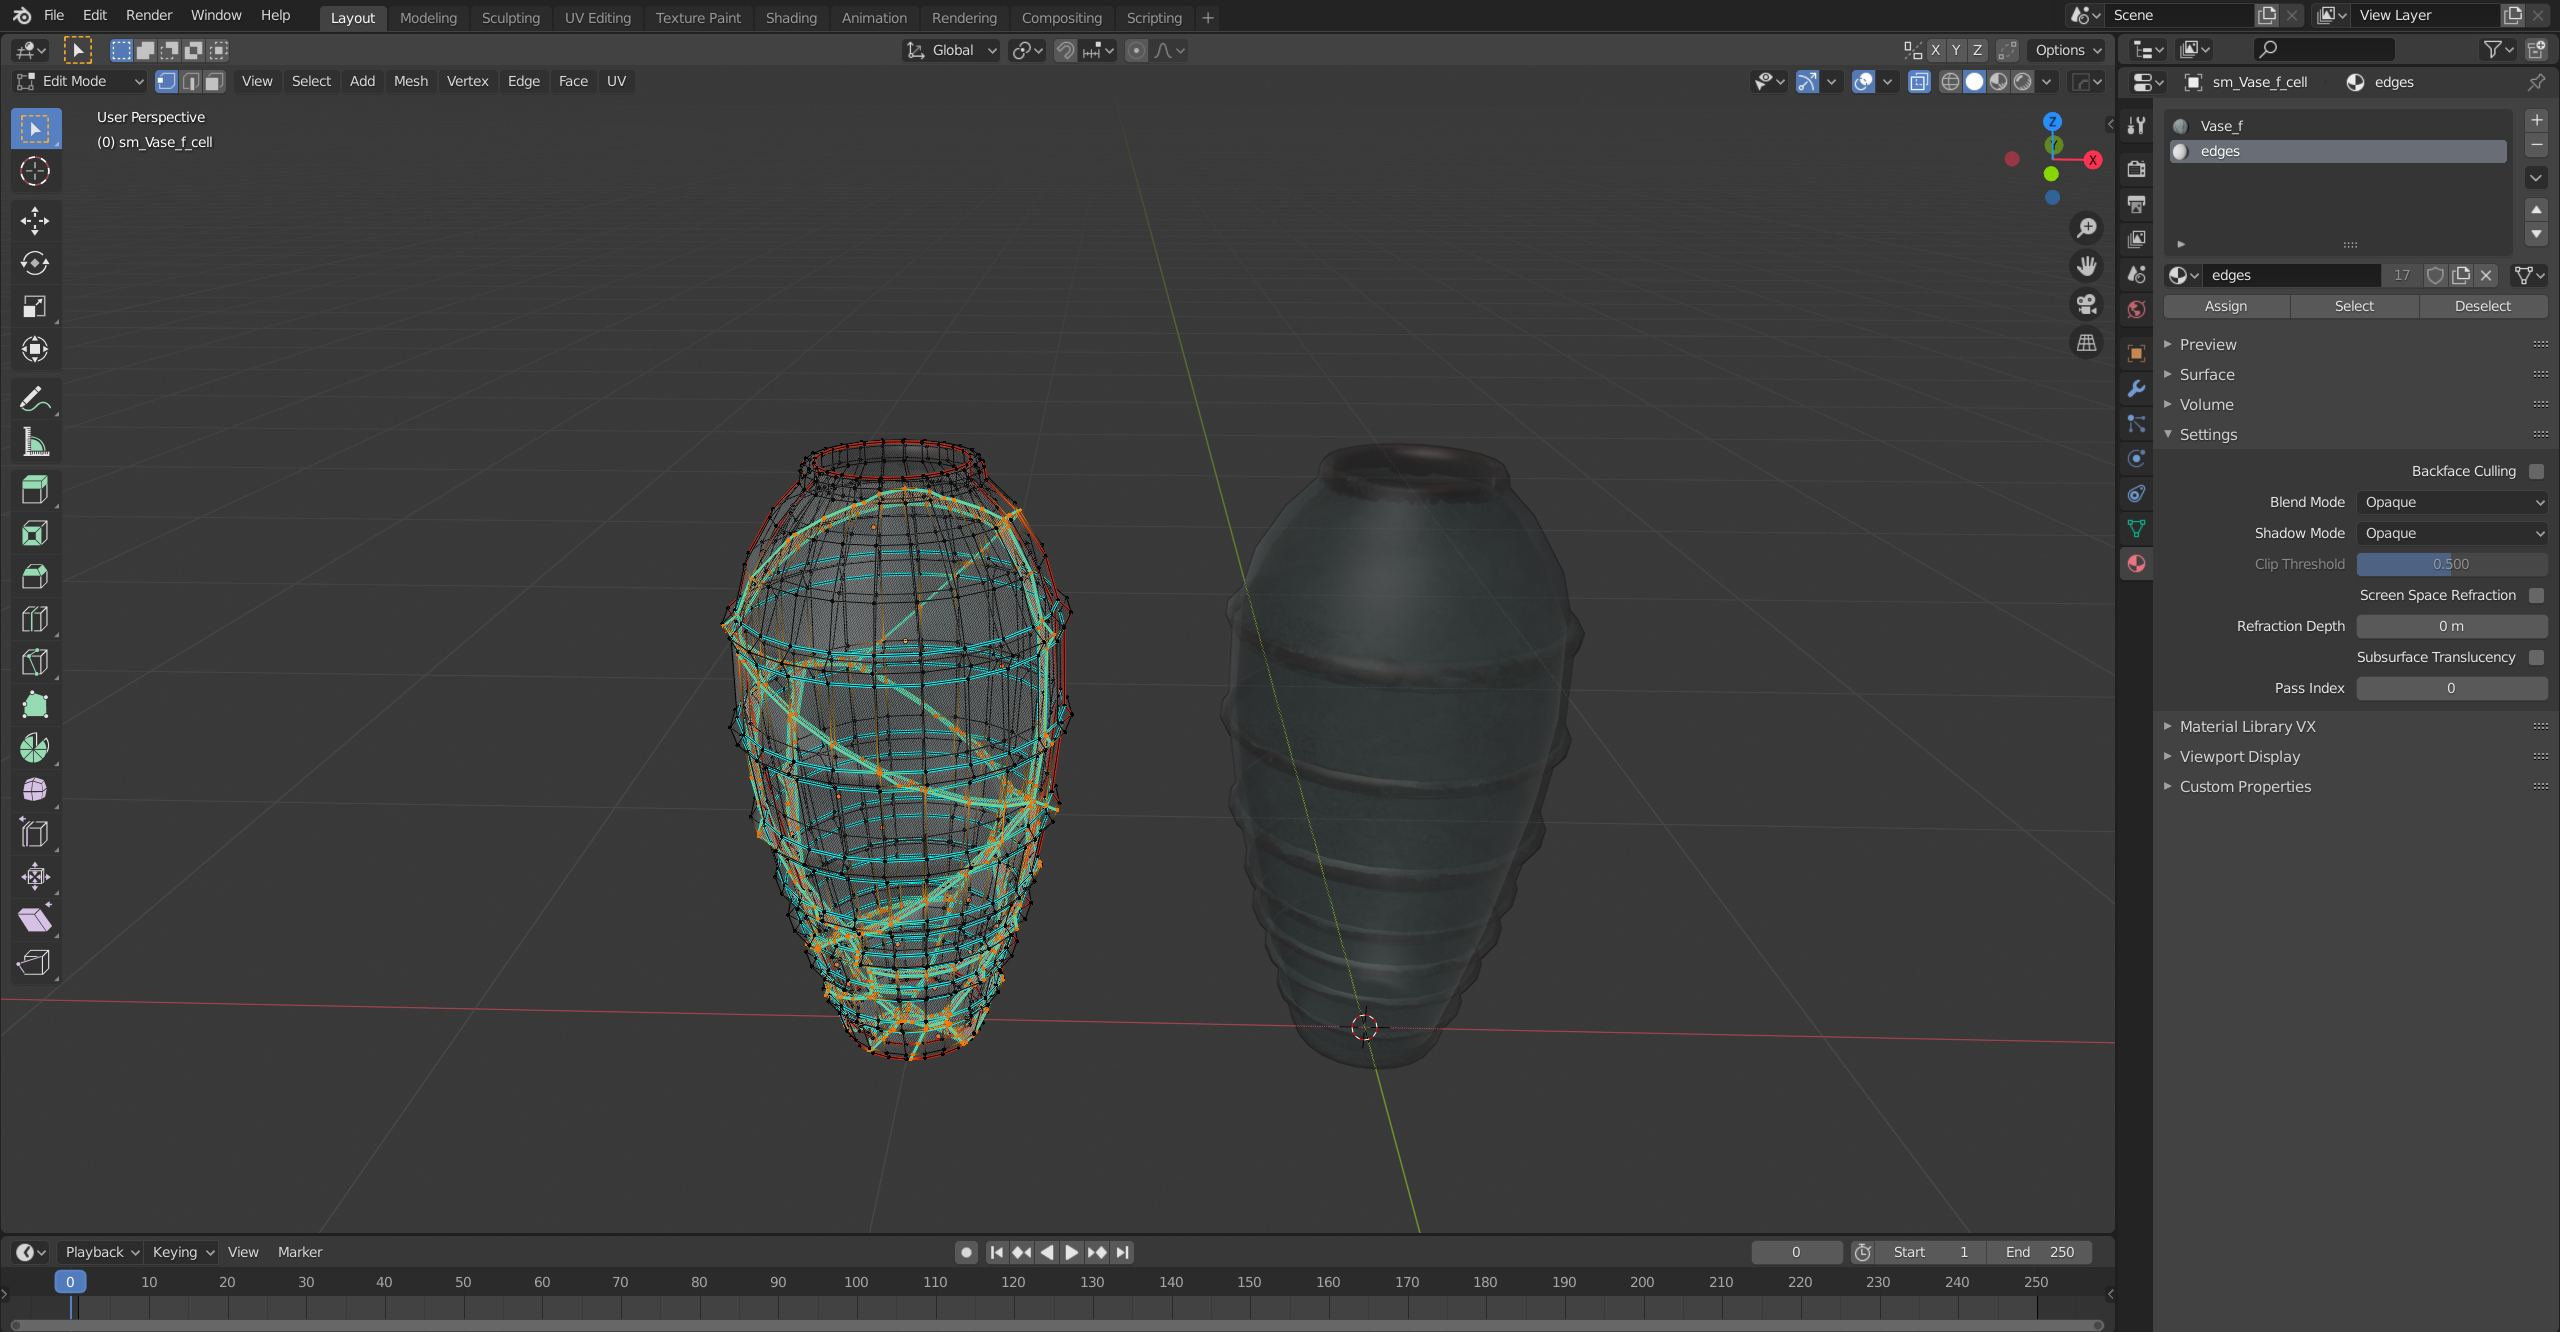
Material selection for unfolding cut pieces
Then we will create a UV map for these parts.

Adding Edge Split
Edge Split will fix the shading.

Link modifiers
Using them will apply Edge Split to all selected parts.
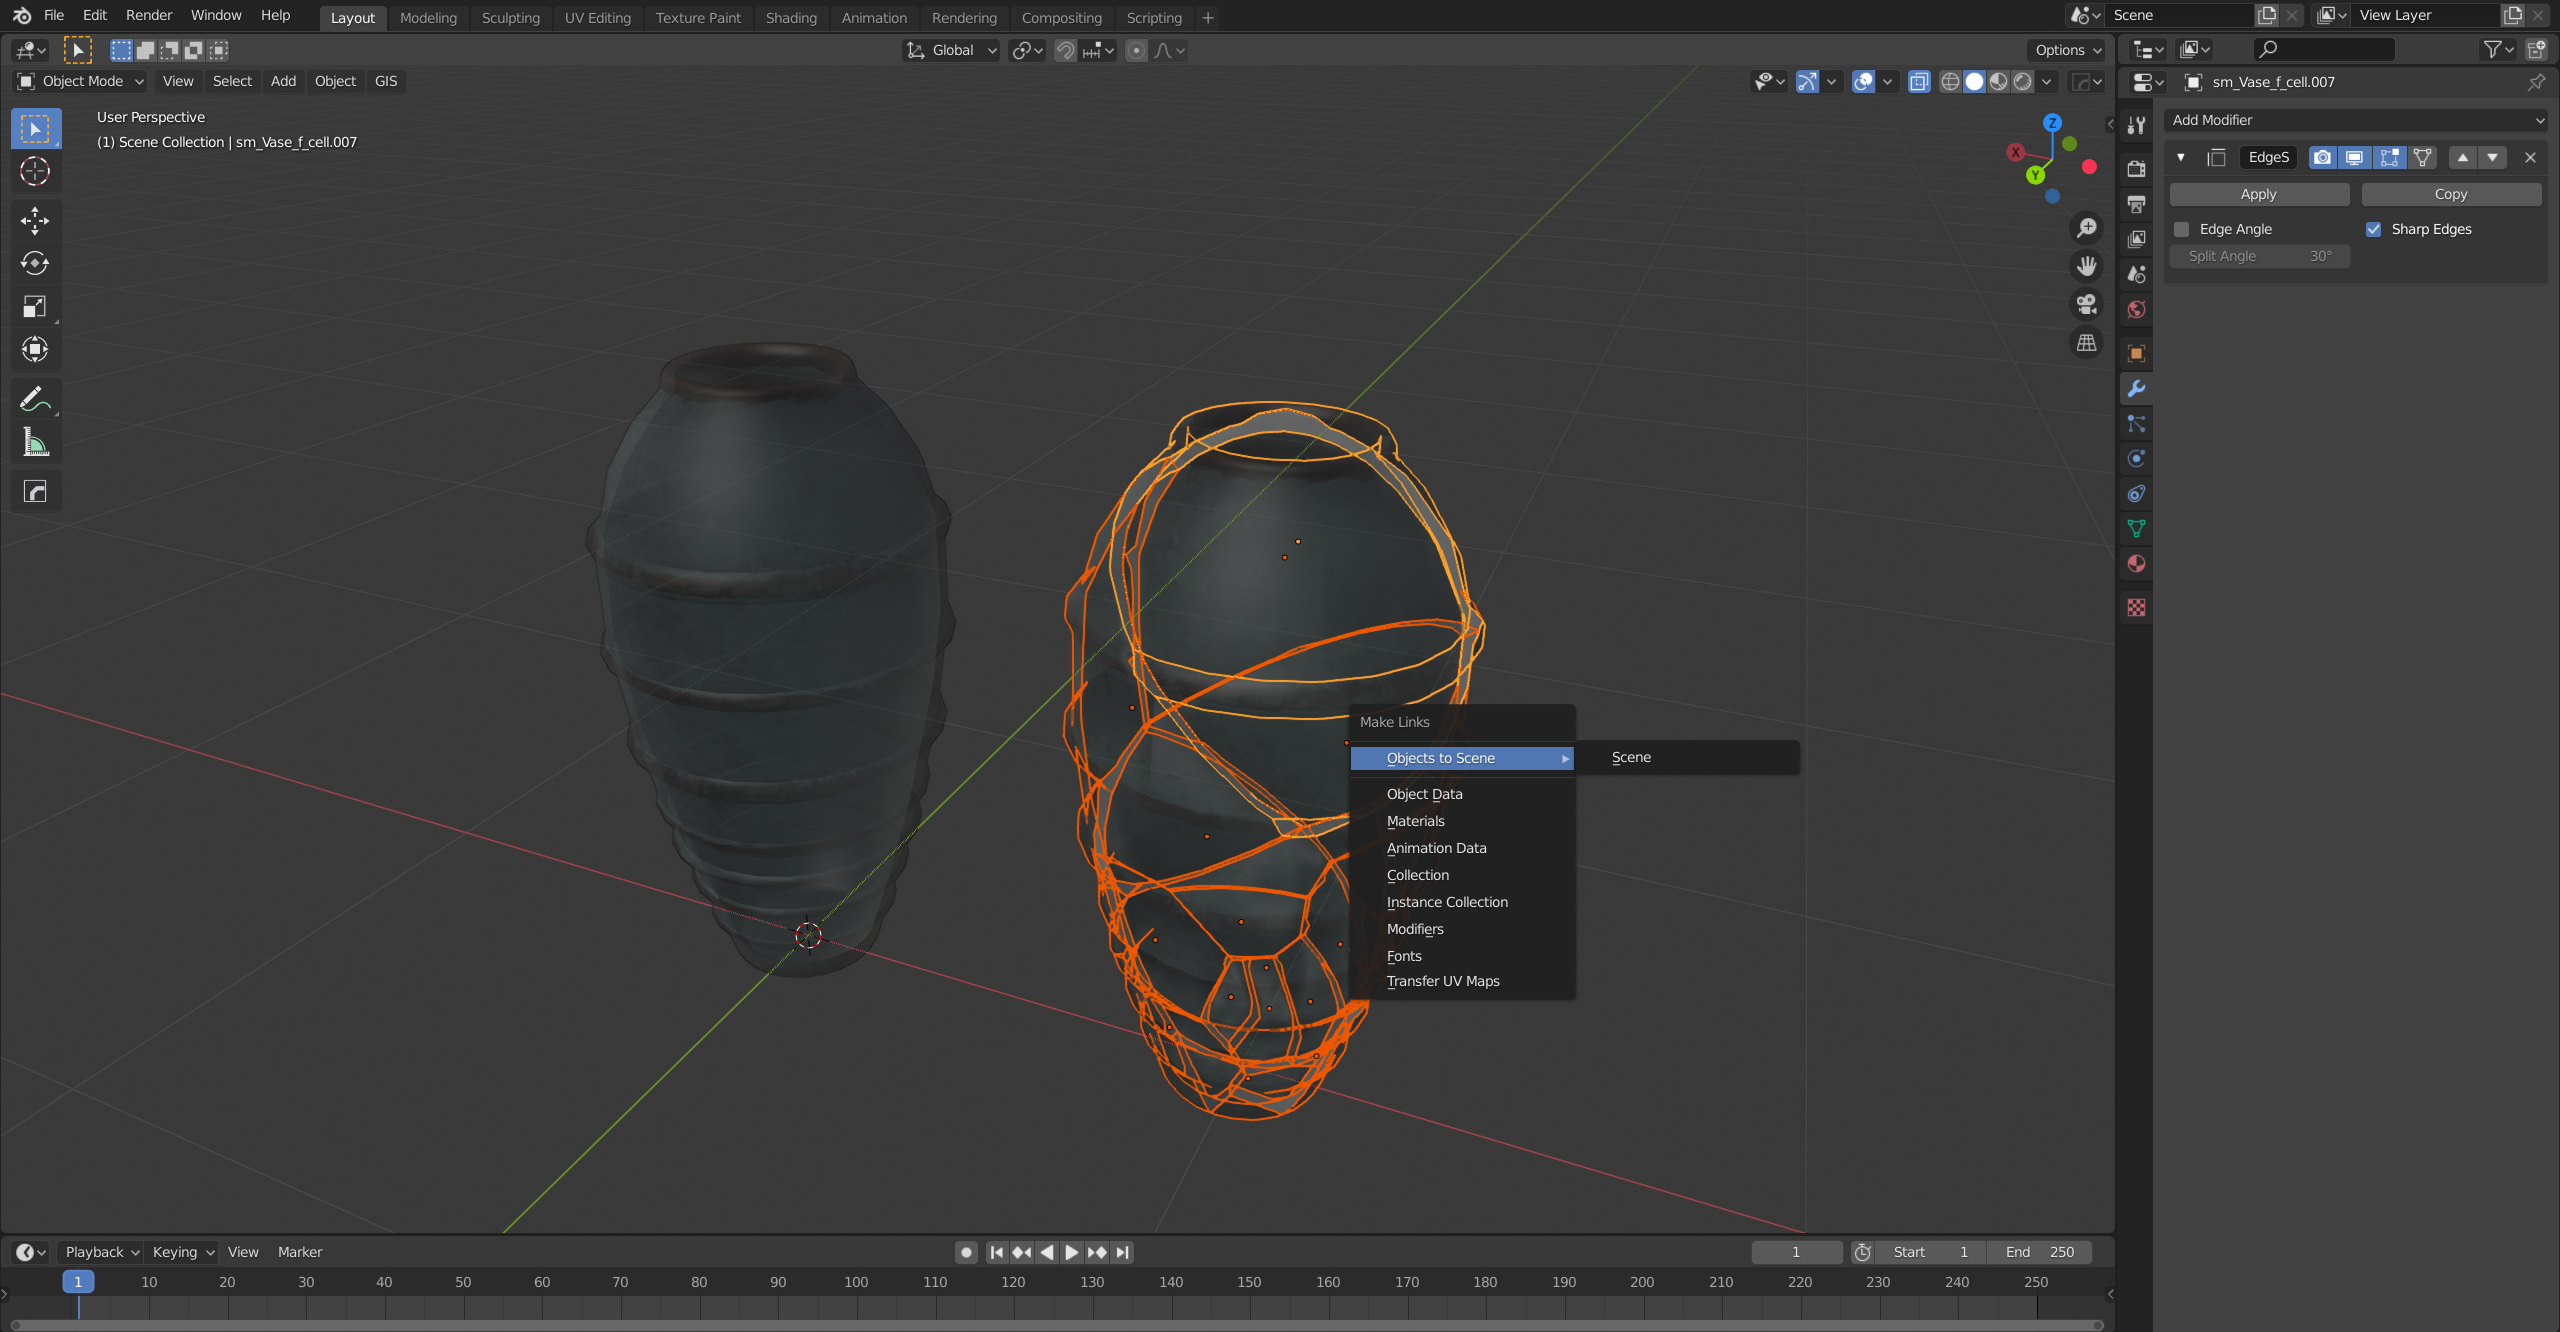
Completion
This is how it looks in Blender. Basically, we don't need to model all the parts separately.

Implementation
Base class
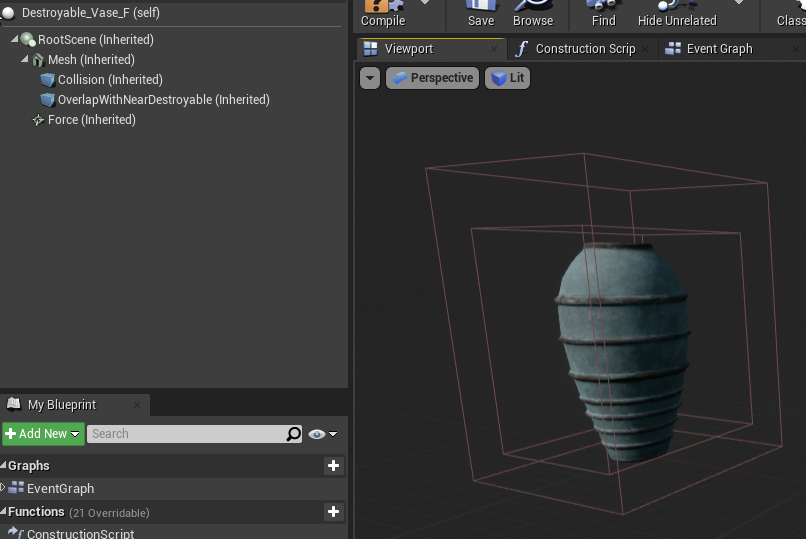
Our destructible object is an Actor, which has several components:
- Root scene;
- Static Mesh - base mesh;
- Collision box;
- Floor box;
- Radial force.
Let's change some settings in the constructor:
- Disable the Tick timer feature (never forget to disable it for actors who don't need it);
- We set up static mobility for all components;
- Disable the influence on navigation;
- Configuring collision profiles.
Setting up an actor in the constructor
ADestroyable::ADestroyable()
{
    PrimaryActorTick.bCanEverTick = false; // Tick
    bDestroyed = false;

    RootScene = CreateDefaultSubobject<USceneComponent>(TEXT("RootComp")); //  ,
    RootScene->SetMobility(EComponentMobility::Static);
    RootComponent = RootScene;

    Mesh = CreateDefaultSubobject<UStaticMeshComponent>(TEXT("BaseMeshComp")); //
    Mesh->SetMobility(EComponentMobility::Static);
    Mesh->SetupAttachment(RootScene);

    Collision = CreateDefaultSubobject<UBoxComponent>(TEXT("CollisionComp")); // ,
    Collision->SetMobility(EComponentMobility::Static);
    Collision->SetupAttachment(Mesh);

    OverlapWithNearDestroyable = CreateDefaultSubobject<UBoxComponent>(TEXT("OverlapWithNearDestroyableComp")); // ,
    OverlapWithNearDestroyable->SetMobility(EComponentMobility::Static);
    OverlapWithNearDestroyable->SetupAttachment(Mesh);

    Force = CreateDefaultSubobject<URadialForceComponent>(TEXT("RadialForceComp")); //
    Force->SetMobility(EComponentMobility::Static);
    Force->SetupAttachment(RootScene);
    Force->Radius = 100.f;
    Force->bImpulseVelChange = true;
    Force->AddCollisionChannelToAffect(ECC_WorldDynamic);

    /*   */
    Mesh->SetCollisionObjectType(ECC_WorldDynamic);
    Mesh->SetCollisionEnabled(ECollisionEnabled::QueryAndPhysics);
    Mesh->SetCollisionResponseToAllChannels(ECR_Block);
    Mesh->SetCollisionResponseToChannel(ECC_Visibility, ECR_Ignore);
    Mesh->SetCollisionResponseToChannel(ECC_Camera, ECR_Ignore);
    Mesh->SetCollisionResponseToChannel(ECC_CameraFadeOverlap, ECR_Overlap);
    Mesh->SetCollisionResponseToChannel(ECC_Interaction, ECR_Ignore);
    Mesh->SetCanEverAffectNavigation(false);

    Collision->SetBoxExtent(FVector(50.f, 50.f, 50.f));
    Collision->SetCollisionObjectType(ECC_WorldDynamic);
    Collision->SetCollisionEnabled(ECollisionEnabled::QueryOnly);
    Collision->SetCollisionResponseToAllChannels(ECR_Ignore);
    Collision->SetCollisionResponseToChannel(ECC_Melee, ECR_Overlap);
    Collision->SetCollisionResponseToChannel(ECC_Pawn, ECR_Overlap);
    Collision->SetCollisionResponseToChannel(ECC_Projectile, ECR_Overlap);
    Collision->SetCanEverAffectNavigation(false);

    Collision->OnComponentBeginOverlap.AddDynamic(this, &ADestroyable::OnBeginOverlap);
    Collision->OnComponentEndOverlap.AddDynamic(this, &ADestroyable::OnEndOverlap);

    OverlapWithNearDestroyable->SetBoxExtent(FVector(40.f, 40.f, 40.f));
    OverlapWithNearDestroyable->SetCollisionObjectType(ECC_WorldDynamic);
    OverlapWithNearDestroyable->SetCollisionEnabled(ECollisionEnabled::NoCollision); //  ,
    OverlapWithNearDestroyable->SetCollisionResponseToAllChannels(ECR_Ignore);
    OverlapWithNearDestroyable->SetCollisionResponseToChannel(ECC_WorldDynamic, ECR_Overlap);
    OverlapWithNearDestroyable->CanCharacterStepUp(false);
    OverlapWithNearDestroyable->SetCanEverAffectNavigation(false);
}
In Begin Play, we collect some data and customize it:
- We are looking for all parts with the "dest" tag;
- Set up collisions for all parts so that the artist doesn't have to think about it;
- Establish static mobility;
- Hide all parts.
Setting up parts of an object in Begin Play
void ADestroyable::ConfigureBreakablesOnStart()
{
    Mesh->SetCullDistance(BaseMeshMaxDrawDistance); //

    for (UStaticMeshComponent* Comp : GetBreakableComponents()) //
    {
        Comp->SetCollisionEnabled(ECollisionEnabled::NoCollision); //
        Comp->SetCollisionResponseToAllChannels(ECR_Ignore); //
        Comp->SetCollisionResponseToChannel(ECC_WorldStatic, ECR_Block);
        Comp->SetMobility(EComponentMobility::Static); //     ,
        Comp->SetHiddenInGame(true); //    ,
    }
}
Simple function to get component parts
TArray<UStaticMeshComponent*> ADestroyable::GetBreakableComponents()
{
    if (BreakableComponents.Num() == 0) //     -  ?
    {
        TInlineComponentArray<UStaticMeshComponent*> ComponentsByClass; //
        GetComponents(ComponentsByClass);

        TArray<UStaticMeshComponent*> ComponentsByTag; //      «dest»
        ComponentsByTag.Reserve(ComponentsByClass.Num());
        for (UStaticMeshComponent* Component : ComponentsByClass)
        {
            if (Component->ComponentHasTag(TEXT("dest")))
            {
                ComponentsByTag.Push(Component);
            }
        }
        BreakableComponents = ComponentsByTag; //
    }
    return BreakableComponents;
}
Destruction triggers
There are three ways to provoke destruction.
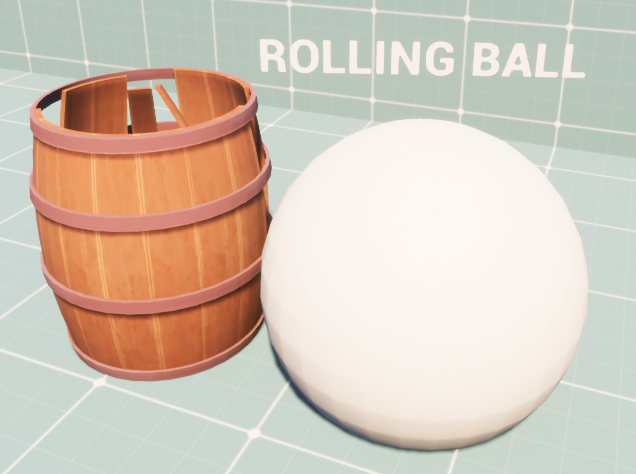
OnOverlap
Destruction occurs when someone throws or otherwise uses an object that activates the process, such as a rolling ball.
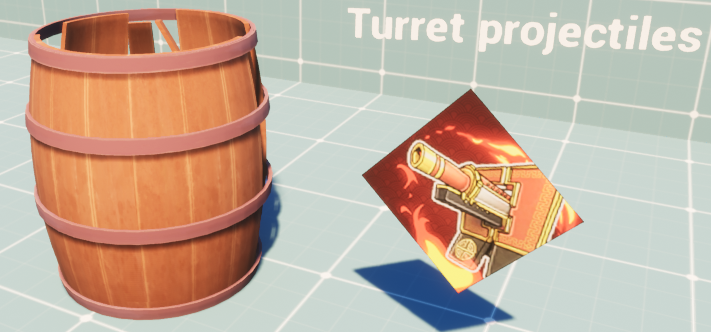
OnTakeDamage The
object being destroyed takes damage.
OnOverlapWithNearDestroyable
In this case, one object being destructible overlaps another. In our case, for simplicity, they both break.
Object destruction flow
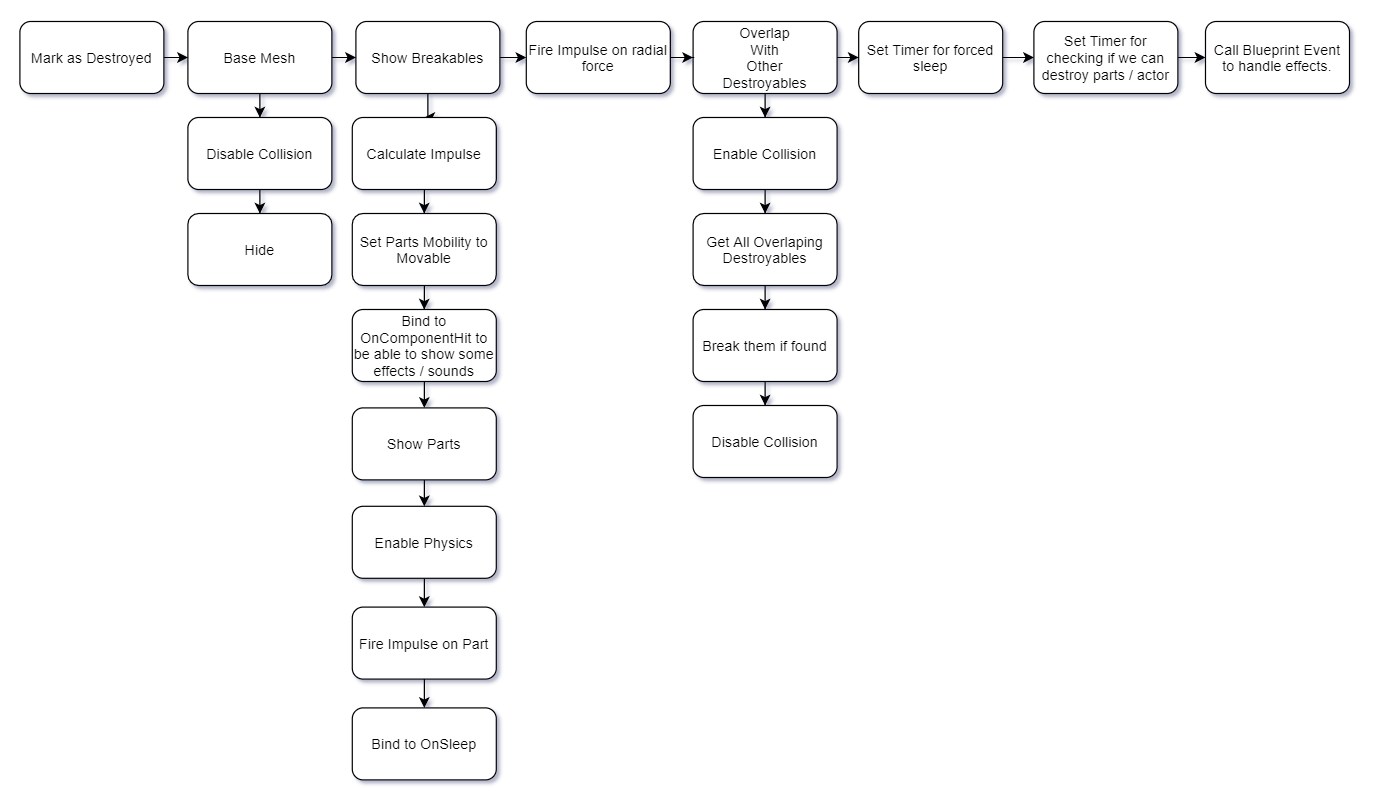
Object destruction diagram
Show destructible parts
void ADestroyable::ShowBreakables(FVector DealerLocation, bool ByOtherDestroyable /*= false*/)
{
    float ImpulseStrength = ByOtherDestroyable ? -500.f : -1000.f; //
    FVector Impulse = (DealerLocation - GetActorLocation()).GetSafeNormal() * ImpulseStrength; //        ,
for (UStaticMeshComponent* Comp : GetBreakableComponents()) //
    {
        Comp->SetMobility(EComponentMobility::Movable); //
        FBodyInstance* RootBI = Comp->GetBodyInstance(NAME_None, false);
        if (RootBI)
        {
            RootBI->bGenerateWakeEvents = true; //

            if (PartsGenerateHitEvent)
            {
                RootBI->bNotifyRigidBodyCollision = true; //   OnComponentHit
                Comp->OnComponentHit.AddDynamic(this, &ADestroyable::OnPartHitCallback); //
            }
        }

        Comp->SetHiddenInGame(false); //
        Comp->SetCollisionEnabled(ECollisionEnabled::QueryAndPhysics); //
        Comp->SetSimulatePhysics(true); //
        Comp->AddImpulse(Impulse, NAME_None, true); //

        if (ByOtherDestroyable)
            Comp->AddAngularImpulseInRadians(Impulse * 5.f); //       ,

        //
        Comp->SetCullDistance(PartsMaxDrawDistance);

        Comp->OnComponentSleep.AddDynamic(this, &ADestroyable::OnPartPutToSleep); //
    }
}
The main function of destruction
void ADestroyable::Break(AActor* InBreakingActor, bool ByOtherDestroyable /*= false*/)
{
    if (bDestroyed) //   ,
        return;

    bDestroyed = true;
    Mesh->SetHiddenInGame(true); //
    Mesh->SetCollisionEnabled(ECollisionEnabled::NoCollision); //
    Collision->SetCollisionEnabled(ECollisionEnabled::NoCollision); //
    OverlapWithNearDestroyable->SetCollisionEnabled(ECollisionEnabled::NoCollision);
    ShowBreakables(InBreakingActor->GetActorLocation(), ByOtherDestroyable); // show parts
    Force->bImpulseVelChange = !ByOtherDestroyable; //   ,
    Force->FireImpulse(); //

    /*     */
    OverlapWithNearDestroyable->SetCollisionEnabled(ECollisionEnabled::QueryOnly); //
    TArray<AActor*> OtherOverlapingDestroyables;
    OverlapWithNearDestroyable->GetOverlappingActors(OtherOverlapingDestroyables, ADestroyable::StaticClass()); //
    for (AActor* OtherActor : OtherOverlapingDestroyables)
    {
        if (OtherActor == this)
            continue;

        if (ADestroyable* OtherDest = Cast<ADestroyable>(OtherActor))
        {
            if (OtherDest->IsDestroyed()) // ,
                continue;

            OtherDest->Break(this, true); //
        }
    }

    OverlapWithNearDestroyable->SetCollisionEnabled(ECollisionEnabled::NoCollision); //

    GetWorld()->GetTimerManager().SetTimer(ForceSleepTimerHandle, this, &ADestroyable::ForceSleep, FORCESLEEPDELAY, false); //    ,

    if(bDestroyAfterDelay)
        GetWorld()->GetTimerManager().SetTimer(DestroyAfterBreakTimerHandle, this, &ADestroyable::DestroyAfterBreaking, DESTROYACTORDELAY, false); //    ,

    OnBreakBP(InBreakingActor, ByOtherDestroyable); // blueprint
}
What to do with sleep function
When the Sleep function is triggered, we disable physics / collisions and set static mobility. This will increase productivity.
Every primitive component with physics can go to sleep. We bind to this function on destruction.
This function can be inherent in any primitive. We bind to it to complete the action on the object.
Sometimes the physical object does not go to sleep and continues to update, even if you do not see any movement. If it continues to simulate physics, we make all of its parts go to sleep after 15 seconds.
Forced sleep function called by timer
void ADestroyable::OnPartPutToSleep(UPrimitiveComponent* InComp, FName InBoneName)
{
    InComp->SetSimulatePhysics(false); //
    InComp->SetCollisionEnabled(ECollisionEnabled::NoCollision); //
    InComp->SetMobility(EComponentMobility::Static); //
    /*         */
}
What to do with destruction
We need to check if the actor can be destroyed (for example, if the player is far away). If not, we will check again after some time.
Let's try to destroy the object in the absence of the player
void ADestroyable::DestroyAfterBreaking()
{
    if (IsPlayerNear()) //  ,
    {
        //
        GetWorld()->GetTimerManager().SetTimer(DestroyAfterBreakTimerHandle, this, &ADestroyable::DestroyAfterBreaking, DESTROYACTORDELAY, false);
    }
    else
    {
        GetWorld()->GetTimerManager().ClearTimer(DestroyAfterBreakTimerHandle); //
        Destroy(); //
    }
}
Calling OnHit Node for Parts of an Object
In our case, Blueprints are responsible for the audiovisual part of the game, so we add Blueprints events where possible.
void ADestroyable::OnPartHitCallback(UPrimitiveComponent* HitComp, AActor* OtherActor, UPrimitiveComponent* OtherComp, FVector NormalImpulse, const FHitResult& Hit)
{
    OnPartHitBP(Hit, NormalImpulse, HitComp, OtherComp); // blueprint
}
End Play and cleanup
Our game can be played in the default editor and some custom editors. That's why we need to clear everything we can in EndPlay.
void ADestroyable::EndPlay(const EEndPlayReason::Type EndPlayReason)
{
    /*   */
    GetWorld()->GetTimerManager().ClearTimer(DestroyAfterBreakTimerHandle);
    GetWorld()->GetTimerManager().ClearTimer(ForceSleepTimerHandle);
    Super::EndPlay(EndPlayReason);
}
Configuration in Blueprints
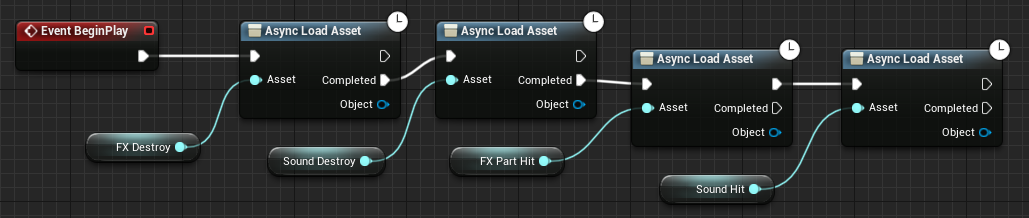
The configuration is simple here. You simply place the pieces attached to the base mesh and mark them as "dest". That's all. Graphic artists don't need to do anything in the engine. Our base Blueprint class only does audiovisual stuff from events we provided in C ++. BeginPlay - downloads the required assets. In fact, in our case, each asset is a pointer to a program object, and you need to use them even when creating prototypes. Hard-coded asset references will increase editor / game load times and memory usage. On Break Event - responds to effects and appearance sounds. You can find some Niagara options here that will be described later. On Part Hit Event

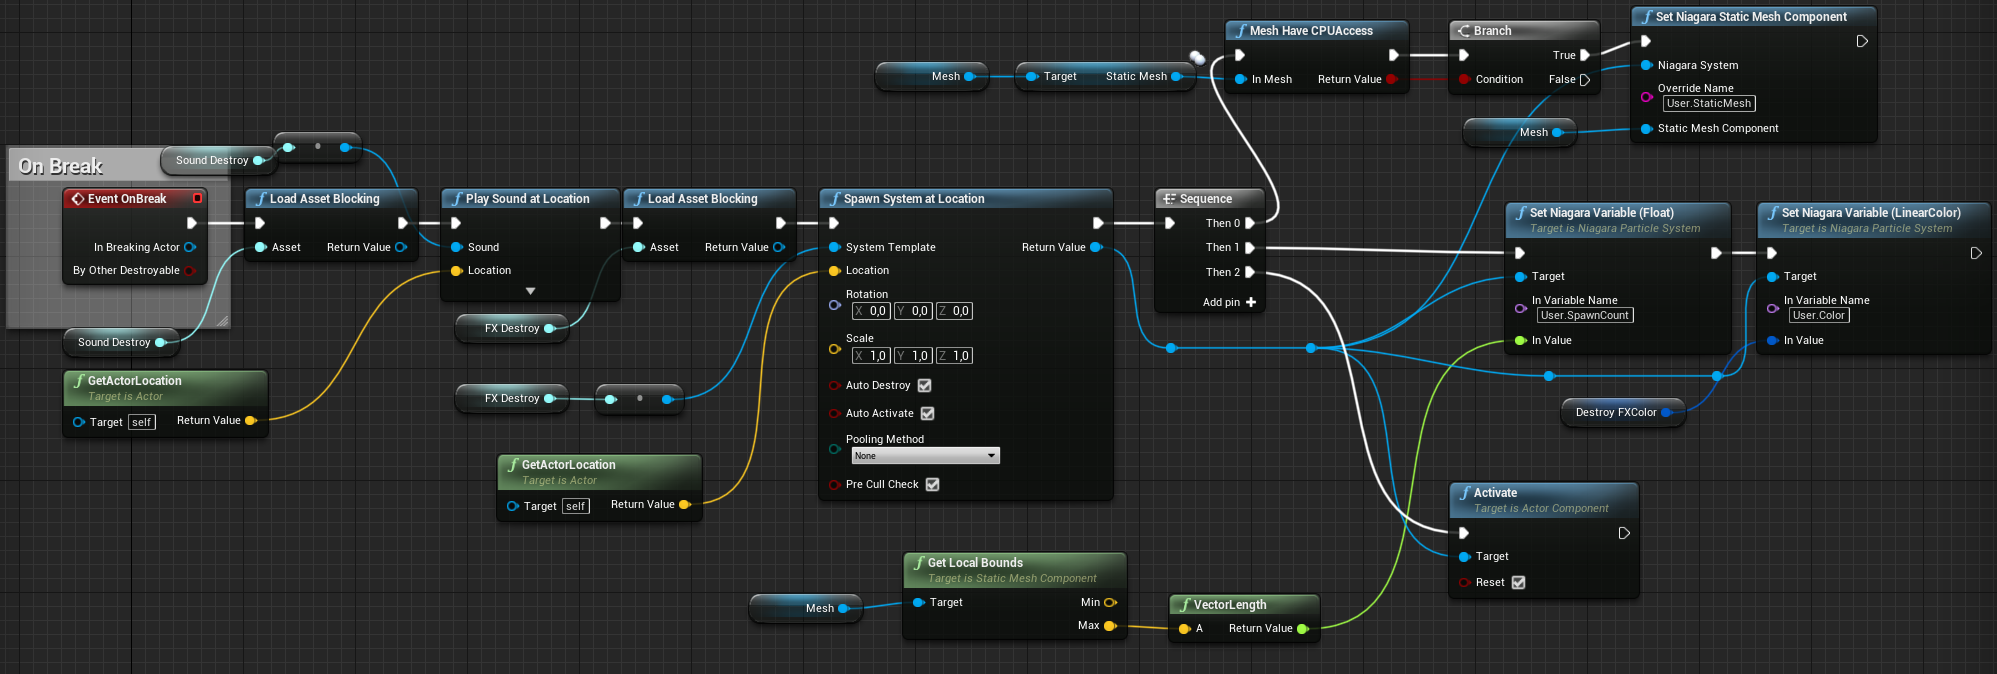
- triggers impact effects and sounds.

A utility for quickly adding collisions
You can use Utility Blueprint to interact with assets to generate collisions for all parts of the object. It's much faster than creating them yourself.


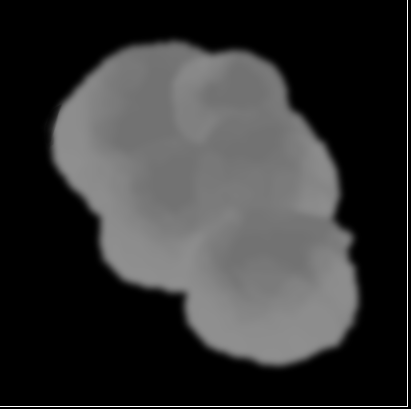
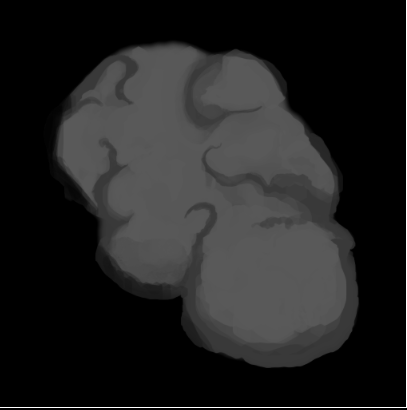
Particle Effects in Niagara
The following describes how to create a simple effect in Niagara .
Material

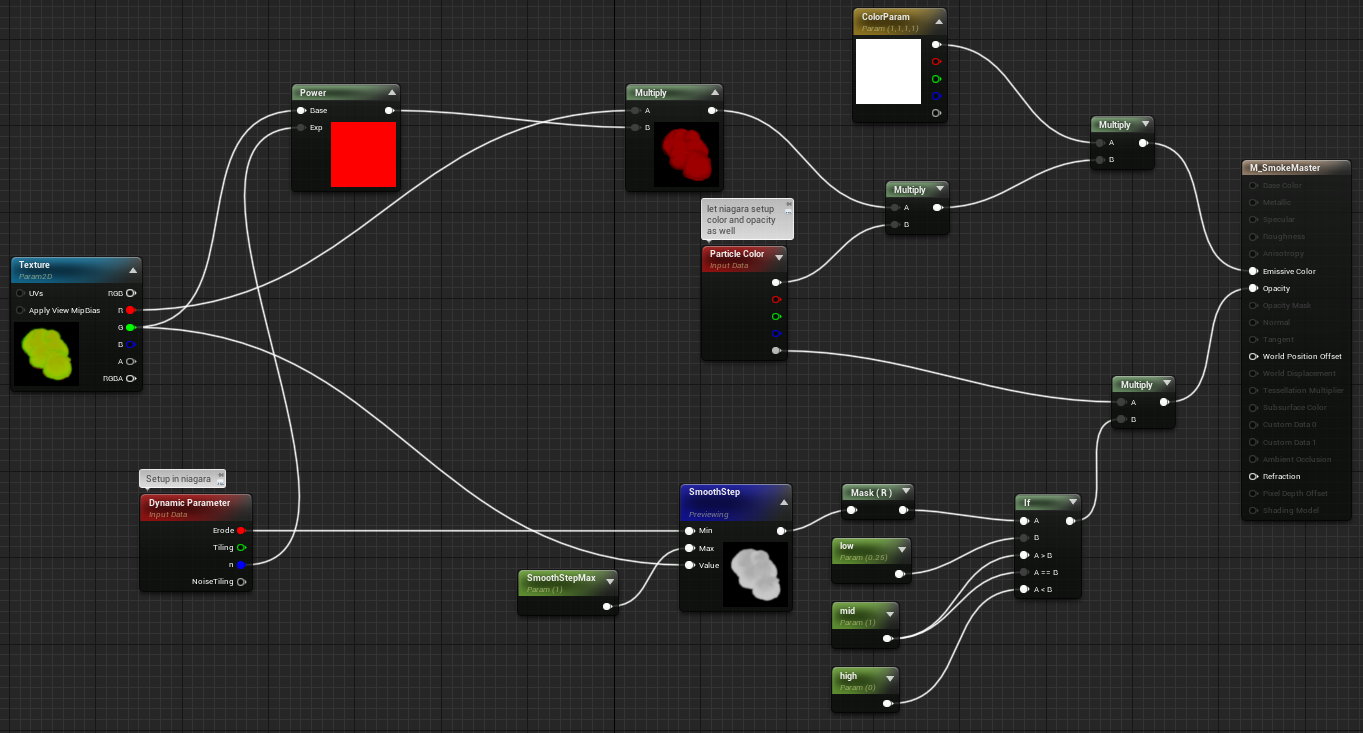
The key to this material is the texture, not the shader, so it's really very simple.
Erosion, color and alpha are taken from Niagara.
Texture channel R Texture
channel G
Most of the effect is achieved by texture. Canal B could still be used to add more detail, but we don't need it at this time.
Niagara System Parameters
We use two Niagara systems: one for the burst effect (it uses a base mesh to spawn particles), and the other when parts collide (no static mesh position).

The user can specify the color and number of spawns and select a static mesh that will be used to select the location of the particle spawn
Niagara spawn burst
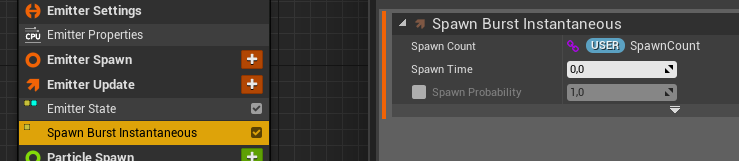
Here the user int32 is involved in order to be able to adjust the appearance counter for each destructible object
Niagara Particle Spawn

- Selecting a static mesh from destructible objects;
- Set random Lifetime, weight and size;
- Choose a color from the custom ones (it is set by the destructible actor);
- Create particles at the mesh vertices,
- Add random speed and rotation speed.
Using a static grid
To be able to use static mesh in Niagara, your mesh must have the AllowCPU checkbox checked.
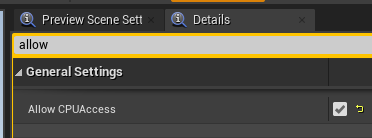
TIP: In the current (4.24) version of the engine, if you re-import your mesh, this value will be reset to the default. And in a shipping build, if you try to run a Niagara system with a mesh that doesn't have CPU access enabled, it will crash.
So let's add some simple code to check if the grid has this value.
bool UFunctionLibrary::MeshHaveCPUAccess(UStaticMesh* InMesh)
{
    return InMesh->bAllowCPUAccess;
}
It was used in Blueprints before Niagara.

You can create an editor widget to find destructible objects and set their Base Mesh variable to AllowCPUAccess.
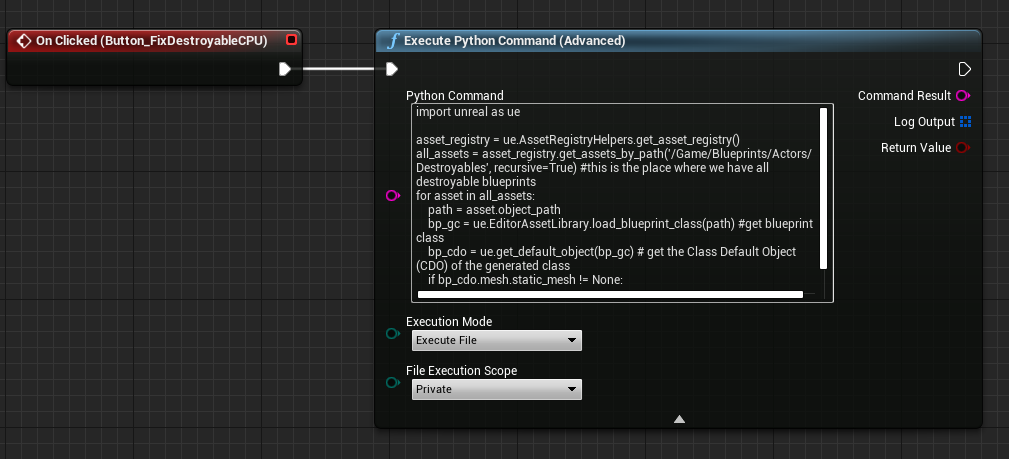
Here's a Python code that looks for all destructible objects and sets CPU access to the underlying mesh.
Python code to set static grid allow_cpu_access variable
import unreal as ue

asset_registry = ue.AssetRegistryHelpers.get_asset_registry()
all_assets = asset_registry.get_assets_by_path('/Game/Blueprints/Actors/Destroyables', recursive=True) #   blueprints
for asset in all_assets:
    path = asset.object_path
    bp_gc = ue.EditorAssetLibrary.load_blueprint_class(path) #get blueprint class
    bp_cdo = ue.get_default_object(bp_gc) # get the Class Default Object (CDO) of the generated class
    if bp_cdo.mesh.static_mesh != None:
        ue.EditorStaticMeshLibrary.set_allow_cpu_access(bp_cdo.mesh.static_mesh, True) # sets allow cpu on static mesh
You can run it directly with the py command, or create a button to run the code in the Utility Widget .

Niagara Particle Update


When updating, we do the following things:
- Scaling Alpha Over Life,
- Add curl noise,
- Change the rotation speed in accordance with the expression: (Particles.RotRate * (0.8 - Particles.NormalizedAge) ;
- Scale the Size Over Life particle parameter,
- Updating the material blur parameter,
- Add a noise vector.
Why such a rather old-school approach?
Of course, you can use the current destruction system from UE4, but this way you can better control performance and visuals. When asked if you need a system as large as the built-in one for your needs, you must find the answer yourself. Because its use is often unreasonable.
As for Chaos, let's wait until it is ready for a full-fledged release, and then we'll look at its capabilities.