Foreword

I am developing an educational project. And this year the children needed writing in English.
Despite the fact that we are increasingly printing texts in electronic format, handwriting is still popular in everyday and professional life.
Recipes are a useful thing for both children and adults. Some are still learning to write, others are training.
It was important for us to create a system for quick and convenient selection of prescriptions. Therefore, we decided to make our own generator.
The topic is interesting, but there was very little information on the Internet. So the idea arose to write instructions for creating your own recipes.
goal
The reasons why
- Price: one set costs about 300 rubles
- The ability to issue more personal tasks depending on what needs to be worked out
- there is no particular information on this topic on the Internet, it became interesting to figure out how it works.
- When you have your own technology, you can refine it (Add the ability to change the text size, for example, or a generator of special tasks related to recipes)
Process of creation
Due to the peculiarities of my project, my implementation was made on PCP, I am sure that there are many other interesting and good options for solving this problem.
Formulation of the problem
You should always start with a simple one, with a problem statement. What is a recipe generator? Here's a simple diagram.
We enter the text, a pdf file is created from the text with the design of a notebook sheet and a handwritten font, which must be outlined.
- Text input
- Creating a pdf file
- ( , )
If ordinary html will help us with entering both text and sending the form, then to generate a pdf document we need a special library, my eyes fell on fpdf (it is small, free and simple - ideal for solving our problem).
There is data sending, there is a pdf generator, now you need a font.
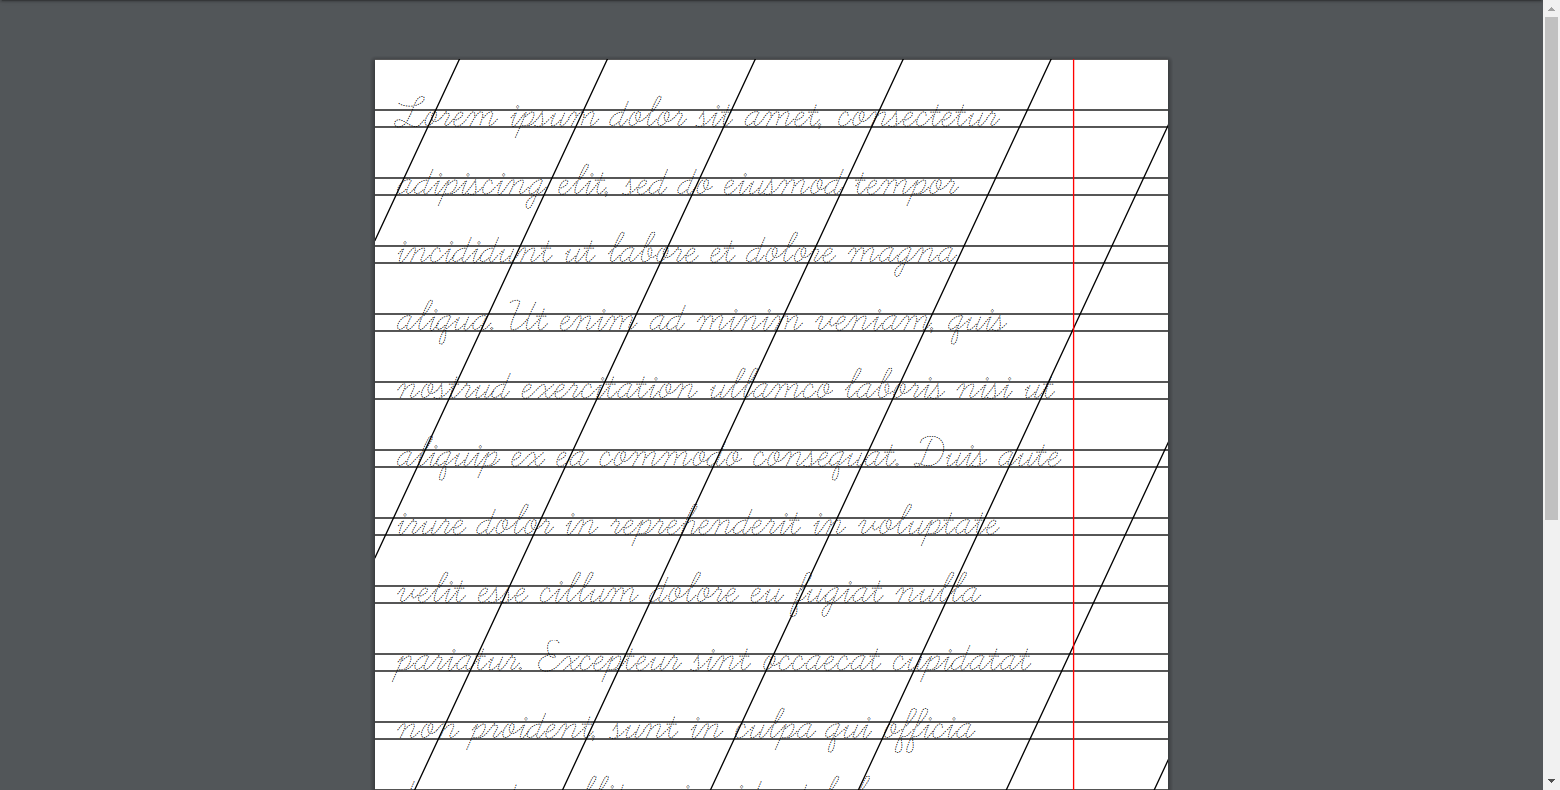
There is a good font Learning Curve that perfectly solves our problem. The font will need to be processed on the fpdf site so that you can add it to the script (cp1252 encoding is fine).
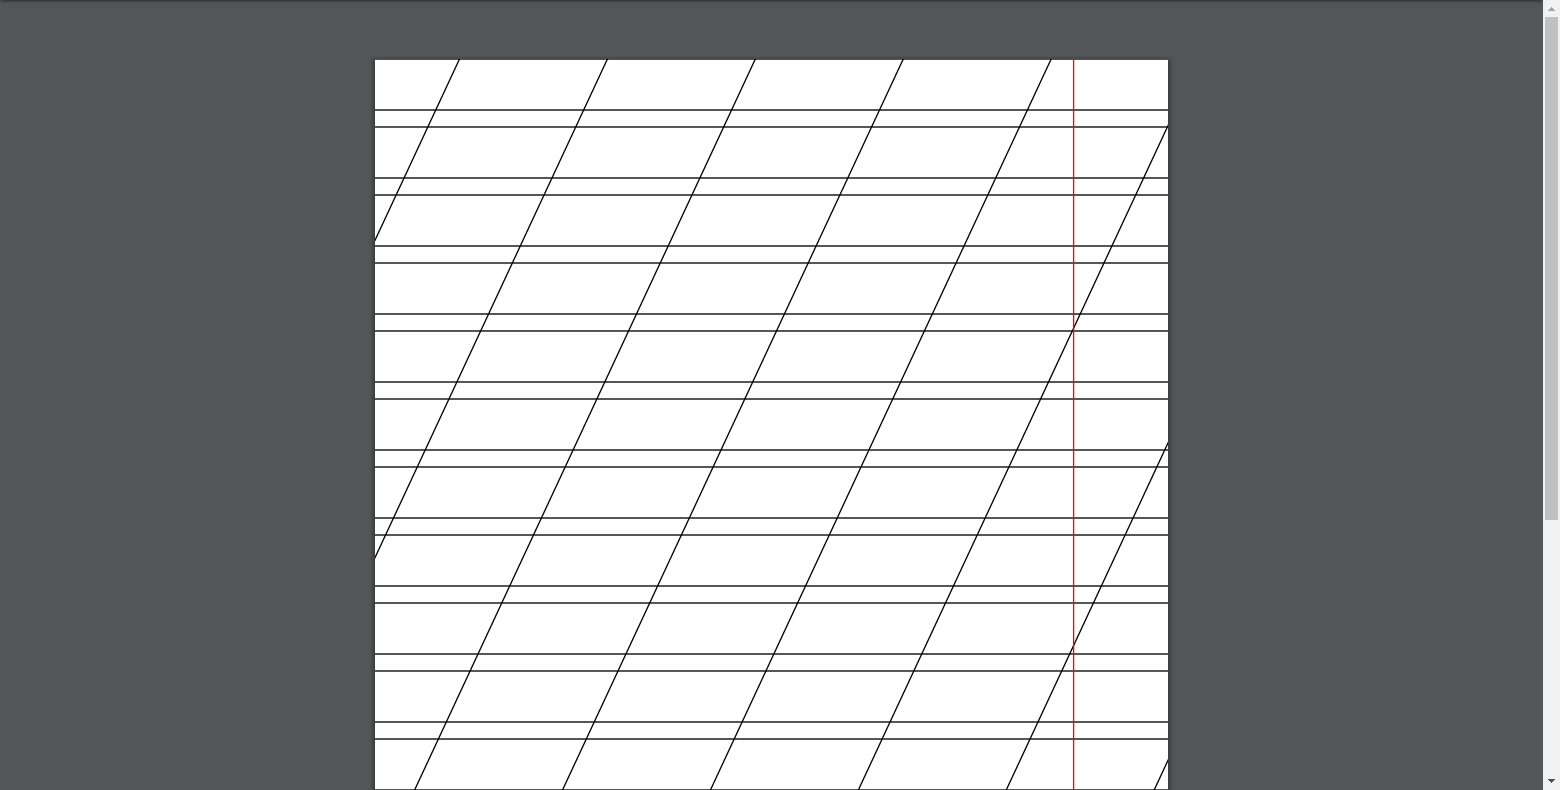
Now it remains to get the design of the notebook sheet: I took the function for drawing cells from the fpdf site , removed the vertical lines there, added oblique lines and margins.
Finally, having collected all the necessary elements, you can make a recipe generator.
Putting it all together
We design the html page with the form submission (I took the design here ):
- Let's make the font selection fields (gray and dotted)
- Let's make a text input field
- Send data button
create-exercise.html
<!DOCTYPE html>
<html>
<head>
<meta charset="UTF-8">
<link rel="stylesheet" href="style.css">
</head>
<body>
<form class="decor" action="gotopdf2.php" method="post">

  <div class="form-left-decoration"></div>
  <div class="form-right-decoration"></div>
  <div class="circle"></div>
  <div class="form-inner">
	<h3>   </h3>
		<p> <input type="radio" name="type_letter_propisi" value=0 checked></p>
		<p> <input type="radio" name="type_letter_propisi" value=1></p>
    <h3>  :</h3>
	<textarea name="data1"rows="10"></textarea>
    <input type="submit" value=" ">
  </div>
</form>
</body>
</html>
style.css
* {box-sizing: border-box;}
body {background: #f69a73;}
.decor {
  position: relative;
  max-width: 400px;
  margin: 50px auto 0;
  background: white;
  border-radius: 30px;
}
.form-left-decoration,
.form-right-decoration {
  content: "";
  position: absolute;
  width: 50px;
  height: 20px;
  background: #f69a73;
  border-radius: 20px;
}
.form-left-decoration {
  bottom: 60px;
  left: -30px;
}
.form-right-decoration {
  top: 60px;
  right: -30px;
}
.form-left-decoration:before,
.form-left-decoration:after,
.form-right-decoration:before,
.form-right-decoration:after {
  content: "";
  position: absolute;
  width: 50px;
  height: 20px;
  border-radius: 30px;
  background: white;
}
.form-left-decoration:before {top: -20px;}
.form-left-decoration:after {
  top: 20px;
  left: 10px;
}
.form-right-decoration:before {
  top: -20px;
  right: 0;
}
.form-right-decoration:after {
  top: 20px;
  right: 10px;
}
.circle {
  position: absolute;
  bottom: 80px;
  left: -55px;
  width: 20px;
  height: 20px;
  border-radius: 50%;
  background: white;
}
.form-inner {padding: 50px;}
.form-inner input{
  display: inline;
  width: normal;
  padding: 0 20px;
  margin-bottom: 10px;
  background: #E9EFF6;
  line-height: 40px;
  border-width: 0;
  border-radius: 20px;
  font-family: 'Roboto', sans-serif;
}

.form-inner textarea {
  display: block;
  width: 100%;
  padding: 0 20px;
  margin-bottom: 10px;
  background: #E9EFF6;
  line-height: 40px;
  border-width: 0;
  border-radius: 20px;
  font-family: 'Roboto', sans-serif;
}
.form-inner input[type="submit"] {
  margin-top: 30px;
  background: #f69a73;
  border-bottom: 4px solid #d87d56;
  color: white;
  font-size: 14px;
}
.form-inner textarea {resize: none;}
.form-inner h3 {
  margin-top: 0;
  font-family: 'Roboto', sans-serif;
  font-weight: 500;
  font-size: 24px;
  color: #707981;
}

Editing the file with the grid class (creating a notebook sheet):
- Disable vertical lines
- Add side margins (red line, although it will still be gray after printing)
- We set the color of the rulers to black, since the notebook light blue on a black and white printer will not be visible, but on a color ink it is a pity
- We write an inclined line through the tangent of the triangle. Empirically measured that the angle should be 25 degrees
grid.php (modified file where there used to be the code to create the grid)
<?php
require_once('fpdf182/fpdf.php');

class PDF_Grid extends FPDF {
    var $grid = false;
	var $inclined = false;
	var $border = true;
	var $i_hl= 0;
	var $i_hl_up= 13.5;


    function DrawGrid()
    {
        if($this->grid===true){
            $spacing = 5;
        } else {
            $spacing = $this->grid;
        }
		$this->SetDrawColor(0,0,0);
        $this->SetLineWidth(0.35);
		$h_limit=$this->h-20;
        for($i=$this->i_hl;$i<$h_limit;$i+=$spacing){						//print _ horizontal lines
            $this->Line(0,$i,$this->w,$i);
        }
		for($i=$this->i_hl_up;$i<$h_limit;$i+=$spacing){						//print up_ horizontal lines 13.5
            $this->Line(0,$i,$this->w,$i);
        }

		//Create inclined lines
		$tan_treangle_inc_line=tan(deg2rad(25));
		if($this->inclined == true){							//print / inclined lines
			$this->SetDrawColor(0,0,0);
			for($i=4;$i<=55;$i+=7)
				$this->Line(12*$i*$tan_treangle_inc_line, 0, 0, 12*$i);
		}
		if($this->border == true){								//print |  right border line
			$this->SetDrawColor(255,0,0);						//red border
			$this->Line(185, 0, 185, 300);
		}

    }

    function Header()
    {
        if($this->grid)
            $this->DrawGrid();
    }

}
?>
Now we create the file itself for processing data and generating words:
- Adding font selections via switch ()
- adjust the size of the text (here you can select specific values, since the A4 sheet size is always the same, this is not a screen), for children it is better to take a larger one, since they are still learning and it will be difficult for them to write in small letters
gotopdf2.php (Handler file where everything is configured and created)
<?php
require_once('gridphp.php');

$pdf=new PDF_Grid();

	/*
	//
	*/

	$pdf->inclined = true;		//
	$pdf->SetMargins(5,5,25);	//
	$pdf->grid = 18;			//
	$pdf->AddPage();


	/*
	//   ( )
	*/

	switch ($_POST['type_letter_propisi']) {
    case 0:		//
		$pdf->AddFont('LearningCurve-Bold','','learning_curve_bold_ot_tt.php');
		$pdf->SetFont('LearningCurve-Bold','',36);
		$pdf->SetTextColor(140,140,140);
		break;
	case 1:		//
		$pdf->AddFont('LearningCurve-dashed','','learning_curve_dashed_ot_tt.php');
		$pdf->SetFont('LearningCurve-dashed','',36);
		$pdf->SetTextColor(0,0,0);
		break;
	default:
		$pdf->Write(18,",     ");
		break;
	}
	$text_propisi = mb_convert_encoding($_POST['data1'], "cp1252");
	$pdf->Write(18,"$text_propisi");		//


$pdf->Output();

?>
Everything is ready! Below I attach the results obtained:

Just a sheet

Normal gray outline

Dotted outline
Output
With minimal cost, we get our own recipe generator. Then you can add various interesting functions here: choosing the size and color of letters, language, etc.
Link to GitHub
P.S. I was doing a project on a local server, used xampp