
This article is the final in a series on applying the MVI architectural pattern in Kotlin Multiplatform. In the previous two parts ( part 1 and part 2 ), we remembered what MVI is, created a generic Kittens module for loading cat images and integrated it into iOS and Android applications.
In this part, we'll cover the Kittens module with unit and integration tests. We will learn about the current limitations of testing in Kotlin Multiplatform, figure out how to overcome them and even make them work to our advantage.
An updated sample project is available on our GitHub .
Prologue
There is no doubt that testing is an important step in software development. Of course, it slows down the process, but at the same time:
- allows you to check edge cases that are difficult to catch manually;
- Reduces the chance of regression when adding new features, fixing bugs and refactoring;
- forces you to decompose and structure your code.
At first glance, the last point may seem like a disadvantage, because it takes time. However, it makes the code more readable and beneficial in the long run.
“Indeed, the ratio of time spent reading versus writing is well over 10 to 1. We are constantly reading old code as part of the effort to write new code. ... [Therefore,] making it easy to read makes it easier to write. " - Robert C. Martin, "Clean Code: A Handbook of Agile Software Craftsmanship"
Kotlin Multiplatform expands testing capabilities. This technology adds one important feature: each test is automatically performed on all supported platforms. If, for example, only Android and iOS are supported, then the number of tests can be multiplied by two. And if at some point support for another platform is added, then it automatically becomes covered in tests.
Testing on all supported platforms is important because there can be differences in the behavior of the code. For example, Kotlin / Native has a special memory model , Kotlin / JS also sometimes gives unexpected results.
Before we go any further, it is worth mentioning some of the testing limitations in Kotlin Multiplatform. The biggest one is the lack of any mocking library for Kotlin / Native and Kotlin / JS. This may seem like a big disadvantage, but I personally consider it an advantage. Testing in Kotlin Multiplatform was quite difficult for me: I had to create interfaces for each dependency and write their test implementations (fakes). It took a long time, but at some point I realized that spending time on abstractions is an investment that leads to cleaner code.
I also noticed that subsequent modifications to this code take less time. Why is that? Because the interaction of a class with its dependencies is not nailed (mocked). In most cases, it is sufficient to simply update their test implementations. You don't need to go deep into every test method to update your mocks. As a result, I stopped using mocking libraries even in standard Android development. I recommend reading the following article: " Mocking is not practical - Use fakes " by Pravin Sonawane .
Plan
Let's remember what we have in the Kittens module and what we should test.
- KittenStore is the main component of the module. Its KittenStoreImpl implementation contains most of the business logic. This is the first thing we are going to test.
- KittenComponent is the module facade and integration point for all internal components. We will cover this component with integration tests.
- KittenView is a public interface that represents the UI dependency of KittenComponent.
- KittenDataSource is an internal Web access interface that has platform-specific implementations for iOS and Android.
For a better understanding of the structure of the module I will give its UML diagram:

The plan is as follows:
- Testing KittenStore
- Creating a test implementation of KittenStore.Parser
- Creating a test implementation of KittenStore.Network
- Writing Unit Tests for KittenStoreImpl
- Creating a test implementation of KittenStore.Parser
- Testing the KittenComponent
- Creating a test implementation of KittenDataSource
- Build a Test KittenView Implementation
- Writing Integration Tests for KittenComponent
- Creating a test implementation of KittenDataSource
- Running tests
- conclusions
KittenStore unit testing
The KittenStore interface has its own implementation class - KittenStoreImpl. This is what we are going to test. It has two dependencies (internal interfaces), defined directly in the class itself. Let's start by writing test implementations for them.
Test implementation of KittenStore.Parser
This component is responsible for network requests. This is what its interface looks like:
Before writing a test implementation of a network interface, we need to answer one important question: what data does the server return? The answer is that the server returns a random set of image links, each time a different set. In real life, the JSON format is used, but since we have a Parser abstraction, we don't care about the format in unit tests.
The real implementation can switch threads, so subscribers can be frozen in Kotlin / Native. It would be great to model this behavior to make sure the code handles everything correctly.
So, our test implementation of Network should have the following features:
- must return a non-empty set of different rows for each request;
- the response format must be common for Network and Parser;
- should be able to simulate network errors (Maybe should complete without a response);
- it must be possible to simulate an invalid response format (to check for errors in Parser);
- it should be possible to simulate response delays (to test the boot phase);
- should be freezeable in Kotlin / Native (just in case).
The test implementation itself might look like this:
TestKittenStoreNetwork has string storage (just like a real server) and can generate strings. For each request, the current list of lines is encoded into one line. If the "images" property is zero, then Maybe will just terminate, which should be considered an error.
We also used TestScheduler . This scheduler has one important function: it freezes all incoming tasks. Thus, the observeOn operator, used in conjunction with the TestScheduler, will freeze the downstream, as well as all data passing through it, just like in real life. But at the same time, multithreading will not be involved, which simplifies testing and makes it more reliable.
In addition, TestScheduler has a special "manual processing" mode that will allow us to simulate network latency.
Test implementation of KittenStore.Parser
This component is responsible for parsing responses from the server. Here is its interface:
So, whatever is downloaded from the web should be converted to a list of links. Our Network simply concatenates strings using a semicolon (;) separator, so use the same format here.
Here's a test implementation:
As with Network, TestScheduler is used to freeze subscribers and verify their compatibility with the Kotlin / Native memory model. Response processing errors are simulated if the input string is empty.
Unit tests for KittenStoreImpl
We now have test implementations of all dependencies. It's time for unit tests. All unit tests can be found in the repository , here I will only give the initialization and a few tests themselves.
The first step is to create instances of our test implementations:
KittenStoreImpl uses mainScheduler, so the next step is to override it:
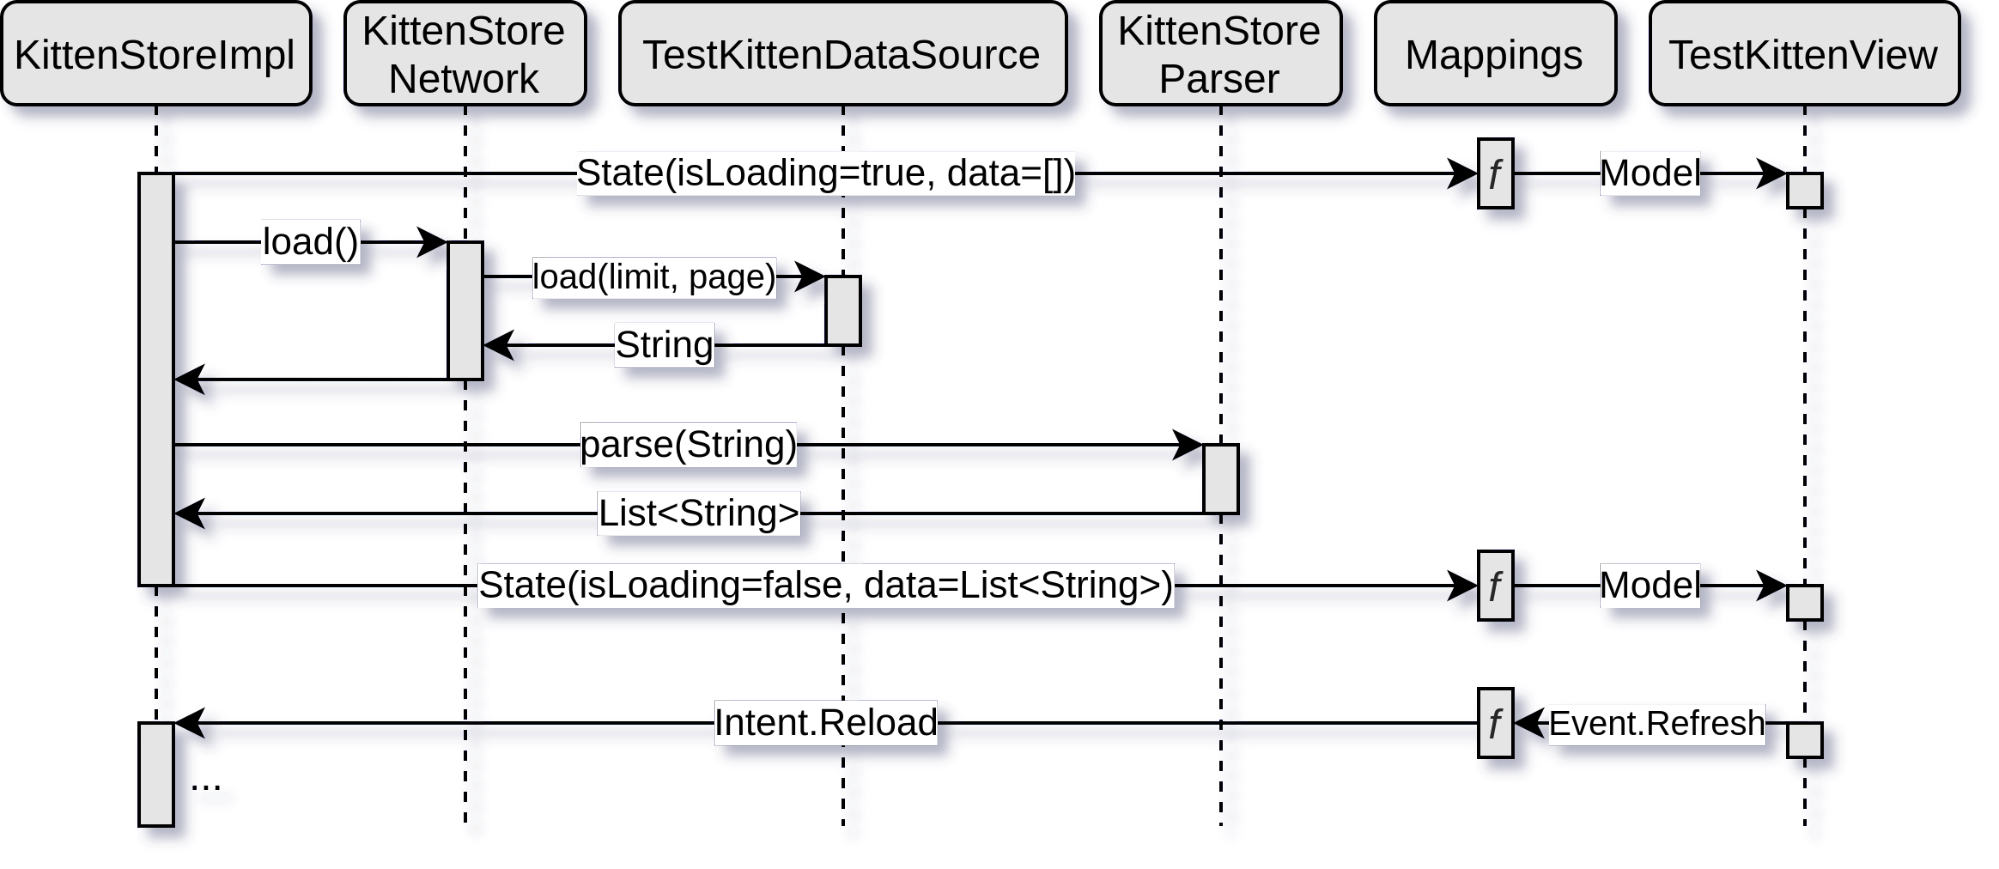
Now we can run some tests. KittenStoreImpl should load images immediately after creation. This means that a network request must be completed, its response must be processed, and the state must be updated with the new result.
What we did:
- generated images on the Network;
- created a new instance of KittenStoreImpl;
- made sure the state contains the correct list of strings.
Another scenario we need to consider is getting KittenStore.Intent.Reload. In this case, the list must be reloaded from the network.
Test steps:
- generate source images;
- create an instance of KittenStoreImpl;
- generate new images;
- send Intent.Reload;
- make sure the condition contains new images.
Finally, let's check out the following scenario: when the isLoading flag is set while images are loading.
We have enabled manual processing for TestScheduler - now tasks will not be processed automatically. This allows us to check the status while waiting for a response.
KittenComponent Integration Testing
As I mentioned above, KittenComponent is the integration point of the whole module. We can cover it with integration tests. Let's take a look at its API:
There are two dependencies, KittenDataSource and KittenView. We'll need test implementations for these before we can start testing.
For completeness, this diagram shows the data flow inside the module:
Test implementation of KittenDataSource
This component is responsible for network requests. It has separate implementations for each platform, and we need another implementation for the tests. This is what the KittenDataSource interface looks like:
TheCatAPI supports pagination, so I added the appropriate arguments right away. Otherwise, it is very similar to KittenStore.Network, which we implemented earlier. The only difference is that we have to use JSON format as we are testing real code in integration. So we're just borrowing the implementation idea:
As before, we generate different lists of strings that are encoded into a JSON array on every request. If no images are generated, or the request arguments are wrong, Maybe will just terminate without a response.
The kotlinx.serialization library is used to form a JSON array . By the way, the tested KittenStoreParser uses it for decoding.
Test implementation of KittenView
This is the last component we need a test implementation for before we can start testing. Here is its interface:
It's a view that just takes models and fires events, so its test implementation is very simple:
We just need to remember the last accepted model - this will allow us to check the correctness of the displayed model. We can also dispatch events on behalf of KittenView using the dispatch (Event) method, which is declared in the inherited AbstractMviView class.
Integration tests for KittenComponent
The complete set of tests can be found in the repository , here I will give only a few of the most interesting ones.
As before, let's start by instantiating dependencies and initializing:
There are currently two schedulers used for the module: mainScheduler and computationScheduler. We need to override them:
Now we can write some tests. Let's check the main script first to make sure the images are loaded and displayed on startup:
This test is very similar to the one we wrote when we looked at the unit tests for KittenStore. Only now is the entire module involved.
Test steps:
- generate links to images in TestKittenDataSource;
- create and run KittenComponent;
- make sure the links reach TestKittenView.
Another interesting scenario: images need to be reloaded when KittenView fires the RefreshTriggered event.
Stages:
- generate source links to images;
- create and run KittenComponent;
- generate new links;
- send Event.RefreshTriggered on behalf of KittenView;
- make sure new links reach TestKittenView.
Running tests
To run all tests, we need to perform the following Gradle task:
./gradlew :shared:kittens:buildThis will compile the module and run all tests on all supported platforms: Android and iosx64.
And here is the JaCoCo coverage report:

Conclusion
In this article, we covered the Kittens module with unit and integration tests. The proposed module design allowed us to cover the following parts:
- KittenStoreImpl - contains most of the business logic;
- KittenStoreNetwork - responsible for high-level network requests;
- KittenStoreParser - responsible for parsing network responses;
- all transformations and connections.
The last point is very important. It is possible to cover it thanks to the MVI feature. The view's sole responsibility is to display data and dispatch events. All subscriptions, conversions and links are done inside the module. Thus, we can cover everything with general tests, except for the display itself.
Such tests have the following advantages:
- do not use platform APIs;
- performed very quickly;
- reliable (do not blink);
- run on all supported platforms.
We were also able to test the code for compatibility with the complex Kotlin / Native memory model. This is also very important because of the lack of security at build time: the code just crashes at runtime with exceptions that are difficult to debug.
Hope this helps you in your projects. Thanks for reading my articles! And don't forget to follow me on Twitter .
...
Bonus exercise
If you want to work with test implementations or play with MVI, here are some hands-on exercises.
Refactoring the KittenDataSource
There are two implementations of the KittenDataSource interface in the module: one for Android and one for iOS. I already mentioned that they are responsible for network access. But they actually have another function: they generate the URL for the request based on the input arguments "limit" and "page". At the same time, we have a KittenStoreNetwork class that does nothing except delegate the call to KittenDataSource.
Assignment: Move the URL request generation logic from KittenDataSourceImpl (on Android and iOS) to KittenStoreNetwork. You need to change the KittenDataSource interface as follows:

Once you have done that, you will need to update your tests. The only class you need to touch is TestKittenDataSource.
Adding page loading
TheCatAPI supports pagination, so we can add this functionality for a better user experience. You can start by adding a new Event.EndReached event for the KittenView, after which the code will stop compiling. Then you will need to add the appropriate Intent.LoadMore, convert the new Event to Intent, and process the latter in KittenStoreImpl. You will also need to modify the KittenStoreImpl.Network interface as follows:

Finally, you will need to update some test implementations, fix one or two existing tests, and then write some new ones to cover the pagination.
