
When most people take a photo, they just need to press the shutter button on their camera or phone, and a ready-to-view image, usually in the well-known JPEG format, will almost instantly appear on the screen. However, for some cases, more control is required over the production of this very JPEG. For example, you may want to increase or decrease the activity of the noise removal function, or you may feel that the colors are not quite right.
And then RAW files come to the rescue. In this context, a raw image is a direct transfer of data received from the pixels of the photo matrix, and did not undergo additional processing... Typically, these files are in a relatively standard Bayer image format, named after Bryce Bayer, who invented the technique in 1974 while working for Kodak. The idea is to prevent the on-board image processor (ISP) from converting the raw Bayer image into viewable, but to do it yourself using a separate program, usually called a RAW converter.
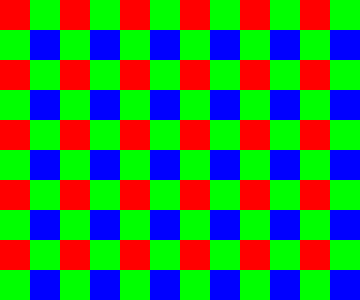
A Bayer image records only one color for each pixel as shown.
Sometimes the raw image is compared to old photographic negative technology, and although many camera manufacturers use their own format, the most common type of RAW file is the Digital Negative (or DNG ), described by Adobe in 2004. The question remains - how to get DNG files from the Raspberry Pi so that they can be processed using your favorite RAW converter.
Getting raw image from Raspberry Pi
Many readers will be familiar with the raspistill application, which receives JPEG images from a camera. Raspistill has a command -r that appends raw data to the end of the JPEG file. JPEG viewers will still display this file as usual, ignoring the many megabytes of raw data attached at the back. Such a JPEG + RAW file can be obtained using the command in the terminal:
raspistill -r -o image.jpgUnfortunately, JPEG + RAW format is just what comes out of the camera and is not supported by the RAW converter. To use it, we need to convert it to DNG format.
PyDNG
This utility converts Raspberry Pi native JPEG + RAW file to DNG. PyDNG can be downloaded from github.com/schoolpost/PyDNG, there is also a more detailed instruction there. In short, we need to follow these steps:
git clone https://github.com/schoolpost/PyDNG
cd PyDNG
pip3 install src/.  #  PyDNG  Python3
PyDNG can be used as part of larger Python scripts, or run on its own. Continuing with the raspistill example, we can enter into the input line:
python3 examples/utility.py image.jpgThe resulting DNG file can be processed with various RAW converters. Some of them are free (for example, RawTherapee or dcraw, although the latter is no longer developed or supported), and there are many well-known commercial options (Adobe Camera Raw or Lightroom).
White balance and color matrices
One of the problems with handling RAW files with the Raspberry Pi at this point is getting meaningful colors. Prior to this, images were rendered with a green bias, since no color balancing was done, and green is usually the most sensitive color channel. To make matters worse, since the RGB values in the raw image simply reflect the sensitivity of the sensor pixels to different wavelengths, they a priori do not accurately correlate with the colors that we perceive with our eyes. This is where white balance and color matrices come in handy.
We need the correct white multipliers to make the neutral parts of the scene appear neutral. We can use an educated guess from raspistill about them, contained in the JPEG + RAW file (or you can measure your own value somewhere in the image - for example, on a gray card). Then matrices and look-up tables are required to convert the colors from the camera to sRGB or Adobe RGB.
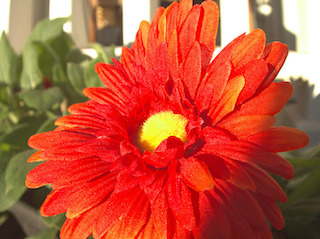
results
Previous attempts to convert RAW and the results obtained after applying the updated version of PyDNG.


DCP Files
For people familiar with DNG files, we provide links to DCP (DNG Camera Profile) files with a camera profile (in binary format). Try different files, we encourage users to experiment, create their own files and publish the results!
- The base color profile built into PyDNG, the results of which are shown above. It is relatively small and can be viewed as a JSON file .
- Enhanced larger profile with reference tables for balanced rendering of colors.
- Similar to the previous one , but with some fixes to improve skin and sky color.
However, these files have several features:
- They are calibrated for one specific Raspberry Pi High Quality Camera, not some average "typical" module.
- The light sources were the ones at our fingertips - in particular, the D65 lamp seems to be transmitted a little inaccurately.
- Calibration works only if the color temperature does not differ much from the two color sources involved in the calibration - in our case, this is the range from 2900K to 6000K.
Therefore, there is still room for improvement. However, tests on many modules have shown that these parameters are a significant step forward.
Acknowledgments
Jack Hogan for color matrix calibration with DCamProf, Zsabe Nagi for adding new features to PyDNG.
Additional materials
- There are many resources out there that describe converting a raw Bayer image to a viewable RGB or YUV image. For example, an article on Jack's blog .
- To understand the role of color matrices they play in a DNG file, refer to its specification . In particular, this is covered in Chapter 6.