We are in our first year undergraduate studies in Applied Mathematics and Informatics at the St. Petersburg HSE. While working on a semester team project in C ++, we decided to write a computer version of the Intellector with a bot - a chess game on a hexagonal board with special figures.
In this article we will talk about how the development of the game went, how to tame the hexagonal board, how to draw on the command line, and also how we made a bot that we almost cannot defeat.
There are 3 people in our team: Yura Khudyakov, Valera Golovin, Misha Savrasov. For each of us, this is the first team project, so in the process of work we not only wrote on the pros, but also learned to work in a team and use version control systems (in our case, git). There are a number of oddities in the project, in particular, bicycles - there are good ready-made solutions that could be used. However, the goal of our project was to gain experience, so we invented and implemented a lot ourselves.
What is an Intellector?
To begin with, it's worth explaining what kind of game we wrote.
The game "Intellector" has appeared recently and is still gaining popularity. The first open championship was held in St. Petersburg this year .

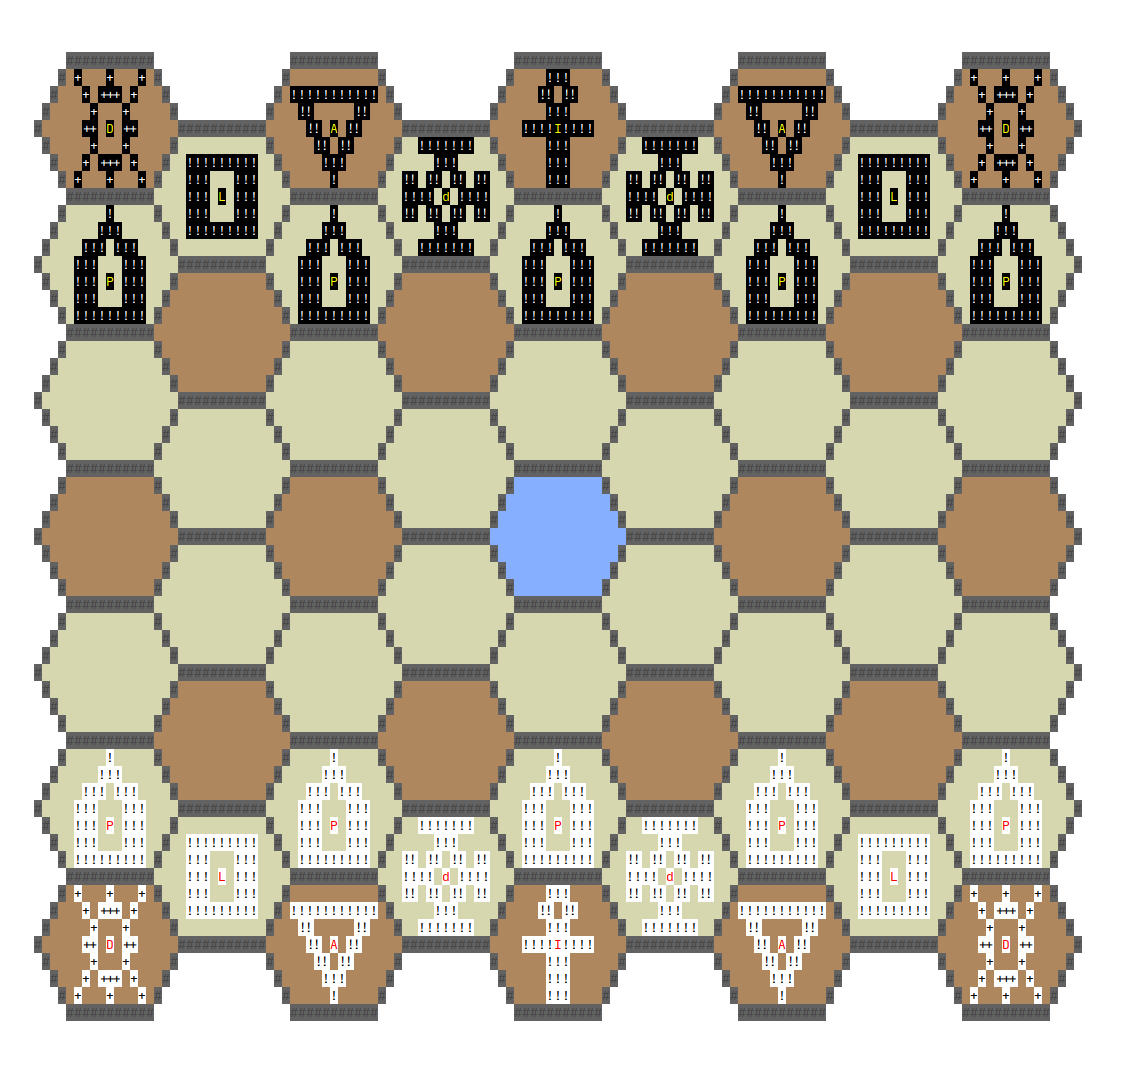
The intellector differs from chess in the structure of the field, rules and a set of pieces. However, many elements are similar: for example, there is a Progressor figure in the game, which plays the role of a Pawn. She walks only forward and can turn into another figure when she reaches the extreme row.
The king here is a figure called the Intellector. The object of the game is to cut this piece down, not checkmate it (although this is almost the same thing).
Differences in the mechanics of the game arise from the specifics of the field. The Intellect field is symmetrical, which significantly distinguishes it from chess with its kingside and queenside.
To understand this article, knowledge of the rules and the ability to play are not required.
General architecture
What do we want in our application?
In order for the game to work, you need to implement its main component: the logic of the game. It includes a board model and move rules. In addition, for convenience, it is worth keeping the history of moves and implementing undo / redo.
The board needs to be displayed and allowed the user to play. This is done by the graphic component of the game - the interface. A user-friendly interface should have menus and settings.
After all, you need an opponent to play. We decided to make a bot for these purposes so that the player can compete with the computer. In this case, the complexity of the bot should be adjustable.
Application plan:
- Game logic
- Hexagonal board model
Stored as a two-dimensional array of hexagonal cells - Rules for moving pieces
Checking the admissibility of a move, getting all available moves for a piece, for a player - Move history
Undo and redo a move
- Hexagonal board model
- Interface
Planned 2 interfaces: ncurses and Qt. Only ncurses is implemented in the project, see the Interface section for details.- Displaying a field Rendering
and updating a field in the console - Move cursor with keyboard keys, play without mouse
- Displaying text history of moves
- Displaying the main menu
- Displaying a field Rendering
- The bot
- Random bot
- Greedy bot
- Alpha-beta bot
Optimized to iterate over all moves
How is it done?
A very simplified application architecture is described by this diagram:

The Game section is responsible for all the game logic and stores the board.
When the game with the computer is turned on, the Game interacts with the bot from the Bot
Controller, takes data about the game from the Game and transfers it to the Interface for display to the players. Interface, in turn, returns the result of user interaction back to the Game through the Controller.
The intermediate link in the form of a controller comes in handy when there are several interfaces (initially we planned to make 2 interfaces: console and graphical). They all communicate with the game in a uniform way through the controller, instead of each of them doing it differently.
Technical details
Game model
Hexagonal board
Consider the Game section from the diagram above. It has to store the board and handle all the in-game logic.
For a better understanding, you can read the article from which we took this idea.
We will store the entire board in a two-dimensional array of cells, the elements of which are indexed by pairs of coordinates
(w,h)as shown in the figure below. Such a choice of coordinates seems natural, but it is inconvenient for describing the movement of figures (observe, for example, how the coordinates change when moving along the diagonal).

Coordinates of cells along the horizontal axis
wand vertical axish
For the convenience of describing the movement of figures, we will use three-dimensional coordinates. Let's choose some cell as a reference cell with coordinates
{0,0,0}(for convenience, it will coincide with the cell of the (0, 0)array).

Three-dimensional coordinates of cells relative to the central cell with coordinates The
{0,0,0}
displacement along the diagonal "from right to left, bottom up" is denoted by the coordinate
x, the displacement from bottom to top - by the coordinate yand the displacement along the diagonal "from left to right, from bottom to top" - by the coordinate z. When moving to an adjacent cell, the corresponding coordinate will change by one. Thus, each cell receives three coordinates, as in the picture above.
In this case, the cells are numbered ambiguously. For example, if from the central cell with coordinates
{0,0,0}we move left down and then up, we get the coordinates of the cell {0,1,-1}. But the same cell has coordinates {1,0,0}if you come to it directly from the central cell, as you can see in the previous figure.

Another option for specifying the coordinates of the cell
{1,0,0}.
Traversing any cell in a cycle "left-down" - "up" - "right down" brings us to the same cell, but adds a vector to its coordinates
{-1,1,-1}, the sum of whose coordinates is -1. Performing mentally such a walk in the same or in the opposite direction several times, we can change the coordinates of any cell to equivalent ones, which will differ by a vector proportional {-1,1,-1}. To get rid of ambiguity, in each equivalence class, we choose as a representative a triple of coordinates, the sum of which is equal to zero. This choice of coordinates is unique (prove it!).
Let us further describe the algorithm for converting from two-dimensional coordinates to three-dimensional coordinates and vice versa within the class
Position.
Position(int w, int h) //
        : x_{-w/2 — w % 2 - h}
        , y_{w % 2 + 2 * h}
        , z_{w / 2 — h} {
}

int posW() const { //
    return -x_ + z_;
}

int posH() const { //
    return (x_ + z_ — (x_ + z_)%2) / 2 + y_;
}
Note that the constructor produces coordinates
(x,y,z)that add up to zero. In this case, the conversion of coordinates (x,y,z)to (w,h)works correctly for any set of coordinates (the sum does not have to be zero).
How did we find all these formulas? By the scientific poke method: by analyzing the change in three-dimensional coordinates when one of the two-dimensional coordinates is shifted by
1(constructor) and in the opposite direction (methods).
Using three-dimensional coordinates, we can easily check that the cells are collinear. For example, to check that two cells lie on the same diagonal
z, you need to find a vector connecting these cells and check that its equivalence class contains a vector of the form{0, 0, z}... Z can be anything - this number gives the distance between cells. It will be very simple to implement the check of the move for correctness and find all the cells available for the move.
In a two-dimensional array that represents the board, we will store information about the position of the figures. In each cell, if there is a chess piece, we will store its type and color.
In our implementation in the board class, we only store the types of pieces in cells. We need a class that can find all possible moves for pieces on this board and check the correctness of moves.
Moves for pieces
We have made a class
FigureMoveValidatorthat has 6 descendants for each type of figure (it was possible to do without descendants if in each method we made a switch case for the type of figure). The class constructor has 2 parameters: position and board reference. Also in the class there are two methods allMovesand checkMove.
Let's consider the method
allMoves. To find all the moves, let's compose an array of vectors of possible displacements and go through it. For pieces that move one step, we need to check that we did not jump off the board and did not get into the cell where our piece is. For figures that move several cells in a straight line, add a move vector while the previous condition passes.
Now
checkMove... We remember that we know how to check if the figures are on the same straight line. If we check that there are no other pieces on this line, then we get a ready-made method for the Dominator (analogue of the rook). If the pieces lie on one straight line, then we can find the distance between them, and get methods for the Progressor (pawn), Defenser (walks like a king), Intelligence (the king, only cannot cut) and Liberator (can walk through one cell to any side). There is still an aggressor (an analogue of an elephant), who moves to cells diagonally in six directions from the current one (from cell {0, 0, 0}to {0, 1, 1}, to {0, 2, 2}, etc .: see the gray cells in the picture below). For this figure, you can try to zero one of the coordinates and check that the remaining 2 coordinates are equal in absolute value (thanks to the three-dimensional coordinates).

Possible moves for the aggressor
Now we need to figure out what to do with the moves. Let's create a Move class that will store all the necessary information for the move. We decided to store 2 positions and 4 pieces: the position from which the piece moves, the position where it will come, and information about which pieces stood in each of these cells and which ones will stand after applying the move. This will make it easy to implement the move history system and move rollback.
Interface
Architecture
The application is written in the ncurses console library (here is a tutorial for it ) . This library allows you to create pseudo graphics in the console. For example, Midnight Commander and Nano are based on it .
The choice may seem very strange: there are many other libraries, more beautiful, convenient and cross-platform. It is connected with the fact that initially we planned to make 2 interfaces: console and graphical. We did not manage to write 2 interfaces by the time the project was delivered and instead made more features in the console version. Although architecturally, the application is still designed for different interfaces.
There are 2 main entities: display and controller... The mappings show the picture to the players, and the controller mediates between the different mappings and the internal game model.
The display handles all user interaction: cursor position and movement, shape selection, highlighting of available fields, game completion, and more. Actions that affect the board refer to the controller and send / receive the necessary information to / from the model.
The display creates its own version of the board, but with additional parameters it needs, such as the position of the cursor and the color of the cells. These parameters cannot be added to the main model as different mappings need different parameters. For example, in the console interface, you need to store the position of the cursor, but not in the graphical interface, since the selection and movement of the figure is done with the mouse.
Here's what happens if a player wants to know the fields available for the move:
- The player moves the cursor to the figure field and presses the spacebar
- The field with the shape is marked as selected
- The interface refers to a method
selectCellon the controller - Method
selectCellrefers to the method ofallFigureMovesthe model allFigureMovescreatesFigureMoveValidatorthat calculates all available movesallFigureMovestransfers found moves back to the controller- The controller passes them to the interface
- The interface redraws the field, highlighting the available fields

The cursor is in the middle of the board: on a pale blue square. Before moving it to this position, the user selected a shape. The moves available to it are highlighted in green, and the selected cell itself is purple.
How is the field drawn?
The console interface is rendered in a rectangular window with lines of text. If you put symbols in the right places and color them, you get a picture:

(Evil Pacman, drawn with the letters "o")
A function
move(int y, int x)in ncurses changes the current position, and the function addch(chtype c)adds a character and shifts the current position 1 to the right ( x —> x+1).
A complex picture can be stored as a two-dimensional array and displayed line by line: when the line ends, move the current position to the beginning of the next line. The principle is very similar to a typewriter.
On the user's computer, the field in our game will be colored if the terminal supports colors and other text attributes.
Ncurses allows the developer to change the attributes of the text when it is output to the console (color, bold, blink). To do this, write in the code:
attron( *attributes* );
addch(c);
attroff( *attributes* );
Each symbol has its own color and background color. Modern consoles support a maximum of 256 colors, so you have to work with a limited set : quite sad in terms of color design.
Images for output can be stored in code (as we did initially), or they can be stored in separate files and read from them when the program starts. For this we have come up with our own file format
*.btn.
It stores a text image that the game will read and display. For example, a shape, or the inscription "White wins" / "Black wins", or a menu button. In this case, sometimes you may need transparency in order not to overwrite what was drawn earlier. To do this, you can add a hash in the first line
#and after the list of "transparent" symbols that will be ignored in the output.
For example, let's say we have 3 rectangles drawn on the screen:

Add a rectangle from the following file to the center:
#C
AAAAAAAAA
ACCCCCCCA
ACCCCCCCA
ACCCCCCCA
ACCCCCCCA
ACCCCCCCA
AAAAAAAAA
And we get the following picture:
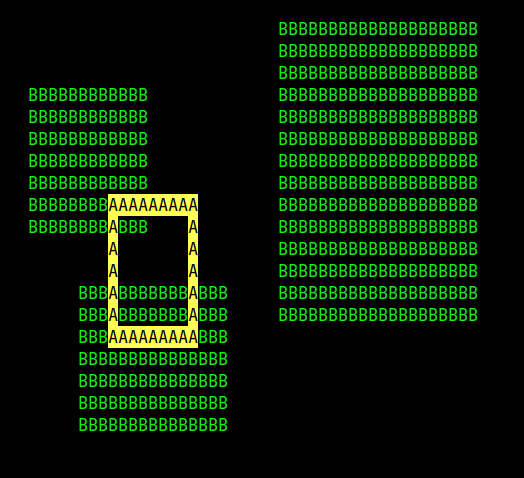
(highlighted in yellow for clarity)
This format was especially useful when developing menus.
Menu
The game also has a menu that contains settings and is drawn before the start of the game and after it ends.
Menu buttons are read from files
*.btn. These buttons should have large, beautiful text. We don't know how to draw beautifully using ASCII characters, but figlet , a utility for displaying ASCII text in different fonts, can:

The buttons frame the labels read from the file:

They are then centered and output sequentially:

In some menus, you can fail and, for example, adjust the complexity and color of the bot:

The most interesting part of designing a menu system is combining its elements into one system. This is done by a separate element of the system, which we called the multiplexer. The name is inspired by terminal multiplexers .
The multiplexer accepts the key pressed by the user and sends it to all currently displayed menus. Each menu decides for itself what to do with the key: ignore or somehow process. The result of processing the menu is returned to the multiplexer, who decides what to do next: close the menu, create a new one, change the settings, close the application ...
This approach turned out to be convenient for our needs, although in general it may not be enough: 2 different menus can react to the same key, and the user should be able to choose which menu should react. The solution would be a special keyboard shortcut that allows you to switch between different menus. For example, as in tmux . But this is overkill and was not required.
The bot
As mentioned above, our game has a bot. We tried to make it interesting for both a beginner and an experienced player.
Before describing bots, I would like to talk about some implementation details. We assigned some weight to each shape. The larger it is, the more valuable this figure is. We determine how good a position is on the board using the formula (sum of weights of white pieces) - (sum of weights of black pieces). It is beneficial for White to maximize this expression, and for Black to minimize.
A complete calculation of the entire tree of moves is too difficult a task, so we only calculated the first few moves (looking ahead, I will say that it turned out to be calculated 6 moves ahead). We considered all states on the board at a certain depth as leaves of the traversal tree.
There are three different types of bots in the game:
RandomBot— . .GreedyBot— «» , , .AlphaBetaBot— , - .
When we started experimenting with optimizations, we realized that we couldn't do without unit tests for the bot, so we created a twin brother for
AlphaBetaBot'a', whom we named OptimizedAlphaBetaBot. We tested all the ideas for optimization on OptimizedAlphaBetaBot, and unit tests helped to make sure that the two twin brothers find the same useful move. RandomBot has served us well by generating random patterns on the board. To do this, it was enough to ask RandomBotand go several dozen times for both sides.
In total
OptimizedAlphaBetaBot , 3 major optimizations were implemented (here they are presented in decreasing order of utility):
- Using rollbacks. After this optimization, it was no longer necessary to copy the board many times to make a move.
-
FigureKeeper, , .std::vector. -
std::unordered_mapZobrish hashing.
In addition to major optimizations, there were also smaller ones. For example, if, before sorting, you calculate all the values of positions on the board, taking into account a certain move, then you no longer need to sort complex objects
Move, but simply int's.
Initially, it was planned to implement several sets of evaluation functions: for example, a figure threatened by an enemy is estimated at half the cost. But it turned out that the bot plays quite "cleanly", losing few pieces, so a simple amount turned out to be more effective.
However, the bot architecture still supports the addition of new evaluation functions. To do this, you need to define only three things:
- Function if you need to calculate the cost "from scratch" for a given arrangement of figures
- Delta function, which should quickly recalculate the cost for a given move.
- The number of this set of functions for the constructor of the custom class
FunctionSet.
You can turn on the battle of bots and watch the process.
A game of 2 bots of the same difficulty (level 4 out of 6 possible). The cursor is in the center of the field for the whole game
Conclusion
We have implemented a game similar to chess, but with different rules and an unusual board. Our implementation has room to expand. Intellector itself is also developing and changing: recently there was an update of the rules, which we have not yet supported in our application. For example, now you cannot cross the center line for the first 2 turns.
In addition, there are various features that we originally planned, but did not have time to implement by the time of the project. For example, in this application I would really like to see a network game. Also, a nice cross-platform interface, for example, on Qt, would not hurt.
Perhaps all or part of this will appear in the near future. Until then, thanks for reading!
Github repository