
Cloud computing is penetrating deeper and deeper into our lives and there is probably not a single person who has not used any cloud services at least once. However, what is a cloud and how it works for the most part, few people know even at the level of ideas. 5G is already becoming a reality and telecom infrastructure is starting to move from pillar solutions to cloud solutions, as when it was moving from fully iron solutions to virtualized “pillars”.
Today we will talk about the inner world of cloud infrastructure, in particular, we will analyze the basics of the network part.
What is a cloud? The same virtualization - profile view?
More than a logical question. No - this is not virtualization, although it was not without it. Consider two definitions:
Cloud computing (hereinafter Cloud) is a model for providing user-friendly access to distributed computing resources that should be deployed and launched on demand with the lowest possible latency and minimum cost from the service provider (translation of the definition from NIST).
Virtualization- this is the ability to divide one physical entity (for example, a server) into several virtual ones, thereby increasing resource utilization (for example, you had 3 servers loaded by 25-30 percent, after virtualization you get 1 server loaded by 80-90 percent). Naturally, virtualization eats up some of the resources - you need to feed the hypervisor, however, as practice has shown, the game is worth the candle. An ideal example of virtualization is VMWare, which prepares virtual machines perfectly, or for example KVM, which I prefer, but this is already a matter of taste.
We use virtualization ourselves without realizing this, and even iron routers already use virtualization - for example, in the latest versions of JunOS, the operating system is installed as a virtual machine on top of the real-time linux distribution kit (Wind River 9). But virtualization is not the cloud, but the cloud cannot exist without virtualization.
Virtualization is one of the building blocks on which the cloud is built.
It will not work to make a cloud by simply collecting several hypervisors into one L2 domain, adding a couple of yaml playbooks for automatically registering vlans via some ansible and stuffing it with something like an orchestration system for automatically creating virtual machines. More precisely, it will turn out, but the resulting Frankenstein is not the cloud that we need, although as someone else, maybe for someone this is the ultimate dream. In addition, if you take the same Openstack - in fact, it's still Frankenstein, but oh well, let's not talk about that yet.
But I understand that from the above definition it is not entirely clear what can actually be called a cloud.
Therefore, the document from NIST (National Institute of Standards and Technology) lists 5 main characteristics that a cloud infrastructure should have:
Service provision on request. The user should be given free access to the computer resources allocated to him (such as networks, virtual disks, memory, processor cores, etc.), and these resources should be provided automatically - that is, without intervention from the service provider.
Wide service availability. Access to resources should be provided by standard mechanisms to be able to use both standard PCs and thin clients and mobile devices.
Pooling of resources.Resource pools should be able to provide resources to multiple clients at the same time, ensuring client isolation and the absence of mutual influence and contention for resources. Networks are also included in the pools, which indicates the possibility of using overlapping addressing. Pools must scale on demand. The use of pools allows you to provide the necessary level of resource resiliency and abstraction of physical and virtual resources - the recipient of the service is simply provided with the set of resources requested by him (where these resources are physically located, on how many servers and switches - the client does not care). However, one must take into account the fact that the provider must ensure transparent reservation of these resources.
Fast adaptation to various conditions.Services should be flexible - fast provision of resources, their reallocation, addition or reduction of resources at the request of the client, and the client should feel that the cloud resources are endless. For ease of understanding, for example, you do not see a warning that you have lost a part of the disk space in Apple iCloud due to the fact that the hard drive on the server is broken, and the disks are breaking. In addition, from your side, the possibilities of this service are almost endless - you need 2 TB - no problem, you paid and received. Similarly, you can give an example with Google.Drive or Yandex.Disk.
The ability to measure the provided service.Cloud systems should automatically control and optimize consumed resources, while these mechanisms should be transparent to both the user and the service provider. That is, you can always check how much resources you and your customers are consuming.
It is worth considering the fact that these requirements are mostly requirements for a public cloud, therefore, for a private cloud (that is, a cloud launched for the internal needs of a company), these requirements can be slightly adjusted. However, they still have to be executed, otherwise we will not get all the advantages of cloud computing.
Why do we need a cloud?
However, any new or existing technology, any new protocol is created for something (well, except for RIP-ng, of course). Protocol for the sake of protocol - nobody needs it (well, except for RIP-ng, of course). It is logical that the Cloud is created to provide some kind of service to the user / client. We are all familiar with at least a couple of cloud services, such as Dropbox or Google.Docs, and I believe most of them successfully use them - for example, this article was written using the Google.Docs cloud service. But the cloud services we know are only part of the capabilities of the cloud - more precisely, it is only a SaaS-type service. We can provide a cloud service in three ways: in the form of SaaS, PaaS or IaaS. What service you need depends on your desires and capabilities.
Let's consider each in order:
Software as a Service (SaaS) is a model for providing a complete service to a client, for example, a mail service like Yandex.Mail or Gmail. In such a service delivery model, you, as a client, in fact do nothing but use the services - that is, you do not need to think about setting up a service, its fault tolerance or reservation. The main thing is not to compromise your password, the provider of this service will do the rest for you. From the point of view of the service provider, he is fully responsible for the entire service - from server hardware and host operating systems to database and software settings.
Platform as a Service (PaaS)- when using this model, the service provider provides the client with a template for the service, for example, let's take a Web server. The service provider provided the client with a virtual server (in fact, a set of resources, such as RAM / CPU / Storage / Nets, etc.), and even installed the OS and the necessary software on this server, however, the client himself configures all this stuff and for the service's performance already the client answers. The service provider, as in the previous case, is responsible for the operability of physical equipment, hypervisors, the virtual machine itself, its network availability, etc., but the service itself is already outside its area of responsibility.
Infrastructure as a Service (IaaS)- this approach is already more interesting, in fact, the service provider provides the client with a complete virtualized infrastructure - that is, some set (pool) of resources, such as CPU Cores, RAM, Networks, etc. Everything else is up to the client - what the client wants to do with these resources within the allocated pool (quota) - the supplier is not particularly important. The client wants to create his own vEPC or even make a mini operator and provide communication services - no question - do it. In such a scenario, the service provider is responsible for the provision of resources, their fault tolerance and availability, as well as for the OS that allows you to combine these resources into pools and provide them to the client with the ability to increase or decrease resources at any time at the request of the client. The client configures all virtual machines and other tinsel himself through the self-service portal and consoles,including the registration of networks (except for external networks).
What is OpenStack?
In all three options, the service provider needs an OS that will enable the cloud infrastructure. In fact, in SaaS, not one department is responsible for the entire stack of this technology stack - there is a department that is responsible for the infrastructure - that is, it provides IaaS to another department, this department provides the SaaS client. OpenStack is one of the cloud operating systems that allows you to collect a bunch of switches, servers and storage systems into a single resource pool, divide this common pool into subpools (tenants) and provide these resources to clients over the network.
OpenstackIs a cloud operating system that allows you to control large pools of computing resources, data storage and network resources, provisioning and management of which is performed through an API using standard authentication mechanisms.
In other words, this is a set of free software projects that are designed to create cloud services (both public and private) - that is, a set of tools that allow you to combine server and switching equipment into a single pool of resources, manage these resources, providing the necessary level of fault tolerance ...
At the time of this writing, the OpenStack structure looks like this:

Picture taken from openstack.org
Each of the components that are part of OpenStack performs a specific function. This distributed architecture allows you to include in the solution the set of functional components that you need. However, some of the components are root components and their removal will lead to complete or partial inoperability of the solution as a whole. It is customary to refer to such components:
- Dashboard - web-based GUI for managing OpenStack services
- Keystone is a centralized identity service that provides authentication and authorization functionality for other services, as well as manage user credentials and roles.
- Neutron — , OpenStack ( VM )
- Cinder —
- Nova —
- Glance —
- Swift —
- Ceilometer — ,
- Heat —
A complete list of all projects and their purpose can be found here .
Each of the OpenStack components is a service responsible for a specific function and provides an API for managing that function and interacting that service with other cloud operating system services to create a unified infrastructure. For example, Nova provides compute resource management and APIs for accessing the configuration of these resources, Glance provides image management and APIs for managing them, Cinder provides block storage and APIs for managing them, and so on. All functions are interconnected in a very close way.
However, if you judge, then all services running in OpenStack are ultimately some kind of virtual machine (or container) connected to the network. The question arises - why do we need so many elements?
Let's go over the algorithm for creating a virtual machine and connecting it to the network and persistent storage in Openstack.
- When you create a request to create a machine, whether it is a request through Horizon (Dashboard) or a request through the CLI, the first thing that happens is your request authorization for Keystone - can you create a machine, has or the right to use this network, do you have enough draft quotas, etc.
- Keystone authenticates your request and generates an auth token in the response message, which will be used later. After receiving a response from Keystone, the request is sent towards Nova (nova api).
- Nova-api , Keystone, auth-
- Keystone auth- .
- Nova-api nova-database VM nova-scheduler.
- Nova-scheduler ( ), VM , . VM nova-database.
- nova-scheduler nova-compute . Nova-compute nova-conductor (nova-conductor nova, nova-database nova-compute, nova-database ).
- Nova-conductor nova-database nova-compute.
- nova-compute glance ID . Glace Keystone .
- Nova-compute neutron . glance, neutron Keystone, database ( ), nova-compute.
- Nova-compute cinder volume. glance, cider Keystone, volume .
- Nova-compute libvirt .
In fact, a seemingly simple operation to create a simple virtual machine turns into such a whirlpool of api calls between elements of the cloud platform. Moreover, as you can see, even the previously designated services also consist of smaller components, between which interaction takes place. Creating a machine is only a small part of what the cloud platform gives you - there is a service responsible for balancing traffic, a service responsible for block storage, a service responsible for DNS, a service responsible for provisioning bare metal servers, etc. The cloud allows you treat your virtual machines like a herd of sheep (as opposed to virtualization). If something happened to your machine in a virtual environment - you restore it from backups, etc., cloud applications are built in this way,so that the virtual machine does not play such an important role - the virtual machine "died" - it does not matter - a new machine is simply created based on the template and, as they say, the squad did not notice the loss of a soldier. Naturally, this provides for the presence of orchestration mechanisms - using Heat templates, you can easily deploy a complex function consisting of dozens of networks and virtual machines without any problems.
It is always worth keeping in mind that there is no cloud infrastructure without a network - each element in one way or another interacts with other elements through the network. In addition, the cloud has a completely non-static network. Naturally, the underlay network is even more or less static - new nodes and switches are not added every day, however, the overlay component can and will inevitably change constantly - new networks will be added or removed, new virtual machines appear and old ones die. And as you remember from the definition of the cloud, given at the very beginning of the article, resources should be allocated to the user automatically and with the least (or better without) intervention from the service provider. That is, the type of provision of network resources,which is now in the form of a frontend in the form of your personal account accessible via http / https and the network engineer on duty Vasily as a backend - this is not a cloud, even if Vasily has eight hands.
Neutron, being a network service, provides an API for managing the network portion of the cloud infrastructure. The service provides the health and management of the Openstack network portion by providing an abstraction layer called Network-as-a-Service (NaaS). That is, the network is the same virtual measurable unit as, for example, CPU virtual cores or RAM.
But before moving on to the OpenStack networking architecture, let's take a look at how OpenStack networking works and why the network is an important and integral part of the cloud.
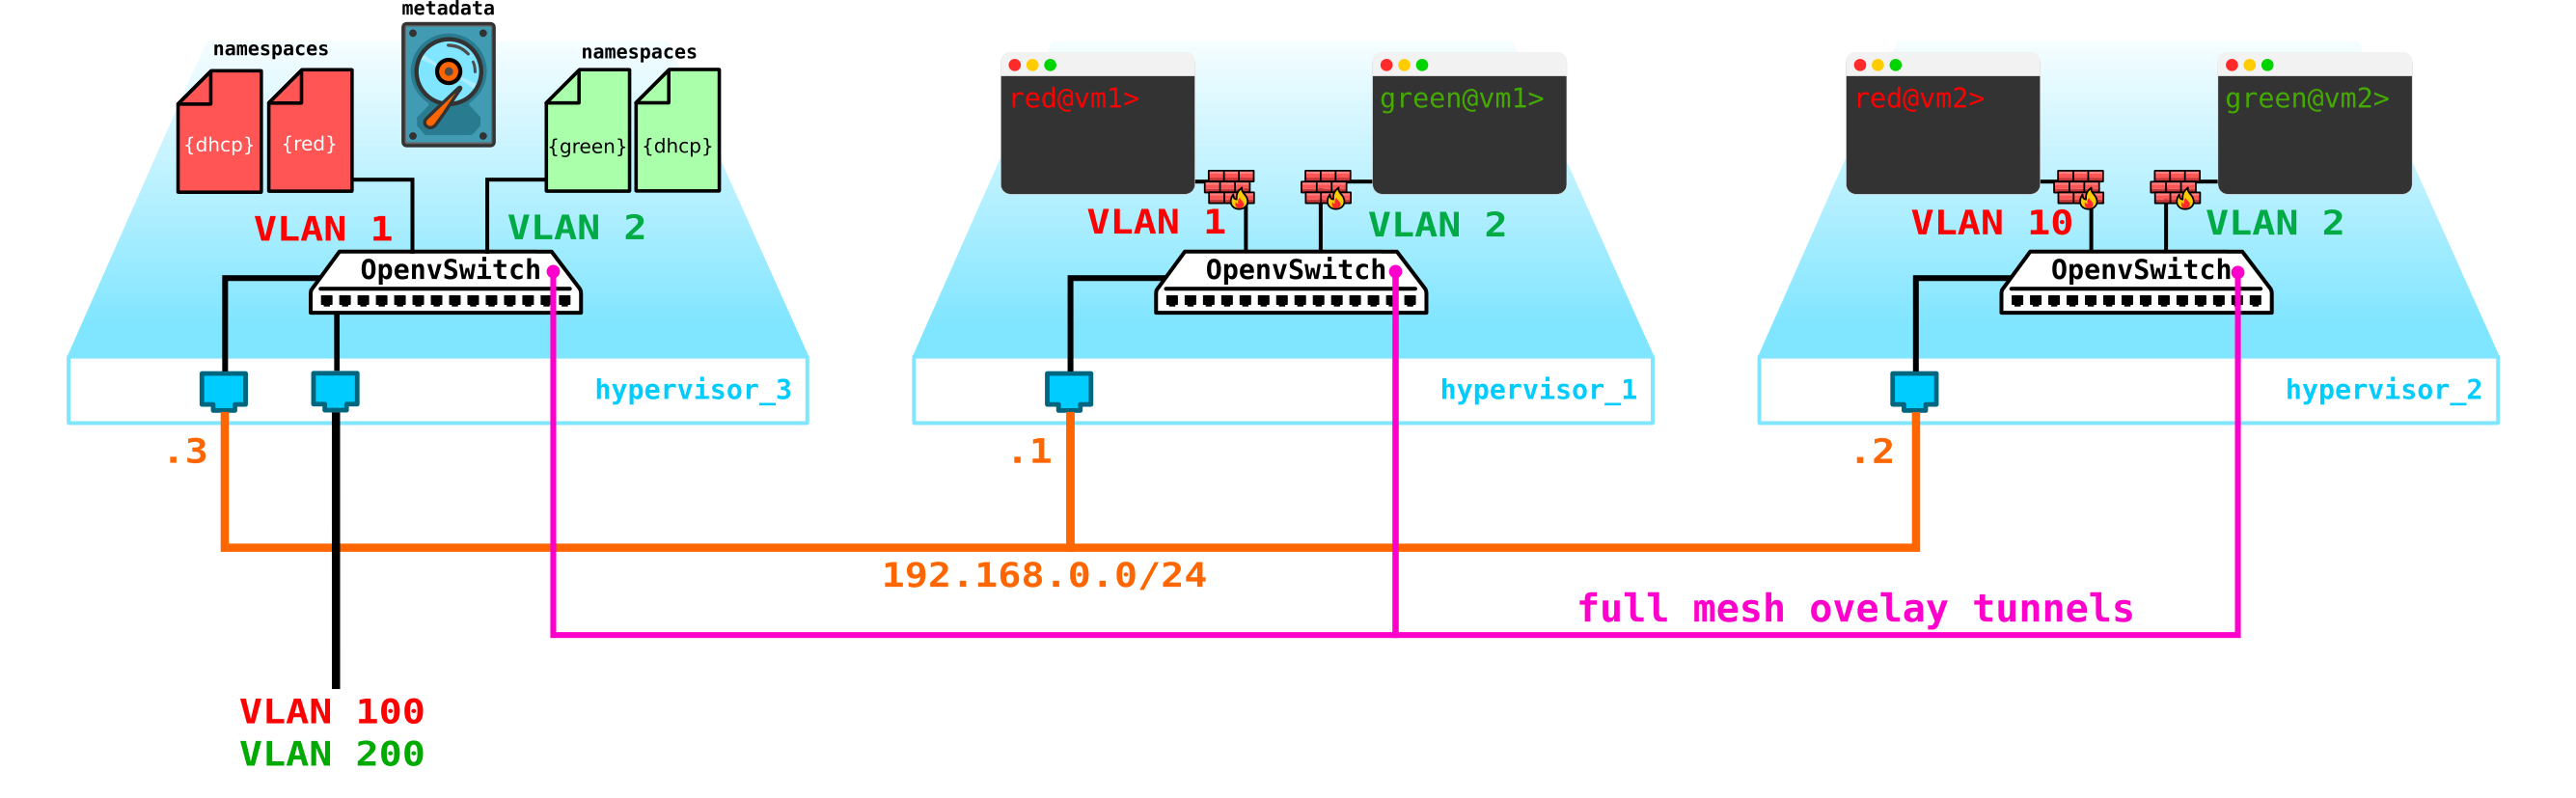
So, we have two RED client virtual machines and two GREEN client virtual machines. Suppose these machines are located on two hypervisors like this:
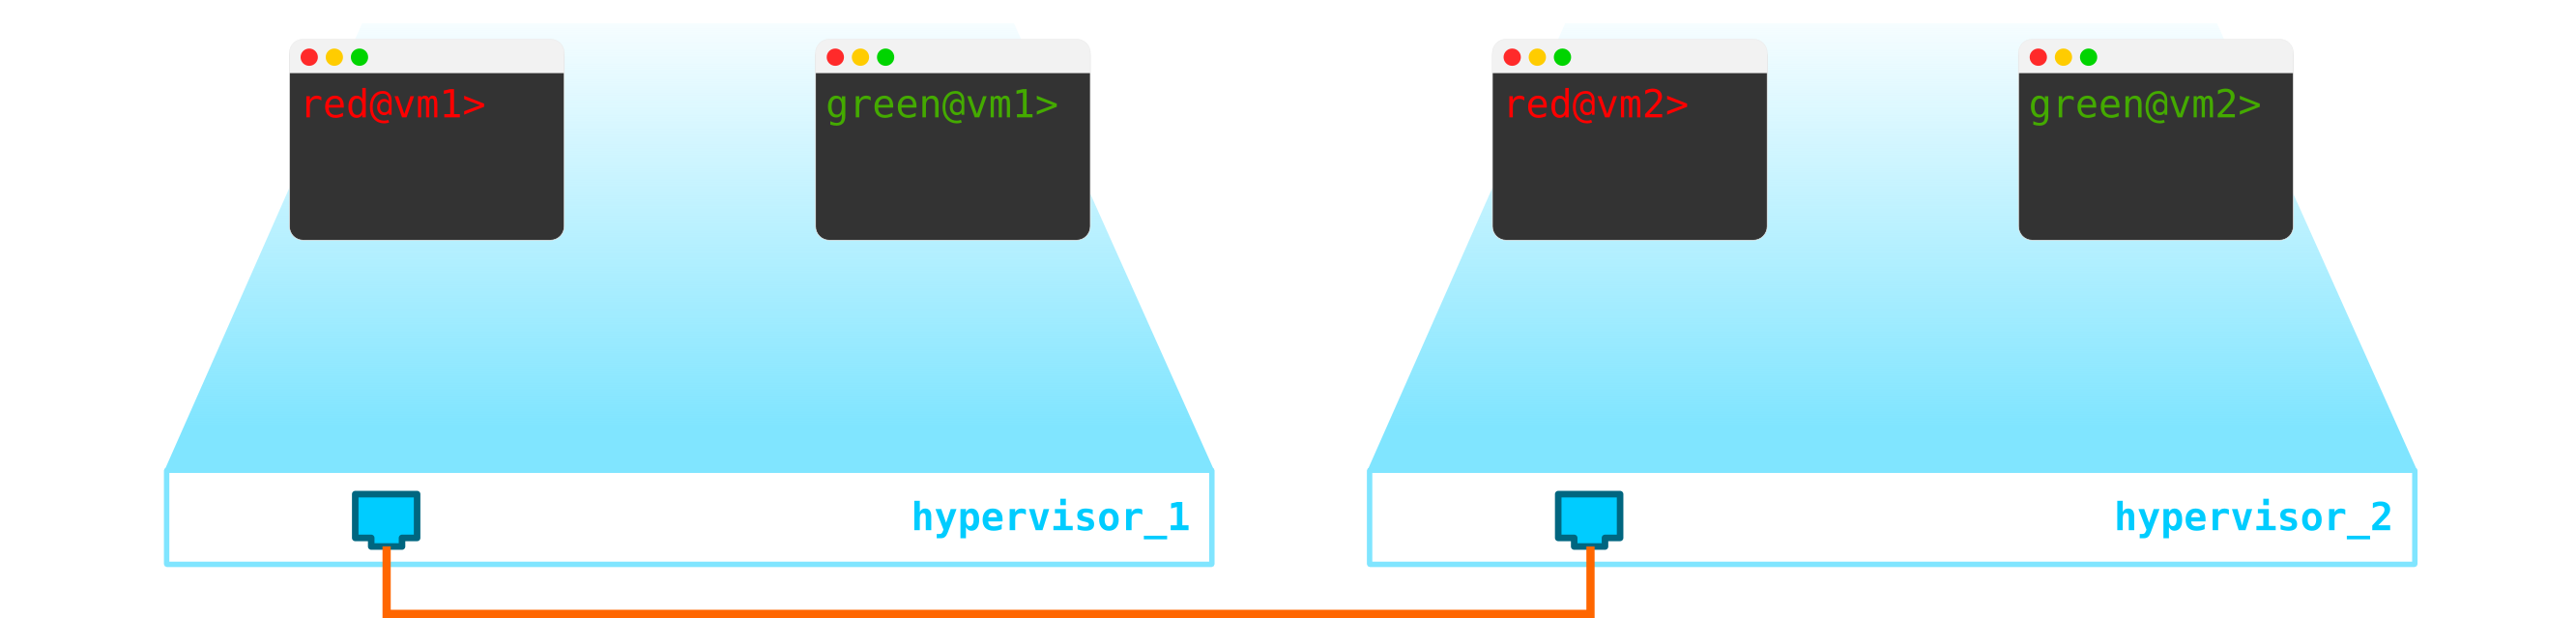
At the moment, this is just virtualization of 4 servers and nothing more, since so far all we have done is virtualized 4 servers, placing them on two physical servers. And so far they are not even connected to the network.
To get a cloud, we need to add several components. First, we virtualize the network part - we need to connect these 4 machines in pairs, and the clients want exactly the L2 connection. You can use the switch and set up a trunk in its direction and manage everything using the linux bridge, or for more advanced openvswitch users (we will return to it later). But there can be a lot of networks, and constantly pushing L2 through a switch is not the best idea - so different divisions, service desk, months of waiting for the execution of an application, weeks of troubleshooting - this approach no longer works in the modern world. And the sooner the company realizes this, the easier it is to move forward. Therefore, between the hypervisors, we will select an L3 network through which our virtual machines will communicate, and already on top of this L3 network we will build virtual superimposed L2 (overlay) networks,where the traffic of our virtual machines will run. GRE, Geneve, or VxLAN can be used as encapsulation. Let's dwell on the latter for now, although it's not particularly important.
We need to locate VTEP somewhere (I hope everyone is familiar with VxLAN terminology). Since the L3 network comes out of the servers at once, nothing prevents us from placing VTEP on the servers themselves, and OVS (OpenvSwitch) can do this perfectly. As a result, we got the following construction:
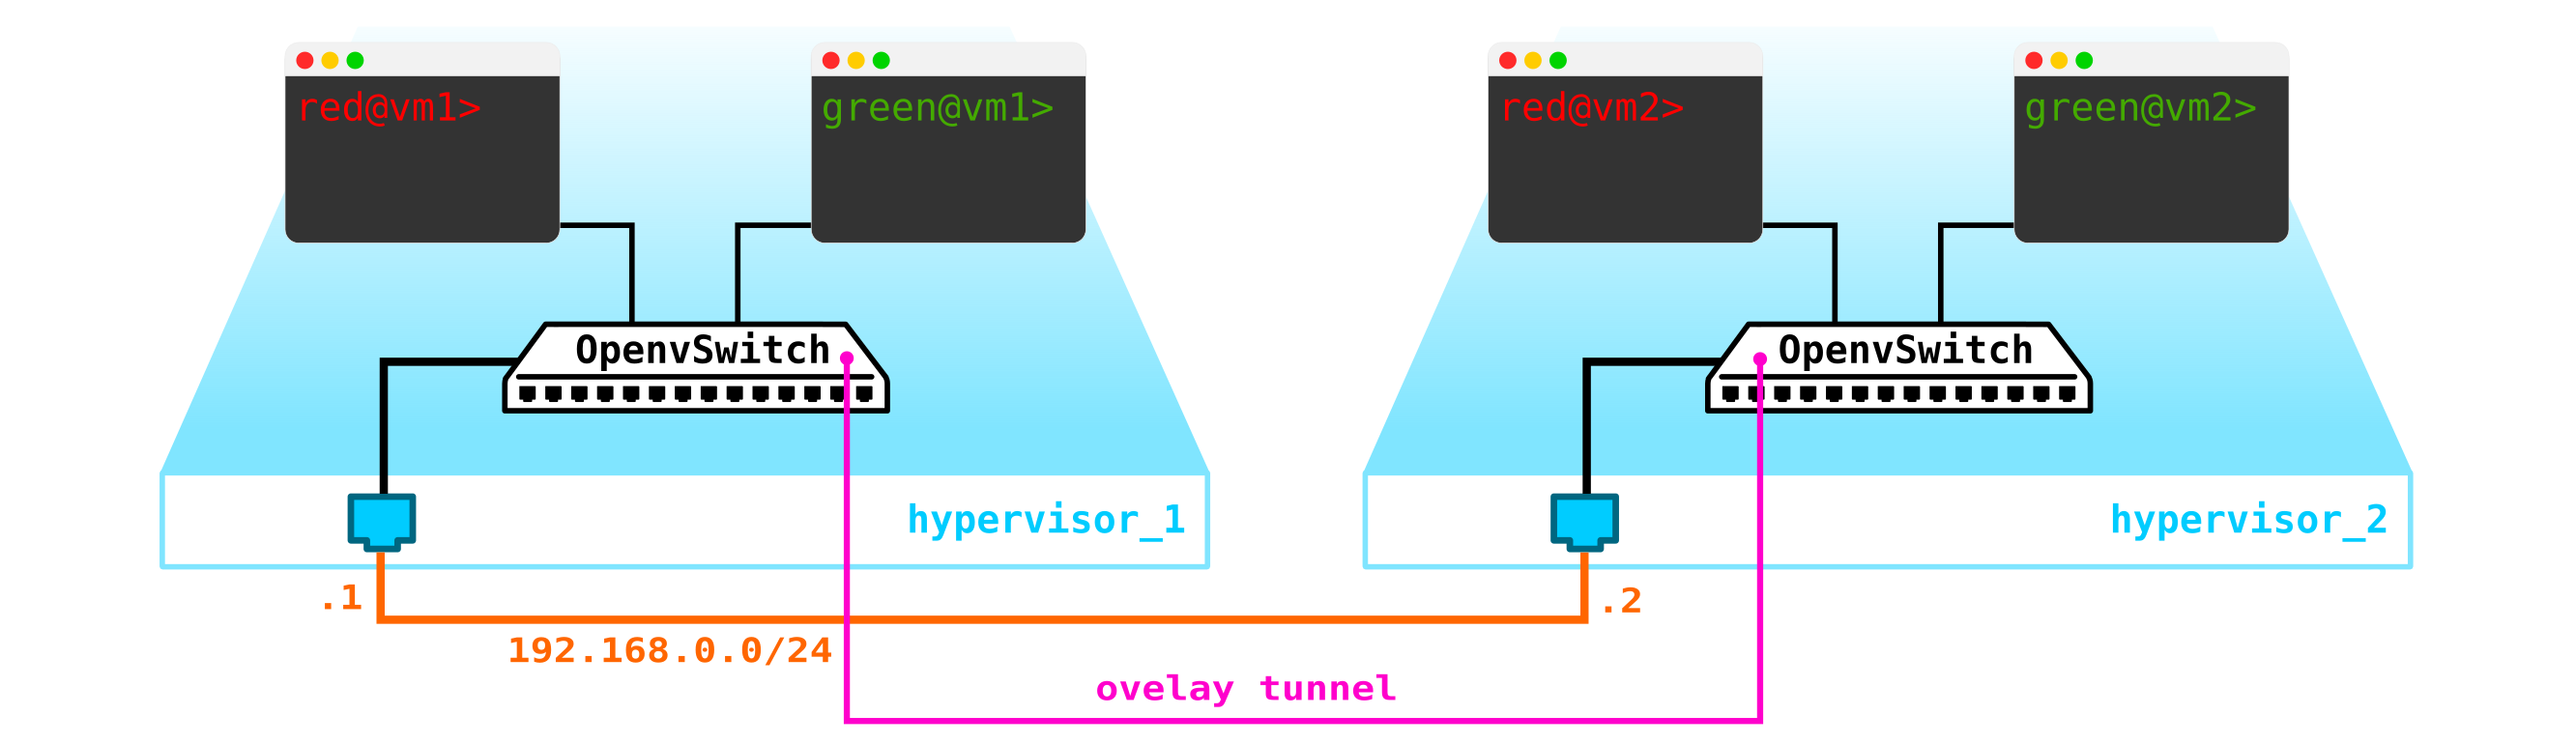
Since the traffic between VMs must be divided, the ports towards the virtual machines will have different vlan numbers. The tag number plays a role only within one virtual switch, since when encapsulating in VxLAN we can remove it without any problems, since we will have a VNI.

Now we can procreate our machines and virtual networks for them without any problems.
However, what if the client has another machine, but is on a different network? We need rooting between networks. We will analyze a simple option when centralized rooting is used - that is, traffic is routed through special dedicated network nodes (well, as a rule, they are combined with control nodes, so we will have the same thing).
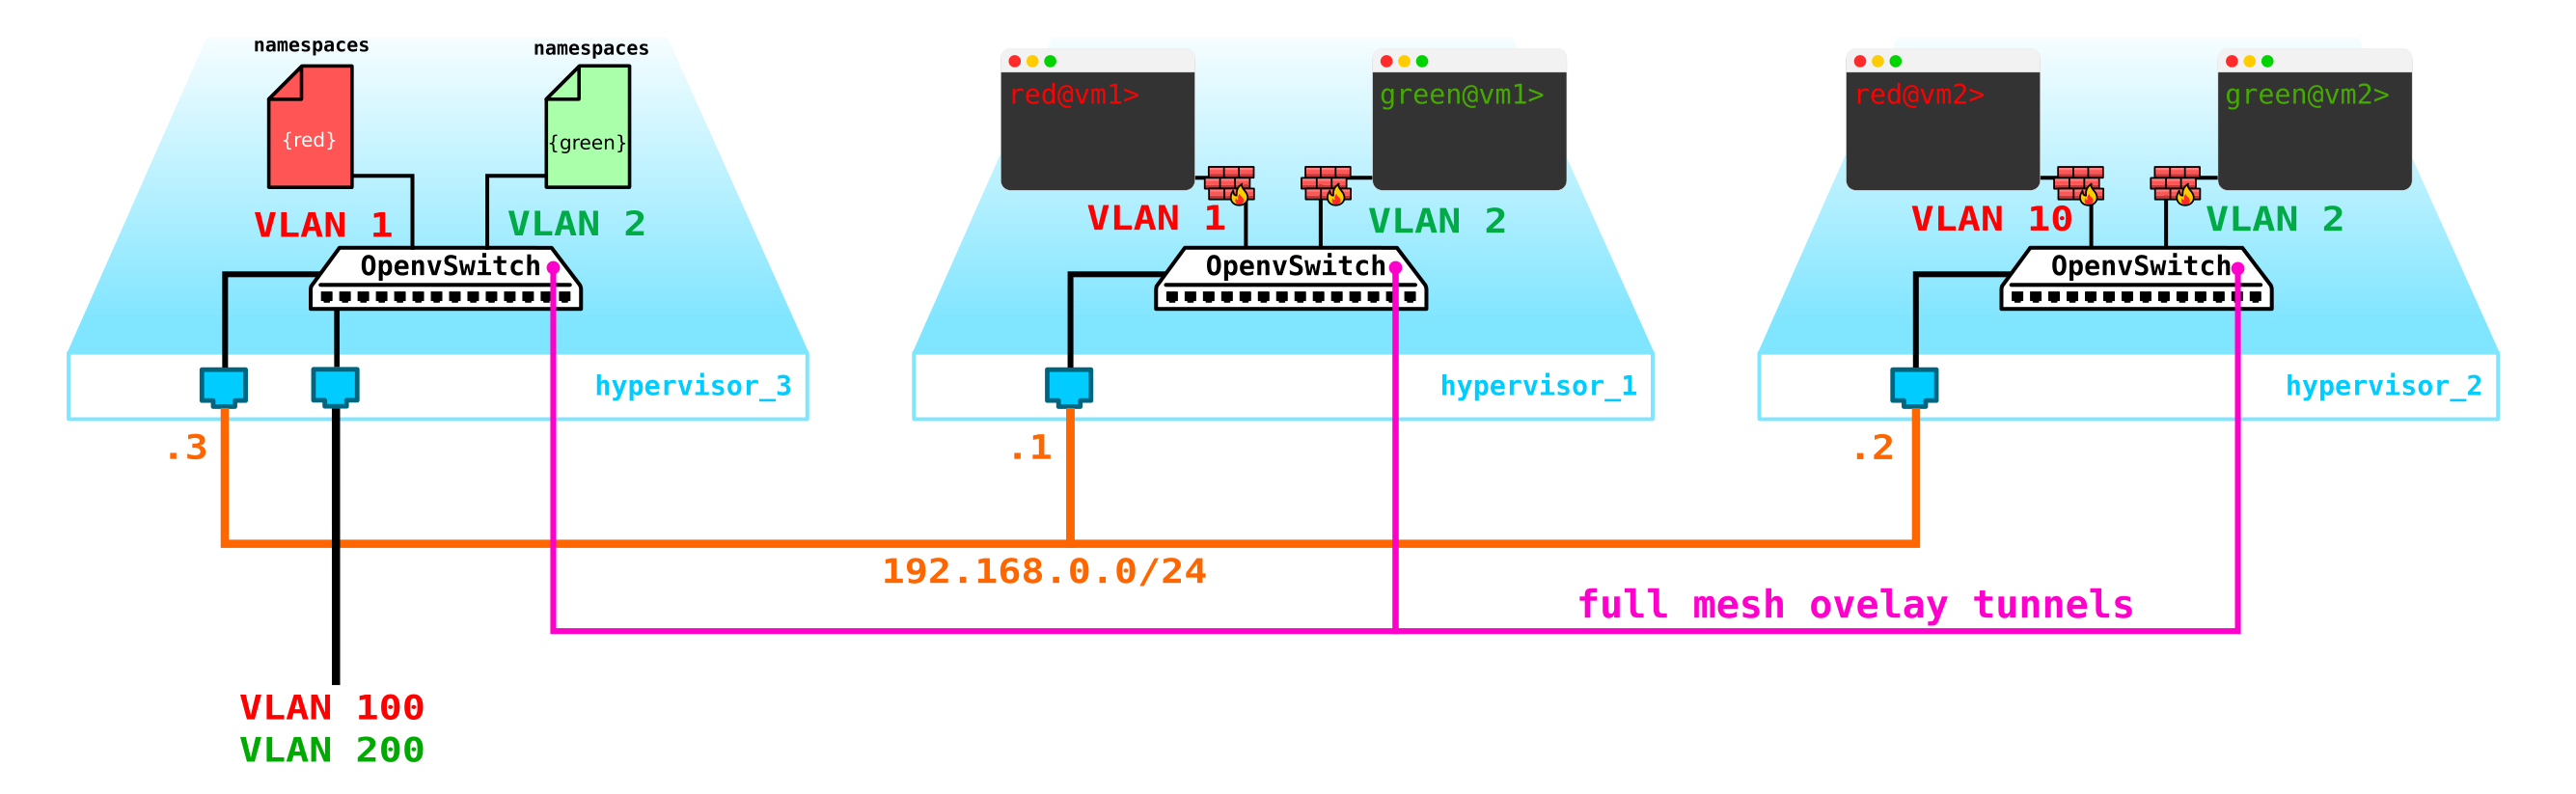
It seems to be nothing complicated - we make a bridge interface on the control node, drive traffic to it and from there route it to where we need it. But the problem is that the RED client wants to use the 10.0.0.0/24 network and the GREEN client wants to use the 10.0.0.0/24 network. That is, the intersection of address spaces begins. In addition, clients do not want other clients to be routed to their internal networks, which is logical. To separate the networks and traffic of customer data, we will allocate a separate namespace for each of them. Namespace is, in fact, a copy of the Linux network stack, that is, clients in namespace RED are completely isolated from clients from namespace GREEN (well, either routing between these client networks is allowed through the default namespace or already on the upstream transport equipment).
That is, we get the following scheme:

L2 tunnels converge from all compute nodes to the control one. the node where the L3 interface for these networks is located, each in a dedicated namespace for isolation.
However, we have forgotten the most important thing. The virtual machine must provide a service to the client, that is, it must have at least one external interface through which it can be reached. That is, we need to go out into the outside world. There are different options here. Let's make the simplest option. Let's add clients on one network, which will be valid in the provider's network and will not intersect with other networks. The networks can also be intersecting and look at different VRFs on the side of the provider network. These networks will also live in the namespace of each client. However, they will still enter the outside world through one physical (or bond, which is more logical) interface. To separate client traffic, traffic going outside will be tagged with a VLAN tag assigned to the client.
As a result, we got the following scheme:

A reasonable question - why not make gateways on the compute nodes themselves? This is not a big problem, moreover, when you turn on the Distributed Router (DVR), it will work like that. In this scenario, we consider the simplest option with a centralized gateway, which is the default in Openstack. For high-load functions, they will use both a distributed router and acceleration technologies such as SR-IOV and Passthrough, but as they say, this is a completely different story. First, let's deal with the basic part, and then let's go into details.
Actually, our scheme is already operational, but there are a couple of nuances:
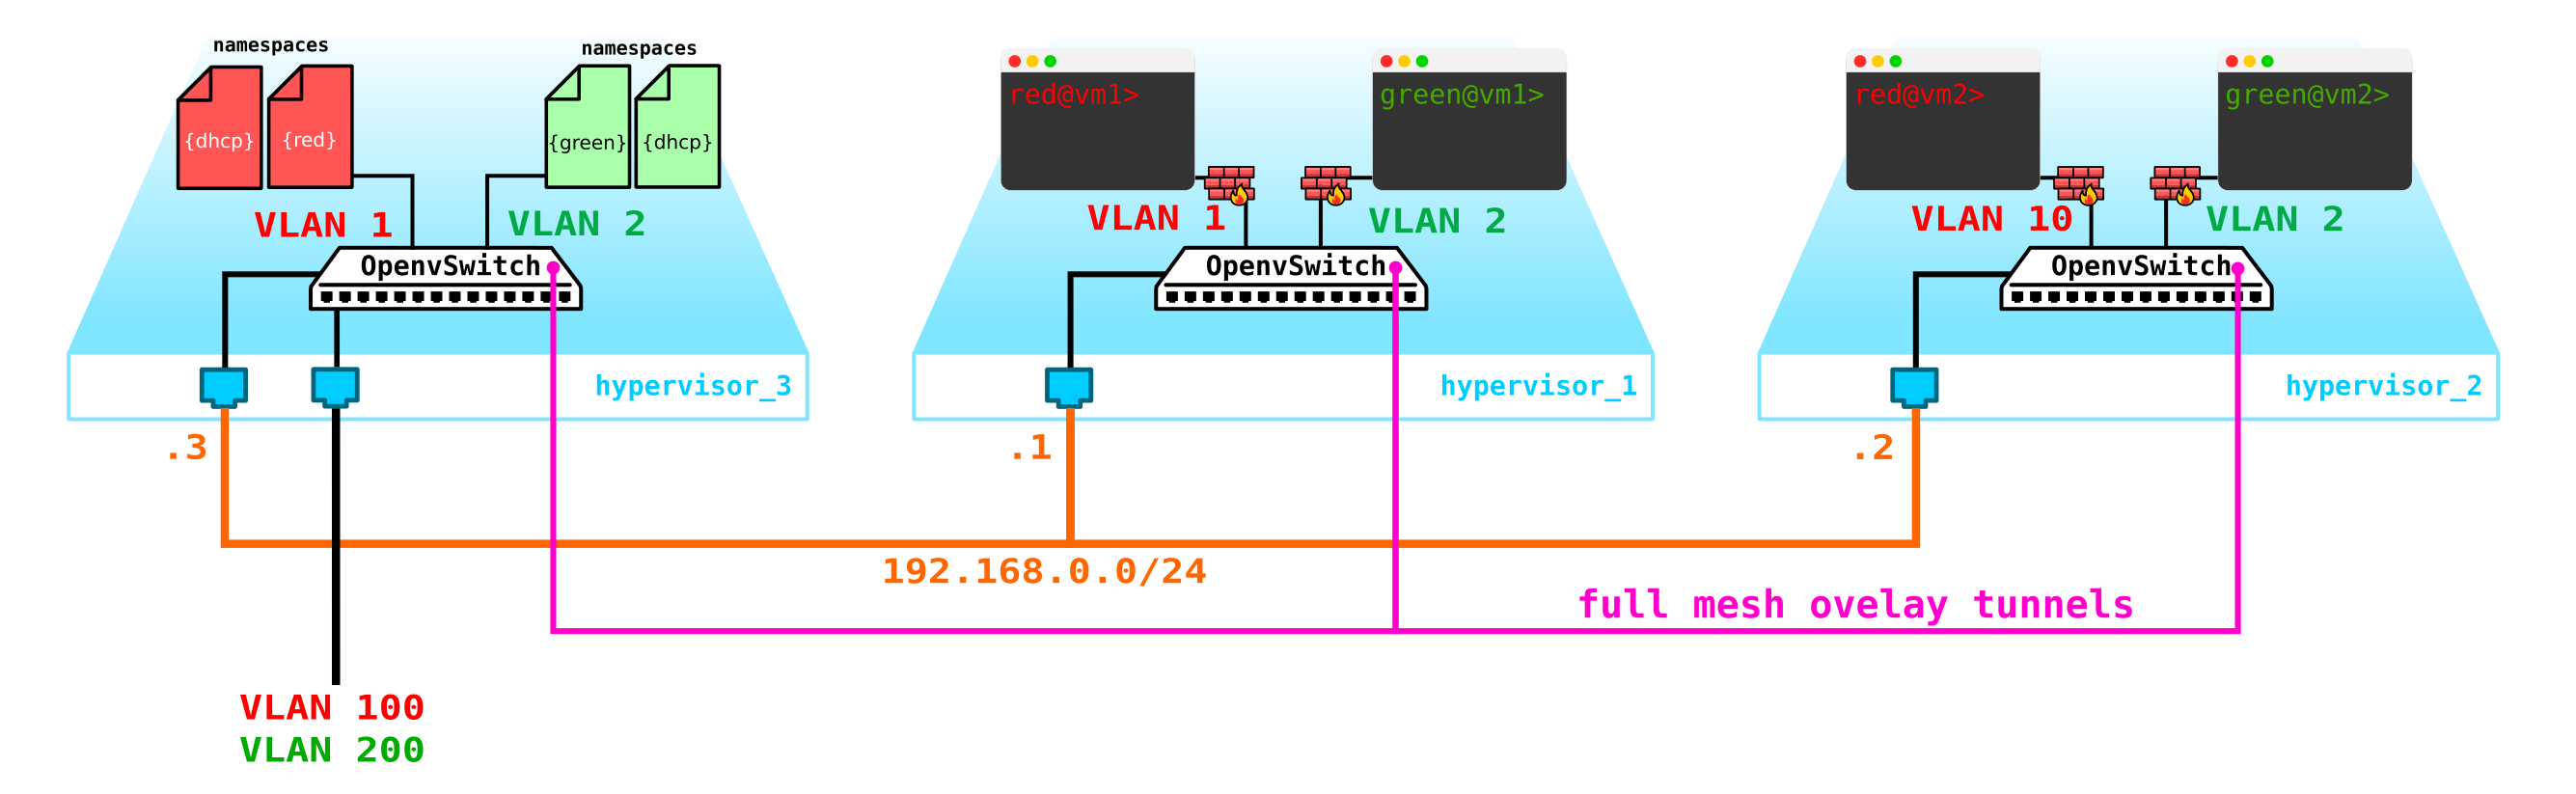
- We need to somehow protect our machines, that is, hang a filter on the switch interface towards the client.
- Make it possible for a virtual machine to automatically obtain an ip address so that you do not have to enter it through the console every time and register the address.
Let's start with protecting the machines. For this, you can use banal iptables, why not.
That is, now our topology has become a little more complicated:
Let's go further. We need to add a DHCP server. The most ideal place for the location of DHCP servers for each of the clients will be the control node already mentioned above, where the namespaces are located:
However, there is a small problem. What if everything reboots and all DHCP address lease information disappears. It is logical that new addresses will be issued to machines, which is not very convenient. There are two ways out - either use domain names and add a DNS server for each client, then the address will not be very important to us (by analogy with the network part in k8s) - but there is a problem with external networks, since addresses can also be issued in them via DHCP - you need to synchronize with DNS servers in the cloud platform and an external DNS server, which, in my opinion, is not very flexible, but quite possible. Or the second option is to use metadata - that is, save information about the address issued to the machine so that the DHCP server knows which address to issue to the machine if the machine has already received an address. The second option is simpler and more flexible, as it allows you to save additional information about the car.Now add the agent metadata to the schema:
Another issue that should also be sanctified is the ability to use one external network for all clients, since external networks, if they are to be valid in the entire network, there will be complexity - you need to constantly allocate and control the allocation of these networks. The ability to use a single external pre-configured network for all clients will be very useful when creating a public cloud. This will make it easier to deploy machines, since we don't have to check the address database and choose a unique address space for each client's external network. In addition, we can register an external network in advance and at the time of deployment we will only need to associate external addresses with client machines.
And here NAT comes to the rescue - we just make it possible for clients to go to the outside world through the default namespace using NAT translation. Well, here's a little problem. It is good if the client server acts as a client, not a server - that is, it initiates rather than accepts connections. But with us it will be the other way around. In this case, we need to do destination NAT so that when receiving traffic, the control node understands that this traffic is intended for virtual machine A of client A, which means that we need to make NAT translation from an external address, for example 100.1.1.1 to an internal address 10.0.0.1. In this case, although all clients will use the same network, the internal isolation is completely preserved. That is, we need to make dNAT and sNAT on the control node.Use a single network with the allocation of floating addresses or external networks, or both at once - due to the fact that you want to drag into the cloud. We will not add floating addresses to the diagram, but we will leave the external networks already added earlier - each client has its own external network (in the diagram, they are designated as vlan 100 and 200 on the external interface).
As a result, we got an interesting and at the same time well thought-out solution, which has a certain flexibility, but so far does not have fault tolerance mechanisms.
Firstly, we have only one control node - its failure will lead to the collapse of all systems. To fix this problem, you need to make at least a quorum of 3 nodes. Let's add this to the diagram:
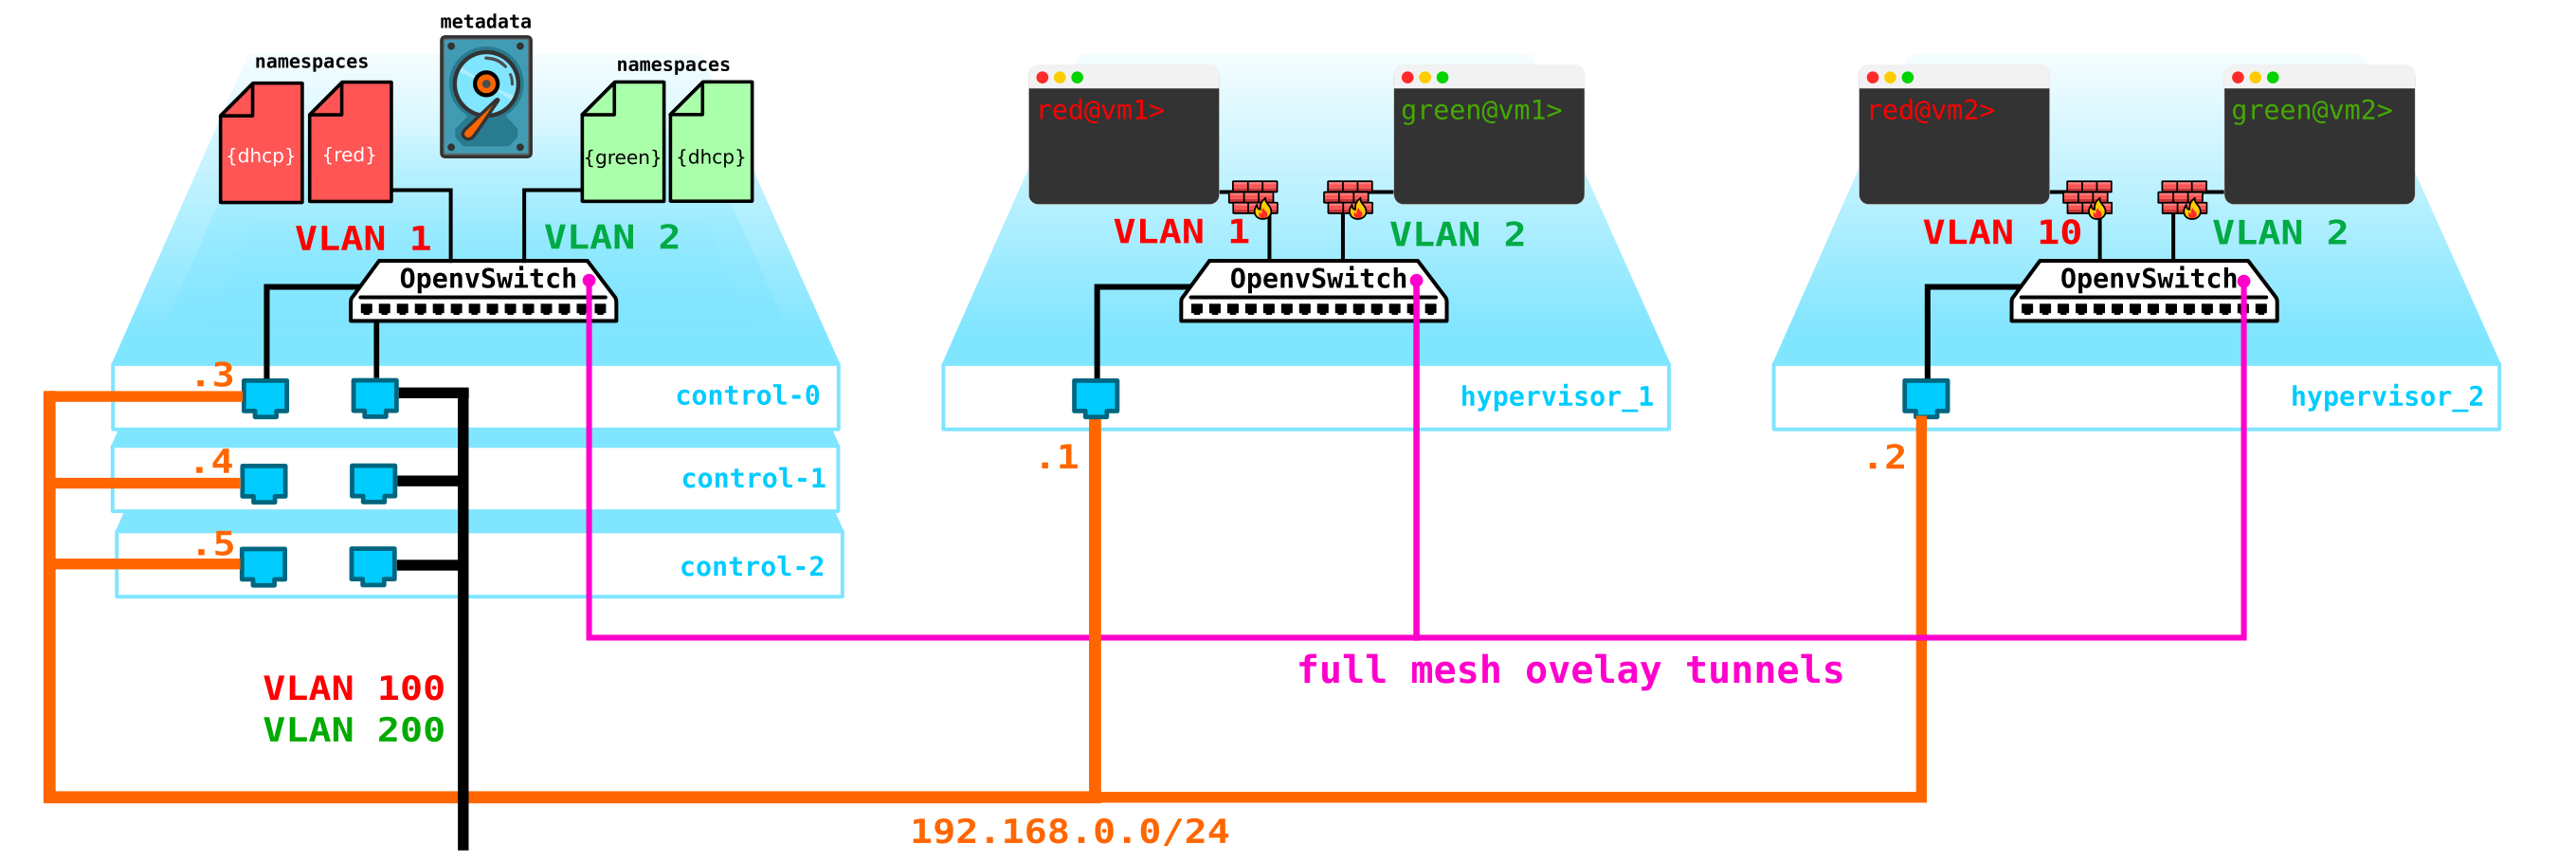
Naturally, all nodes are synchronized and when the active node exits, another node will take over its responsibilities.
The next problem is virtual machine disks. At the moment, they are stored on the hypervisors themselves, and in case of problems with the hypervisor, we lose all data - and the presence of a raid will not help here in any way if we lose not the disk, but the entire server. To do this, we need to make a service that will act as a frontend for some storage. What kind of storage it will be is not particularly important to us, but it should protect our data from failure of both the disk and the node, and possibly the whole cabinet. There are several options here - there are, of course, SAN networks with Fiber Channel, but let's be honest - FC is already a relic of the past - an analogue of E1 in transport - yes, I agree, it is still used, but only where it is absolutely impossible without it. Therefore, I would not voluntarily deploy the FC network in 2020, knowing that there are other more interesting alternatives.Although to each his own and perhaps there will be those who believe that FC with all its limitations is all we need - I will not argue, everyone has their own opinion. However, the most interesting solution in my opinion is using SDS, for example Ceph.
Ceph allows you to build vyskodostupnoe storage solution with a bunch of options for redundancy, since the code parity (analog raid 5 or 6) ending with a full replication of data over multiple disks based disk location servers, and servers in cabinets and so on.
For Ceph assembly needs 3 more nodes. Interaction with the storage will also be carried out via the network using the services of block, object and file storage. Add storage to the schema:
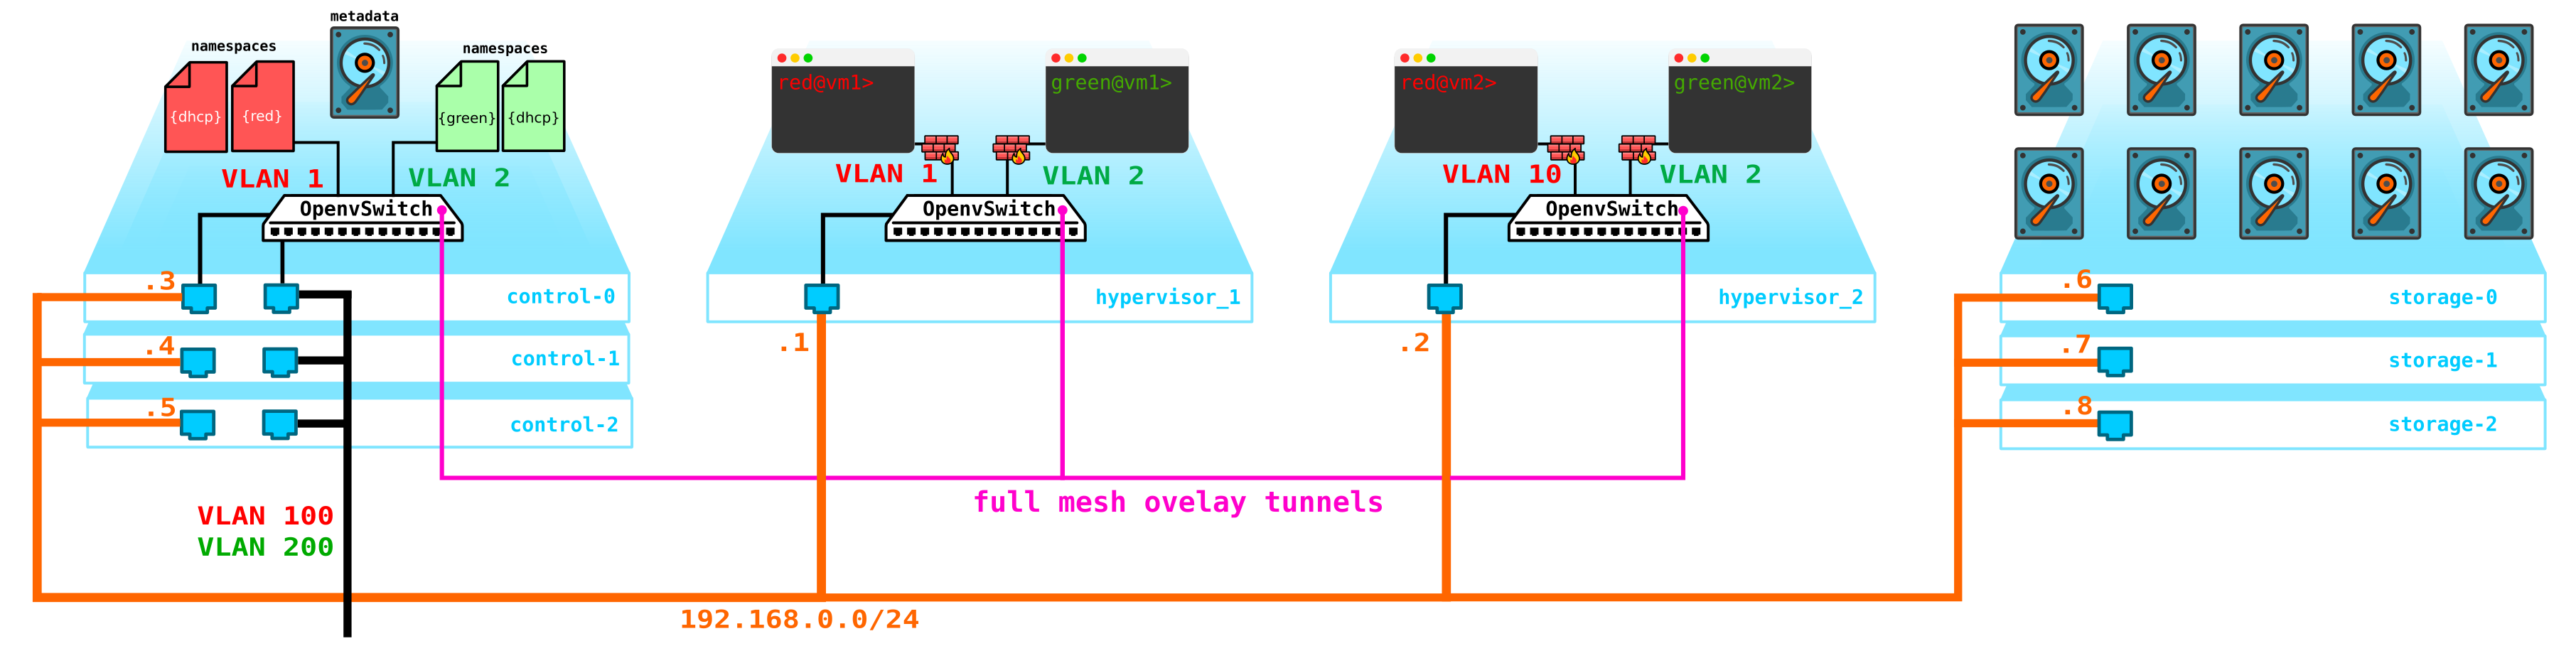
: compute — — storage+compute — ceph storage. — SDS . — — storage ( ) — CPU SDS ( , , ). compute storage.All this stuff needs to be managed somehow - we need something through which we can create a machine, network, virtual router, etc. To do this, add a service to the control node that will act as a dashboard - the client will be able to connect to this portal via http / https and do whatever it needs to (well, almost).
As a result, we now have a fault-tolerant system. All elements of this infrastructure must be managed somehow. It was previously described that Openstack is a set of projects, each of which provides some specific function. As we can see, there are more than enough elements that need to be configured and controlled. Today we will talk about the network part.
Neutron architecture
In OpenStack, it is Neutron who is responsible for connecting the ports of virtual machines to a common L2 network, ensuring traffic routing between VMs located in different L2 networks, as well as routing outward, providing services such as NAT, Floating IP, DHCP, etc. The
high-level operation of the network service ( basic part) can be described as follows.
When starting the VM, the network service:
- Creates a port for this VM (or ports) and notifies the DHCP service about it;
- A new virtual network device is created (via libvirt);
- VM connects to the port (ports) created in step 1;
Oddly enough, but at the heart of Neutron's work are standard mechanisms familiar to everyone who has ever plunged into Linux - namespaces, iptables, linux bridges, openvswitch, conntrack, etc.
It should be immediately clarified that Neutron is not an SDN controller.
Neutron consists of several interconnected components:
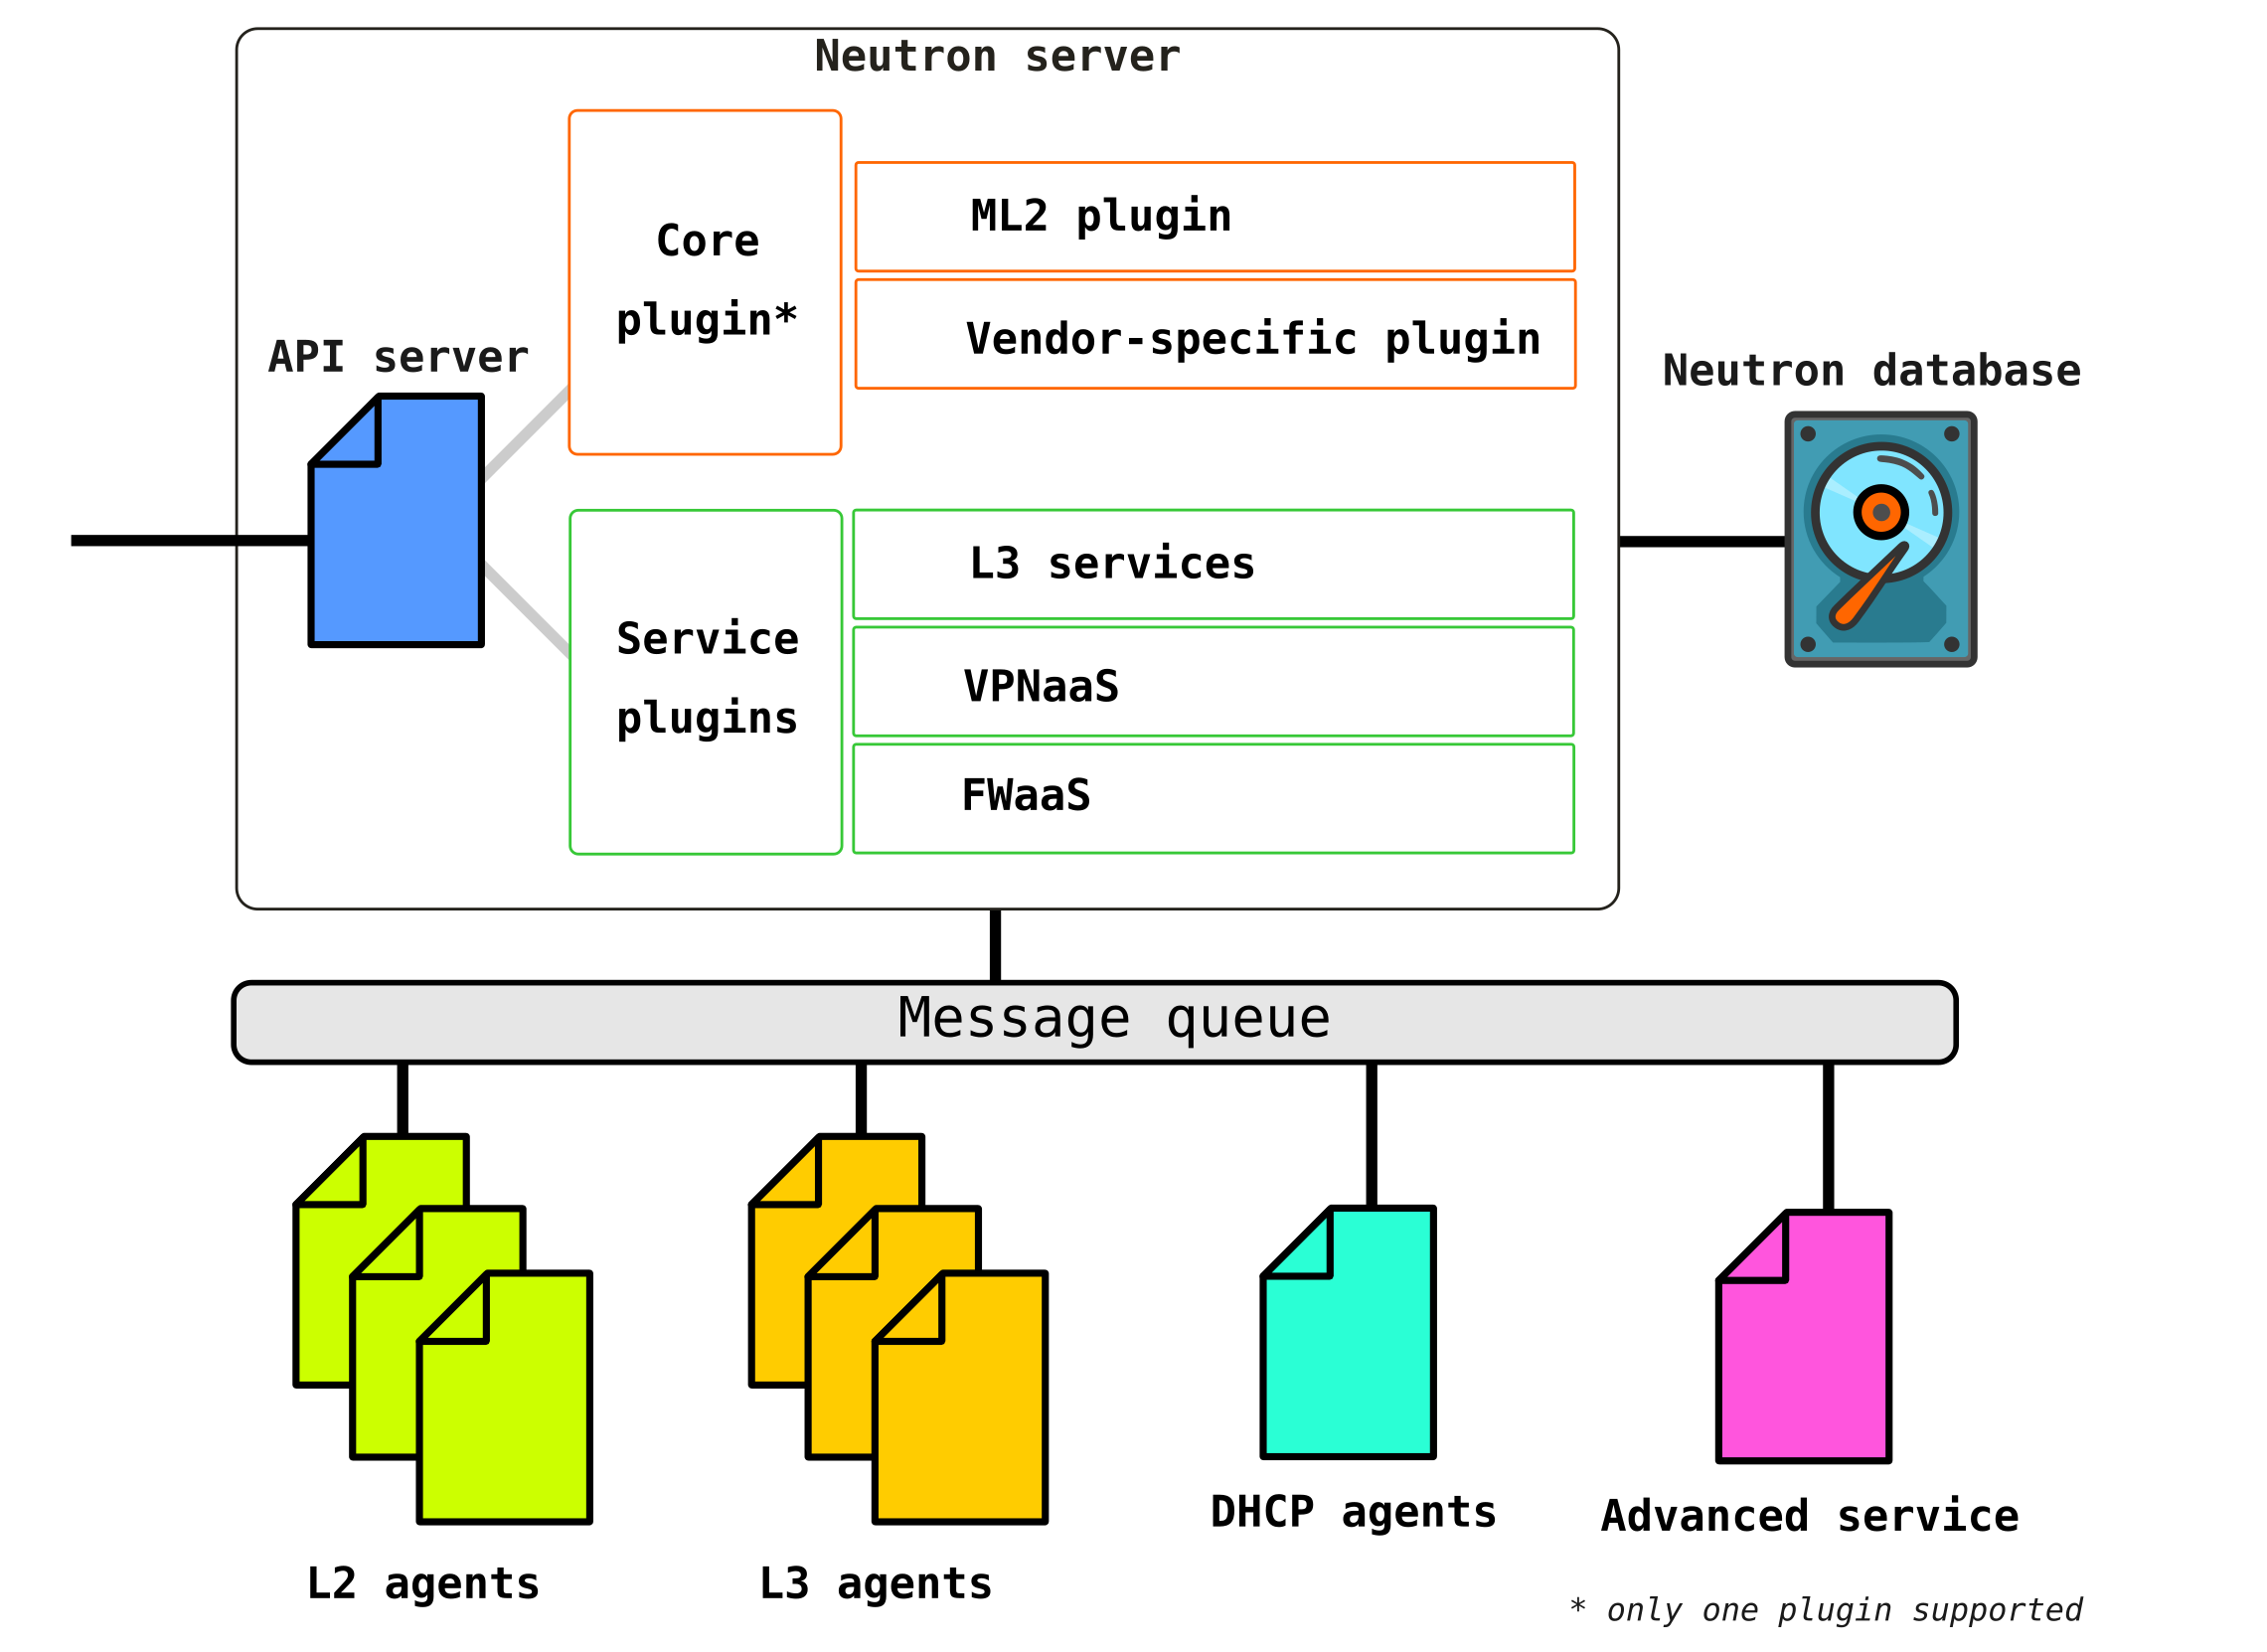
Openstack-neutron-server is a daemon that works with user requests via an API. This daemon does not prescribe any network connectivity, but gives the necessary information for this to its plugins, which then configure the required network element. Neutron agents on OpenStack nodes register with the Neutron server.
Neutron-server is actually an application written in python, consisting of two parts:
- REST service
- Neutron Plugin (core / service)
A REST service is designed to receive API calls from other components (for example, a request to provide some information, etc.)
Plugins are plug-in software components / modules that are called upon API requests - that is, a service is assigned through them. Plugins are divided into two types - service and root. As a rule, the horse plug-in is mainly responsible for managing the address space and L2 connections between VMs, and the service plug-ins already provide additional functionality, such as VPN or FW.
The list of plugins available for today can be viewed for example here There
may be several service plugins, but there can be only one horse plugin.
Openstack-neutron-ml2Is the standard Openstack root plugin. This plug-in has a modular architecture (unlike its predecessor) and configures the network service through the drivers connected to it. We will consider the plugin itself a little later, since in fact it gives the flexibility that OpenStack has in the network part. The root plugin can be replaced (eg Contrail Networking makes such a replacement).
RPC service (rabbitmq-server) - A service that provides queue management and communication with other OpenStack services, as well as communication between network service agents.
Network agents - agents that are located in each node through which network services are configured.
Agents are of several types.
The main agent isL2 agent . These agents run on each of the hypervisors, including control nodes (more precisely, on all nodes that provide any service for tenants) and their main function is to connect virtual machines to a common L2 network, as well as generate alerts when any events occur (for example disable / enable port).
The next, no less important agent is the L3 agent... By default, this agent runs exclusively on the network node (often a network node is combined with a control node) and provides routing between tenant networks (both between its networks and networks of other tenants, and is available to the outside world, providing NAT and DHCP services). However, when using a DVR (distributed router), the need for an L3 plugin appears on compute nodes as well.
The L3 agent uses Linux namespaces to provide each tenant with a set of their own isolated networks and the functionality of virtual routers that route traffic and provide gateway services for Layer 2 networks.
Database - a database of identifiers of networks, subnets, ports, pools, etc.
In fact, Neutron accepts API requests from the creation of any network entities, authenticates the request, and through RPC (if it addresses to some plugin or agent) or REST API (if communicating in SDN) sends agents (through plugins) the instructions necessary to organize the requested service ...
Now let's turn to the test installation (how it is deployed and what it contains later in the practical part) and see where which component is located:
(overcloud) [stack@undercloud ~]$ openstack network agent list
+--------------------------------------+--------------------+-------------------------------------+-------------------+-------+-------+---------------------------+
| ID                                   | Agent Type         | Host                                | Availability Zone | Alive | State | Binary                    |
+--------------------------------------+--------------------+-------------------------------------+-------------------+-------+-------+---------------------------+
| 10495de9-ba4b-41fe-b30a-b90ec3f8728b | Open vSwitch agent | overcloud-novacompute-1.localdomain | None              | :-)   | UP    | neutron-openvswitch-agent |
| 1515ad4a-5972-46c3-af5f-e5446dff7ac7 | L3 agent           | overcloud-controller-0.localdomain  | nova              | :-)   | UP    | neutron-l3-agent          |
| 322e62ca-1e5a-479e-9a96-4f26d09abdd7 | DHCP agent         | overcloud-controller-0.localdomain  | nova              | :-)   | UP    | neutron-dhcp-agent        |
| 9c1de2f9-bac5-400e-998d-4360f04fc533 | Open vSwitch agent | overcloud-novacompute-0.localdomain | None              | :-)   | UP    | neutron-openvswitch-agent |
| d99c5657-851e-4d3c-bef6-f1e3bb1acfb0 | Open vSwitch agent | overcloud-controller-0.localdomain  | None              | :-)   | UP    | neutron-openvswitch-agent |
| ff85fae6-5543-45fb-a301-19c57b62d836 | Metadata agent     | overcloud-controller-0.localdomain  | None              | :-)   | UP    | neutron-metadata-agent    |
+--------------------------------------+--------------------+-------------------------------------+-------------------+-------+-------+---------------------------+
(overcloud) [stack@undercloud ~]$ 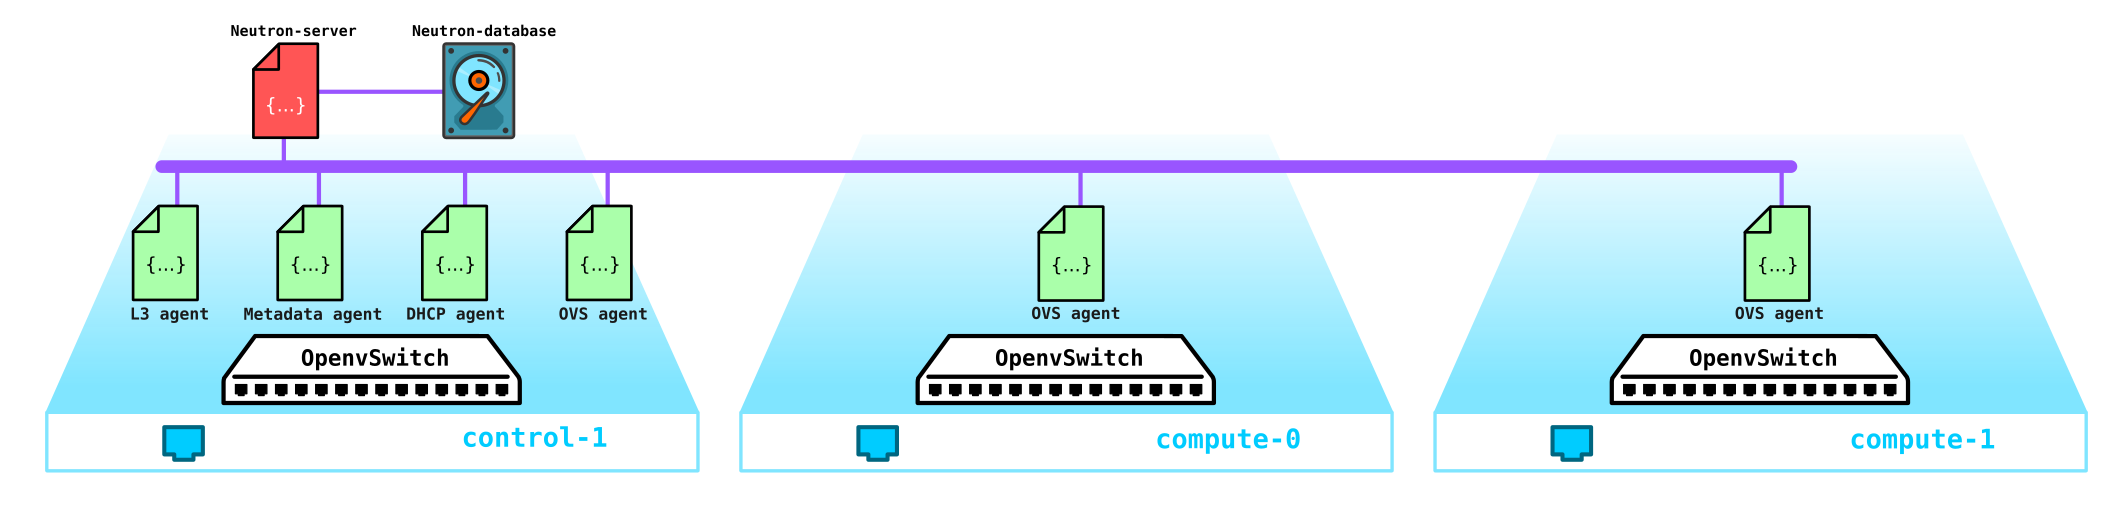
Actually, that's the whole structure of Neutron. Now it's worth taking some time for the ML2 plugin.
Modular layer 2
As stated above, the plugin is a standard OpenStack root plugin and has a modular architecture.
The predecessor of the ML2 plug-in had a monolithic structure, which did not allow, for example, using a mix of several technologies in one installation. For example, you could not use both openvswitch and linuxbridge at the same time - either the first or the second. For this reason, ML2 plugin with its architecture was created.
ML2 has two components - two types of drivers: Type drivers and Mechanism drivers.
Type drivers define the technologies that will be used to organize network connectivity, such as VxLAN, VLAN, GRE. At the same time, the driver allows you to use different technologies. The standard technology is VxLAN encapsulation for overlay networks and vlan external networks.
Type drivers include the following types of networks:
Flat - a network without tagging
VLAN - a tagged network
Local - a special type of network for all-in-one installations (such installations are needed either for developers or for training)
GRE - overlay network using GRE
VxLAN tunnels - overlay network using VxLAN tunnels
Mechanism drivers define the means that provide the organization of the technologies specified in the type driver - for example, openvswitch, sr-iov, opendaylight, OVN, etc.
Depending on the implementation of this driver, either agents controlled by Neutron will be used, or connections with an external SDN controller will be used, which takes care of all the issues of organizing L2 networks, routing, etc.
Example If we use ML2 together with OVS, then on each computational node is set up with an L2 agent that manages the OVS. However, if we use, for example, OVN or OpenDayLight, then OVS control comes under their jurisdiction - Neutron gives commands to the controller through the root plugin, and he already does what he was told.
Refreshing Open vSwitch
At the moment, one of the key components of OpenStack is Open vSwitch.
When installing OpenStack without any additional vendor SDN such as Juniper Contrail or Nokia Nuage, OVS is the main network component of the cloud network and, in combination with iptables, conntrack, namespaces, allows you to organize a full-fledged overlay network with multi-tenancy. Naturally, this component can be replaced, for example, when using third-party proprietary (vendor) SDN solutions.
OVS is an open source software switch designed for use in virtualized environments as a virtual traffic forwarder.
At the moment, OVS has very decent functionality, which includes technologies such as QoS, LACP, VLAN, VxLAN, GENEVE, OpenFlow, DPDK, etc.
Note: initially OVS was not conceived as a soft switch for high-load telecom functions and was more designed for less bandwidth-intensive IT functions such as a WEB server or mail server. However, OVS is being finalized and the current OVS implementations have greatly improved its performance and capabilities, which allows it to be used by telecom operators with high-load functions, for example, there is an OVS implementation with DPDK acceleration support.
There are three important OVS components to be aware of:
- Kernel module - a component located in the kernel space that processes traffic based on the rules received from the control;
- vSwitch daemon (ovs-vswitchd) — , user space, kernel —
- Database server — , , OVS, . OVSDB SDN .
All this is also accompanied by a set of diagnostic and management utilities, such as ovs-vsctl, ovs-appctl, ovs-ofctl, etc.
Currently, Openstack is widely used by telecom operators to migrate network functions to it, such as EPC, SBC, HLR etc. Some functions can live without problems with OVS in the form in which it is, but for example, EPC processes subscriber traffic - that is, it passes a huge amount of traffic through itself (now traffic volumes reach several hundred gigabits per second). Naturally, driving such traffic through the kernel space (since the forwarder is located there by default) is not a good idea. Therefore, OVS is often deployed entirely in the user space using DPDK acceleration technology to forward traffic from the NIC to the user space bypassing the kernel.
Note: for a cloud deployed for telecom functions, it is possible to output traffic from the compute node bypassing OVS directly to the switching equipment. The SR-IOV and Passthrough mechanisms are used for this purpose.
How does it work on a real layout?
Well, now let's move on to the practical part and see how it all works in practice.
Let's start by deploying a simple Openstack installation. Since I do not have a set of servers at hand for experiments, we will assemble the layout on one physical server from virtual machines. Yes, of course, such a solution is not suitable for commercial purposes, but to look at an example of how the network works in Openstack, such an installation will be enough for the eyes. Moreover, such an installation for training purposes is even more interesting - since you can catch traffic, etc.
Since we need to see only the basic part, we can not use several networks, but raise everything using only two networks, and the second network in this layout will be used exclusively for accessing the undercloud and dns server. We will not touch on external networks for now - this is a topic for a separate large article.
So let's start in order. First, a little theory. We will install Openstack using TripleO (Openstack on Openstack). The essence of TripleO is that we install an Openstack all-in-one (that is, on one node), called undercloud, and then use the capabilities of the deployed Openstack to install an Openstack intended for exploitation, called overcloud. Undercloud will use the inherent ability to manage physical servers (bare metal) - the Ironic project - for provisioning hypervisors that will act as compute, control, storage nodes. That is, we do not use any third-party tools to deploy Openstack - we deploy Openstack with Openstack. Further along the installation it will become much clearer, so we will not stop there and go ahead.
: Openstack, . — , , . . ceph ( ) (Storage management Storage) , , QoS , . .
Note: Since we are going to run virtual machines in a virtual environment based on virtual machines, we first need to enable nested virtualization.
You can check whether nested virtualization is enabled or not like this:
[root@hp-gen9 bormoglotx]# cat /sys/module/kvm_intel/parameters/nested
N
[root@hp-gen9 bormoglotx]#
If you see the letter N, then enable support for nested virtualization according to any guide that you find on the network, for example this one .
We need to assemble the following scheme from virtual machines:

In my case, for the connectivity of the virtual machines that are part of the future installation (and I got 7 of them, but you can get by with 4 if you don't have a lot of resources), I used OpenvSwitch. I created one ovs bridge and connected virtual machines to it via port-groups. To do this, I created an xml file of the following form:
[root@hp-gen9 ~]# virsh net-dumpxml ovs-network-1
<network>
  <name>ovs-network-1</name>
  <uuid>7a2e7de7-fc16-4e00-b1ed-4d190133af67</uuid>
  <forward mode='bridge'/>
  <bridge name='ovs-br1'/>
  <virtualport type='openvswitch'/>
  <portgroup name='trunk-1'>
    <vlan trunk='yes'>
      <tag id='100'/>
      <tag id='101'/>
      <tag id='102'/>
    </vlan>
  </portgroup>
  <portgroup name='access-100'>
    <vlan>
      <tag id='100'/>
    </vlan>
  </portgroup>
  <portgroup name='access-101'>
    <vlan>
      <tag id='101'/>
    </vlan>
  </portgroup>
</network>
Three ports of the group are declared here - two access and one trunk (the latter was needed for a DNS server, but you can do without it, or raise it on the host machine - that's whatever is more convenient for you). Next, using this template, we declare our is via virsh net-define:
virsh net-define ovs-network-1.xml
virsh net-start ovs-network-1
virsh net-autostart ovs-network-1
Now let's edit the configuration of the ports of the hypervisor:
[root@hp-gen9 ~]# cat /etc/sysconfig/network-scripts/ifcfg-ens1f0
TYPE=Ethernet
NAME=ens1f0
DEVICE=ens1f0
TYPE=OVSPort
DEVICETYPE=ovs
OVS_BRIDGE=ovs-br1
ONBOOT=yes
OVS_OPTIONS="trunk=100,101,102"
[root@hp-gen9 ~]
[root@hp-gen9 ~]# cat /etc/sysconfig/network-scripts/ifcfg-ovs-br1
DEVICE=ovs-br1
DEVICETYPE=ovs
TYPE=OVSBridge
BOOTPROTO=static
ONBOOT=yes
IPADDR=192.168.255.200
PREFIX=24
[root@hp-gen9 ~]#
Note: in this scenario, the address on the port ovs-br1 will not be available, since it does not have a vlan tag. To fix this, issue the command sudo ovs-vsctl set port ovs-br1 tag = 100. However, after a reboot, this tag will disappear (if anyone knows how to make it stay in place, I will be very grateful). But this is not so important, because we will need this address only for the time of installation and will not be needed when Openstack is fully deployed.Next, we create an undercloud car:
virt-install -n undercloud --description "undercloud" --os-type=Linux --os-variant=centos7.0 --ram=8192 --vcpus=8 --disk path=/var/lib/libvirt/images/undercloud.qcow2,bus=virtio,size=40,format=qcow2 --network network:ovs-network-1,model=virtio,portgroup=access-100 --network network:ovs-network-1,model=virtio,portgroup=access-101 --graphics none --location /var/lib/libvirt/boot/CentOS-7-x86_64-Minimal-2003.iso --extra-args console=ttyS0During the installation, you set all the necessary parameters, such as the machine name, passwords, users, ntp servers, etc., you can immediately configure the ports, but after installation it is easier for me to go into the machine through the console and correct the necessary files. If you already have a ready-made image, then you can use it, or do as I do - download the minimal image of Centos 7 and use it to install the VM.
After successful installation, you should have a virtual machine on which you can put undercloud
[root@hp-gen9 bormoglotx]# virsh list
 Id    Name                           State
----------------------------------------------------
 6     dns-server                     running
 62    undercloud                     running
First, we install the tools necessary during the installation process:
sudo yum update -y
sudo yum install -y net-tools
sudo yum install -y wget
sudo yum install -y ipmitool
Installing Undercloud
Create a stack user, set a password, add it to sudoer and give it the ability to execute root commands via sudo without having to enter a password:
useradd stack
passwd stack

echo “stack ALL=(root) NOPASSWD:ALL” > /etc/sudoers.d/stack
chmod 0440 /etc/sudoers.d/stack
Now we specify the full name undercloud in the hosts file:
vi /etc/hosts

127.0.0.1   undercloud.openstack.rnd localhost localhost.localdomain localhost4 localhost4.localdomain4
::1         localhost localhost.localdomain localhost6 localhost6.localdomain6
Next, add the repositories and install the software we need:
sudo yum install -y https://trunk.rdoproject.org/centos7/current/python2-tripleo-repos-0.0.1-0.20200409224957.8bac392.el7.noarch.rpm
sudo -E tripleo-repos -b queens current
sudo -E tripleo-repos -b queens current ceph
sudo yum install -y python-tripleoclient
sudo yum install -y ceph-ansible
Note: if you do not plan to install ceph, then you do not need to enter commands related to ceph. I used the Queens release, but you can use whatever you like.Next, copy the undercloud configuration file to the user's stack home directory:
cp /usr/share/instack-undercloud/undercloud.conf.sample ~/undercloud.confNow we need to fix this file by adjusting it to our installation.
At the beginning of the file, add these lines:
vi undercloud.conf
[DEFAULT]
undercloud_hostname = undercloud.openstack.rnd
local_ip = 192.168.255.1/24
network_gateway = 192.168.255.1
undercloud_public_host = 192.168.255.2
undercloud_admin_host = 192.168.255.3
undercloud_nameservers = 192.168.255.253
generate_service_certificate = false
local_interface = eth0
local_mtu = 1450
network_cidr = 192.168.255.0/24
masquerade = true
masquerade_network = 192.168.255.0/24
dhcp_start = 192.168.255.11
dhcp_end = 192.168.255.50
inspection_iprange = 192.168.255.51,192.168.255.100
scheduler_max_attempts = 10
So, go through the settings:
undercloud_hostname - complete undercloud server name must match the entry in the DNS server
local_ip - local address undercloud towards provizhening network
network_gateway - the same local address, which will serve as the gateway for access to the outside world during installation overcloud node, also coincides with local ip
undercloud_public_host - external API address, assigned any free address from the provisioning network
undercloud_admin_host internal API address, assigned any free address from the provisioning network
undercloud_nameservers - DNS server
generate_service_certificate- this line is very important in the current example, because if it is not set to false, you will receive an error during installation, the problem is described on the Red Hat bug tracker
local_interface interface in the provisioning network. This interface will be reconfigured during the deployment of undercloud, so you need to have two interfaces on undercloud - one for accessing it, the second for provisioning
local_mtu - MTU. Since we have a test lab and MTU I have 1,500 ports OVS Svicha, it is necessary to put in value in 1450, which would have been encapsulated in VxLAN packages
network_cidr - provisioning network
masquerade - the use of NAT to access the external network
masquerade_network - a network that will NAT -sya
dhcp_start - the starting address of the address pool from which addresses will be assigned to nodes during deployment overcloud
dhcp_end - the final address of the address pool from which addresses will be assigned to nodes during deployment overcloud
inspection_iprange - the pool of addresses required for introspection (must not overlap with the above-mentioned pool )
scheduler_max_attempts - the maximum number of attempts to install overcloud (must be greater than or equal to the number of nodes)
After the file is described, you can give the command to deploy undercloud:
openstack undercloud install
The procedure takes 10 to 30 minutes, depending on your iron. Ultimately, you should see output like this:
vi undercloud.conf
2020-08-13 23:13:12,668 INFO:
#############################################################################
Undercloud install complete.

The file containing this installation's passwords is at
/home/stack/undercloud-passwords.conf.

There is also a stackrc file at /home/stack/stackrc.

These files are needed to interact with the OpenStack services, and should be
secured.

#############################################################################
This output says that you have successfully installed undercloud and now you can check the status of undercloud and proceed to install overcloud.
If you look at the output of ifconfig, you will see that there is a new bridge interface
[stack@undercloud ~]$ ifconfig
br-ctlplane: flags=4163<UP,BROADCAST,RUNNING,MULTICAST>  mtu 1450
        inet 192.168.255.1  netmask 255.255.255.0  broadcast 192.168.255.255
        inet6 fe80::5054:ff:fe2c:89e  prefixlen 64  scopeid 0x20<link>
        ether 52:54:00:2c:08:9e  txqueuelen 1000  (Ethernet)
        RX packets 14  bytes 1095 (1.0 KiB)
        RX errors 0  dropped 0  overruns 0  frame 0
        TX packets 20  bytes 1292 (1.2 KiB)
        TX errors 0  dropped 0 overruns 0  carrier 0  collisions 0
Overcloud deployment will now be performed through this interface.
From the output below it can be seen that we have all services on one node:
(undercloud) [stack@undercloud ~]$ openstack host list
+--------------------------+-----------+----------+
| Host Name                | Service   | Zone     |
+--------------------------+-----------+----------+
| undercloud.openstack.rnd | conductor | internal |
| undercloud.openstack.rnd | scheduler | internal |
| undercloud.openstack.rnd | compute   | nova     |
+--------------------------+-----------+----------+
Below is the configuration of the undercloud network part:
(undercloud) [stack@undercloud ~]$ python -m json.tool /etc/os-net-config/config.json
{
    "network_config": [
        {
            "addresses": [
                {
                    "ip_netmask": "192.168.255.1/24"
                }
            ],
            "members": [
                {
                    "dns_servers": [
                        "192.168.255.253"
                    ],
                    "mtu": 1450,
                    "name": "eth0",
                    "primary": "true",
                    "type": "interface"
                }
            ],
            "mtu": 1450,
            "name": "br-ctlplane",
            "ovs_extra": [
                "br-set-external-id br-ctlplane bridge-id br-ctlplane"
            ],
            "routes": [],
            "type": "ovs_bridge"
        }
    ]
}
(undercloud) [stack@undercloud ~]$
Overcloud installation
At the moment, we only have undercloud, and we do not have enough nodes from which overcloud will be built. Therefore, first of all, we will deploy the virtual machines we need. During the deployment, undercloud itself will install the OS and the necessary software on the overcloud machine - that is, we do not need to fully deploy the machine, but only create a disk (or disks) for it and determine its parameters - that is, in fact, we get a bare server without an OS installed on it ...
Go to the folder with the disks of our virtual machines and create disks of the required size:
cd /var/lib/libvirt/images/
qemu-img create -f qcow2 -o preallocation=metadata control-1.qcow2 60G
qemu-img create -f qcow2 -o preallocation=metadata compute-1.qcow2 60G
qemu-img create -f qcow2 -o preallocation=metadata compute-2.qcow2 60G
qemu-img create -f qcow2 -o preallocation=metadata storage-1.qcow2 160G
qemu-img create -f qcow2 -o preallocation=metadata storage-2.qcow2 160G
Since we are acting from root, we need to change the owner of these disks so as not to get a problem with the rights:
[root@hp-gen9 images]# ls -lh
total 5.8G
drwxr-xr-x. 2 qemu qemu 4.0K Aug 13 16:15 backups
-rw-r--r--. 1 root root  61G Aug 14 03:07 compute-1.qcow2
-rw-r--r--. 1 root root  61G Aug 14 03:07 compute-2.qcow2
-rw-r--r--. 1 root root  61G Aug 14 03:07 control-1.qcow2
-rw-------. 1 qemu qemu  41G Aug 14 03:03 dns-server.qcow2
-rw-r--r--. 1 root root 161G Aug 14 03:07 storage-1.qcow2
-rw-r--r--. 1 root root 161G Aug 14 03:07 storage-2.qcow2
-rw-------. 1 qemu qemu  41G Aug 14 03:07 undercloud.qcow2
[root@hp-gen9 images]#
[root@hp-gen9 images]#
[root@hp-gen9 images]# chown qemu:qemu /var/lib/libvirt/images/*qcow2
[root@hp-gen9 images]# ls -lh
total 5.8G
drwxr-xr-x. 2 qemu qemu 4.0K Aug 13 16:15 backups
-rw-r--r--. 1 qemu qemu  61G Aug 14 03:07 compute-1.qcow2
-rw-r--r--. 1 qemu qemu  61G Aug 14 03:07 compute-2.qcow2
-rw-r--r--. 1 qemu qemu  61G Aug 14 03:07 control-1.qcow2
-rw-------. 1 qemu qemu  41G Aug 14 03:03 dns-server.qcow2
-rw-r--r--. 1 qemu qemu 161G Aug 14 03:07 storage-1.qcow2
-rw-r--r--. 1 qemu qemu 161G Aug 14 03:07 storage-2.qcow2
-rw-------. 1 qemu qemu  41G Aug 14 03:08 undercloud.qcow2
[root@hp-gen9 images]#
Note: if you plan to install ceph in order to study it, then create at least 3 nodes with at least two disks, and in the template indicate that virtual disks vda, vdb, etc. will be used.Great, now we need to define all these machines:
virt-install --name control-1 --ram 32768 --vcpus 8 --os-variant centos7.0 --disk path=/var/lib/libvirt/images/control-1.qcow2,device=disk,bus=virtio,format=qcow2 --noautoconsole --vnc  --network network:ovs-network-1,model=virtio,portgroup=access-100 --network network:ovs-network-1,model=virtio,portgroup=trunk-1 --dry-run --print-xml > /tmp/control-1.xml

virt-install --name storage-1 --ram 16384 --vcpus 4 --os-variant centos7.0 --disk path=/var/lib/libvirt/images/storage-1.qcow2,device=disk,bus=virtio,format=qcow2 --noautoconsole --vnc  --network network:ovs-network-1,model=virtio,portgroup=access-100 --dry-run --print-xml > /tmp/storage-1.xml

virt-install --name storage-2 --ram 16384 --vcpus 4 --os-variant centos7.0 --disk path=/var/lib/libvirt/images/storage-2.qcow2,device=disk,bus=virtio,format=qcow2 --noautoconsole --vnc  --network network:ovs-network-1,model=virtio,portgroup=access-100 --dry-run --print-xml > /tmp/storage-2.xml

virt-install --name compute-1 --ram 32768 --vcpus 12 --os-variant centos7.0 --disk path=/var/lib/libvirt/images/compute-1.qcow2,device=disk,bus=virtio,format=qcow2 --noautoconsole --vnc  --network network:ovs-network-1,model=virtio,portgroup=access-100 --dry-run --print-xml > /tmp/compute-1.xml

virt-install --name compute-2 --ram 32768 --vcpus 12 --os-variant centos7.0 --disk path=/var/lib/libvirt/images/compute-2.qcow2,device=disk,bus=virtio,format=qcow2 --noautoconsole --vnc  --network network:ovs-network-1,model=virtio,portgroup=access-100 --dry-run --print-xml > /tmp/compute-2.xml
At the end there are commands --print-xml> /tmp/storage-1.xml, which creates an xml file with a description of each machine in the / tmp / folder, if you do not add it, you will not be able to define virtual machines.
Now we need to define all these machines in virsh:
virsh define --file /tmp/control-1.xml
virsh define --file /tmp/compute-1.xml
virsh define --file /tmp/compute-2.xml
virsh define --file /tmp/storage-1.xml
virsh define --file /tmp/storage-2.xml

[root@hp-gen9 ~]# virsh list --all
 Id    Name                           State
----------------------------------------------------
 6     dns-server                     running
 64    undercloud                     running
 -     compute-1                      shut off
 -     compute-2                      shut off
 -     control-1                      shut off
 -     storage-1                      shut off
 -     storage-2                      shut off

[root@hp-gen9 ~]#
Now a little nuance - tripleO uses IPMI in order to manage the servers during installation and introspection.
Introspection is the process of inspecting the hardware in order to obtain its parameters required for further provisioning of nodes. Introspection is performed using ironic - a service designed to work with bare metal servers.
But here is the problem - if the IPMI iron servers have a separate port (or shared port, but this is not important), then the virtual machines do not have such ports. Here a crutch called vbmc comes to our rescue - a utility that allows you to emulate an IPMI port. This nuance is worth paying attention to especially for those who want to raise such a laboratory on an ESXI hypervisor - if, of course, I don't know if it has an analogue of vbmc, so you should be puzzled by this question before deploying everything.
Install vbmc:
yum install yum install python2-virtualbmcIf your OS cannot find the package, then add the repository:
yum install -y https://www.rdoproject.org/repos/rdo-release.rpmNow we configure the utility. Everything is trite to disgrace here. Now it is logical that there are no servers in the vbmc list
[root@hp-gen9 ~]# vbmc list

[root@hp-gen9 ~]#
For them to appear, they must be manually declared in this way:
[root@hp-gen9 ~]# vbmc add control-1 --port 7001 --username admin --password admin
[root@hp-gen9 ~]# vbmc add storage-1 --port 7002 --username admin --password admin
[root@hp-gen9 ~]# vbmc add storage-2 --port 7003 --username admin --password admin
[root@hp-gen9 ~]# vbmc add compute-1 --port 7004 --username admin --password admin
[root@hp-gen9 ~]# vbmc add compute-2 --port 7005 --username admin --password admin
[root@hp-gen9 ~]#
[root@hp-gen9 ~]# vbmc list
+-------------+--------+---------+------+
| Domain name | Status | Address | Port |
+-------------+--------+---------+------+
| compute-1   | down   | ::      | 7004 |
| compute-2   | down   | ::      | 7005 |
| control-1   | down   | ::      | 7001 |
| storage-1   | down   | ::      | 7002 |
| storage-2   | down   | ::      | 7003 |
+-------------+--------+---------+------+
[root@hp-gen9 ~]#
I think the command syntax is clear and without explanation. However, for now, all our sessions are in the DOWN status. For them to go to the UP status, you must enable them:
[root@hp-gen9 ~]# vbmc start control-1
2020-08-14 03:15:57,826.826 13149 INFO VirtualBMC [-] Started vBMC instance for domain control-1
[root@hp-gen9 ~]# vbmc start storage-1
2020-08-14 03:15:58,316.316 13149 INFO VirtualBMC [-] Started vBMC instance for domain storage-1
[root@hp-gen9 ~]# vbmc start storage-2
2020-08-14 03:15:58,851.851 13149 INFO VirtualBMC [-] Started vBMC instance for domain storage-2
[root@hp-gen9 ~]# vbmc start compute-1
2020-08-14 03:15:59,307.307 13149 INFO VirtualBMC [-] Started vBMC instance for domain compute-1
[root@hp-gen9 ~]# vbmc start compute-2
2020-08-14 03:15:59,712.712 13149 INFO VirtualBMC [-] Started vBMC instance for domain compute-2
[root@hp-gen9 ~]#
[root@hp-gen9 ~]#
[root@hp-gen9 ~]# vbmc list
+-------------+---------+---------+------+
| Domain name | Status  | Address | Port |
+-------------+---------+---------+------+
| compute-1   | running | ::      | 7004 |
| compute-2   | running | ::      | 7005 |
| control-1   | running | ::      | 7001 |
| storage-1   | running | ::      | 7002 |
| storage-2   | running | ::      | 7003 |
+-------------+---------+---------+------+
[root@hp-gen9 ~]#
And the final touch - you need to correct the firewall rules (well, or disable it altogether):
firewall-cmd --zone=public --add-port=7001/udp --permanent
firewall-cmd --zone=public --add-port=7002/udp --permanent
firewall-cmd --zone=public --add-port=7003/udp --permanent
firewall-cmd --zone=public --add-port=7004/udp --permanent
firewall-cmd --zone=public --add-port=7005/udp --permanent
firewall-cmd --reload
Now let's go to undercloud and check that everything works. The host machine address is 192.168.255.200, we added the necessary ipmitool package to undercloud during preparation for deployment:
[stack@undercloud ~]$ ipmitool -I lanplus -U admin -P admin -H 192.168.255.200 -p 7001 power status
Chassis Power is off
[stack@undercloud ~]$ ipmitool -I lanplus -U admin -P admin -H 192.168.255.200 -p 7001 power on
Chassis Power Control: Up/On
[stack@undercloud ~]$

[root@hp-gen9 ~]# virsh list
 Id    Name                           State
----------------------------------------------------
 6     dns-server                     running
 64    undercloud                     running
 65    control-1                      running
As you can see, we have successfully launched the control node via vbmc. Now turn it off and move on:
[stack@undercloud ~]$ ipmitool -I lanplus -U admin -P admin -H 192.168.255.200 -p 7001 power off
Chassis Power Control: Down/Off
[stack@undercloud ~]$ ipmitool -I lanplus -U admin -P admin -H 192.168.255.200 -p 7001 power status
Chassis Power is off
[stack@undercloud ~]$

[root@hp-gen9 ~]# virsh list --all
 Id    Name                           State
----------------------------------------------------
 6     dns-server                     running
 64    undercloud                     running
 -     compute-1                      shut off
 -     compute-2                      shut off
 -     control-1                      shut off
 -     storage-1                      shut off
 -     storage-2                      shut off

[root@hp-gen9 ~]#
The next step is introspection of the nodes on which the overcloud will be installed. To do this, we need to prepare a json file with a description of our nodes. Please note that, unlike installation on bare servers, the file specifies the port on which vbmc is running for each of the machines.
[root@hp-gen9 ~]# virsh domiflist --domain control-1
Interface  Type       Source     Model       MAC
-------------------------------------------------------
-          network    ovs-network-1 virtio      52:54:00:20:a2:2f
-          network    ovs-network-1 virtio      52:54:00:3f:87:9f

[root@hp-gen9 ~]# virsh domiflist --domain compute-1
Interface  Type       Source     Model       MAC
-------------------------------------------------------
-          network    ovs-network-1 virtio      52:54:00:98:e9:d6

[root@hp-gen9 ~]# virsh domiflist --domain compute-2
Interface  Type       Source     Model       MAC
-------------------------------------------------------
-          network    ovs-network-1 virtio      52:54:00:6a:ea:be

[root@hp-gen9 ~]# virsh domiflist --domain storage-1
Interface  Type       Source     Model       MAC
-------------------------------------------------------
-          network    ovs-network-1 virtio      52:54:00:79:0b:cb

[root@hp-gen9 ~]# virsh domiflist --domain storage-2
Interface  Type       Source     Model       MAC
-------------------------------------------------------
-          network    ovs-network-1 virtio      52:54:00:a7:fe:27
Note: there are two interfaces on the control node, but in this case it is not important, in this installation one will be enough for us.Now we are preparing a json file. We need to specify the poppy address of the port through which provisioning will be performed, the parameters of the nodes, give them names and specify how to get to ipmi:
{
    "nodes":[
        {
            "mac":[
                "52:54:00:20:a2:2f"
            ],
            "cpu":"8",
            "memory":"32768",
            "disk":"60",
            "arch":"x86_64",
            "name":"control-1",
            "pm_type":"pxe_ipmitool",
            "pm_user":"admin",
            "pm_password":"admin",
            "pm_addr":"192.168.255.200",
            "pm_port":"7001"
        },
        {
            "mac":[
                "52:54:00:79:0b:cb"
            ],
            "cpu":"4",
            "memory":"16384",
            "disk":"160",
            "arch":"x86_64",
            "name":"storage-1",
            "pm_type":"pxe_ipmitool",
            "pm_user":"admin",
            "pm_password":"admin",
            "pm_addr":"192.168.255.200",
            "pm_port":"7002"
        },
        {
            "mac":[
                "52:54:00:a7:fe:27"
            ],
            "cpu":"4",
            "memory":"16384",
            "disk":"160",
            "arch":"x86_64",
            "name":"storage-2",
            "pm_type":"pxe_ipmitool",
            "pm_user":"admin",
            "pm_password":"admin",
            "pm_addr":"192.168.255.200",
            "pm_port":"7003"
        },
        {
            "mac":[
                "52:54:00:98:e9:d6"
            ],
            "cpu":"12",
            "memory":"32768",
            "disk":"60",
            "arch":"x86_64",
            "name":"compute-1",
            "pm_type":"pxe_ipmitool",
            "pm_user":"admin",
            "pm_password":"admin",
            "pm_addr":"192.168.255.200",
            "pm_port":"7004"
        },
        {
            "mac":[
                "52:54:00:6a:ea:be"
            ],
            "cpu":"12",
            "memory":"32768",
            "disk":"60",
            "arch":"x86_64",
            "name":"compute-2",
            "pm_type":"pxe_ipmitool",
            "pm_user":"admin",
            "pm_password":"admin",
            "pm_addr":"192.168.255.200",
            "pm_port":"7005"
        }
    ]
}
Now we need to prepare images for ironic. To do this, download them via wget and install:
(undercloud) [stack@undercloud ~]$ sudo wget https://images.rdoproject.org/queens/delorean/current-tripleo-rdo/overcloud-full.tar --no-check-certificate
(undercloud) [stack@undercloud ~]$ sudo wget https://images.rdoproject.org/queens/delorean/current-tripleo-rdo/ironic-python-agent.tar --no-check-certificate
(undercloud) [stack@undercloud ~]$ ls -lh
total 1.9G
-rw-r--r--. 1 stack stack 447M Aug 14 10:26 ironic-python-agent.tar
-rw-r--r--. 1 stack stack 1.5G Aug 14 10:26 overcloud-full.tar
-rw-------. 1 stack stack  916 Aug 13 23:10 stackrc
-rw-r--r--. 1 stack stack  15K Aug 13 22:50 undercloud.conf
-rw-------. 1 stack stack 2.0K Aug 13 22:50 undercloud-passwords.conf
(undercloud) [stack@undercloud ~]$ mkdir images/
(undercloud) [stack@undercloud ~]$ tar -xpvf ironic-python-agent.tar -C ~/images/
ironic-python-agent.initramfs
ironic-python-agent.kernel
(undercloud) [stack@undercloud ~]$ tar -xpvf overcloud-full.tar -C ~/images/
overcloud-full.qcow2
overcloud-full.initrd
overcloud-full.vmlinuz
(undercloud) [stack@undercloud ~]$
(undercloud) [stack@undercloud ~]$ ls -lh images/
total 1.9G
-rw-rw-r--. 1 stack stack 441M Aug 12 17:24 ironic-python-agent.initramfs
-rwxr-xr-x. 1 stack stack 6.5M Aug 12 17:24 ironic-python-agent.kernel
-rw-r--r--. 1 stack stack  53M Aug 12 17:14 overcloud-full.initrd
-rw-r--r--. 1 stack stack 1.4G Aug 12 17:18 overcloud-full.qcow2
-rwxr-xr-x. 1 stack stack 6.5M Aug 12 17:14 overcloud-full.vmlinuz
(undercloud) [stack@undercloud ~]$
Uploading images to undercloud:
(undercloud) [stack@undercloud ~]$ openstack overcloud image upload --image-path ~/images/
Image "overcloud-full-vmlinuz" was uploaded.
+--------------------------------------+------------------------+-------------+---------+--------+
|                  ID                  |          Name          | Disk Format |   Size  | Status |
+--------------------------------------+------------------------+-------------+---------+--------+
| c2553770-3e0f-4750-b46b-138855b5c385 | overcloud-full-vmlinuz |     aki     | 6761064 | active |
+--------------------------------------+------------------------+-------------+---------+--------+
Image "overcloud-full-initrd" was uploaded.
+--------------------------------------+-----------------------+-------------+----------+--------+
|                  ID                  |          Name         | Disk Format |   Size   | Status |
+--------------------------------------+-----------------------+-------------+----------+--------+
| 949984e0-4932-4e71-af43-d67a38c3dc89 | overcloud-full-initrd |     ari     | 55183045 | active |
+--------------------------------------+-----------------------+-------------+----------+--------+
Image "overcloud-full" was uploaded.
+--------------------------------------+----------------+-------------+------------+--------+
|                  ID                  |      Name      | Disk Format |    Size    | Status |
+--------------------------------------+----------------+-------------+------------+--------+
| a2f2096d-c9d7-429a-b866-c7543c02a380 | overcloud-full |    qcow2    | 1487475712 | active |
+--------------------------------------+----------------+-------------+------------+--------+
Image "bm-deploy-kernel" was uploaded.
+--------------------------------------+------------------+-------------+---------+--------+
|                  ID                  |       Name       | Disk Format |   Size  | Status |
+--------------------------------------+------------------+-------------+---------+--------+
| e413aa78-e38f-404c-bbaf-93e582a8e67f | bm-deploy-kernel |     aki     | 6761064 | active |
+--------------------------------------+------------------+-------------+---------+--------+
Image "bm-deploy-ramdisk" was uploaded.
+--------------------------------------+-------------------+-------------+-----------+--------+
|                  ID                  |        Name       | Disk Format |    Size   | Status |
+--------------------------------------+-------------------+-------------+-----------+--------+
| 5cf3aba4-0e50-45d3-929f-27f025dd6ce3 | bm-deploy-ramdisk |     ari     | 461759376 | active |
+--------------------------------------+-------------------+-------------+-----------+--------+
(undercloud) [stack@undercloud ~]$
Check that all images are loaded
(undercloud) [stack@undercloud ~]$  openstack image list
+--------------------------------------+------------------------+--------+
| ID                                   | Name                   | Status |
+--------------------------------------+------------------------+--------+
| e413aa78-e38f-404c-bbaf-93e582a8e67f | bm-deploy-kernel       | active |
| 5cf3aba4-0e50-45d3-929f-27f025dd6ce3 | bm-deploy-ramdisk      | active |
| a2f2096d-c9d7-429a-b866-c7543c02a380 | overcloud-full         | active |
| 949984e0-4932-4e71-af43-d67a38c3dc89 | overcloud-full-initrd  | active |
| c2553770-3e0f-4750-b46b-138855b5c385 | overcloud-full-vmlinuz | active |
+--------------------------------------+------------------------+--------+
(undercloud) [stack@undercloud ~]$
One more touch - you need to add a dns server:
(undercloud) [stack@undercloud ~]$ openstack subnet list
+--------------------------------------+-----------------+--------------------------------------+------------------+
| ID                                   | Name            | Network                              | Subnet           |
+--------------------------------------+-----------------+--------------------------------------+------------------+
| f45dea46-4066-42aa-a3c4-6f84b8120cab | ctlplane-subnet | 6ca013dc-41c2-42d8-9d69-542afad53392 | 192.168.255.0/24 |
+--------------------------------------+-----------------+--------------------------------------+------------------+
(undercloud) [stack@undercloud ~]$ openstack subnet show f45dea46-4066-42aa-a3c4-6f84b8120cab
+-------------------+-----------------------------------------------------------+
| Field             | Value                                                     |
+-------------------+-----------------------------------------------------------+
| allocation_pools  | 192.168.255.11-192.168.255.50                             |
| cidr              | 192.168.255.0/24                                          |
| created_at        | 2020-08-13T20:10:37Z                                      |
| description       |                                                           |
| dns_nameservers   |                                                           |
| enable_dhcp       | True                                                      |
| gateway_ip        | 192.168.255.1                                             |
| host_routes       | destination='169.254.169.254/32', gateway='192.168.255.1' |
| id                | f45dea46-4066-42aa-a3c4-6f84b8120cab                      |
| ip_version        | 4                                                         |
| ipv6_address_mode | None                                                      |
| ipv6_ra_mode      | None                                                      |
| name              | ctlplane-subnet                                           |
| network_id        | 6ca013dc-41c2-42d8-9d69-542afad53392                      |
| prefix_length     | None                                                      |
| project_id        | a844ccfcdb2745b198dde3e1b28c40a3                          |
| revision_number   | 0                                                         |
| segment_id        | None                                                      |
| service_types     |                                                           |
| subnetpool_id     | None                                                      |
| tags              |                                                           |
| updated_at        | 2020-08-13T20:10:37Z                                      |
+-------------------+-----------------------------------------------------------+
(undercloud) [stack@undercloud ~]$
(undercloud) [stack@undercloud ~]$ neutron subnet-update f45dea46-4066-42aa-a3c4-6f84b8120cab --dns-nameserver 192.168.255.253
neutron CLI is deprecated and will be removed in the future. Use openstack CLI instead.
Updated subnet: f45dea46-4066-42aa-a3c4-6f84b8120cab
(undercloud) [stack@undercloud ~]$
Now we can issue the command for introspection:
(undercloud) [stack@undercloud ~]$ openstack overcloud node import --introspect --provide inspection.json
Started Mistral Workflow tripleo.baremetal.v1.register_or_update. Execution ID: d57456a3-d8ed-479c-9a90-dff7c752d0ec
Waiting for messages on queue 'tripleo' with no timeout.


5 node(s) successfully moved to the "manageable" state.
Successfully registered node UUID b4b2cf4a-b7ca-4095-af13-cc83be21c4f5
Successfully registered node UUID b89a72a3-6bb7-429a-93bc-48393d225838
Successfully registered node UUID 20a16cc0-e0ce-4d88-8f17-eb0ce7b4d69e
Successfully registered node UUID bfc1eb98-a17a-4a70-b0b6-6c0db0eac8e8
Successfully registered node UUID 766ab623-464c-423d-a529-d9afb69d1167
Waiting for introspection to finish...
Started Mistral Workflow tripleo.baremetal.v1.introspect. Execution ID: 6b4d08ae-94c3-4a10-ab63-7634ec198a79
Waiting for messages on queue 'tripleo' with no timeout.
Introspection of node b89a72a3-6bb7-429a-93bc-48393d225838 completed. Status:SUCCESS. Errors:None
Introspection of node 20a16cc0-e0ce-4d88-8f17-eb0ce7b4d69e completed. Status:SUCCESS. Errors:None
Introspection of node bfc1eb98-a17a-4a70-b0b6-6c0db0eac8e8 completed. Status:SUCCESS. Errors:None
Introspection of node 766ab623-464c-423d-a529-d9afb69d1167 completed. Status:SUCCESS. Errors:None
Introspection of node b4b2cf4a-b7ca-4095-af13-cc83be21c4f5 completed. Status:SUCCESS. Errors:None
Successfully introspected 5 node(s).
Started Mistral Workflow tripleo.baremetal.v1.provide. Execution ID: f5594736-edcf-4927-a8a0-2a7bf806a59a
Waiting for messages on queue 'tripleo' with no timeout.
5 node(s) successfully moved to the "available" state.
(undercloud) [stack@undercloud ~]$
As you can see from the output, everything ended without errors. Let's check that all nodes are available:
(undercloud) [stack@undercloud ~]$ openstack baremetal node list
+--------------------------------------+-----------+---------------+-------------+--------------------+-------------+
| UUID                                 | Name      | Instance UUID | Power State | Provisioning State | Maintenance |
+--------------------------------------+-----------+---------------+-------------+--------------------+-------------+
| b4b2cf4a-b7ca-4095-af13-cc83be21c4f5 | control-1 | None          | power off   | available          | False       |
| b89a72a3-6bb7-429a-93bc-48393d225838 | storage-1 | None          | power off   | available          | False       |
| 20a16cc0-e0ce-4d88-8f17-eb0ce7b4d69e | storage-2 | None          | power off   | available          | False       |
| bfc1eb98-a17a-4a70-b0b6-6c0db0eac8e8 | compute-1 | None          | power off   | available          | False       |
| 766ab623-464c-423d-a529-d9afb69d1167 | compute-2 | None          | power off   | available          | False       |
+--------------------------------------+-----------+---------------+-------------+--------------------+-------------+
(undercloud) [stack@undercloud ~]$
If the nodes are in a different state, usually manageable, then something went wrong and you need to look at the log, figure out why it happened. Keep in mind that in this scenario we are using virtualization and there may be bugs associated with the use of virtual machines or vbmc.
Next, we need to specify which node will perform which function - that is, indicate the profile with which the node will deploy:
(undercloud) [stack@undercloud ~]$ openstack overcloud profiles list
+--------------------------------------+-----------+-----------------+-----------------+-------------------+
| Node UUID                            | Node Name | Provision State | Current Profile | Possible Profiles |
+--------------------------------------+-----------+-----------------+-----------------+-------------------+
| b4b2cf4a-b7ca-4095-af13-cc83be21c4f5 | control-1 | available       | None            |                   |
| b89a72a3-6bb7-429a-93bc-48393d225838 | storage-1 | available       | None            |                   |
| 20a16cc0-e0ce-4d88-8f17-eb0ce7b4d69e | storage-2 | available       | None            |                   |
| bfc1eb98-a17a-4a70-b0b6-6c0db0eac8e8 | compute-1 | available       | None            |                   |
| 766ab623-464c-423d-a529-d9afb69d1167 | compute-2 | available       | None            |                   |
+--------------------------------------+-----------+-----------------+-----------------+-------------------+
(undercloud) [stack@undercloud ~]$ openstack flavor list
+--------------------------------------+---------------+------+------+-----------+-------+-----------+
| ID                                   | Name          |  RAM | Disk | Ephemeral | VCPUs | Is Public |
+--------------------------------------+---------------+------+------+-----------+-------+-----------+
| 168af640-7f40-42c7-91b2-989abc5c5d8f | swift-storage | 4096 |   40 |         0 |     1 | True      |
| 52148d1b-492e-48b4-b5fc-772849dd1b78 | baremetal     | 4096 |   40 |         0 |     1 | True      |
| 56e66542-ae60-416d-863e-0cb192d01b09 | control       | 4096 |   40 |         0 |     1 | True      |
| af6796e1-d0c4-4bfe-898c-532be194f7ac | block-storage | 4096 |   40 |         0 |     1 | True      |
| e4d50fdd-0034-446b-b72c-9da19b16c2df | compute       | 4096 |   40 |         0 |     1 | True      |
| fc2e3acf-7fca-4901-9eee-4a4d6ef0265d | ceph-storage  | 4096 |   40 |         0 |     1 | True      |
+--------------------------------------+---------------+------+------+-----------+-------+-----------+
(undercloud) [stack@undercloud ~]$
We indicate the profile for each node:
openstack baremetal node set --property capabilities='profile:control,boot_option:local' b4b2cf4a-b7ca-4095-af13-cc83be21c4f5
openstack baremetal node set --property capabilities='profile:ceph-storage,boot_option:local' b89a72a3-6bb7-429a-93bc-48393d225838
openstack baremetal node set --property capabilities='profile:ceph-storage,boot_option:local' 20a16cc0-e0ce-4d88-8f17-eb0ce7b4d69e
openstack baremetal node set --property capabilities='profile:compute,boot_option:local' bfc1eb98-a17a-4a70-b0b6-6c0db0eac8e8
openstack baremetal node set --property capabilities='profile:compute,boot_option:local' 766ab623-464c-423d-a529-d9afb69d1167
We check that we have done everything correctly:
(undercloud) [stack@undercloud ~]$ openstack overcloud profiles list
+--------------------------------------+-----------+-----------------+-----------------+-------------------+
| Node UUID                            | Node Name | Provision State | Current Profile | Possible Profiles |
+--------------------------------------+-----------+-----------------+-----------------+-------------------+
| b4b2cf4a-b7ca-4095-af13-cc83be21c4f5 | control-1 | available       | control         |                   |
| b89a72a3-6bb7-429a-93bc-48393d225838 | storage-1 | available       | ceph-storage    |                   |
| 20a16cc0-e0ce-4d88-8f17-eb0ce7b4d69e | storage-2 | available       | ceph-storage    |                   |
| bfc1eb98-a17a-4a70-b0b6-6c0db0eac8e8 | compute-1 | available       | compute         |                   |
| 766ab623-464c-423d-a529-d9afb69d1167 | compute-2 | available       | compute         |                   |
+--------------------------------------+-----------+-----------------+-----------------+-------------------+
(undercloud) [stack@undercloud ~]$
If everything is correct, we give the command to deploy overcloud:
openstack overcloud deploy --templates --control-scale 1 --compute-scale 2 --ceph-storage-scale 2 --control-flavor control --compute-flavor compute --ceph-storage-flavor ceph-storage --libvirt-type qemuIn a real installation, custom templates will naturally be used, in our case this will greatly complicate the process, since it will be necessary to explain every edit in the template. As it was written earlier, even a simple installation will be enough for us to see how it works.
Note: the variable --libvirt-type qemu is required in this case, since we will be using nested virtualization. Otherwise, you will not have virtual machines running.
Now you have about an hour, or maybe more (depending on the capabilities of the hardware) and you can only hope that after this time you will see the following inscription:
2020-08-14 08:39:21Z [overcloud]: CREATE_COMPLETE  Stack CREATE completed successfully

 Stack overcloud CREATE_COMPLETE

Host 192.168.255.21 not found in /home/stack/.ssh/known_hosts
Started Mistral Workflow tripleo.deployment.v1.get_horizon_url. Execution ID: fcb996cd-6a19-482b-b755-2ca0c08069a9
Overcloud Endpoint: http://192.168.255.21:5000/
Overcloud Horizon Dashboard URL: http://192.168.255.21:80/dashboard
Overcloud rc file: /home/stack/overcloudrc
Overcloud Deployed
(undercloud) [stack@undercloud ~]$
Now you have an almost full-fledged version of the openstack, on which you can study, put on experiments, etc.
Let's check that everything works fine. In the user's home directory stack there are two files - one stackrc (for managing undercloud) and the other overcloudrc (for managing overcloud). These files must be specified as source, as they contain the information required for authentication.
(undercloud) [stack@undercloud ~]$ openstack server list
+--------------------------------------+-------------------------+--------+-------------------------+----------------+--------------+
| ID                                   | Name                    | Status | Networks                | Image          | Flavor       |
+--------------------------------------+-------------------------+--------+-------------------------+----------------+--------------+
| fd7d36f4-ce87-4b9a-93b0-add2957792de | overcloud-controller-0  | ACTIVE | ctlplane=192.168.255.15 | overcloud-full | control      |
| edc77778-8972-475e-a541-ff40eb944197 | overcloud-novacompute-1 | ACTIVE | ctlplane=192.168.255.26 | overcloud-full | compute      |
| 5448ce01-f05f-47ca-950a-ced14892c0d4 | overcloud-cephstorage-1 | ACTIVE | ctlplane=192.168.255.34 | overcloud-full | ceph-storage |
| ce6d862f-4bdf-4ba3-b711-7217915364d7 | overcloud-novacompute-0 | ACTIVE | ctlplane=192.168.255.19 | overcloud-full | compute      |
| e4507bd5-6f96-4b12-9cc0-6924709da59e | overcloud-cephstorage-0 | ACTIVE | ctlplane=192.168.255.44 | overcloud-full | ceph-storage |
+--------------------------------------+-------------------------+--------+-------------------------+----------------+--------------+
(undercloud) [stack@undercloud ~]$
(undercloud) [stack@undercloud ~]$ source overcloudrc
(overcloud) [stack@undercloud ~]$
(overcloud) [stack@undercloud ~]$ openstack project list
+----------------------------------+---------+
| ID                               | Name    |
+----------------------------------+---------+
| 4eed7d0f06544625857d51cd77c5bd4c | admin   |
| ee1c68758bde41eaa9912c81dc67dad8 | service |
+----------------------------------+---------+
(overcloud) [stack@undercloud ~]$
(overcloud) [stack@undercloud ~]$
(overcloud) [stack@undercloud ~]$ openstack network agent list
+--------------------------------------+--------------------+-------------------------------------+-------------------+-------+-------+---------------------------+
| ID                                   | Agent Type         | Host                                | Availability Zone | Alive | State | Binary                    |
+--------------------------------------+--------------------+-------------------------------------+-------------------+-------+-------+---------------------------+
| 10495de9-ba4b-41fe-b30a-b90ec3f8728b | Open vSwitch agent | overcloud-novacompute-1.localdomain | None              | :-)   | UP    | neutron-openvswitch-agent |
| 1515ad4a-5972-46c3-af5f-e5446dff7ac7 | L3 agent           | overcloud-controller-0.localdomain  | nova              | :-)   | UP    | neutron-l3-agent          |
| 322e62ca-1e5a-479e-9a96-4f26d09abdd7 | DHCP agent         | overcloud-controller-0.localdomain  | nova              | :-)   | UP    | neutron-dhcp-agent        |
| 9c1de2f9-bac5-400e-998d-4360f04fc533 | Open vSwitch agent | overcloud-novacompute-0.localdomain | None              | :-)   | UP    | neutron-openvswitch-agent |
| d99c5657-851e-4d3c-bef6-f1e3bb1acfb0 | Open vSwitch agent | overcloud-controller-0.localdomain  | None              | :-)   | UP    | neutron-openvswitch-agent |
| ff85fae6-5543-45fb-a301-19c57b62d836 | Metadata agent     | overcloud-controller-0.localdomain  | None              | :-)   | UP    | neutron-metadata-agent    |
+--------------------------------------+--------------------+-------------------------------------+-------------------+-------+-------+---------------------------+
(overcloud) [stack@undercloud ~]$
In my installation, one more small touch is required - to add a route on the controller, since the machine I am working with is on a different network. To do this, go to control-1 under the heat-admin account and write the route
(undercloud) [stack@undercloud ~]$ ssh heat-admin@192.168.255.15
Last login: Fri Aug 14 09:47:40 2020 from 192.168.255.1
[heat-admin@overcloud-controller-0 ~]$
[heat-admin@overcloud-controller-0 ~]$
[heat-admin@overcloud-controller-0 ~]$ sudo ip route add 10.169.0.0/16 via 192.168.255.254
Well, now you can go to the horizon. All information - addresses, username and password - are in the file / home / stack / overcloudrc. The final scheme looks like this:

By the way, in our installation, the addresses of the machines were issued via DHCP and, as you can see, they are issued “at random”. You can hard-code in the template which address should be attached to which machine during deployment, if you need it.
How does traffic flow between virtual machines?
In this article, we will consider three options for passing traffic
- Two machines on one hypervisor in one L2 network
- Two machines on different hypervisors in one L2 network
- Two machines on different networks (rooting between networks)
Cases with access to the outside world through an external network, using floating addresses, as well as distributed routing, will be considered next time, for now we will focus on internal traffic.
To test, let's put together the following scheme:
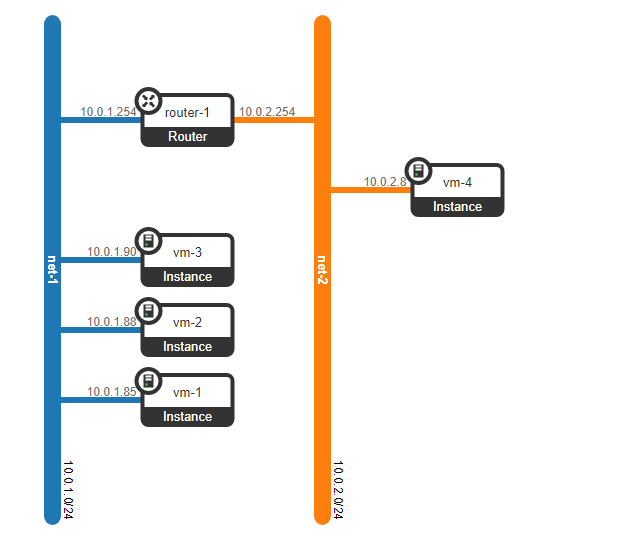
We have created 4 virtual machines - 3 in one L2 network - net-1, and another 1 in the net-2 network
(overcloud) [stack@undercloud ~]$ nova list --tenant 5e18ce8ec9594e00b155485f19895e6c
+--------------------------------------+------+----------------------------------+--------+------------+-------------+-----------------+
| ID                                   | Name | Tenant ID                        | Status | Task State | Power State | Networks        |
+--------------------------------------+------+----------------------------------+--------+------------+-------------+-----------------+
| f53b37b5-2204-46cc-aef0-dba84bf970c0 | vm-1 | 5e18ce8ec9594e00b155485f19895e6c | ACTIVE | -          | Running     | net-1=10.0.1.85 |
| fc8b6722-0231-49b0-b2fa-041115bef34a | vm-2 | 5e18ce8ec9594e00b155485f19895e6c | ACTIVE | -          | Running     | net-1=10.0.1.88 |
| 3cd74455-b9b7-467a-abe3-bd6ff765c83c | vm-3 | 5e18ce8ec9594e00b155485f19895e6c | ACTIVE | -          | Running     | net-1=10.0.1.90 |
| 7e836338-6772-46b0-9950-f7f06dbe91a8 | vm-4 | 5e18ce8ec9594e00b155485f19895e6c | ACTIVE | -          | Running     | net-2=10.0.2.8  |
+--------------------------------------+------+----------------------------------+--------+------------+-------------+-----------------+
(overcloud) [stack@undercloud ~]$
Let's see on which hypervisors the created machines are located:
(overcloud) [stack@undercloud ~]$ nova show f53b37b5-2204-46cc-aef0-dba84bf970c0 | egrep "hypervisor_hostname|instance_name|hostname"
| OS-EXT-SRV-ATTR:hostname             | vm-1                                                     |
| OS-EXT-SRV-ATTR:hypervisor_hostname  | overcloud-novacompute-0.localdomain                      |
| OS-EXT-SRV-ATTR:instance_name        | instance-00000001                                        |
(overcloud) [stack@undercloud ~]$ nova show fc8b6722-0231-49b0-b2fa-041115bef34a | egrep "hypervisor_hostname|instance_name|hostname"
| OS-EXT-SRV-ATTR:hostname | vm-2 |
| OS-EXT-SRV-ATTR:hypervisor_hostname | overcloud-novacompute-1.localdomain |
| OS-EXT-SRV-ATTR:instance_name | instance-00000002 |(overcloud) [stack@undercloud ~]$ nova show 3cd74455-b9b7-467a-abe3-bd6ff765c83c | egrep "hypervisor_hostname|instance_name|hostname"
| OS-EXT-SRV-ATTR:hostname | vm-3 |
| OS-EXT-SRV-ATTR:hypervisor_hostname | overcloud-novacompute-0.localdomain |
| OS-EXT-SRV-ATTR:instance_name | instance-00000003 |(overcloud) [stack@undercloud ~]$ nova show 7e836338-6772-46b0-9950-f7f06dbe91a8 | egrep "hypervisor_hostname|instance_name|hostname"
| OS-EXT-SRV-ATTR:hostname | vm-4 |
| OS-EXT-SRV-ATTR:hypervisor_hostname | overcloud-novacompute-1.localdomain |
| OS-EXT-SRV-ATTR:instance_name | instance-00000004 |(overcloud) [stack @ undercloud ~] $
Machines vm-1 and vm-3 are located on compute-0, machines vm-2 and vm-4 are located on node compute-1.
In addition, a virtual router has been created to enable routing between the specified networks:
(overcloud) [stack@undercloud ~]$ openstack router list  --project 5e18ce8ec9594e00b155485f19895e6c
+--------------------------------------+----------+--------+-------+-------------+-------+----------------------------------+
| ID                                   | Name     | Status | State | Distributed | HA    | Project                          |
+--------------------------------------+----------+--------+-------+-------------+-------+----------------------------------+
| 0a4d2420-4b9c-46bd-aec1-86a1ef299abe | router-1 | ACTIVE | UP    | False       | False | 5e18ce8ec9594e00b155485f19895e6c |
+--------------------------------------+----------+--------+-------+-------------+-------+----------------------------------+
(overcloud) [stack@undercloud ~]$
The router has two virtual ports that act as gateways for networks:
(overcloud) [stack@undercloud ~]$ openstack router show 0a4d2420-4b9c-46bd-aec1-86a1ef299abe | grep interface
| interfaces_info         | [{"subnet_id": "2529ad1a-6b97-49cd-8515-cbdcbe5e3daa", "ip_address": "10.0.1.254", "port_id": "0c52b15f-8fcc-4801-bf52-7dacc72a5201"}, {"subnet_id": "335552dd-b35b-456b-9df0-5aac36a3ca13", "ip_address": "10.0.2.254", "port_id": "92fa49b5-5406-499f-ab8d-ddf28cc1a76c"}] |
(overcloud) [stack@undercloud ~]$
But before looking at how the traffic goes, let's look at what we have at the moment on the control node (which is also a network node) and on the compute node. Let's start with a compute node.
[heat-admin@overcloud-novacompute-0 ~]$ sudo ovs-vsctl show
[heat-admin@overcloud-novacompute-0 ~]$ sudo sudo ovs-appctl dpif/show
system@ovs-system: hit:3 missed:3
  br-ex:
    br-ex 65534/1: (internal)
    phy-br-ex 1/none: (patch: peer=int-br-ex)
  br-int:
    br-int 65534/2: (internal)
    int-br-ex 1/none: (patch: peer=phy-br-ex)
    patch-tun 2/none: (patch: peer=patch-int)
  br-tun:
    br-tun 65534/3: (internal)
    patch-int 1/none: (patch: peer=patch-tun)
    vxlan-c0a8ff0f 3/4: (vxlan: egress_pkt_mark=0, key=flow, local_ip=192.168.255.19, remote_ip=192.168.255.15)
    vxlan-c0a8ff1a 2/4: (vxlan: egress_pkt_mark=0, key=flow, local_ip=192.168.255.19, remote_ip=192.168.255.26)
[heat-admin@overcloud-novacompute-0 ~]$
At the moment, the node has three ovs bridges - br-int, br-tun, br-ex. Between them, as we can see, there is a set of interfaces. For ease of perception, we will put all these interfaces on the diagram and see what happens.

From the addresses to which the VxLAN tunnels are raised, you can see that one tunnel is raised on compute-1 (192.168.255.26), the second tunnel looks at control-1 (192.168.255.15). But the most interesting thing is that br-ex does not have physical interfaces, and if you look at which flows are configured, you can see that this bridge at the moment can only drop traffic.
[heat-admin@overcloud-novacompute-0 ~]$ ifconfig eth0
eth0: flags=4163<UP,BROADCAST,RUNNING,MULTICAST>  mtu 1450
        inet 192.168.255.19  netmask 255.255.255.0  broadcast 192.168.255.255
        inet6 fe80::5054:ff:fe6a:eabe  prefixlen 64  scopeid 0x20<link>
        ether 52:54:00:6a:ea:be  txqueuelen 1000  (Ethernet)
        RX packets 2909669  bytes 4608201000 (4.2 GiB)
        RX errors 0  dropped 0  overruns 0  frame 0
        TX packets 1821057  bytes 349198520 (333.0 MiB)
        TX errors 0  dropped 0 overruns 0  carrier 0  collisions 0

[heat-admin@overcloud-novacompute-0 ~]$
As you can see from the output, the address is screwed directly to the physical port, and not to the virtual bridge interface.
[heat-admin@overcloud-novacompute-0 ~]$  sudo ovs-appctl fdb/show br-ex
 port  VLAN  MAC                Age
[heat-admin@overcloud-novacompute-0 ~]$  sudo ovs-ofctl dump-flows br-ex
 cookie=0x9169eae8f7fe5bb2, duration=216686.864s, table=0, n_packets=303, n_bytes=26035, priority=2,in_port="phy-br-ex" actions=drop
 cookie=0x9169eae8f7fe5bb2, duration=216686.887s, table=0, n_packets=0, n_bytes=0, priority=0 actions=NORMAL
[heat-admin@overcloud-novacompute-0 ~]$
According to the first rule, everything that comes from the phy-br-ex port must be discarded.
Actually, there is nowhere else for traffic to get to this bridge, except from this interface (junction with br-int), and judging by the drops, BUM traffic has already arrived in the bridge.
That is, traffic from this node can only go through the VxLAN tunnel and nothing else. However, if you turn on the DVR, the situation will change, but we will deal with it another time. When using network isolation for example using vlans, you will have not one L3 interface in the 0th vlan, but several interfaces. However, VxLAN traffic will go out from the node in the same way, but also encapsulated into some kind of dedicated vlan.
We figured out the compute node, go to the control node.
[heat-admin@overcloud-controller-0 ~]$ sudo ovs-appctl dpif/show
system@ovs-system: hit:930491 missed:825
  br-ex:
    br-ex 65534/1: (internal)
    eth0 1/2: (system)
    phy-br-ex 2/none: (patch: peer=int-br-ex)
  br-int:
    br-int 65534/3: (internal)
    int-br-ex 1/none: (patch: peer=phy-br-ex)
    patch-tun 2/none: (patch: peer=patch-int)
  br-tun:
    br-tun 65534/4: (internal)
    patch-int 1/none: (patch: peer=patch-tun)
    vxlan-c0a8ff13 3/5: (vxlan: egress_pkt_mark=0, key=flow, local_ip=192.168.255.15, remote_ip=192.168.255.19)
    vxlan-c0a8ff1a 2/5: (vxlan: egress_pkt_mark=0, key=flow, local_ip=192.168.255.15, remote_ip=192.168.255.26)
[heat-admin@overcloud-controller-0 ~]$
In fact, we can say that everything is the same, but the ip address is no longer on the physical interface, but on the virtual bridge. This is done due to the fact that this port is a port through which traffic will go to the outside world.
[heat-admin@overcloud-controller-0 ~]$ ifconfig br-ex
br-ex: flags=4163<UP,BROADCAST,RUNNING,MULTICAST>  mtu 1450
        inet 192.168.255.15  netmask 255.255.255.0  broadcast 192.168.255.255
        inet6 fe80::5054:ff:fe20:a22f  prefixlen 64  scopeid 0x20<link>
        ether 52:54:00:20:a2:2f  txqueuelen 1000  (Ethernet)
        RX packets 803859  bytes 1732616116 (1.6 GiB)
        RX errors 0  dropped 63  overruns 0  frame 0
        TX packets 808475  bytes 121652156 (116.0 MiB)
        TX errors 0  dropped 0 overruns 0  carrier 0  collisions 0

[heat-admin@overcloud-controller-0 ~]$
[heat-admin@overcloud-controller-0 ~]$ sudo ovs-appctl fdb/show br-ex
 port  VLAN  MAC                Age
    3   100  28:c0:da:00:4d:d3   35
    1     0  28:c0:da:00:4d:d3   35
    1     0  52:54:00:98:e9:d6    0
LOCAL     0  52:54:00:20:a2:2f    0
    1     0  52:54:00:2c:08:9e    0
    3   100  52:54:00:20:a2:2f    0
    1     0  52:54:00:6a:ea:be    0
[heat-admin@overcloud-controller-0 ~]$
This port is tied to the br-ex bridge and since there are no vlan tags on it, this port is a trunk port on which all vlans are allowed, now traffic goes outside without a tag, as indicated by vlan-id 0 in the output above.
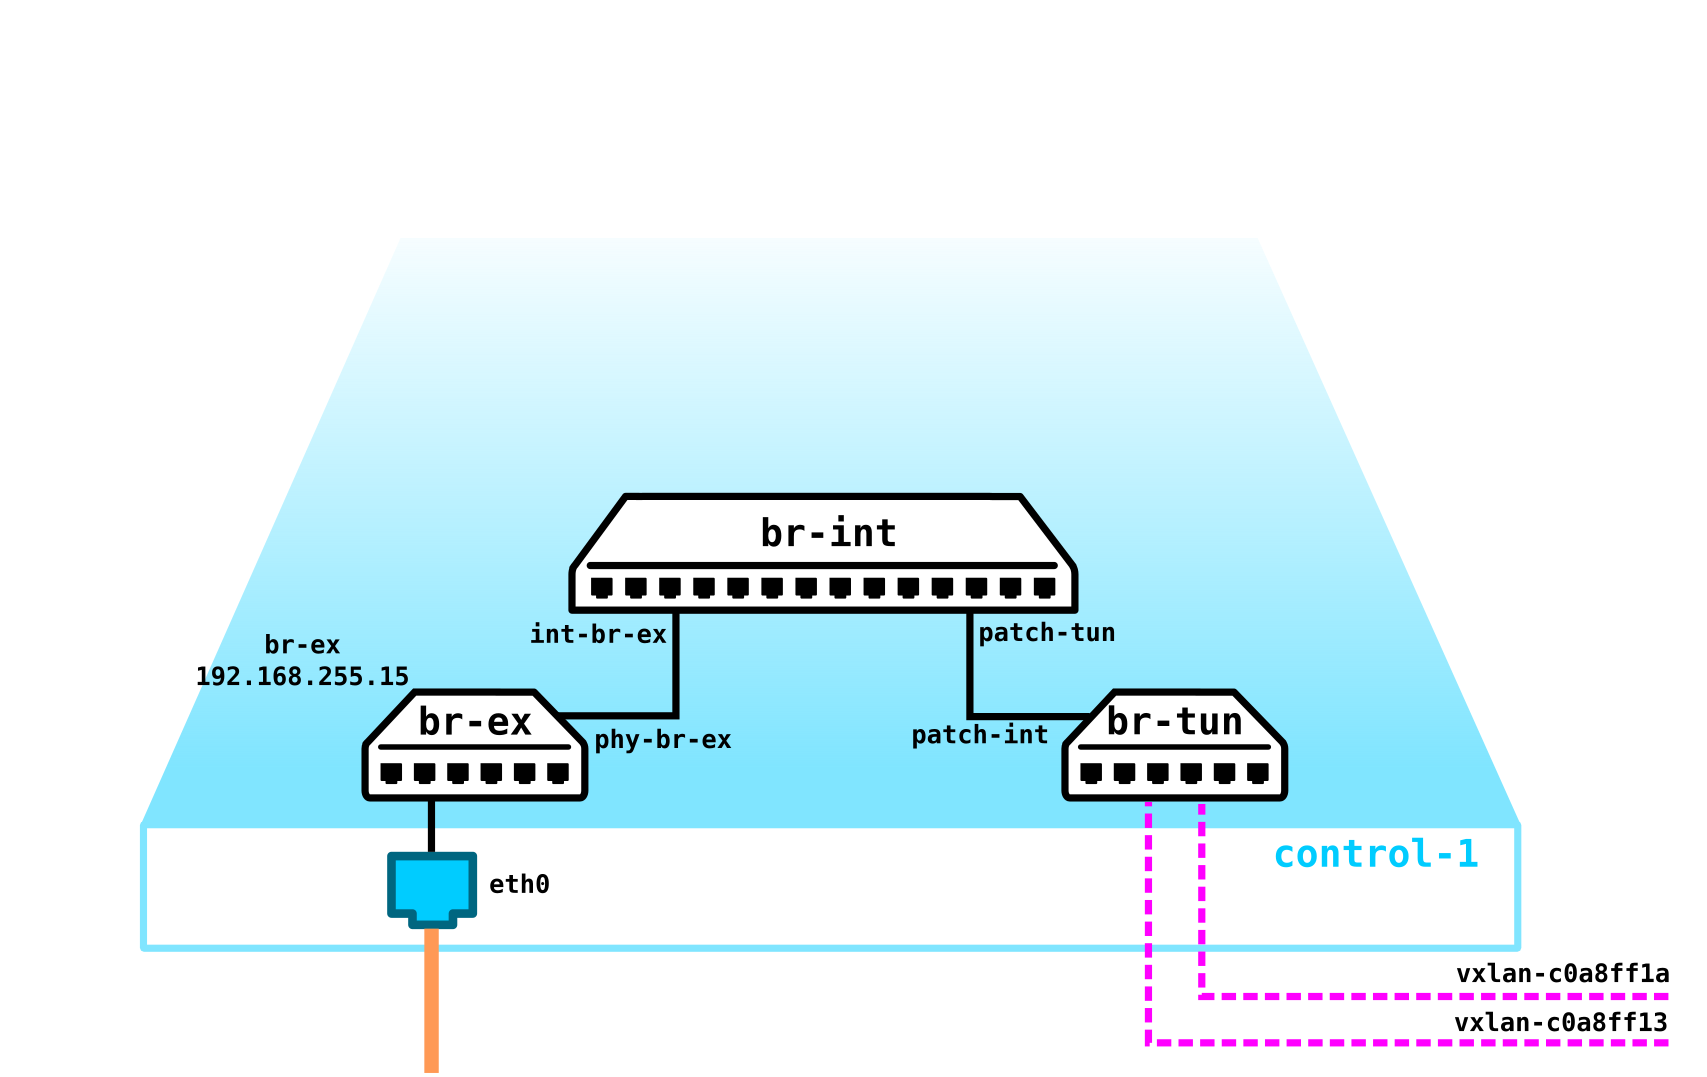
Everything else at the moment is similar to the compute node - the same bridges, the same tunnels going to two compute nodes.
We will not consider storage nodes in this article, but for understanding it must be said that the network part of these nodes is banal to the point of disgrace. In our case, there is only one physical port (eth0) with an ip address hung on it and that's it. There are no VxLAN tunnels, tunnel bridges, etc. - there are no ovs at all, since there is no point in it. When using network isolation - this node will have two interfaces (physical ports, baud, or just two vlans - it doesn't matter - it depends on what you want) - one for management, the second for traffic (writing to the VM disk, reading from disk, etc.).
We figured out what we have on the nodes in the absence of any services. Now let's start 4 virtual machines and see how the scheme described above changes - we should have ports, virtual routers, etc.
So far, our network looks like this:
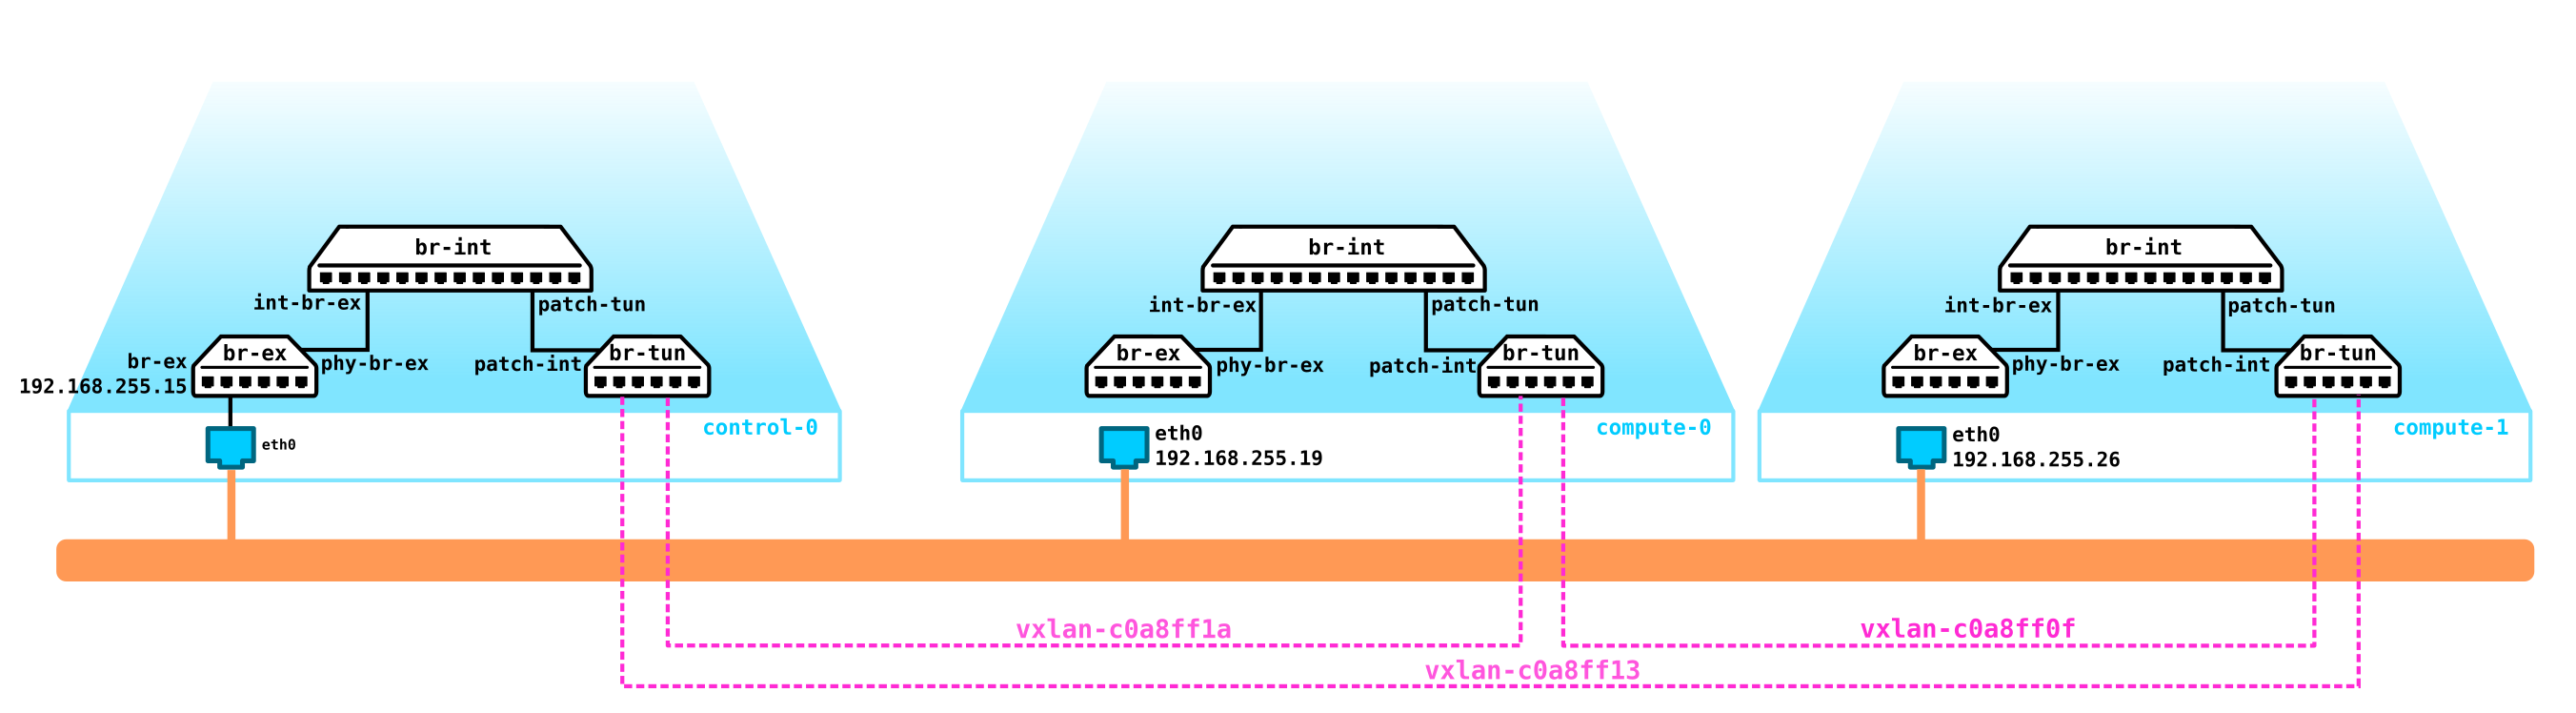
We have two virtual machines on each computer. Let's see how everything is included with compute-0.
[heat-admin@overcloud-novacompute-0 ~]$ sudo virsh list
 Id    Name                           State
----------------------------------------------------
 1     instance-00000001              running
 3     instance-00000003              running

[heat-admin@overcloud-novacompute-0 ~]$
The machine has only one virtual interface - tap95d96a75-a0:
[heat-admin@overcloud-novacompute-0 ~]$ sudo virsh domiflist instance-00000001
Interface  Type       Source     Model       MAC
-------------------------------------------------------
tap95d96a75-a0 bridge     qbr95d96a75-a0 virtio      fa:16:3e:44:98:20

[heat-admin@overcloud-novacompute-0 ~]$
This interface looks at the linux bridge:
[heat-admin@overcloud-novacompute-0 ~]$ sudo brctl show
bridge name     bridge id               STP enabled     interfaces
docker0         8000.0242904c92a8       no
qbr5bd37136-47          8000.5e4e05841423       no              qvb5bd37136-47
                                                        tap5bd37136-47
qbr95d96a75-a0          8000.de076cb850f6       no              qvb95d96a75-a0
                                                        tap95d96a75-a0
[heat-admin@overcloud-novacompute-0 ~]$
As you can see from the output, there are only two interfaces in the brigade - tap95d96a75-a0 and qvb95d96a75-a0.
It is worthAs you understand, if we have a qvb95d96a75-a0 port in the brigade, which is a vEth pair, then where is its counterpart, which should logically be called qvo95d96a75-a0. Let's see what ports are on the OVS.
dwelling a little on the types of virtual network devices in OpenStack: vtap - a virtual interface connected to an instance (VM)
qbr - Linux bridge
qvb and qvo - vEth pair connected to a Linux bridge and Open vSwitch bridge
br-int, br-tun, br-vlan - Open vSwitch bridges
patch-, int-br-, phy-br- - Open vSwitch patch-interfaces connecting bridges
qg, qr, ha, fg, sg - Open vSwitch ports used by virtual devices to connect to OVS
[heat-admin@overcloud-novacompute-0 ~]$ sudo sudo ovs-appctl dpif/show
system@ovs-system: hit:526 missed:91
  br-ex:
    br-ex 65534/1: (internal)
    phy-br-ex 1/none: (patch: peer=int-br-ex)
  br-int:
    br-int 65534/2: (internal)
    int-br-ex 1/none: (patch: peer=phy-br-ex)
    patch-tun 2/none: (patch: peer=patch-int)
    qvo5bd37136-47 6/6: (system)
    qvo95d96a75-a0 3/5: (system)
  br-tun:
    br-tun 65534/3: (internal)
    patch-int 1/none: (patch: peer=patch-tun)
    vxlan-c0a8ff0f 3/4: (vxlan: egress_pkt_mark=0, key=flow, local_ip=192.168.255.19, remote_ip=192.168.255.15)
    vxlan-c0a8ff1a 2/4: (vxlan: egress_pkt_mark=0, key=flow, local_ip=192.168.255.19, remote_ip=192.168.255.26)
[heat-admin@overcloud-novacompute-0 ~]$
As we can see, the port is in br-int. Br-int acts as a switch that terminates the ports of virtual machines. In addition to qvo95d96a75-a0, the output shows the port qvo5bd37136-47. This is the port to the second virtual machine. As a result, our scheme now looks like this: The

question that should immediately interest the attentive reader - why is the linux bridge between the virtual machine port and the OVS port? The fact is that security groups are used to protect the machine, which are nothing more than iptables. OVS does not work with iptables, so such a "crutch" was invented. However, it is outliving its own - it is replaced by conntrack in new releases.
That is, ultimately the scheme looks like this:

Two machines on one hypervisor in one L2 network
Since these two VMs are in the same L2 network and on the same hypervisor, traffic between them will logically go locally via br-int, since both machines will be in the same VLAN:
[heat-admin@overcloud-novacompute-0 ~]$ sudo virsh domiflist instance-00000001
Interface  Type       Source     Model       MAC
-------------------------------------------------------
tap95d96a75-a0 bridge     qbr95d96a75-a0 virtio      fa:16:3e:44:98:20

[heat-admin@overcloud-novacompute-0 ~]$
[heat-admin@overcloud-novacompute-0 ~]$
[heat-admin@overcloud-novacompute-0 ~]$ sudo virsh domiflist instance-00000003
Interface  Type       Source     Model       MAC
-------------------------------------------------------
tap5bd37136-47 bridge     qbr5bd37136-47 virtio      fa:16:3e:83:ad:a4

[heat-admin@overcloud-novacompute-0 ~]$
[heat-admin@overcloud-novacompute-0 ~]$ sudo ovs-appctl fdb/show br-int
 port  VLAN  MAC                Age
    6     1  fa:16:3e:83:ad:a4    0
    3     1  fa:16:3e:44:98:20    0
[heat-admin@overcloud-novacompute-0 ~]$
Two machines on different hypervisors in the same L2 network
Now let's see how the traffic goes between two machines in the same L2 network, but located on different hypervisors. To be honest, nothing will change much, just the traffic between the hypervisors will go through the vxlan tunnel. Let's see an example.
The addresses of the virtual machines between which we will watch the traffic:
[heat-admin@overcloud-novacompute-0 ~]$ sudo virsh domiflist instance-00000001
Interface  Type       Source     Model       MAC
-------------------------------------------------------
tap95d96a75-a0 bridge     qbr95d96a75-a0 virtio      fa:16:3e:44:98:20

[heat-admin@overcloud-novacompute-0 ~]$
[heat-admin@overcloud-novacompute-1 ~]$ sudo virsh domiflist instance-00000002
Interface  Type       Source     Model       MAC
-------------------------------------------------------
tape7e23f1b-07 bridge     qbre7e23f1b-07 virtio      fa:16:3e:72:ad:53

[heat-admin@overcloud-novacompute-1 ~]$
We look at the forwarding table in br-int at compute-0:
[heat-admin@overcloud-novacompute-0 ~]$  sudo ovs-appctl fdb/show br-int | grep fa:16:3e:72:ad:53
    2     1  fa:16:3e:72:ad:53    1
[heat-admin@overcloud-novacompute-0 ~]
Traffic should go to port 2 - let's see what this port is:
[heat-admin@overcloud-novacompute-0 ~]$ sudo ovs-ofctl show br-int | grep addr
 1(int-br-ex): addr:7e:7f:28:1f:bd:54
 2(patch-tun): addr:0a:bd:07:69:58:d9
 3(qvo95d96a75-a0): addr:ea:50:9a:3d:69:58
 6(qvo5bd37136-47): addr:9a:d1:03:50:3d:96
 LOCAL(br-int): addr:1a:0f:53:97:b1:49
[heat-admin@overcloud-novacompute-0 ~]$
This is patch-tun - that is, the interface to br-tun. Let's see what happens to the packet on br-tun:
[heat-admin@overcloud-novacompute-0 ~]$ sudo ovs-ofctl dump-flows br-tun | grep fa:16:3e:72:ad:53
 cookie=0x8759a56536b67a8e, duration=1387.959s, table=20, n_packets=1460, n_bytes=138880, hard_timeout=300, idle_age=0, hard_age=0, priority=1,vlan_tci=0x0001/0x0fff,dl_dst=fa:16:3e:72:ad:53 actions=load:0->NXM_OF_VLAN_TCI[],load:0x16->NXM_NX_TUN_ID[],output:2
[heat-admin@overcloud-novacompute-0 ~]$
The packet is packed into VxLAN and sent to port 2. Let's see where port 2 leads:
[heat-admin@overcloud-novacompute-0 ~]$ sudo ovs-ofctl show br-tun | grep addr
 1(patch-int): addr:b2:d1:f8:21:96:66
 2(vxlan-c0a8ff1a): addr:be:64:1f:75:78:a7
 3(vxlan-c0a8ff0f): addr:76:6f:b9:3c:3f:1c
 LOCAL(br-tun): addr:a2:5b:6d:4f:94:47
[heat-admin@overcloud-novacompute-0 ~]$
This is a vxlan tunnel on compute-1:
[heat-admin@overcloud-novacompute-0 ~]$ sudo ovs-appctl dpif/show | egrep vxlan-c0a8ff1a
    vxlan-c0a8ff1a 2/4: (vxlan: egress_pkt_mark=0, key=flow, local_ip=192.168.255.19, remote_ip=192.168.255.26)
[heat-admin@overcloud-novacompute-0 ~]$
Go to compute-1 and see what happens next with the package:
[heat-admin@overcloud-novacompute-1 ~]$ sudo ovs-appctl fdb/show br-int | egrep fa:16:3e:44:98:20
    2     1  fa:16:3e:44:98:20    1
[heat-admin@overcloud-novacompute-1 ~]$
The Mac is in the br-int forwarding table on compute-1, and as you can see from the output above, it is visible through port 2, which is ports towards br-tun:
[heat-admin@overcloud-novacompute-1 ~]$ sudo ovs-ofctl show br-int | grep addr
 1(int-br-ex): addr:8a:d7:f9:ad:8c:1d
 2(patch-tun): addr:46:cc:40:bd:20:da
 3(qvoe7e23f1b-07): addr:12:78:2e:34:6a:c7
 4(qvo3210e8ec-c0): addr:7a:5f:59:75:40:85
 LOCAL(br-int): addr:e2:27:b2:ed:14:46
Well, then we look that there is a destination mac in br-int on compute-1:
[heat-admin@overcloud-novacompute-1 ~]$ sudo ovs-appctl fdb/show br-int | egrep fa:16:3e:72:ad:53
    3     1  fa:16:3e:72:ad:53    0
[heat-admin@overcloud-novacompute-1 ~]$
That is, the received packet will fly to port 3, behind which the instance-00000003 virtual machine is already located.
The beauty of deploying Openstack for learning on a virtual infrastructure is that we can easily catch traffic between hypervisors and see what happens to it. We will do this now, run tcpdump on the vnet port towards compute-0:
[root@hp-gen9 bormoglotx]# tcpdump -vvv -i vnet3
tcpdump: listening on vnet3, link-type EN10MB (Ethernet), capture size 262144 bytes

*****************omitted*******************

04:39:04.583459 IP (tos 0x0, ttl 64, id 16868, offset 0, flags [DF], proto UDP (17), length 134)
    192.168.255.19.39096 > 192.168.255.26.4789: [no cksum] VXLAN, flags [I] (0x08), vni 22
IP (tos 0x0, ttl 64, id 8012, offset 0, flags [DF], proto ICMP (1), length 84)
    10.0.1.85 > 10.0.1.88: ICMP echo request, id 5634, seq 16, length 64
04:39:04.584449 IP (tos 0x0, ttl 64, id 35181, offset 0, flags [DF], proto UDP (17), length 134)
    192.168.255.26.speedtrace-disc > 192.168.255.19.4789: [no cksum] VXLAN, flags [I] (0x08), vni 22
IP (tos 0x0, ttl 64, id 59124, offset 0, flags [none], proto ICMP (1), length 84)
    10.0.1.88 > 10.0.1.85: ICMP echo reply, id 5634, seq 16, length 64

*****************omitted*******************
The first line shows that the patch with the address 10.0.1.85 goes to the address 10.0.1.88 (ICMP traffic), and it is wrapped in a VxLAN packet with vni 22 and the packet goes from the host 192.168.255.19 (compute-0) to the host 192.168.255.26 ( compute-1). We can check that the VNI matches the one specified in the ovs.
Let's go back to this line actions = load: 0-> NXM_OF_VLAN_TCI [], load: 0x16-> NXM_NX_TUN_ID [], output: 2. 0x16 is hexadecimal vni. Let's translate this number into the 10th system:
16 = 6*16^0+1*16^1 = 6+16 = 22That is, vni corresponds to reality.
The second line shows the return traffic, well, it makes no sense to explain it there, and everything is clear.
Two machines on different networks (routing between networks)
The last case for today is routing between networks within one project using a virtual router. We are considering a case without a DVR (we will consider it in another article), so routing occurs on the network node. In our case, the network node is not a separate entity and is located on the control node.
First, let's see that routing works:
$ ping 10.0.2.8
PING 10.0.2.8 (10.0.2.8): 56 data bytes
64 bytes from 10.0.2.8: seq=0 ttl=63 time=7.727 ms
64 bytes from 10.0.2.8: seq=1 ttl=63 time=3.832 ms
^C
--- 10.0.2.8 ping statistics ---
2 packets transmitted, 2 packets received, 0% packet loss
round-trip min/avg/max = 3.832/5.779/7.727 ms
Since in this case the packet must go to the gateway and be routed there, we need to find out the MAC address of the gateway, for which we will look at the ARP table in the instance:
$ arp
host-10-0-1-254.openstacklocal (10.0.1.254) at fa:16:3e:c4:64:70 [ether]  on eth0
host-10-0-1-1.openstacklocal (10.0.1.1) at fa:16:3e:e6:2c:5c [ether]  on eth0
host-10-0-1-90.openstacklocal (10.0.1.90) at fa:16:3e:83:ad:a4 [ether]  on eth0
host-10-0-1-88.openstacklocal (10.0.1.88) at fa:16:3e:72:ad:53 [ether]  on eth0
Now let's see where the traffic should be sent with the destination (10.0.1.254) fa: 16: 3e: c4: 64: 70:
[heat-admin@overcloud-novacompute-0 ~]$ sudo ovs-appctl fdb/show br-int | egrep fa:16:3e:c4:64:70
    2     1  fa:16:3e:c4:64:70    0
[heat-admin@overcloud-novacompute-0 ~]$
We look where port 2 leads:
[heat-admin@overcloud-novacompute-0 ~]$ sudo ovs-ofctl show br-int | grep addr
 1(int-br-ex): addr:7e:7f:28:1f:bd:54
 2(patch-tun): addr:0a:bd:07:69:58:d9
 3(qvo95d96a75-a0): addr:ea:50:9a:3d:69:58
 6(qvo5bd37136-47): addr:9a:d1:03:50:3d:96
 LOCAL(br-int): addr:1a:0f:53:97:b1:49
[heat-admin@overcloud-novacompute-0 ~]$
Everything is logical, the traffic goes to br-tun. Let's see which vxlan tunnel it will be wrapped in:
[heat-admin@overcloud-novacompute-0 ~]$ sudo ovs-ofctl dump-flows br-tun | grep fa:16:3e:c4:64:70
 cookie=0x8759a56536b67a8e, duration=3514.566s, table=20, n_packets=3368, n_bytes=317072, hard_timeout=300, idle_age=0, hard_age=0, priority=1,vlan_tci=0x0001/0x0fff,dl_dst=fa:16:3e:c4:64:70 actions=load:0->NXM_OF_VLAN_TCI[],load:0x16->NXM_NX_TUN_ID[],output:3
[heat-admin@overcloud-novacompute-0 ~]$
The third port is the vxlan tunnel:
[heat-admin@overcloud-controller-0 ~]$ sudo ovs-ofctl show br-tun | grep addr
 1(patch-int): addr:a2:69:00:c5:fa:ba
 2(vxlan-c0a8ff1a): addr:86:f0:ce:d0:e8:ea
 3(vxlan-c0a8ff13): addr:72:aa:73:2c:2e:5b
 LOCAL(br-tun): addr:a6:cb:cd:72:1c:45
[heat-admin@overcloud-controller-0 ~]$
Which looks at the control node:
[heat-admin@overcloud-controller-0 ~]$ sudo sudo ovs-appctl dpif/show | grep vxlan-c0a8ff1a
    vxlan-c0a8ff1a 2/5: (vxlan: egress_pkt_mark=0, key=flow, local_ip=192.168.255.15, remote_ip=192.168.255.26)
[heat-admin@overcloud-controller-0 ~]$
The traffic reached the control node, so we need to go to it and see how routing will take place.
As you remember, the control node inside looked exactly like the compute node - the same three bridges, only br-ex had a physical port through which the node could send traffic outside. Instance creation changed the configuration on compute nodes - linux bridge, iptables and interfaces were added to the nodes. The creation of networks and a virtual router also left its mark on the configuration of the control node.
So, it is obvious that the gateway poppy address should be in the br-int forwarding table on the control node. Let's check that it is there and where it looks:
[heat-admin@overcloud-controller-0 ~]$ sudo ovs-appctl fdb/show br-int | grep fa:16:3e:c4:64:70
    5     1  fa:16:3e:c4:64:70    1
[heat-admin@overcloud-controller-0 ~]$
[heat-admin@overcloud-controller-0 ~]$  sudo ovs-ofctl show br-int | grep addr
 1(int-br-ex): addr:2e:58:b6:db:d5:de
 2(patch-tun): addr:06:41:90:f0:9e:56
 3(tapca25a97e-64): addr:fa:16:3e:e6:2c:5c
 4(tap22015e46-0b): addr:fa:16:3e:76:c2:11
 5(qr-0c52b15f-8f): addr:fa:16:3e:c4:64:70
 6(qr-92fa49b5-54): addr:fa:16:3e:80:13:72
 LOCAL(br-int): addr:06:de:5d:ed:44:44
[heat-admin@overcloud-controller-0 ~]$
Mac is visible from port qr-0c52b15f-8f. If we go back to the list of virtual ports in Openstack, then this port type is used to connect various virtual devices to OVS. To be more precise qr is a port towards the virtual router, which is represented as a namespace.
Let's see what namespaces are on the server:
[heat-admin@overcloud-controller-0 ~]$ sudo  ip netns
qrouter-0a4d2420-4b9c-46bd-aec1-86a1ef299abe (id: 2)
qdhcp-7d541e74-1c36-4e1d-a7c4-0968c8dbc638 (id: 1)
qdhcp-67a3798c-32c0-4c18-8502-2531247e3cc2 (id: 0)
[heat-admin@overcloud-controller-0 ~]$
As many as three copies. But judging by the names, you can guess the purpose of each of them. We will return to instances with IDs 0 and 1 later, now we are interested in namespace qrouter-0a4d2420-4b9c-46bd-aec1-86a1ef299abe:
[heat-admin@overcloud-controller-0 ~]$ sudo  ip netns exec qrouter-0a4d2420-4b9c-46bd-aec1-86a1ef299abe ip route
10.0.1.0/24 dev qr-0c52b15f-8f proto kernel scope link src 10.0.1.254
10.0.2.0/24 dev qr-92fa49b5-54 proto kernel scope link src 10.0.2.254
[heat-admin@overcloud-controller-0 ~]$
This namespace has two internal ones that we created earlier. Both virtual ports are added to br-int. Let's check the mass address of the port qr-0c52b15f-8f, since traffic, judging by the destination poppy address, went exactly to this interface.
[heat-admin@overcloud-controller-0 ~]$ sudo  ip netns exec qrouter-0a4d2420-4b9c-46bd-aec1-86a1ef299abe ifconfig qr-0c52b15f-8f
qr-0c52b15f-8f: flags=4163<UP,BROADCAST,RUNNING,MULTICAST>  mtu 1450
        inet 10.0.1.254  netmask 255.255.255.0  broadcast 10.0.1.255
        inet6 fe80::f816:3eff:fec4:6470  prefixlen 64  scopeid 0x20<link>
        ether fa:16:3e:c4:64:70  txqueuelen 1000  (Ethernet)
        RX packets 5356  bytes 427305 (417.2 KiB)
        RX errors 0  dropped 0  overruns 0  frame 0
        TX packets 5195  bytes 490603 (479.1 KiB)
        TX errors 0  dropped 0 overruns 0  carrier 0  collisions 0

[heat-admin@overcloud-controller-0 ~]$
That is, in this case, everything works according to the laws of standard routing. Since the traffic is intended for the host 10.0.2.8, it must go out through the second interface qr-92fa49b5-54 and go through the vxlan tunnel to the compute node:
[heat-admin@overcloud-controller-0 ~]$ sudo  ip netns exec qrouter-0a4d2420-4b9c-46bd-aec1-86a1ef299abe arp
Address                  HWtype  HWaddress           Flags Mask            Iface
10.0.1.88                ether   fa:16:3e:72:ad:53   C                     qr-0c52b15f-8f
10.0.1.90                ether   fa:16:3e:83:ad:a4   C                     qr-0c52b15f-8f
10.0.2.8                 ether   fa:16:3e:6c:ad:9c   C                     qr-92fa49b5-54
10.0.2.42                ether   fa:16:3e:f5:0b:29   C                     qr-92fa49b5-54
10.0.1.85                ether   fa:16:3e:44:98:20   C                     qr-0c52b15f-8f
[heat-admin@overcloud-controller-0 ~]$
Everything is logical, no surprises. We look from where the poppy address of the host 10.0.2.8 is visible in br-int:
[heat-admin@overcloud-controller-0 ~]$ sudo ovs-appctl fdb/show br-int | grep fa:16:3e:6c:ad:9c
    2     2  fa:16:3e:6c:ad:9c    1
[heat-admin@overcloud-controller-0 ~]$
[heat-admin@overcloud-controller-0 ~]$ sudo ovs-ofctl show br-int | grep addr
 1(int-br-ex): addr:2e:58:b6:db:d5:de
 2(patch-tun): addr:06:41:90:f0:9e:56
 3(tapca25a97e-64): addr:fa:16:3e:e6:2c:5c
 4(tap22015e46-0b): addr:fa:16:3e:76:c2:11
 5(qr-0c52b15f-8f): addr:fa:16:3e:c4:64:70
 6(qr-92fa49b5-54): addr:fa:16:3e:80:13:72
 LOCAL(br-int): addr:06:de:5d:ed:44:44
[heat-admin@overcloud-controller-0 ~]$
As expected, traffic goes to br-tun, let's see which tunnel the traffic goes to next:
[heat-admin@overcloud-controller-0 ~]$ sudo ovs-ofctl dump-flows br-tun | grep fa:16:3e:6c:ad:9c
 cookie=0x2ab04bf27114410e, duration=5346.829s, table=20, n_packets=5248, n_bytes=498512, hard_timeout=300, idle_age=0, hard_age=0, priority=1,vlan_tci=0x0002/0x0fff,dl_dst=fa:16:3e:6c:ad:9c actions=load:0->NXM_OF_VLAN_TCI[],load:0x63->NXM_NX_TUN_ID[],output:2
[heat-admin@overcloud-controller-0 ~]$
[heat-admin@overcloud-controller-0 ~]$ sudo ovs-ofctl show br-tun | grep addr
 1(patch-int): addr:a2:69:00:c5:fa:ba
 2(vxlan-c0a8ff1a): addr:86:f0:ce:d0:e8:ea
 3(vxlan-c0a8ff13): addr:72:aa:73:2c:2e:5b
 LOCAL(br-tun): addr:a6:cb:cd:72:1c:45
[heat-admin@overcloud-controller-0 ~]$
[heat-admin@overcloud-controller-0 ~]$ sudo sudo ovs-appctl dpif/show | grep vxlan-c0a8ff1a
    vxlan-c0a8ff1a 2/5: (vxlan: egress_pkt_mark=0, key=flow, local_ip=192.168.255.15, remote_ip=192.168.255.26)
[heat-admin@overcloud-controller-0 ~]$
Traffic goes into the tunnel to compute-1. Well, on compute-1 everything is simple - from br-tun the packet goes to br-int and from there to the interface of the virtual machine:
[heat-admin@overcloud-controller-0 ~]$ sudo sudo ovs-appctl dpif/show | grep vxlan-c0a8ff1a
    vxlan-c0a8ff1a 2/5: (vxlan: egress_pkt_mark=0, key=flow, local_ip=192.168.255.15, remote_ip=192.168.255.26)
[heat-admin@overcloud-controller-0 ~]$
[heat-admin@overcloud-novacompute-1 ~]$ sudo ovs-appctl fdb/show br-int | grep fa:16:3e:6c:ad:9c
    4     2  fa:16:3e:6c:ad:9c    1
[heat-admin@overcloud-novacompute-1 ~]$ sudo ovs-ofctl show br-int | grep addr
 1(int-br-ex): addr:8a:d7:f9:ad:8c:1d
 2(patch-tun): addr:46:cc:40:bd:20:da
 3(qvoe7e23f1b-07): addr:12:78:2e:34:6a:c7
 4(qvo3210e8ec-c0): addr:7a:5f:59:75:40:85
 LOCAL(br-int): addr:e2:27:b2:ed:14:46
[heat-admin@overcloud-novacompute-1 ~]$
Let's check that this is indeed the correct interface:
[heat-admin@overcloud-novacompute-1 ~]$ brctl show
bridge name     bridge id               STP enabled     interfaces
docker0         8000.02429c001e1c       no
qbr3210e8ec-c0          8000.ea27f45358be       no              qvb3210e8ec-c0
                                                        tap3210e8ec-c0
qbre7e23f1b-07          8000.b26ac0eded8a       no              qvbe7e23f1b-07
                                                        tape7e23f1b-07
[heat-admin@overcloud-novacompute-1 ~]$
[heat-admin@overcloud-novacompute-1 ~]$ sudo virsh domiflist instance-00000004
Interface  Type       Source     Model       MAC
-------------------------------------------------------
tap3210e8ec-c0 bridge     qbr3210e8ec-c0 virtio      fa:16:3e:6c:ad:9c

[heat-admin@overcloud-novacompute-1 ~]$
Actually, we went all the way through the package. I think you noticed that traffic went through different vxlan tunnels and exited with different VNIs. Let's see what kind of VNIs they are, after which we will collect a dump on the control port of the node and make sure that traffic flows exactly as described above.
So, the tunnel to compute-0 has the following actions = load: 0-> NXM_OF_VLAN_TCI [], load: 0x16-> NXM_NX_TUN_ID [], output: 3. Converting 0x16 to Decimal notation:
0x16 = 6*16^0+1*16^1 = 6+16 = 22The tunnel to compute-1 has the following VNI: actions = load: 0-> NXM_OF_VLAN_TCI [], load: 0x63-> NXM_NX_TUN_ID [], output: 2. Converting 0x63 in Decimal notation:
0x63 = 3*16^0+6*16^1 = 3+96 = 99Well, now let's see the dump:
[root@hp-gen9 bormoglotx]# tcpdump -vvv -i vnet4
tcpdump: listening on vnet4, link-type EN10MB (Ethernet), capture size 262144 bytes

*****************omitted*******************

04:35:18.709949 IP (tos 0x0, ttl 64, id 48650, offset 0, flags [DF], proto UDP (17), length 134)
    192.168.255.19.41591 > 192.168.255.15.4789: [no cksum] VXLAN, flags [I] (0x08), vni 22
IP (tos 0x0, ttl 64, id 49042, offset 0, flags [DF], proto ICMP (1), length 84)
    10.0.1.85 > 10.0.2.8: ICMP echo request, id 5378, seq 9, length 64
04:35:18.710159 IP (tos 0x0, ttl 64, id 23360, offset 0, flags [DF], proto UDP (17), length 134)
    192.168.255.15.38983 > 192.168.255.26.4789: [no cksum] VXLAN, flags [I] (0x08), vni 99
IP (tos 0x0, ttl 63, id 49042, offset 0, flags [DF], proto ICMP (1), length 84)
    10.0.1.85 > 10.0.2.8: ICMP echo request, id 5378, seq 9, length 64
04:35:18.711292 IP (tos 0x0, ttl 64, id 43596, offset 0, flags [DF], proto UDP (17), length 134)
    192.168.255.26.42588 > 192.168.255.15.4789: [no cksum] VXLAN, flags [I] (0x08), vni 99
IP (tos 0x0, ttl 64, id 55103, offset 0, flags [none], proto ICMP (1), length 84)
    10.0.2.8 > 10.0.1.85: ICMP echo reply, id 5378, seq 9, length 64
04:35:18.711531 IP (tos 0x0, ttl 64, id 8555, offset 0, flags [DF], proto UDP (17), length 134)
    192.168.255.15.38983 > 192.168.255.19.4789: [no cksum] VXLAN, flags [I] (0x08), vni 22
IP (tos 0x0, ttl 63, id 55103, offset 0, flags [none], proto ICMP (1), length 84)
    10.0.2.8 > 10.0.1.85: ICMP echo reply, id 5378, seq 9, length 64

*****************omitted*******************
The first packet is a vxlan packet from host 192.168.255.19 (compute-0) to host 192.168.255.15 (control-1) with vni 22, inside which an ICMP packet is packed from host 10.0.1.85 to host 10.0.2.8. As we calculated above, vni corresponds to what we saw in the outputs.
The second packet is a vxlan packet from host 192.168.255.15 (control-1) to host 192.168.255.26 (compute-1) with vni 99, inside which an ICMP packet is packed from host 10.0.1.85 to host 10.0.2.8. As we calculated above, vni corresponds to what we saw in the outputs.
The next two packets are return traffic from 10.0.2.8 not 10.0.1.85.
That is, in the end, we got the following control node scheme:

Like everything? We forgot about two namespaces:
[heat-admin@overcloud-controller-0 ~]$ sudo  ip netns
qrouter-0a4d2420-4b9c-46bd-aec1-86a1ef299abe (id: 2)
qdhcp-7d541e74-1c36-4e1d-a7c4-0968c8dbc638 (id: 1)
qdhcp-67a3798c-32c0-4c18-8502-2531247e3cc2 (id: 0)
[heat-admin@overcloud-controller-0 ~]$
As we talked about the architecture of the cloud platform, it would be nice if machines receive addresses automatically from a DHCP server. These are two DHCP servers for our two networks 10.0.1.0/24 and 10.0.2.0/24.
Let's check that this is so. There is only one address in this namespace - 10.0.1.1 - the address of the DHCP server itself, and it is also included in the br-int:
[heat-admin@overcloud-controller-0 ~]$ sudo ip netns exec qdhcp-67a3798c-32c0-4c18-8502-2531247e3cc2 ifconfig
lo: flags=73<UP,LOOPBACK,RUNNING>  mtu 65536
        inet 127.0.0.1  netmask 255.0.0.0
        inet6 ::1  prefixlen 128  scopeid 0x10<host>
        loop  txqueuelen 1000  (Local Loopback)
        RX packets 1  bytes 28 (28.0 B)
        RX errors 0  dropped 0  overruns 0  frame 0
        TX packets 1  bytes 28 (28.0 B)
        TX errors 0  dropped 0 overruns 0  carrier 0  collisions 0

tapca25a97e-64: flags=4163<UP,BROADCAST,RUNNING,MULTICAST>  mtu 1450
        inet 10.0.1.1  netmask 255.255.255.0  broadcast 10.0.1.255
        inet6 fe80::f816:3eff:fee6:2c5c  prefixlen 64  scopeid 0x20<link>
        ether fa:16:3e:e6:2c:5c  txqueuelen 1000  (Ethernet)
        RX packets 129  bytes 9372 (9.1 KiB)
        RX errors 0  dropped 0  overruns 0  frame 0
        TX packets 49  bytes 6154 (6.0 KiB)
        TX errors 0  dropped 0 overruns 0  carrier 0  collisions 0
Let's see if the processes containing qdhcp-67a3798c-32c0-4c18-8502-2531247e3cc2 in their names on the control node:
[heat-admin@overcloud-controller-0 ~]$ ps -aux | egrep qdhcp-7d541e74-1c36-4e1d-a7c4-0968c8dbc638
root      640420  0.0  0.0   4220   348 ?        Ss   11:31   0:00 dumb-init --single-child -- ip netns exec qdhcp-7d541e74-1c36-4e1d-a7c4-0968c8dbc638 /usr/sbin/dnsmasq -k --no-hosts --no-resolv --pid-file=/var/lib/neutron/dhcp/7d541e74-1c36-4e1d-a7c4-0968c8dbc638/pid --dhcp-hostsfile=/var/lib/neutron/dhcp/7d541e74-1c36-4e1d-a7c4-0968c8dbc638/host --addn-hosts=/var/lib/neutron/dhcp/7d541e74-1c36-4e1d-a7c4-0968c8dbc638/addn_hosts --dhcp-optsfile=/var/lib/neutron/dhcp/7d541e74-1c36-4e1d-a7c4-0968c8dbc638/opts --dhcp-leasefile=/var/lib/neutron/dhcp/7d541e74-1c36-4e1d-a7c4-0968c8dbc638/leases --dhcp-match=set:ipxe,175 --local-service --bind-dynamic --dhcp-range=set:subnet-335552dd-b35b-456b-9df0-5aac36a3ca13,10.0.2.0,static,255.255.255.0,86400s --dhcp-option-force=option:mtu,1450 --dhcp-lease-max=256 --conf-file= --domain=openstacklocal
heat-ad+  951620  0.0  0.0 112944   980 pts/0    S+   18:50   0:00 grep -E --color=auto qdhcp-7d541e74-1c36-4e1d-a7c4-0968c8dbc638
[heat-admin@overcloud-controller-0 ~]$
There is such a process, and based on the information presented in the output above, we can, for example, see what we have in rent at the moment:
[heat-admin@overcloud-controller-0 ~]$ cat /var/lib/neutron/dhcp/7d541e74-1c36-4e1d-a7c4-0968c8dbc638/leases
1597492111 fa:16:3e:6c:ad:9c 10.0.2.8 host-10-0-2-8 01:fa:16:3e:6c:ad:9c
1597491115 fa:16:3e:76:c2:11 10.0.2.1 host-10-0-2-1 *
[heat-admin@overcloud-controller-0 ~]$
As a result, we get such a set of services on the control node:

Well, keep in mind - it's just - 4 machines, 2 internal networks and one virtual router ... We don't have external networks here now, heaps of different projects, each with its own networks (overlapping ), and we turned off the distributed router, and in the end there was only one control node in the test bench (for fault tolerance, there must be a quorum of three nodes). It is logical that in commerce everything is "a little" more complicated, but in this simple example we understand how this should work - if you have 3 or 300 namespaces, of course, it is important, but from the point of view of the operation of the whole structure, nothing will change much ... but as long as you do not stick some kind of vendor SDN. But that's a completely different story.
I hope it was interesting. If there are comments / additions well, or somewhere I openly lied (I am a human being and my opinion will always be subjective) - write what needs to be corrected / added - we will correct / add everything.
In conclusion, I would like to say a few words about comparing Openstack (both vanilla and vendor) with a cloud solution from VMWare - too often I have been asked this question for the last couple of years and, to be honest, I'm tired of it, but still. In my opinion, these two solutions are very difficult to compare, but we can unequivocally say that there are disadvantages in both solutions, and when choosing one solution, one must weigh the pros and cons.
If OpenStack is a community-driven solution, then VMWare has the right to do only what it wants (read - what is profitable for it) and this is logical - because it is a commercial company that is used to making money from its clients. But here there is one big and fat BUT - you can get off OpenStack, for example, from Nokia and with little blood, switch to a solution from, for example, Juniper (Contrail Cloud), but you are unlikely to get off VMWare. For me, these two solutions look like this - Openstack (vendor) is a simple cage in which you are put, but you have the key and you can exit at any time. VMWare is a golden cage, the owner has the key to the cage and it will cost you dearly.
I am not campaigning for either the first product or the second - you choose what you need. But if I had such a choice, then I would choose both solutions - VMWare for IT cloud (low loads, convenient management), OpenStack from some vendor (Nokia and Juniper provide very nice turnkey solutions) - for Telecom clouds. I would not use Openstack for pure IT - it's like shooting a sparrow with a cannon, but I don't see any contraindications to using it, except for redundancy. However, using VMWare in telecom - how to transport rubble on a Ford Raptor - is beautiful from the outside, but the driver has to make 10 trips instead of one.
In my opinion, the biggest drawback of VMWare is its complete closedness - the company will not give you any information about how it works, for example, vSAN or what is in the hypervisor core - it is simply not profitable for it - that is, you will never become an expert in VMWare - without vendor support, you are doomed (very often I meet VMWare experts who are baffled by banal questions). For me, VMWare is buying a car with a locked hood - yes, perhaps you have specialists who can change the timing belt, but only the one who sold you this solution can open the hood. Personally, I don't like solutions I can't fit into. You will say that you may not have to go under the hood. Yes, this is possible, but I will look at you when you need to assemble a large function in the cloud from 20-30 virtual machines, 40-50 networks,half of which wants to go outside, and the other half asks for SR-IOV acceleration, otherwise you will need a couple of dozen more of these machines - otherwise the performance will not be enough.
There are other points of view, so only you can decide what to choose and, most importantly, you will be responsible for your choice later. This is just my opinion - a person who has seen and touched at least 4 products - Nokia, Juniper, Red Hat and VMWare. That is, I have something to compare with.