20-30 years ago, cassettes were the most popular storage medium for audio recordings. They were also used for data storage, in particular, programs for 8-bit computers. It was the cassettes that were used to load and save programs for the ZX Spectrum. Nevertheless, cassettes are becoming less and less, despite the fact that there are quite a lot of fans of the ZX Spectrum and other similar PCs. Of course, you can use the ZX Spectrum emulator under Windows or Linux. But it's still less lamp-like than a real computer. There is another way out - to find a replacement for the cassette.
A user with the nickname JamHamster decided to go this route. His solution is the device, which looks like a familiar audio cassette, works with a cassette recorder, but instead of a magnetic tape, it uses an SD card. According to the enthusiast's idea, such a "cassette" should be inserted into a tape recorder to transmit signals to the ZX Spectrum, or connected via an audio output. By the way, there are solutions for loading programs from cassettes - for example, TZXDuino for working with ZX Spectrum, ZX81 and Amstrad CPC, but it seemed to the developer too cumbersome.
Preparing for assembly
JamHamster chose an Arduino Nano board (only 7mm board size) to build, on which he placed a memory card reader, amplifier and small display. As software for interacting with the ZX Spectrum - software that was previously developed by Edrew Beer and Duncan Edwards.

The enthusiast explained that the cassette form factor was chosen to maintain authenticity. “I think cassette-style SD boot devices are the right solution. They look cool and are stored in a standard cassette case, the design of which I really like, ”explained JamHamster.
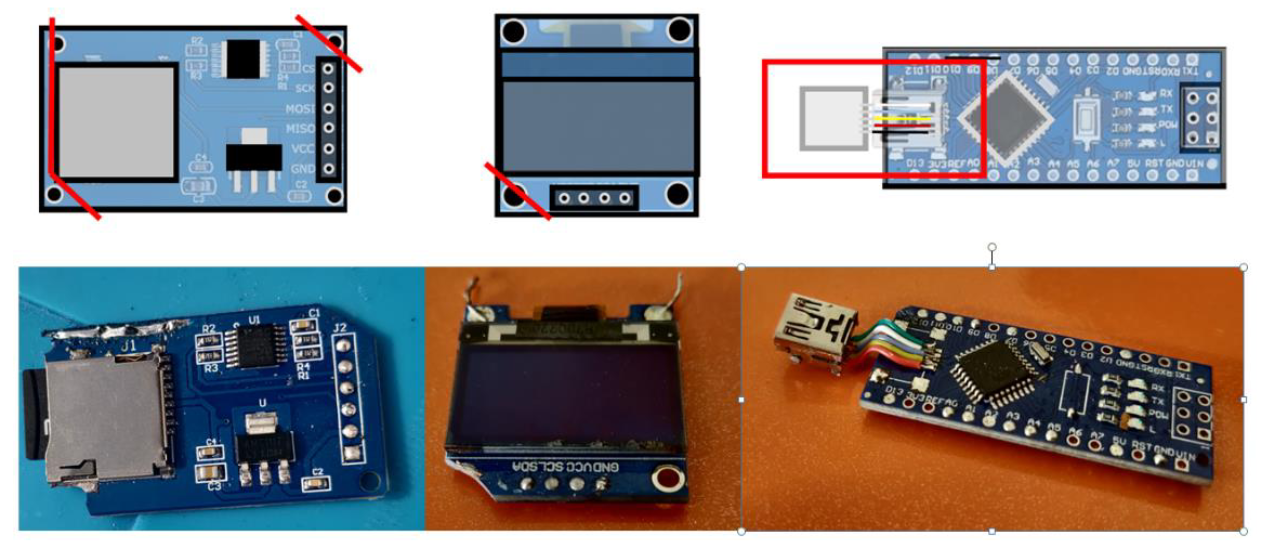
The physical dimensions of the cassette body became a challenge for the placement of all components. Therefore JamHamster has made a number of modifications. For example, the display and SD card reader have been physically reduced. Some modules, in particular the USB port, had to be “hung” on wires to fit the structure into the case. And the developer made the audio output himself.

Additionally, JamHamster gave some tips for those who want to repeat his experiment:
- Do not solder components inside the case, as it is fragile and quickly damaged.
- Check the functionality of the components before installing.
- You need to solder the wires over the contact pads, and not through.
- Do not cross the wires so as not to increase the thickness of the structure.
Do-it-yourself Arduino cassette assembly

JamHamster has prepared instructions for those who want to repeat his experiment. In it, you can find the shape according to which you need to cut the printed circuit board so that all the components fit. The volume control is first installed on it so that the wheel rotates freely and sticks out of the cassette body.

To create an audio output (you have to do it manually), you need a steel spring with a diameter of 3.5 mm. If it is not there, then this element can be created without problems using a drill of the appropriate diameter. Then, using the headphone jack, the length is verified, and all this is soldered to the board. The audio output is used when there is no cassette recorder. Through it, the gadget connects directly to the computer and transmits a signal.
As for the operation of the "cassette" with a tape recorder, to realize this possibility, a magnetic recording head is built into the device, the signal of which is read by another head, but in a cassette holder. Unfortunately, the output power of the microcontroller is not enough, so the developer added a miniature amplifier PAM8403 (2 x 3W). It is quite portable, so that the overall dimensions of the structure have not increased much.
Power supply is not required during operation, since the "cassette" has its own battery.


The chassis also houses five pushbutton switches to control the SD card reader.

By the way, data storage is not implemented in the form of .exe or .txt files. Instead, audio tracks are used, which contain program code. This is how the data was stored on audio cassettes with magnetic tape.
The main difficulty is to place the card in the cassette body. The author had to break his head over the solution of this issue, but in the end he found a solution. Shown below is how to properly cut the display board, SD reader board and rewire the USB port to save space on the board. Hot glue can be used to attach the components to the board.

The screen is placed between the cassette wheels so it will be better seen. By the way, you will have to make a change in the software code to flip the image on the monitor. This is not difficult. It is enough to replace a piece of code:
#define ROTATE180 1
// # define UNROTATE 1
with:
// # define ROTATE180 1
#define UNROTATE 1
Now it remains to install the battery, wire the wiring as indicated in the original instructions, and check the operation of all components. Then you can test on the ZX Spectrum.

The developer spent a lot of time on the implementation of the project, but the result was worth it. JamHamster and the enthusiasts who repeated his work were very pleased with what came out in the end.