
Large texture problems
The idea of rendering giant textures is not new in itself. It would seem that what could be easier - load a huge texture of a million megapixels, and draw an object with it. But, as always, there are nuances:
- Graphics APIs limit the maximum size of a texture in width and height. It can depend on both hardware and drivers. The maximum size for today is 32768x32768 pixels.
- Even if we climbed into these limits, 32768x32768 RGBA texture will take 4 gigabytes of video memory. The video memory is fast, lies on a wide bus, but is relatively expensive. Therefore, it is usually less than system memory and much less than disk memory.
1. Modern rendering of large textures
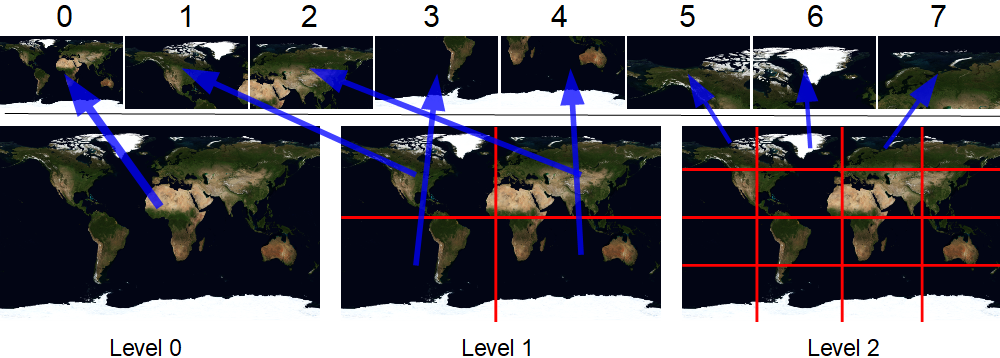
Since the image does not fit into the limits, a solution naturally suggests itself - just break it into pieces (tiles):

Various variations of this approach are still used for analytical geometry. This is not a universal approach; it requires non-trivial calculations on the CPU. Each tile is drawn as a separate object, which adds overhead and excludes the possibility of applying bilinear texture filtering (there will be a visible line between the tile boundaries). However, the texture size limitation can be circumvented by texture arrays! Yes, this texture still has limited width and height, but additional layers have appeared. The number of layers is also limited, but you can count on 2048, although the specification of the volcano only promises 256. On a 1060 GTX video card, you can create a texture containing 32768 * 32768 * 2048 pixels. It just won't be possible to create it, because it takes 8 terabytes, and there is not so much video memory. If you apply to it hardware compression block BC1 , such a texture would occupy "only" 1 terabyte. It still won't fit into a video card, but I'll tell you what to do with it further.
So, we still cut the original image into pieces. But now it will not be a separate texture for each tile, but just a piece inside a huge texture array containing all the tiles. Each piece has its own index, all pieces are arranged sequentially. First by columns, then by rows, then by layers:

A small digression about the sources of the test texture
For example - I took an image of the earth from here . I increased its original size 43200x2160 to 65536x32768. This, of course, did not add details, but I got the image I needed, which does not fit in one texture layer. Then I recursively reduced it in half with bilinear filtering, until I got a 512 by 256 pixel tile. Then I beat the resulting layers into 512x256 tiles. Compressed them BC1 and wrote them sequentially to a file. Something like this:
As a result, we got a file of 1,431,633,920 bytes, consisting of 21845 tiles. The size 512 by 256 is not random. A 512 by 256 BC1 compressed image is exactly 65536 bytes, which is the block size of the sparse image - the hero of this article. Tile size is not important for rendering.
Description of the technique for painting large textures
So we have loaded a texture array in which the tiles are sequential columns / lines / layers.
Then the shader that draws this very texture may look like this:
layout(set=0, binding=0) uniform sampler2DArray u_Texture;
layout(location = 0) in vec2 v_uv;
layout(location = 0) out vec4 out_Color;

int lodBase[8] = { 0, 1, 5, 21, 85, 341, 1365, 5461};

int tilesInWidth = 32768 / 512;
int tilesInHeight = 32768 / 256;
int tilesInLayer = tilesInWidth * tilesInHeight;

void main() {
  float lod = log2(1.0f / (512.0f * dFdx(v_uv.x)));
  int iLod = int(clamp(floor(lod),0,7));
  int cellsSize = int(pow(2,iLod));

  int tX = int(v_uv.x * cellsSize); //column index in current level of detail
  int tY = int(v_uv.y * cellsSize); //row index in current level of detail

  int tileID = lodBase[iLod] + tX + tY * cellsSize; //global tile index

  int layer = tileID / tilesInLayer;
  int row = (tileID % tilesInLayer) / tilesInWidth;
  int column = (tileID % tilesInWidth);
  vec2 inTileUV = fract(v_uv * cellsSize);
  vec2 duv = (inTileUV  + vec2(column,row)) / vec2(tilesInWidth,tilesInHeight);
  out_Color = texelFetch(u_Texture,ivec3(duv * textureSize(u_Texture,0).xy,layer),0);
}
Let's take a look at this shader. First of all, we need to determine what level of detail to choose. The wonderful function dFdx will help us with this . To simplify greatly, it returns the value by which the passed attribute is larger in the neighboring pixel. In the demo I draw a flat rectangle with texture coordinates in the range 0..1. When this rectangle is X pixels wide, dFdx (v_uv.x) will return 1 / X. Thus, the tile of the first level will fall pixel to pixel with dFdx == 1/512. The second at 1/1024, the third at 1/2048, etc. The level of detail itself can be calculated as follows: log2 (1.0f / (512.0f * dFdx (v_uv.x))). Let's cut off the fractional part from it. Then we count how many tiles are in width / height in the level.
Let's consider the calculation of the rest using an example:

here lod = 2, u = 0.65, v = 0.37
since lod is equal to two, then cellsSize is equal to four. The picture shows that this level consists of 16 tiles (4 rows 4 columns) - everything is correct.
tX = int (0.65 * 4) = int (2.6) = 2
tY = int (0.37 * 4) = int (1.48) = 1
i.e. inside the level, this tile is on the third column and second row (indexing from zero).
We also need the local coordinates of the fragment (yellow arrows in the picture). They can be easily calculated by simply multiplying the original texture coordinates by the number of cells in a row / column and taking the fractional part. In the calculations above, they are already there - 0.6 and 0.48.
Now we need a global index for this tile. For this I use the lodBase pre-calculated array. It stores by index the values of how many tiles were in all the previous (smaller) levels. Add to it the local index of the tile inside the level. For example, it turns out lodBase [2] + 1 * 4 + 2 = 5 + 4 + 2 = 11. Which is also correct.
Knowing the global index, we now need to find the coordinates of the tile in our texture array. To do this, we need to know how many tiles we have fit in width and height. Their product is how many tiles fit into the layer. In this example, I stitched these constants right in the shader code, for simplicity. Next, we get the texture coordinates and read the texel from them. Note that sampler2DArray is used as a sampler . Therefore texelFetch we pass a three-component vector, in the third coordinate - the layer number.
Textures not fully loaded (partial residency images)
As I wrote above, huge textures consume a lot of video memory. Moreover, a very small number of pixels are used from this texture. The solution to the problem - Partial Residency Textures appeared in 2011. Its essence is in short - the tile may not be physically in memory! At the same time, the specification guarantees that the application does not crash, and all known implementations guarantee that zeros are returned. Also, the specification guarantees that if the extension is supported, then the guaranteed block size in bytes is supported - 64 kibytes. The resolutions of the building blocks in the texture are tied to this size:
| TEXEL SIZE (bits) | Block Shape (2D) | Block Shape (3D) |
|---|---|---|
| ? 4-Bit? | ? 512 × 256 × 1 | not support |
| 8-Bit | 256 × 256 × 1 | 64 × 32 × 32 |
| 16-Bit | 256 × 128 × 1 | 32 × 32 × 32 |
| 32-Bit | 128 × 128 × 1 | 32 × 32 × 16 |
| 64-Bit | 128 × 64 × 1 | 32 × 16 × 16 |
| 128-Bit | 64 × 64 × 1 | 16 × 16 × 16 |
In fact, there is nothing in the specification about 4-bit texels, but we can always find out about them using vkGetPhysicalDeviceSparseImageFormatProperties .
VkSparseImageFormatProperties sparseProps;
ermy::u32 propsNum = 1;

vkGetPhysicalDeviceSparseImageFormatProperties(hphysicalDevice, VK_FORMAT_BC1_RGB_SRGB_BLOCK, VkImageType::VK_IMAGE_TYPE_2D,
			VkSampleCountFlagBits::VK_SAMPLE_COUNT_1_BIT, VkImageUsageFlagBits::VK_IMAGE_USAGE_SAMPLED_BIT | VkImageUsageFlagBits::VK_IMAGE_USAGE_TRANSFER_DST_BIT
			, VkImageTiling::VK_IMAGE_TILING_OPTIMAL, &propsNum, &sparseProps);

int pageWidth = sparseProps.imageGranularity.width;
int pageHeight = sparseProps.imageGranularity.height;
The creation of such a sparse texture is different from the usual one.
Firstly in VkImageCreateInfo in flags must be specified VK_IMAGE_CREATE_SPARSE_BINDING_BIT and VK_IMAGE_CREATE_SPARSE_RESIDENCY_BIT
Second, tying via memory vkBindImageMemory not necessary.
You need to find out what types of memory can be used through vkGetImageMemoryRequirements . It will also tell you how much memory is needed to load the entire texture, but we don't need this figure.
Instead, we need to decide at the application level, how many tiles can be simultaneously visible?
After loading some tiles, others will be unloaded, since they are no longer needed. In the demo, I just pointed my finger at the sky and allocated memory for one thousand twenty four tiles. Sounds wasteful, but it's only 50 megabytes versus 1.4GB of a fully loaded texture. You also need to allocate memory on the host, for staging - a buffer.
const int sparseBlockSize = 65536;
int numHotPages = 512; //
VkMemoryRequirements memReqsOpaque;
vkGetImageMemoryRequirements(device, mySparseImage, &memReqsOpaque); //    memoryTypeBits.       -

VkMemoryRequirements image_memory_requirements;
image_memory_requirements.alignment = sparseBlockSize ; //
image_memory_requirements.size = sparseBlockSize * numHotPages;
image_memory_requirements.memoryTypeBits = memReqsOpaque.memoryTypeBits;
This way we will have a huge texture in which only some parts are loaded. It will look something like this:

Tile management
In what follows, I will use the term tile to denote a piece of texture (dark green and gray squares in the figure) and the term page to denote a piece in a large block pre-allocated in video memory (light green and light blue rectangles in the figure).
After creating such a sparse VkImage , it can be used through the VkImageView in the shader. Of course, this will be useless - sampling will return zeros, there is no data, but unlike the usual VkImage, nothing will fall and the debug layers will not swear. The data in this texture will need to be not only loaded, but also unloaded, since we save video memory.
The OpenGL approach, which provides for the allocation of memory by the driver for each block, does not seem correct to me. Yes, maybe some clever and fast allocator is used there, because the block size is fixed. This is hinted at by the fact that a similar approach is used in the example of sparse residency textures in a volcano. But in any case, select a large linear block of pages and, on the application side, bind these pages to specific texture tiles and fill them with data will definitely not be slower.
Thus, the interface of our sparse texture will include methods like:
void CommitTile(int tileID, void* dataPtr); //    64
void FreeTile(int tileID);
void Flush();
The last method is needed in order to group the fill / release of tiles. Updating tiles one at a time is quite expensive, just once per frame. Let's sort them out in order.
//void CommitTile(int tileID, void* dataPtr)
int freePageID = _getFreePageID();

if (freePageID != -1)
{
	tilesByPageIndex[freePageID] = tileID;
	tilesByTileID[tileID] = freePageID;

	memcpy(stagingPtr + freePageID * pageDataSize, tileData, pageDataSize);

	int pagesInWidth = textureWidth / pageWidth;
	int pagesInHeight = textureHeight / pageHeight;
	int pagesInLayer = pagesInWidth * pagesInHeight;

	int layer = tileID / pagesInLayer;
	int row = (tileID % pagesInLayer) / pagesInWidth;
	int column = tileID % pagesInWidth;

	VkSparseImageMemoryBind mbind;
	mbind.subresource.aspectMask = VK_IMAGE_ASPECT_COLOR_BIT;
	mbind.subresource.mipLevel = 0;
	mbind.subresource.arrayLayer = layer;
	mbind.extent.width = pageWidth;
	mbind.extent.height = pageHeight;
	mbind.extent.depth = 1;
	mbind.offset.x = column * pageWidth;
	mbind.offset.y = row * pageHeight;
	mbind.offset.z = 0;
	mbind.memory = optimalTilingMem;
	mbind.memoryOffset = freePageID * pageDataSize;
	mbind.flags = 0;
	memoryBinds.push_back(mbind);

	VkBufferImageCopy copyRegion;
	copyRegion.bufferImageHeight = pageHeight;
	copyRegion.bufferRowLength = pageWidth;
	copyRegion.bufferOffset = mbind.memoryOffset;
	copyRegion.imageExtent.depth = 1;
	copyRegion.imageExtent.width = pageWidth;
	copyRegion.imageExtent.height = pageHeight;
	copyRegion.imageOffset.x = mbind.offset.x;
	copyRegion.imageOffset.y = mbind.offset.y;
	copyRegion.imageOffset.z = 0;
	copyRegion.imageSubresource.aspectMask = VK_IMAGE_ASPECT_COLOR_BIT;
	copyRegion.imageSubresource.baseArrayLayer = layer;
	copyRegion.imageSubresource.layerCount = 1;
	copyRegion.imageSubresource.mipLevel = 0;
	copyRegions.push_back(copyRegion);

        return true;
}

return false;
First, we need to find a free block. I just go through the array of these very pages and look for the first one, which contains the stub number -1. This will be the index of the free page. I copy data from disk to staging buffer using memcpy. The source is a memory mapped file with an offset for a specific tile. Further, by the ID of the tile, I consider its position (x, y, layer) in the texture array.
Next, the most interesting part begins - filling in the VkSparseImageMemoryBind structure . It is she who binds the video memory to the tile. Its important fields are:
memory . This is a VkDeviceMemory object . It pre-allocated memory for all pages.
memoryOffset . This is the offset in bytes to the page we need.
Next, we will need to copy data from the staging buffer into this freshly bound memory. This is done using vkCmdCopyBufferToImage .
Since we will copy many sections at once, in this place we only fill in the structure, with a description of where and where we will copy. Here bufferOffset is important , which indicates the offset already in the staging buffer. In this case, it coincides with the offset in the video memory, but the strategies can be different. For example, divide tiles into hot, warm and cold. The hot ones are in the video memory, the warm ones are in the operational memory, and the cold ones are on the disk. Then the staging buffer can be larger and the offset will be different.
//void FreeTile(int tileID)
if (tilesByTileID.count(tileID) > 0)
{
	i16 hotPageID = tilesByTileID[tileID];

	int pagesInWidth = textureWidth / pageWidth;
	int pagesInHeight = textureHeight / pageHeight;
	int pagesInLayer = pagesInWidth * pagesInHeight;

	int layer = tileID / pagesInLayer;
	int row = (tileID % pagesInLayer) / pagesInWidth;
	int column = tileID % pagesInWidth;

	VkSparseImageMemoryBind mbind;
	mbind.memory = optimalTilingMem;
	mbind.subresource.aspectMask = VK_IMAGE_ASPECT_COLOR_BIT;
	mbind.subresource.mipLevel = 0;
	mbind.subresource.arrayLayer = layer;
	mbind.extent.width = pageWidth;
	mbind.extent.height = pageHeight;
	mbind.extent.depth = 1;
	mbind.offset.x = column * pageWidth;
	mbind.offset.y = row * pageHeight;
	mbind.offset.z = 0;
	mbind.memory = VK_NULL_HANDLE;
	mbind.memoryOffset = 0;
	mbind.flags = 0;

	memoryBinds.push_back(mbind);

	tilesByPageIndex[hotPageID] = -1;
	tilesByTileID.erase(tileID);

	return true;
}

return false;
This is where we decouple the memory from the tile. To do this, assign memory VK_NULL_HANDLE .
//void Flush();
cbuff = hostDevice->CreateOneTimeSubmitCommandBuffer();

VkImageSubresourceRange imageSubresourceRange;
imageSubresourceRange.aspectMask = VK_IMAGE_ASPECT_COLOR_BIT;
imageSubresourceRange.baseMipLevel = 0;
imageSubresourceRange.levelCount = 1;
imageSubresourceRange.baseArrayLayer = 0;
imageSubresourceRange.layerCount = numLayers;

VkImageMemoryBarrier bSamplerToTransfer;
bSamplerToTransfer.sType = VK_STRUCTURE_TYPE_IMAGE_MEMORY_BARRIER;
bSamplerToTransfer.pNext = nullptr;
bSamplerToTransfer.srcAccessMask = 0;
bSamplerToTransfer.dstAccessMask = VK_ACCESS_TRANSFER_WRITE_BIT;
bSamplerToTransfer.oldLayout = VK_IMAGE_LAYOUT_SHADER_READ_ONLY_OPTIMAL;
bSamplerToTransfer.newLayout = VK_IMAGE_LAYOUT_TRANSFER_DST_OPTIMAL;
bSamplerToTransfer.srcQueueFamilyIndex = VK_QUEUE_FAMILY_IGNORED;
bSamplerToTransfer.dstQueueFamilyIndex = VK_QUEUE_FAMILY_IGNORED;
bSamplerToTransfer.image = opaqueImage;
bSamplerToTransfer.subresourceRange = imageSubresourceRange;

VkSparseImageMemoryBindInfo imgBindInfo;
imgBindInfo.image = opaqueImage;
imgBindInfo.bindCount = memoryBinds.size();
imgBindInfo.pBinds = memoryBinds.data();

VkBindSparseInfo sparseInfo;
sparseInfo.sType = VK_STRUCTURE_TYPE_BIND_SPARSE_INFO;
sparseInfo.pNext = nullptr;
sparseInfo.waitSemaphoreCount = 0;
sparseInfo.pWaitSemaphores = nullptr;
sparseInfo.bufferBindCount = 0;
sparseInfo.pBufferBinds = nullptr;
sparseInfo.imageOpaqueBindCount = 0;
sparseInfo.pImageOpaqueBinds = nullptr;
sparseInfo.imageBindCount = 1;
sparseInfo.pImageBinds = &imgBindInfo;
sparseInfo.signalSemaphoreCount = 0;
sparseInfo.pSignalSemaphores = nullptr;

VkImageMemoryBarrier bTransferToSampler;
bTransferToSampler.sType = VK_STRUCTURE_TYPE_IMAGE_MEMORY_BARRIER;
bTransferToSampler.pNext = nullptr;
bTransferToSampler.srcAccessMask = 0;
bTransferToSampler.dstAccessMask = VK_ACCESS_SHADER_READ_BIT;
bTransferToSampler.oldLayout = VK_IMAGE_LAYOUT_TRANSFER_DST_OPTIMAL;
bTransferToSampler.newLayout = VK_IMAGE_LAYOUT_SHADER_READ_ONLY_OPTIMAL;
bTransferToSampler.srcQueueFamilyIndex = VK_QUEUE_FAMILY_IGNORED;
bTransferToSampler.dstQueueFamilyIndex = VK_QUEUE_FAMILY_IGNORED;
bTransferToSampler.image = opaqueImage;
bTransferToSampler.subresourceRange = imageSubresourceRange;

vkQueueBindSparse(graphicsQueue, 1, &sparseInfo, fence);

vkWaitForFences(device, 1, &fence, true, UINT64_MAX);
vkResetFences(device, 1, &fence);

vkCmdPipelineBarrier(cbuff, VK_PIPELINE_STAGE_TOP_OF_PIPE_BIT, VK_PIPELINE_STAGE_TRANSFER_BIT, 0, 0, nullptr, 0, nullptr, 1, &bSamplerToTransfer);

if (copyRegions.size() > 0)
{
	vkCmdCopyBufferToImage(cbuff, stagingBuffer, opaqueImage, VkImageLayout::VK_IMAGE_LAYOUT_TRANSFER_DST_OPTIMAL, copyRegions.size(), copyRegions.data());
}

vkCmdPipelineBarrier(cbuff, VK_PIPELINE_STAGE_TRANSFER_BIT, VK_PIPELINE_STAGE_FRAGMENT_SHADER_BIT, 0, 0, nullptr, 0, nullptr, 1, &bTransferToSampler);

hostDevice->ExecuteCommandBuffer(cbuff);

copyRegions.clear();
memoryBinds.clear();
The main work takes place in this method. At the time of its call, we already have two arrays with VkSparseImageMemoryBind and VkBufferImageCopy. We fill in the structures for calling vkQueueBindSparse and call it. This is not a blocking function (like almost all functions in Vulkan), so we will need to wait explicitly for it to execute. For this, the last parameter is passed to it VkFence , the execution of which we will wait. In fact, in my case, waiting for this fenza did not affect the performance of the program in any way. But, in theory, it is needed here.
After we have attached memory to the tiles, we need to fill in pictures in them. This is done with the vkCmdCopyBufferToImage function .
You can fill the data into the texture with layoutVK_IMAGE_LAYOUT_TRANSFER_DST_OPTIMAL , and get them in the shader with layout VK_IMAGE_LAYOUT_SHADER_READ_ONLY_OPTIMAL . Therefore, we need two barriers. Please note that in VK_IMAGE_LAYOUT_TRANSFER_DST_OPTIMAL wetranslate strictly from VK_IMAGE_LAYOUT_SHADER_READ_ONLY_OPTIMAL , not from VK_IMAGE_LAYOUT_UNDEFINED . Since we are filling only part of the texture, it is important for us not to lose those parts of it that were filled earlier.
Here's a video of how it works. One texture. One object. Tens of thousands of tiles.
What remains behind the scenes is how to determine in the application how to actually find out which tile is time to load and which to unload. In the section describing the benefits of the new approach, one of the points was that you can use complex geometry. In the same test, I myself use the simplest orthographic projection and rectangle. And I count the id of the tiles analytically. Unsportsmanlike.
In fact, the ids of visible tiles are counted twice. Analytically on the CPU and honestly on the fragment shader. It would seem, why not pick them up from the fragment shader? But it’s not that simple. This will be the second article.