
One of the tasks of a phonoscopic examination is to establish the authenticity and authenticity of an audio recording - in other words, to identify signs of editing, distortion and alteration of the recording. We had the task of conducting it in order to establish the authenticity of the records - to determine that no influence was carried out on the records. But how to analyze thousands, and even hundreds of thousands of audio recordings?
AI methods come to our rescue, as well as a utility for working with audio, which we talked about in an article on the NewTechAudit website "PROCESSING AUDIO WITH FFMPEG" .
How do changes in audio appear? How can you tell a modified file from an untouched file?
There are several such signs, and the simplest is identifying information on editing a file and analyzing the date of its modification. These methods are easily implemented by means of the OS itself, so we will not dwell on these methods. But changes can be made by a more qualified user who can hide or change the information about editing, in this case, more complex methods are used, for example:
- shift of contours;
- changing the spectral profile of the recorded audio;
- the appearance of pauses;
- and many others.
And all these complex sounding methods are performed by specially trained experts - phonoscopists using specialized software such as Praat, Speech Analyzer SIL, ELAN, most of which are paid and require high enough qualifications to use and interpret the results.
Experts analyze audio using a spectral profile, namely by analyzing its cepstral coefficients. We will use the experience of experts, and at the same time use the ready-made code, adapting it to our task.
So there are a lot of changes that can be made, how do we choose?
Of the possible types of changes that can be made to audio files, we are interested in cutting out a part from the audio, or cutting out a part and then replacing the original part with a piece of the same duration - the so-called cut / copy changes. editing files in terms of noise reduction, changing the tone frequency and others do not carry the risk of hiding information.
And how will we identify these same cut / copy? Should they be compared with something?
It's very simple - with the help of the FFmpeg utility we will cut out a part of a random duration from the file and in a random place after which we will compare the small-cepstral spectrograms of the original and the "cut" file.
Code to display them:
import numpy as np
import librosa
import librosa.display
import matplotlib.pyplot as plt

def make_spek(audio):
    n_fft = 2048
    y, sr = librosa.load(audio)
    ft = np.abs(librosa.stft(y[:n_fft], hop_length = n_fft+1))
    spec = np.abs(librosa.stft(y, hop_length=512))
    spec = librosa.amplitude_to_db(spec, ref=np.max)
    mel_spect = librosa.feature.melspectrogram(y=y, sr=sr, n_fft=2048, hop_length=1024)
    mel_spect = librosa.power_to_db(mel_spect, ref=np.max)
    librosa.display.specshow(mel_spect, y_axis='mel', fmax=8000, x_axis='time');
    plt.title('Mel Spectrogram');
    plt.colorbar(format='%+2.0f dB');
    plt.show();
make_spek('./audio/original.wav')# './audio/original.wav'
We prepare a dataset from the source and cut files using the FFmpeg utility command:
ffmpeg -i oroginal.wav -ss STARTTIME -to ENDTIME -acodec copy cut.wav where STARTTIME and ENDTIME are the beginning and end of the cut fragment. And using the command:
ffmpeg -iconcat:"part_0.wav|part_1.wav |part_2.wav" -codeccopyconcat.wavjoin the part of the file to insert part_1.wav with the original parts (for wrapping FFmpeg commands in python, see our article on FFmpeg).
Here are the original files chalk-spectrogram of which have been cut out of the audio of 0.2-2.5 seconds, and chalk-spectrogram of files that have been cut out of the audio of 0.2-2.5 seconds, and then inserted into the audio fragments of a similar duration of this audio file:
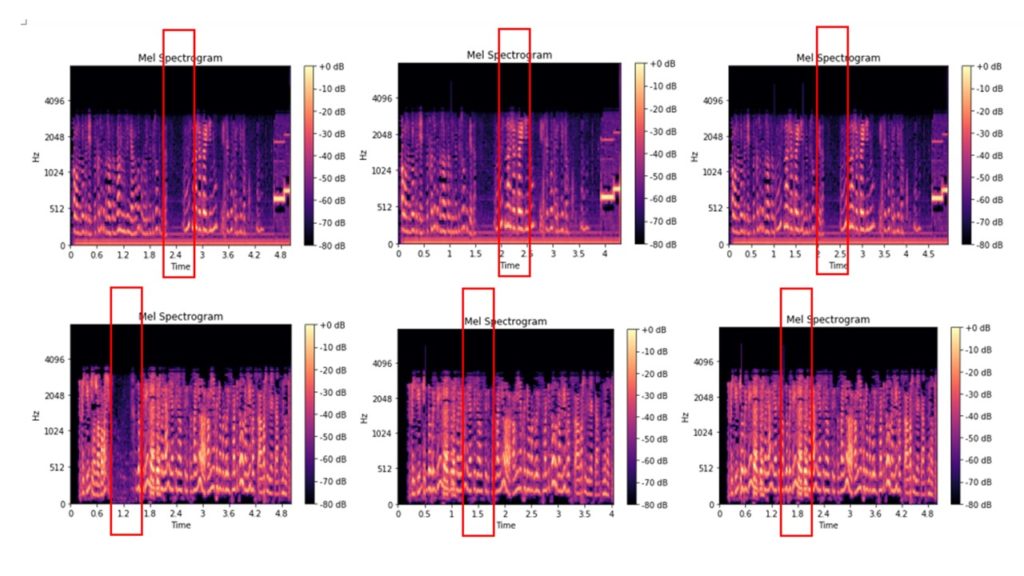
Some images are distinguishable even visually, others look almost the same. We distribute the resulting images into folders and use them as input data for training the model for image classification. Folder structure:
model.py #
/input/train/original/ #
/input/train/cut_copy/ #
For us, it makes no difference whether the modified audio file was supplemented or shortened - we divide all the results into good, that is, files without changes, and bad. Thus, we solve the classical problem of binary classification. We will classify using neural networks, we will take the code for working with a neural network ready-made from examples of working with the Keras package.
#
from keras.models import Sequential
from keras.layers import Flatten
from keras.layers import Dense
from keras.layers import Conv2D
from keras.layers import MaxPooling2D

#
classifier = Sequential()
classifier.add(Conv2D(32, (3, 3), input_shape = (64, 64, 3), activation = 'relu'))
classifier.add(MaxPooling2D(pool_size = (2, 2)))
classifier.add(Conv2D(32, (3, 3), activation = 'relu'))
classifier.add(MaxPooling2D(pool_size = (2, 2)))
classifier.add(Flatten())
classifier.add(Dense(units = 128, activation = 'relu'))
classifier.add(Dense(units = 1, activation = 'sigmoid'))
classifier.compile(optimizer = 'adam', loss = 'binary_crossentropy', metrics = ['accuracy'])

#
from keras.preprocessing.image import ImageDataGenerator as img

train_datagen = img(rescale = 1./255,
shear_range = 0.2,
zoom_range = 0.2,
horizontal_flip = True)
test_datagen = img(rescale = 1./255)
training_set = train_datagen.flow_from_directory('input/train',
target_size = (64, 64),
batch_size = 32,
class_mode = 'binary')
test_set = test_datagen.flow_from_directory('input/test',
target_size = (64, 64),
batch_size = 32,
class_mode = 'binary')
classifier.fit_generator(
    training_set,
    steps_per_epoch = 8000,
    epochs = 25,
    validation_data = test_set,
    validation_steps = 2000)
Further, after the model has trained, we carry out the classification with its help
import numpy as np
from keras.preprocessing import image

test_image = image.load_img('dataset/prediction/original_or_corrupt.jpg', target_size = (64, 64))
test_image = image.img_to_array(test_image)
test_image = np.expand_dims(test_image, axis = 0)
result = classifier.predict(test_image)
training_set.class_indices
ifresult[0][0] == 1:
prediction = 'original'
else:
prediction = 'corrupt'
At the output, we get the audio file classification - 'original' / 'corrupt', i.e. the file unchanged and the files to which the changes were made.
We proved once again that complex looking things can be done simply - we used not the most difficult mechanism of AI methods, ready-made solutions and checked the audio for changes. Well, we were the experts from the detective.