
: WWDC 2020, . , , — - , . , , - WWDC
Most of you have probably worked or are currently working on an application for which much of the functionality depends on communicating with the server over HTTP. When things don't work as expected, or you just want to understand a region of code that you are not already familiar with, it is often helpful to look at the HTTP requests going between the application and the server. What requests were made? What exactly is the server sending? For this, you probably use tools like Charles Proxy or Wireshark .
However, these tools are often quite difficult to use and especially to set up. They may require you to set up your own SSL certificate and perform many non-trivial steps to get the device to trust it. They also display a lot of information that you may never need to understand your application. And at the same time, they are difficult to map to what is happening in your application. What if I told you that there are tools out there that can do most of this work, that require a lot less hassle from you setting them up, and that display the information in a way that is much more comparable to what is actually happening in your application? ?
In preparation for next week's WWDC 1 , I (re) watched a couple of talks from previous WWDCs. Anyway, I completely missed that the core tools were rewritten to unify them and make it much easier to create custom tools for Xcode 10. Also, WWDC 2019 turned out to be a great introduction to the tools that I have been missing all these years.
Cool, now you can write your own tools to measure things that tools don't normally measure. But what can you measure and how easy is it? I would say: "almost everything" and "not that very difficult, fast enough." Typically, all you need to do is write an XML file that tells you how to convert the signpost pointers from your code to data for display in tools, and the XML required to do this is not particularly fancy. The main obstacle is that the "code" you write is likely to be very different from what you are used to, there are very few examples, the documentation only gives a general overview of how to do this, and although Xcode is actually quite strictly checks XML files, there is no autocompletion, and there is little that can make it easier for you to find errors. But after spending a little timeyou can find the elements you need, and if you have an example to adapt the code, you can get things done pretty quickly. Here I'm just going to give an example and try to list all the useful links.
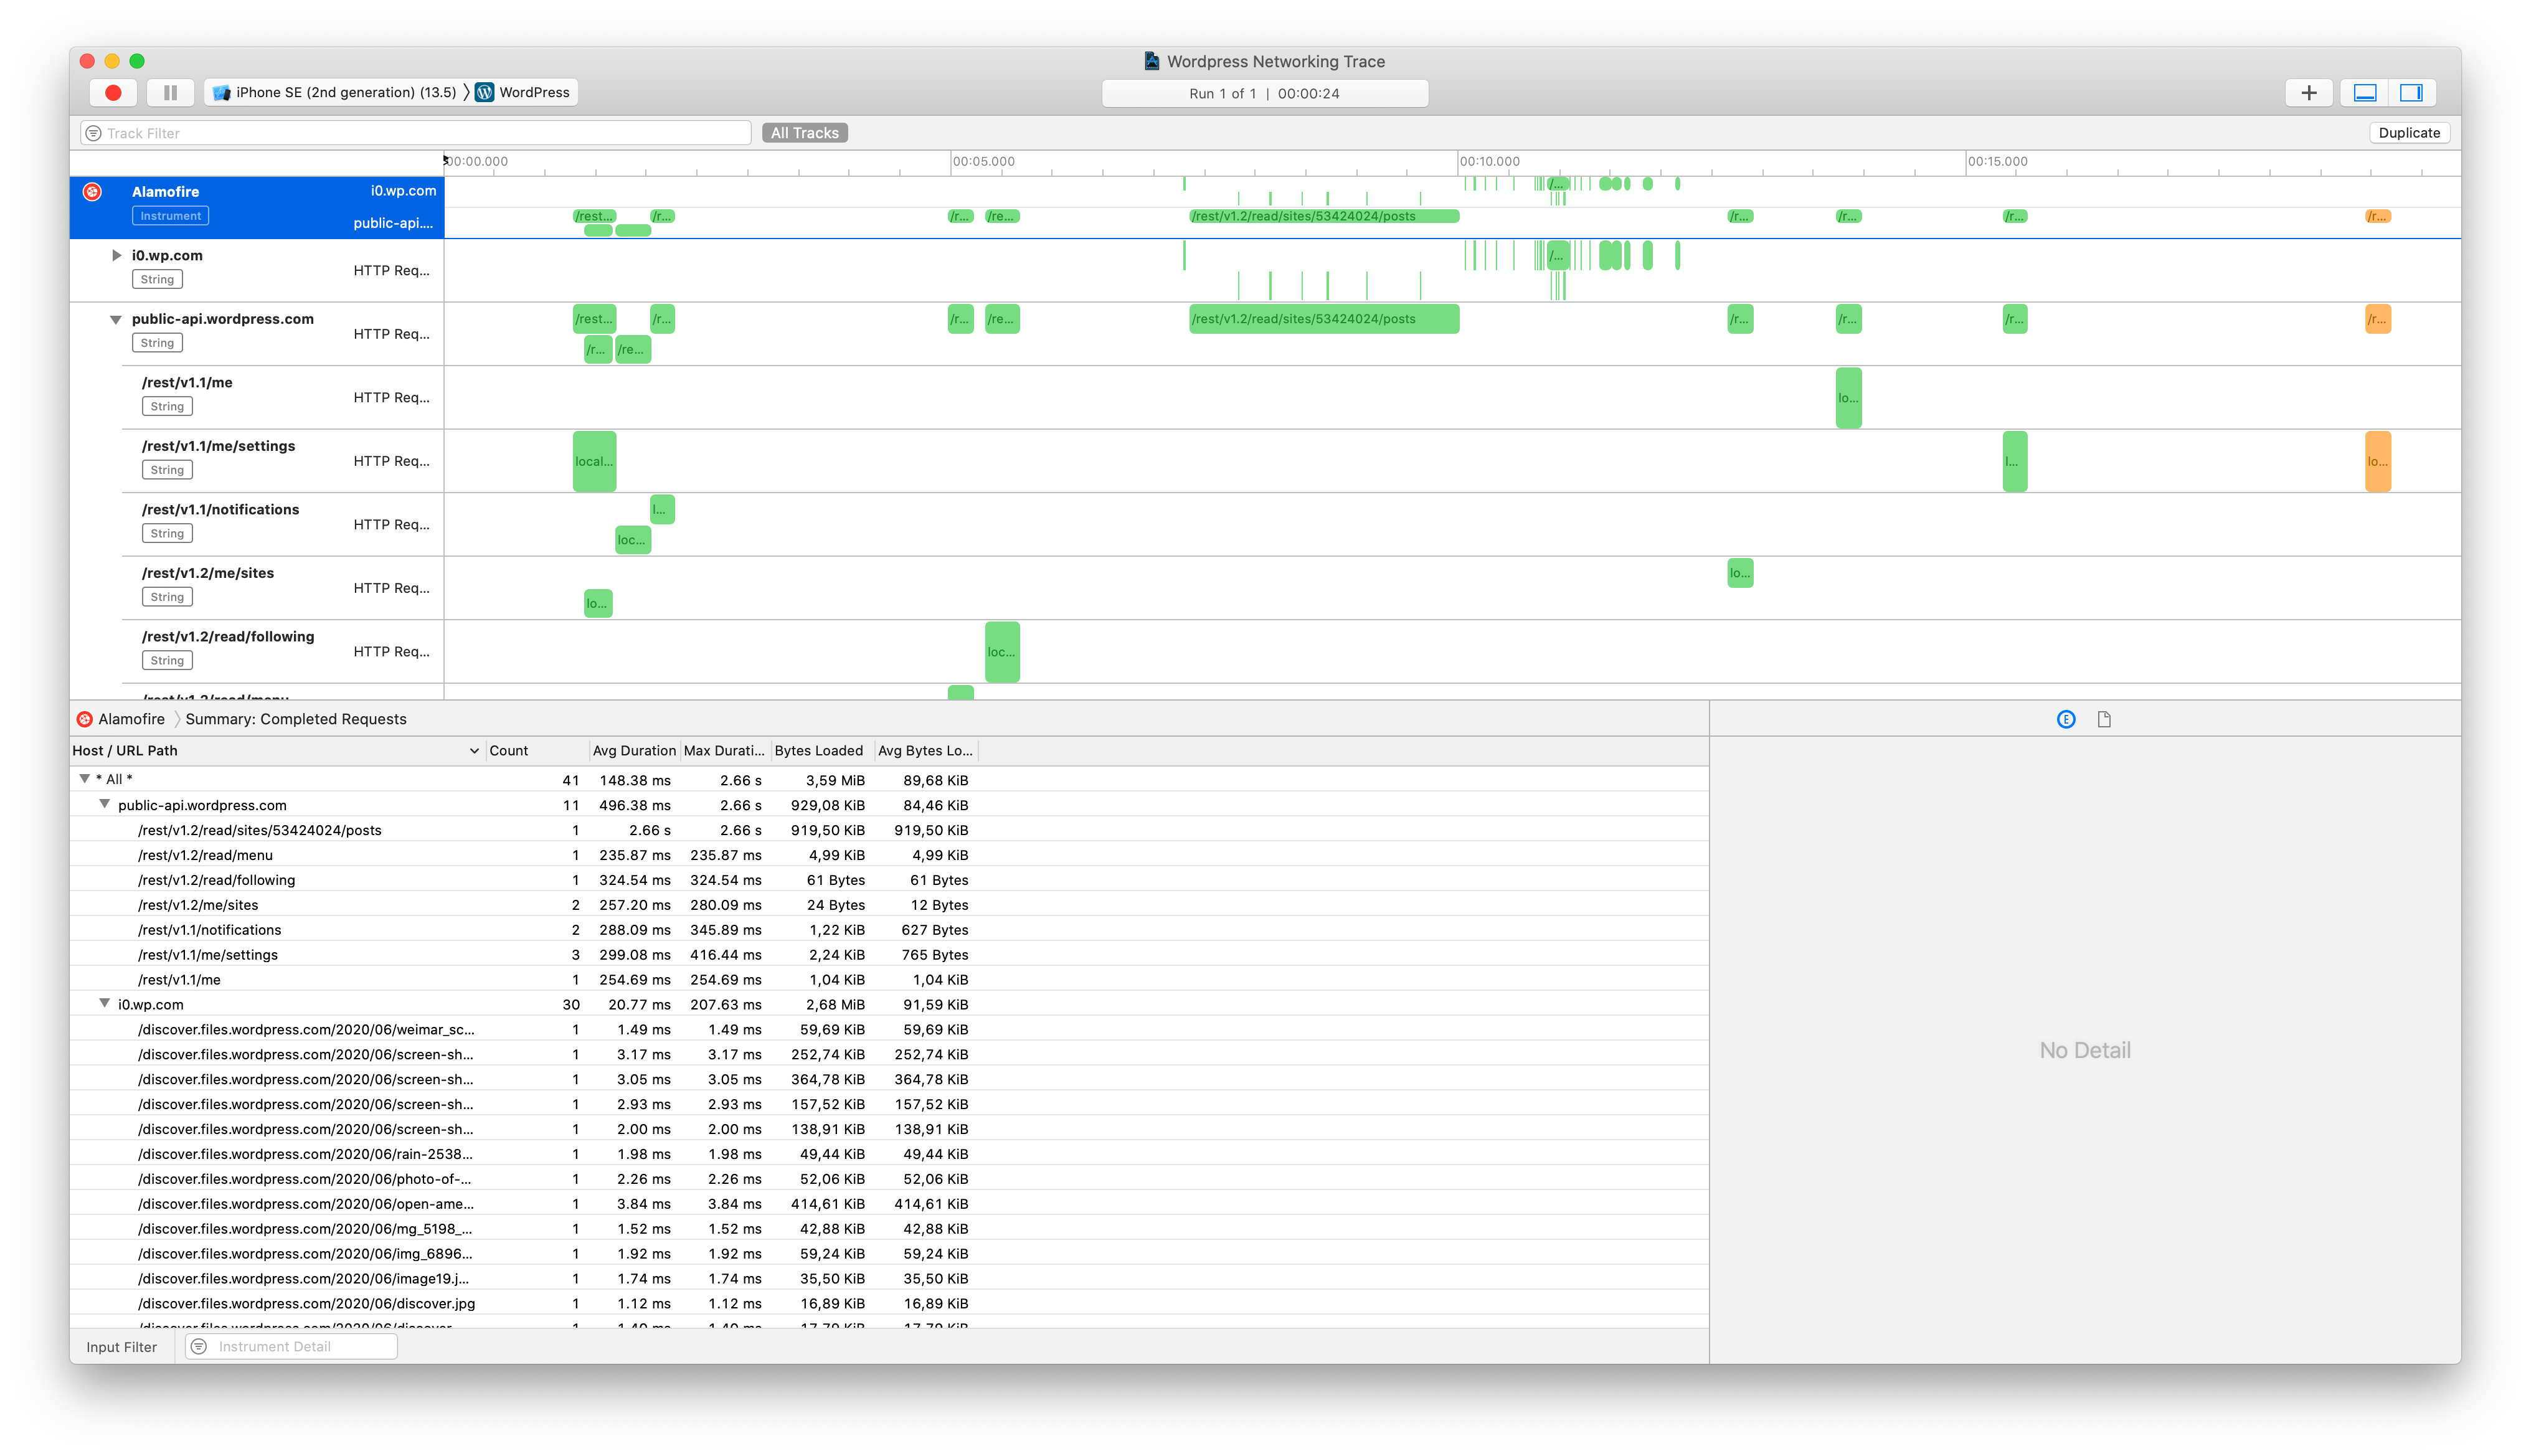
But let's start at the beginning: I want any of you who have used Charles or Wireshark before to debug your application, or have developed an application that makes a lot of HTTP requests, to be able to create an HTTP trace tool customized for your application, or at least a framework. It will look like this:
It took me approximately one day to build and debug this prototype (after watching the relevant WWDC videos). If you are not interested in anything other than the code, you can see it here .
Overview
The easiest way to create a custom tool is to use os_signpost , which is exactly what we're going to do here. You use it to log the .event or .begin and .end signpost pointers . Then you set up a custom tool to analyze these os_signpost intervals and extract additional values that you logged into it, set up how to display them on a graph, how to group them, which ones to filter, and how to present the structures of lists or trees / flowcharts in the tool's details pane. ...
We want to create a tool that displays all HTTP requests that go through our networking library as intervals (start + end) so that we can see how long they are taking and correlate them with other events happening in our application. In this article, I use Alamofire as the tool's networking library and Wordpress as my profiling application, simply because they are open source. But you can easily adapt all the code to your network library.
Step 0: Check out the Instruments App
- ( 411 WWDC 2019) — . «Orientation», , (instruments), (tracks), (lanes), (traces), (templates), (detail view) . .
- ( 410 WWDC 2018), , . , «Architecture» ( , , ) «Intermediate». , , , - . , , . , .
1: signpost-
We want to build our tool on signpost, that is, we will log our data through signpost. Alamofire sends a Notification every time a request starts or ends, so all we need is something like this 2 :
NotificationCenter.default.addObserver(forName: Notification.Name.Task.DidResume, object: nil, queue: nil) { (notification) in
    guard let task = notification.userInfo?[Notification.Key.Task] as? URLSessionTask,
        let request = task.originalRequest,
        let url = request.url else {
            return
    }
    let signpostId = OSSignpostID(log: networking, object: task)
    os_signpost(.begin, log: SignpostLog.networking, name: "Request", signpostID: signpostId, "Request Method %{public}@ to host: %{public}@, path: %@, parameters: %@", request.httpMethod ?? "", url.host ?? "Unknown", url.path, url.query ?? "")
}
NotificationCenter.default.addObserver(forName: Notification.Name.Task.DidComplete, object: nil, queue: nil) { (notification) in
    guard let task = notification.userInfo?[Notification.Key.Task] as? URLSessionTask else { return }
    let signpostId = OSSignpostID(log: networking, object: task)
    let statusCode = (task.response as? HTTPURLResponse)?.statusCode ?? 0
    os_signpost(.end, log: SignpostLog.networking, name: "Request", signpostID: signpostId, "Status: %@, Bytes Received: %llu, error: %d, statusCode: %d", "Completed", task.countOfBytesReceived, task.error == nil ? 0 : 1, statusCode)
}
When the request starts, we log the signpost
.begin, when it completes, we add the signpost .end. To match the end of the call with the corresponding start of the call is used signpostIdto make sure we close the correct interval if multiple requests are occurring in parallel. Ideally, we should store signpostIdin the request object to make sure we are using the same for .beginand .end. However, I didn't want to edit the type Requestin Alamofire, so I decided to use OSSignpostID(log:, object:)and pass the ID object to it. We use the base object URLSessionTaskbecause in both cases it will be the same, which allows OSSignpostID(log:, object:)us to return the same identifier when it is called multiple times.
We log data using format string. You should probably always separate the two arguments with some well-defined string to make it easier to parse on the tool side and also to make parsing easier. Please note that you do not need to log data in the
.endcall if you have already logged it to .begin. They will be combined into one interval and you will have access to them.
Step 2: Create a new custom tool project in Xcode.
Follow the steps from Create Custom Instruments (Session 410 from WWDC 2018) or Instruments App help - Create a Toolbox Project to create a new toolbox project in Xcode. This will give you a basic Xcode project with
.instrpkga. We will indicate all the details there.
Step 3: do the rest
Basically, you will follow the steps outlined in the Instruments App help - Create a tool from signpost data . While the descriptions of all the steps here are correct, they still lack a lot of detail, so it's best to have an example of a real custom tool in front of you. You can take a look at mine here . Basically you will need the following parts:
Schema
This tells the tools how to parse the data from your signpost pointers into variables that you can use. You define a template that extracts variables from your log messages and distributes them across columns.
<os-signpost-interval-schema>
	<id>org-alamofire-networking-schema</id>
	<title>Alamofire Networking Schema</title>

	<subsystem>"org.alamofire"</subsystem>
	<category>"networking"</category>
	<name>"Request"</name>

	<start-pattern>
	    <message>"Request Method " ?http-method " to host: " ?host ", path: " ?url-path ", parameters: " ?query-parameters</message>
	</start-pattern>
	<end-pattern>
	    <message>"Status: " ?completion-status ", Bytes Received: " ?bytes-received ", error: " ?errored ", statusCode: " ?http-status-code</message>
	</end-pattern>

	<column>
	    <mnemonic>column-http-method</mnemonic>
	    <title>HTTP Method</title>
	    <type>string</type>
	    <expression>?http-method</expression>
	</column>
	<!--      -->
</os-signpost-interval-schema>mnemonicis the identifier that you are going to refer to this column later. For some reason I found it a little strange to name columns the same as variables, so I put a prefix in front of them column. But, as far as I know, there is no need to do this.
Tool
Tool consists of a basic definition:
<instrument>
    <id>org.alamofire.networking.instrument</id>
    <title>Alamofire</title>
    <category>Behavior</category>
    <purpose>Trace HTTP calls made via Alamofire, grouped by method, host, path, etc.</purpose>
    <icon>Network</icon>

    <create-table>
        <id>alamofire-requests</id>
        <schema-ref>org-alamofire-networking-schema</schema-ref>
    </create-table>

    <!--     -->
</instrument>
It's pretty simple. Most of these fields are free-form text or are related to materials that you defined earlier (
schema-ref). But categoryalso iconcan only have a small set of values defined here and here .
Graph within a tool
A graph defines the graphical portion of the tool's user interface, the visual representation that you see in the track area. It looks something like this:
<instrument>
    <!--    -->
    <graph>
        <title>HTTP Requests</title>
        <lane>
            <title>the Requests</title>
            <table-ref>alamofire-requests</table-ref>

            <plot-template>
                <instance-by>column-host</instance-by>
                <label-format>%s</label-format>
                <value-from>column-url-path</value-from>
                <color-from>column-response</color-from>
                <label-from>column-url-path</label-from>
            </plot-template>
        </lane>
    </graph>
    <!--    -->
</instrument>
You can have different lane, and you can use the plot-template to implement a dynamic number of plots per lane. My example contains an example of a simple graph . I'm not sure why
graphand lanehave titles. In addition to this, each chart in plot-templatealso receives a label from label-format.
List, aggregation or whatever for a detailed view
With just a chart, the tools would look somewhat incomplete. You would also like to display something in the Detail View. You can do this with
list, aggregationor narrative. There may be even more options that I have not yet met. The aggregation looks something like this:
<instrument>
    <!--    -->
    <aggregation>
        <title>Summary: Completed Requests</title>
        <table-ref>alamofire-requests</table-ref>
        <slice>
                <column>column-completion-status</column>
                <equals><string>Completed</string></equals>
        </slice>
        <hierarchy>
            <level>
                <column>column-host</column>
            </level>
            <level>
                <column>column-url-path</column>
            </level>
        </hierarchy>

        <column><count/></column>
        <column><average>duration</average></column>
        <column><max>duration</max></column>
        <column><sum>column-size</sum></column>
        <column><average>column-size</average></column>
    </aggregation>
    <!--    -->
</instrument>
the list looks like this:
<instrument>
    <!--    -->
    <list>
        <title>List: Requests</title>
        <table-ref>alamofire-requests</table-ref>
        <column>start</column>
        <column>duration</column>
        <column>column-host</column>
        <!--   ->
    </list>
    <!--    -->
</instrument>
Bonus material
This, in fact, is all. However, you have not done much more than what the WWDC video describes, and I promised to fill in some of the gaps.
My example tool contains a couple more nice things.
A small CLIPS expression to color the interval depending on whether the request was successful or not . You can find color values in the Instruments Engineering Type Reference .
With a chart template, you can display multiple charts on one strip, or for example have a chart per host, like in my example. However, you can have more than one level of hierarchy and allow the user to expand or collapse parts. For this you will need to use an element
<engineering-type-track>Further actions
If you haven't come across it from the previous links yet, there is actually a complete help for everything you can put in the
.instrpkgfile. For example, it will tell you which elements <instrument><instrument><title><category>Review the creation of custom tools (Session 410 from WWDC 2018) again to note the details you might need. There is also sample code from the WWDC 2019 session where I found an example of use
<engineering-type-track>CLIPS is the language used to write custom modelers (modelers - we won't cover that here), but it can also be used for short expressions during column declarations. The language documentation is much more extensive than what you need. The main thing you probably need to know to write a simple expression is that CLIPS uses prefix notation, so
?a + ?byou have to write instead (+ ?a ?b).
More articles on custom tools
Igor on creating custom toolboxes in Xcode
Debugging
It is always a good idea to add the tool
XCodeos_signpostto your trace document. This way, if something doesn't work as expected, you can check if your data is logged correctly and if your tool interpreted it correctly.
What I haven't figured out yet
- How to use the values that Instruments provides you by default and displays in the user interface (for example, duration) in expressions for column definitions (for example, to create a baud rate column by dividing the received bytes by the duration).
- How to display anything in the extra detail area. It feels like it's just for the call stack. I would like to display, for example, the JSON body of the selected request, but have not found any example that clarifies this.
What this tool is capable of
Work still in progress
Download it and see for yourself.
Footnotes
- Okay, there actually were other reasons.
- The complete code for logging in my example is in the Logger.swift file . It's assumed for Alamofire 4.8, because that's what the current version of the Wordpress iOS app uses, although Alamofire 5 is already released at the time of writing. Because of the notifications, this logging code is easy to add without changing Alamofire itself, however if you have a custom networking library it may be easier to add an entry to the library itself to access more details.
A quick start to iOS development (free webinar)