
Hello, Habr! My name is Vasily Kozlov, I am an iOS tech lead at Delivery Club, and I found the project in its monolithic form. I confess that I had a hand in what this article is about to fight, but I repented and transformed my consciousness along with the project.
I want to tell you how I split an existing project in Objective-C and Swift into separate modules - frameworks. According to Apple , a framework is a directory of a specific structure.
Initially, we set a goal: to isolate the code that implements the chat function for user support and to reduce the build time. This led to useful consequences that are difficult to follow without habit and existing in the monolithic world of one project.
Suddenly, the notorious SOLID principles began to take shape, and most importantly, the very formulation of the problem forced to organize the code in accordance with them. By moving an entity into a separate module, you automatically come across all its dependencies, which should not be in this module, and also duplicated in the main application project. Therefore, the question of organizing an additional module with common functionality is ripe. Is this not the principle of single responsibility, when one entity should have one purpose?
The complexity of dividing a project with two languages and a large legacy into modules can scare off at first glance, which happened to me, but interest in the new task prevailed.
In previously found articles, the authors promiseda cloudless future with simple and clear steps typical for a new project. But when I moved the first base class to the module for general code, so many non-obvious dependencies came to light, so many lines of code were covered in red in Xcode that I didn't want to continue.
The project contained a lot of legacy code, cross-dependencies on classes in Objective-C and Swift, different targets in terms of iOS development, an impressive list of CocoaPods. Any step away from this monolith led to the fact that the project stopped building in Xcode, sometimes finding errors in the most unexpected places.
Therefore, I decided to write down the sequence of actions I took to make life easier for the owners of such projects.
The first steps
They are obvious, many articles have been written about them . Apple has tried to make them as user-friendly as possible.
1. Create the first module: File → New Project → Cocoa Touch Framework
2. Add the module to the project workspace
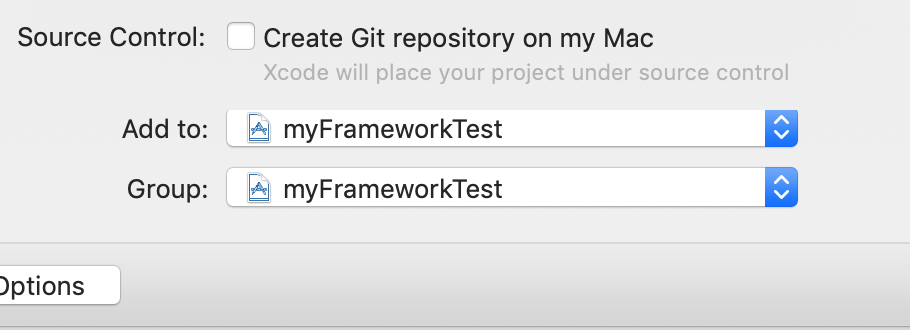
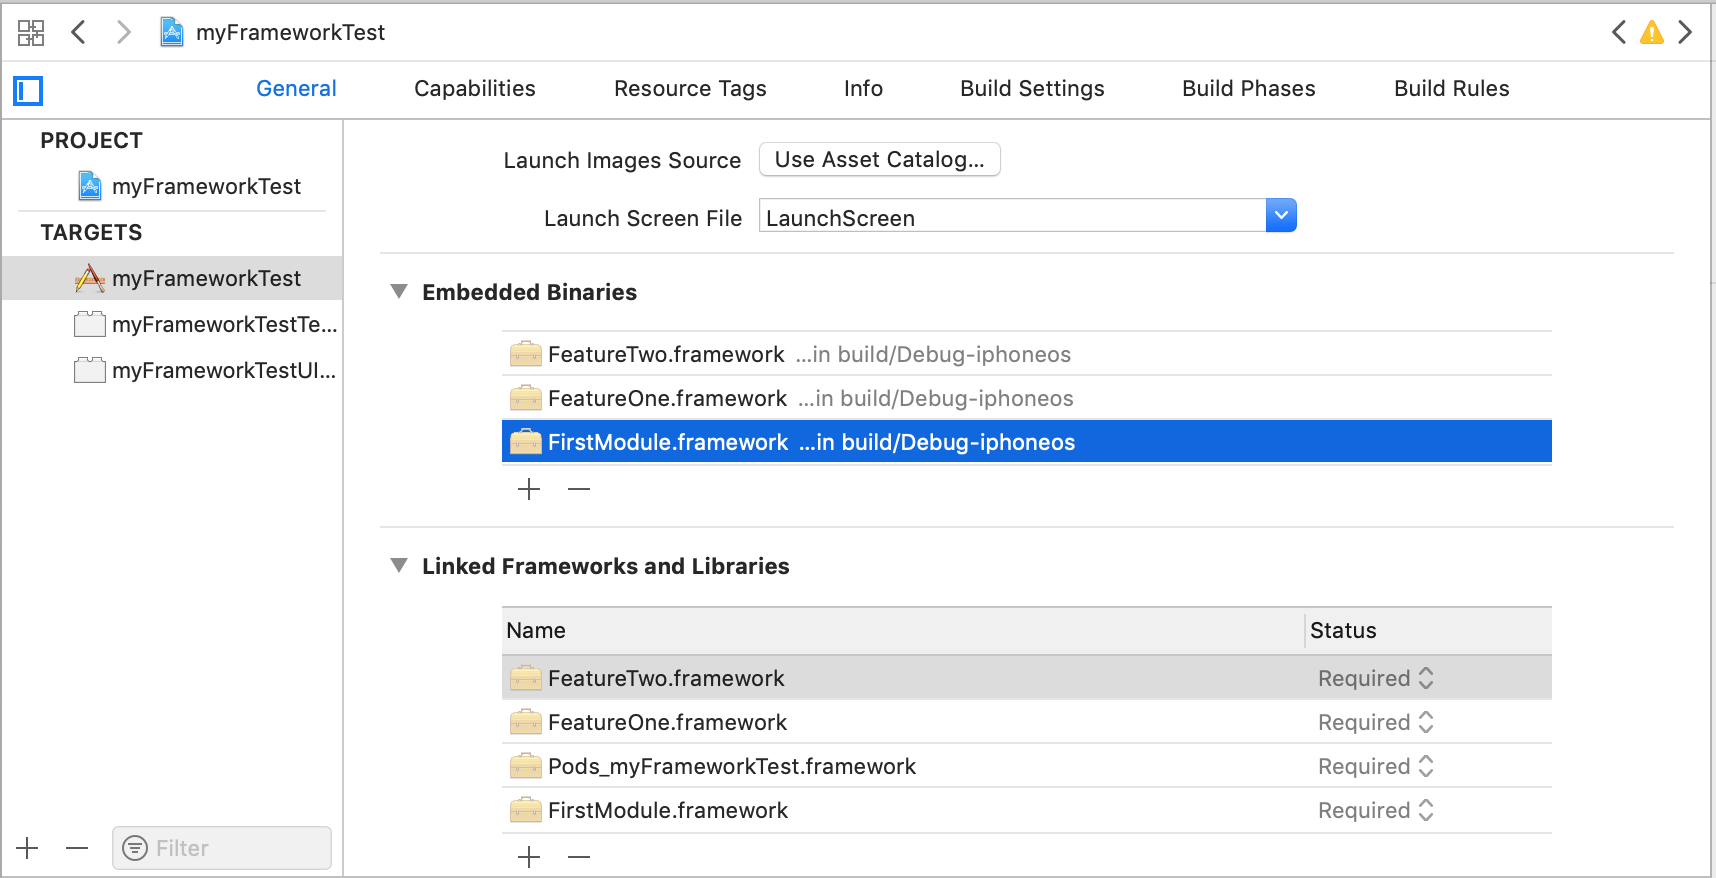
3. Create the dependency of the main project on the module, specifying the latter in the Embedded Binaries section. If there are several targets in the project, then the module will need to be included in the Embedded Binaries section of each target that depends on it.
I will add only one comment on my own: do not rush.
Do you know what will be placed in this module, on what basis will the modules be divided? In my version, it should have been
UIViewControllerfor chatting with table and cells. Cocoapods with a chat should be attached to the module. But it turned out a little differently. I had to postpone the implementation of the chat, because UIViewControllerboth its presenter and even the cell were based on base classes and protocols that the new module knew nothing about.
How to highlight a module? The most logical approach - on "ficham» ( features ), that is, for some user tasks. For example, chat with tech support, registration / login screens, bottom sheet with the main screen settings. In addition, most likely, you will need some kind of basic functionality, which is not a feature, but only a set of UI elements, base classes, etc. This functionality should be moved into a common module similar to the famous Utils file... Do not be afraid to split this module too. The smaller the cubes, the easier it is to fit them into the main building. It seems to me that this is how one of the SOLID principles can be formulated .
There are ready-made tips for dividing into modules, which I did not use, which is why I broke so many copies, and even decided to talk about the painful one. However, this approach - first to act, then to think - just opened my eyes to the horror of dependent code in a monolithic project. When you are at the beginning of the journey, you find it difficult to grasp the full amount of changes that will be required to eliminate dependencies.
So just move the class from one module to another, see what's blushed in Xcode, and try to figure out the dependencies. Xcode 10 is tricky: when you move links to files from one module to another, it leaves the files in the same place. Therefore the next step will be like this ...
4. Move files in the file manager, delete old links in Xcode and re-add files to the new module. Doing this one class at a time will make it easier not to get tangled up in dependencies.
To make all detached entities available from outside the module, you have to take into account the peculiarities of Swift and Objective-C.
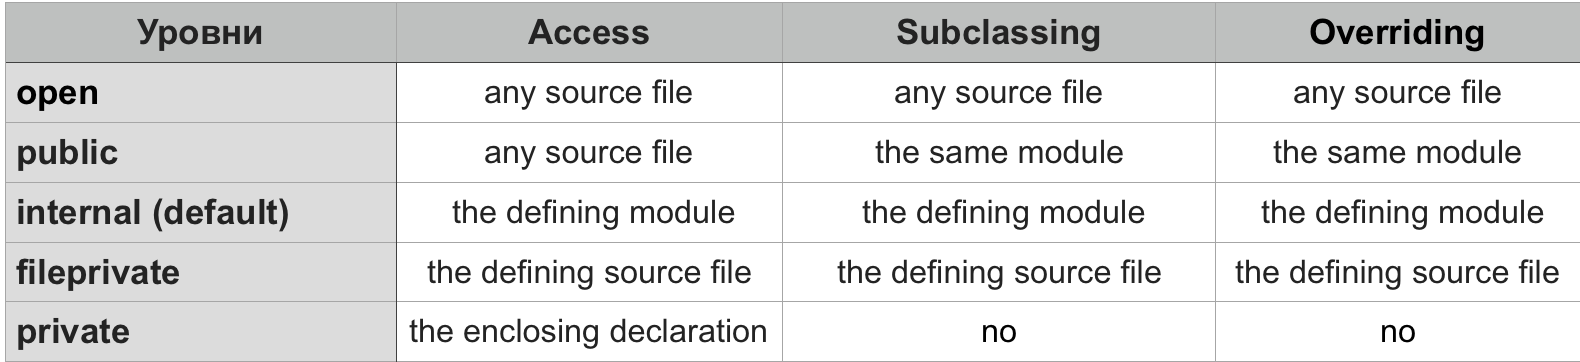
5. In Swift, all classes, enumerations and protocols must be marked with an access modifier
publicthen they can be accessed from outside the module. If a base class is moved to a separate framework, it should be marked with a modifier open, otherwise it will not work to create a descendant class from it.
You should immediately remember (or learn for the first time) what access levels are in Swift, and get a profit!
When changing the access level for the ported class, Xcode will require you to change the access level for all overridden methods to the same.

Then you need to add the import of the new framework to the Swift file, where the selected functionality is used, along with some UIKit. After that, there should be fewer errors in Xcode.
import UIKit
import FeatureOne
import FeatureTwo
class ViewController: UIViewController {
//..
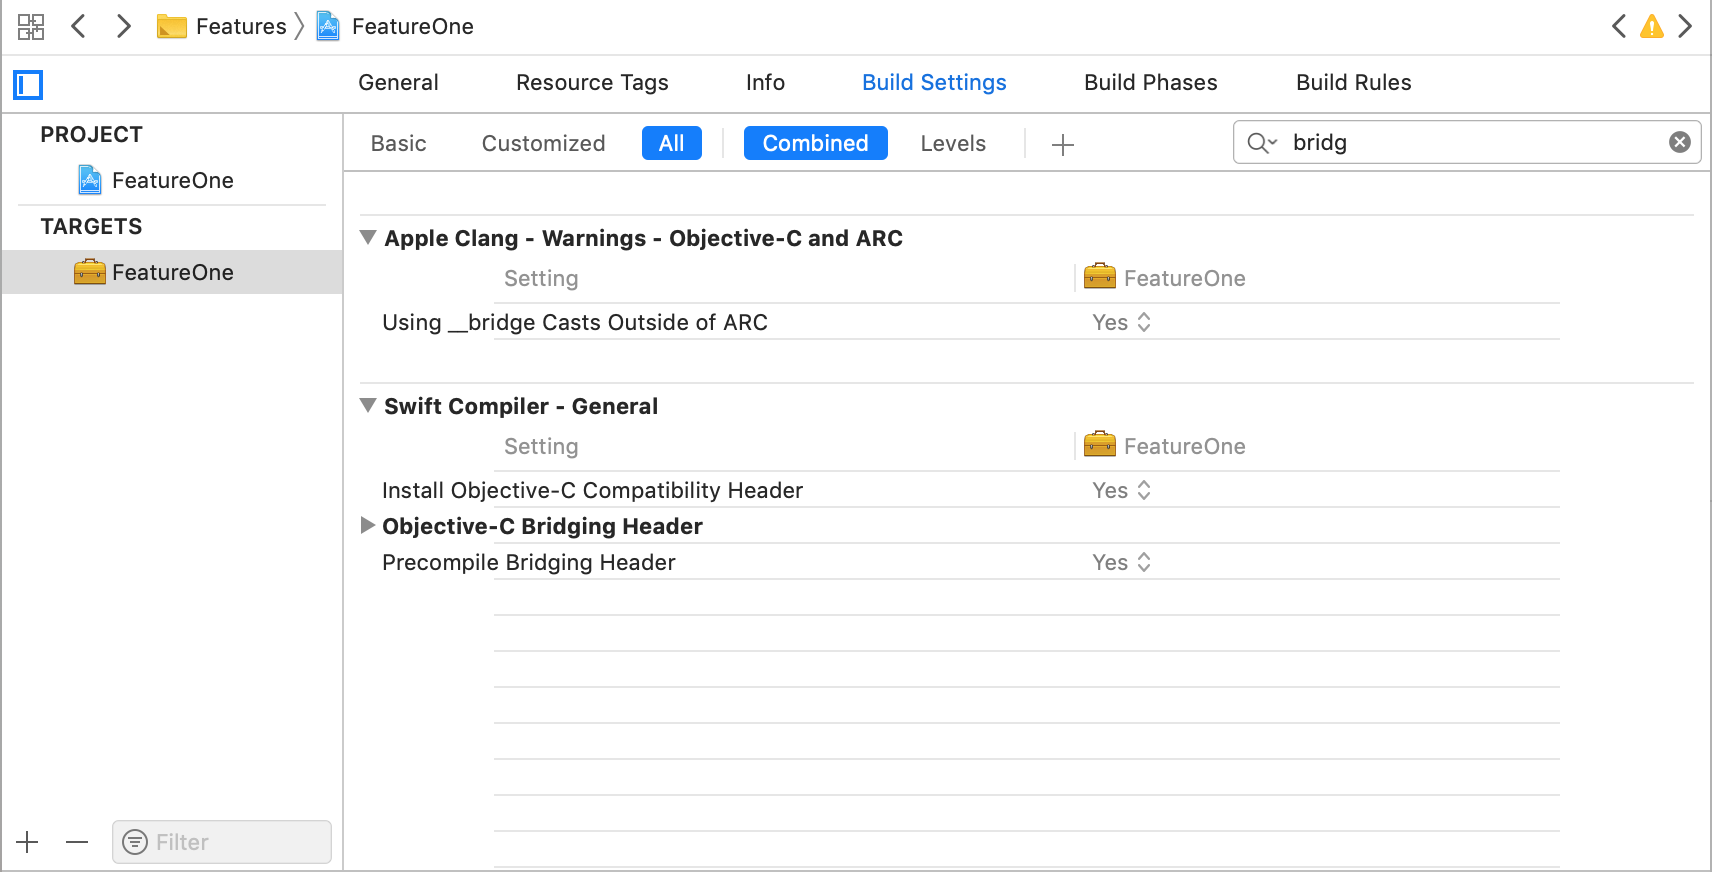
}With Objective-C, the sequence is a little more complicated. Also, using a bridging header to import Objective-C classes into Swift is not supported in frameworks.

Therefore, the Objective-C Bridging Header field must be empty in the framework settings.
There is a way out of this situation, and why this is so is a topic for a separate study.
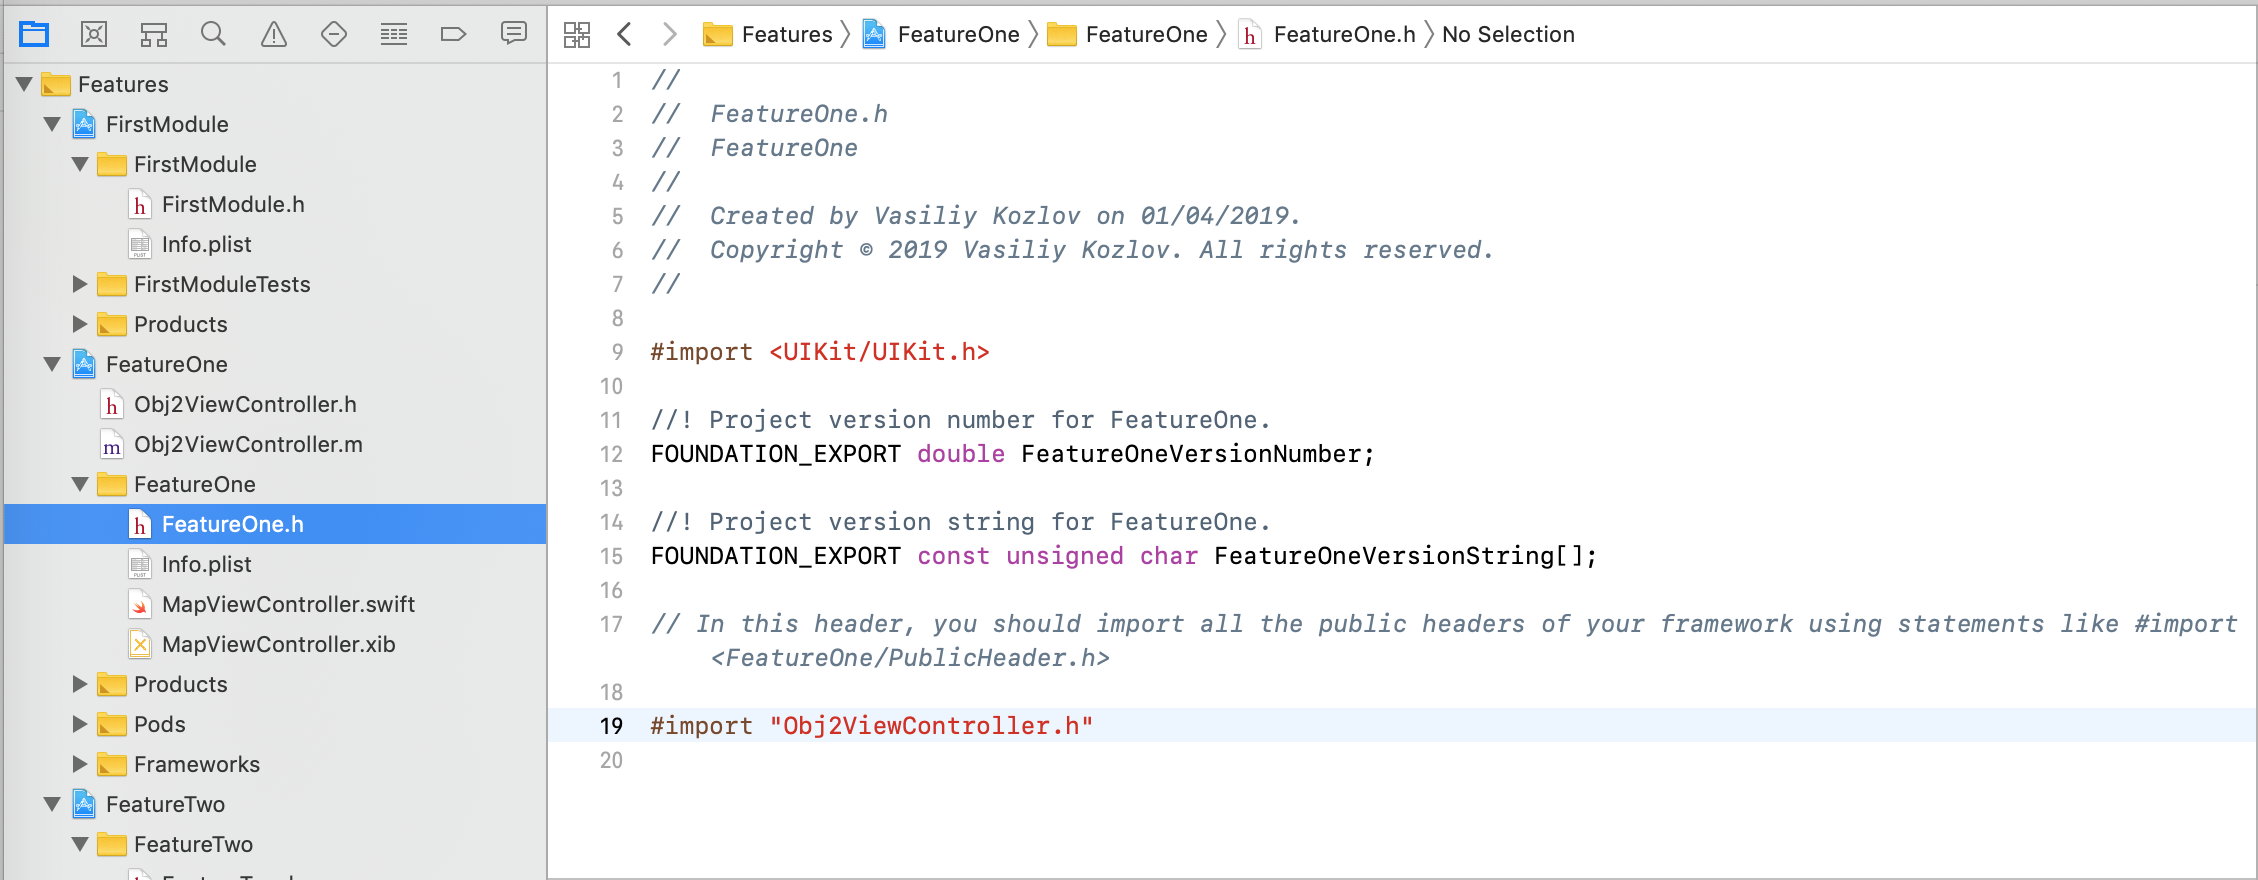
6. Each framework has its own umbrella header file , through which all public Objective-C interfaces will look into the outside world.
If you specify import of all other header files in this umbrella header, then they will be available in Swift.
import UIKit
import FeatureOne
import FeatureTwo

class ViewController: UIViewController {
    var vc: Obj2ViewController?

    override func viewDidLoad() {
        super.viewDidLoad()
        // Do any additional setup after loading the view, typically from a nib.
    }
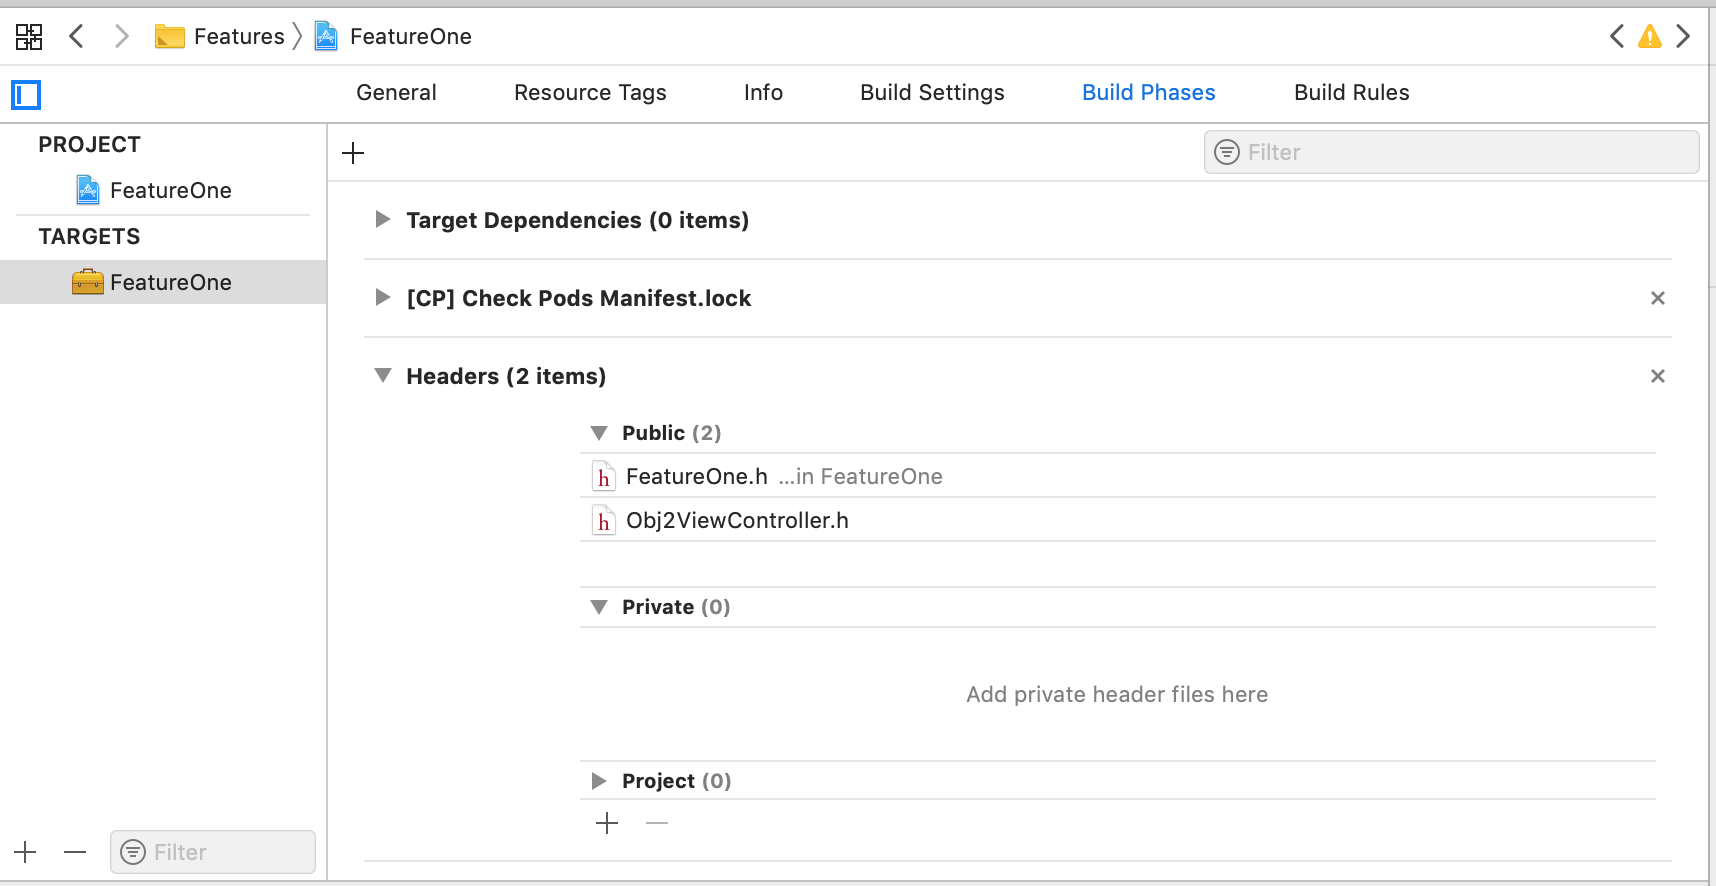
In Objective-C, to access classes outside of a module, you have to play around with its settings: make the header files public.
7. When all the files have been transferred one by one to a separate module, do not forget about Cocoapods. The Podfile needs to be reorganized if some functionality ends up in a separate framework. This is how it was for me: the pod with graphical indicators had to be brought into the general framework, and the chat - the new pod - was included in its own separate framework.
It is necessary to explicitly indicate that the project is now not just a project, but a workspace with subprojects:
workspace 'myFrameworkTest'Dependencies common for frameworks should be moved into separate variables, for example,
networkPodsand uiPods:
def networkPods
     pod 'Alamofire'
end


 def uiPods
     pod 'GoogleMaps'
 end
Then the dependencies of the main project will be described as follows:
target 'myFrameworkTest' do
project 'myFrameworkTest'
    networkPods
    uiPods
    target 'myFrameworkTestTests' do
    end
end
The framework dependencies with chat - this way:
target 'FeatureOne' do
    project 'FeatureOne/FeatureOne'
    uiPods
    pod 'ChatThatMustNotBeNamed'
end
Underwater rocks
Probably, this could be finished, but later I discovered several implicit problems, which I also want to mention.
All common dependencies are moved into one separate framework, chat - into another, the code has become a little cleaner, the project is built, but it crashes when it starts.
The first problem was in the chat implementation. In the vastness of the network, the problem also occurs in other pods, just google " Library not loaded: Reason: image not found ". It was with this message that the fall took place.
I could not find a more elegant solution and was forced to duplicate the pod connection with chat in the main application:
target 'myFrameworkTest' do
    project 'myFrameworkTest'
    pod 'ChatThatMustNotBeNamed'
    networkPods
    uiPods
    target 'myFrameworkTestTests' do
    end
end
Thus, Cocoapods allows the application to see the dynamically linked library at startup and when the project is compiled.
Another problem was the resources, which I had safely forgotten and had never seen any mention of this aspect to be kept in mind. Application crashed when trying to register cell xib file: "Could not load NIB in bundle" .
The default
init(nibName:bundle:)class constructor UINiblooks for a resource in the main application module. Naturally, you don't know anything about this when development is carried out in a monolithic project.
The solution is to specify the bundle in which the resource class is defined, or let the compiler do it itself using the
init(for:)class constructorBundle... And, of course, do not forget in the future that resources can now be common to all modules or specific to one module.
If the module uses xibs, then Xcode will, as usual, offer for buttons and
UIImageViewselect graphic resources from the entire project, but at run time all resources located in other modules will not be loaded. I loaded images in code using the constructor of the init(named:in:compatibleWith:)class UIImage, where the second parameter Bundleis where the image file is located.
Cells in
UITableViewand UICollectionViewnow must also register in a similar manner. And we must remember that Swift classes in string representation also include the name of the module, and a method NSClassFromString()from Objective-C returnsnil, so I recommend registering cells by specifying not a string, but a class. For UITableViewyou can use the following helper method:
@objc public extension UITableView {

    func registerClass(_ classType: AnyClass) {
        let bundle = Bundle(for: classType)
        let name = String(describing: classType)
        register(UINib(nibName: name, bundle: bundle), forCellReuseIdentifier: name)
    }
}
conclusions
Now you don't have to worry if one pull request contains changes in the project structure made in different modules, because each module has its own xcodeproj file. You can distribute work so that you don't have to spend several hours putting the project file together. It is useful to have a modular architecture in large and distributed teams. As a consequence, development speed should increase, but the opposite is also true. I spent much more time on my very first module than if I would create a chat inside a monolith.
Of the obvious pluses that Apple also points out, - the ability to reuse the code. If the application has different targets (app extensions), then this is the most accessible approach. Perhaps chat isn't the best example. I should have started by laying out the network layer, but let's be honest with ourselves, this is a very long and dangerous road that is best broken down into small sections. And since over the past couple of years this was the introduction of a second service for organizing technical support, I wanted to implement it without introducing it. Where are the guarantees that the third will not appear soon?
One subtle effect when designing a module is smarter, cleaner interfaces. The developer has to design classes so that certain properties and methods are accessible from the outside. Inevitably, you have to think about what to hide and how to make the module so that it can be easily used again.