How did the idea come about
The idea to create such a game came right during the hackathon. The format assumed that there was one working day for development, that is, 8 hours. To make a prototype in time, I chose the Android SDK. Perhaps game engines would be better suited, but I don't understand them.
The concept of controlling with the help of emotions was suggested by another game: there, the character's movements could be set by changing the volume of your voice. Maybe someone has already used emotions in game control. But I know few such examples, so I settled on this format.
Beware of loud video!
Setting up the development environment
We only need Android Studio on the computer. If there is no real Android device to run, you can use an emulator with a webcam enabled .
Create a project with ML Kit

ML Kit is a great tool to impress the hackathon jury: you are using AI in a prototype! In general, it helps to embed solutions based on machine learning into projects, for example, functionality for identifying objects in a frame, translation and text recognition.
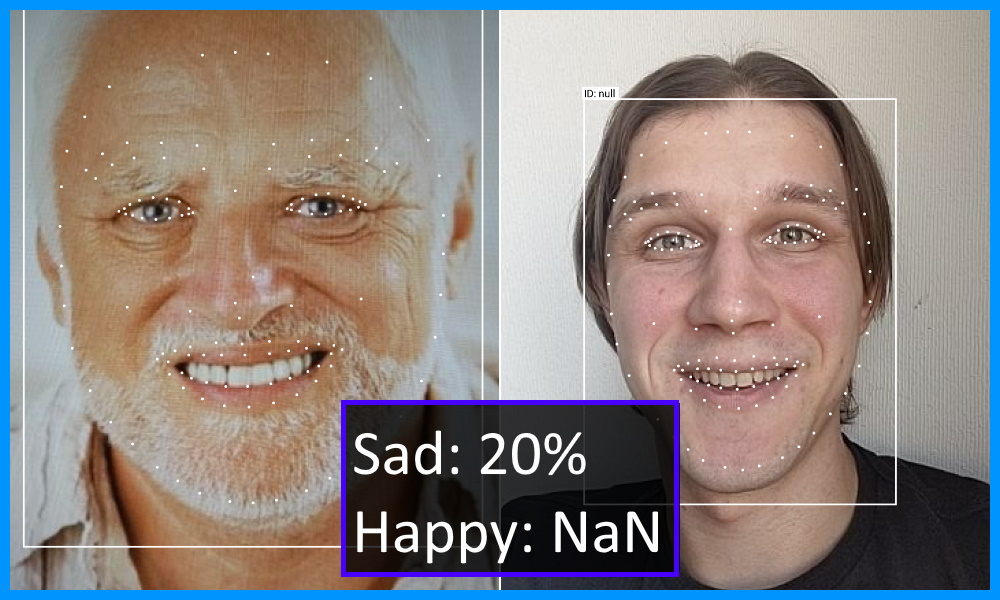
It is important for us that ML Kit has a free offline API for recognizing smiles and open or closed eyes.
Previously, to create any project with ML Kit, you first had to register in the Firebase console . This step can now be skipped for offline functionality.
Android app
Remove unnecessary
In order not to write the logic for working with the camera from scratch, let's take the official sample and remove from it what we don't need.
First, download the example and try running. Explore the Face detection mode: it will look like the article preview.
Manifesto
Let's start editing AndroidManifest.xml. Remove all activity tags except the first one. And in its place we will put CameraXLivePreviewActivity to start immediately from the camera. In the value of the android: value attribute, we leave only the face in order to exclude unnecessary resources from the APK.
<meta-data
 android:name="com.google.mlkit.vision.DEPENDENCIES"
  android:value="face"/>
<activity
  android:name=".CameraXLivePreviewActivity"
  android:exported="true"
  android:theme="@style/AppTheme">
  <intent-filter>
      <action android:name="android.intent.action.MAIN"/>
      <category android:name="android.intent.category.LAUNCHER"/>
  </intent-filter>
</activity>
Full step diff.
Camera
Let's save time - we will not delete unnecessary files, instead we will focus on the elements of the CameraXLivePreviewActivity screen.
- On line 117, set the face detection mode:
private String selectedModel = FACE_DETECTION; - On line 118, turn on the front camera:
private int lensFacing = CameraSelector.LENS_FACING_FRONT; - At the end of the onCreate method on lines 198-199, hide the settings
findViewById( R.id.settings_button ).setVisibility( View.GONE );
findViewById( R.id.control ).setVisibility( View.GONE );
We can stop at this. But if FPS rendering and face grid are visually distracting, then you can turn them off like this:
- In the VisionProcessorBase.java file, delete lines 213-215 to hide the FPS:
graphicOverlay.add( new InferenceInfoGraphic( graphicOverlay, currentLatencyMs, shouldShowFps ? framesPerSecond : null)); - In the FaceDetectorProcessor.java file, delete lines 75–78 to hide the face mesh:
for (Face face : faces) {
    graphicOverlay.add(new FaceGraphic(graphicOverlay, face));
    logExtrasForTesting(face);
}
Full step diff.
Recognizing emotions
Smile detection is turned off by default, but it's easy to get started. It's not for nothing that we took the example code as a basis! Let's select the parameters we need into a separate class and declare the listener interface:
FaceDetectorProcessor.java
//   FaceDetectorProcessor.java
public class FaceDetectorProcessor extends VisionProcessorBase<List<Face>> {
    public static class Emotion {
        public final float smileProbability;
        public final float leftEyeOpenProbability;
        public final float rightEyeOpenProbability;
        public Emotion(float smileProbability, float leftEyeOpenProbability, float rightEyeOpenProbability) {
           this.smileProbability = smileProbability;
            this.leftEyeOpenProbability = leftEyeOpenProbability;
           this.rightEyeOpenProbability = rightEyeOpenProbability;
        }
    }
    public interface EmotionListener {
        void onEmotion(Emotion emotion);
    }
    private EmotionListener listener;
    public void setListener(EmotionListener listener) {
       this.listener = listener;
    }

    @Override
    protected void onSuccess(@NonNull List<Face> faces, @NonNull GraphicOverlay graphicOverlay) {
        if (!faces.isEmpty() && listener != null) {
            Face face = faces.get(0);
            if (face.getSmilingProbability() != null &&
                    face.getLeftEyeOpenProbability() != null && face.getRightEyeOpenProbability() != null) {
                listener.onEmotion(new Emotion(
                        face.getSmilingProbability(),
                        face.getLeftEyeOpenProbability(),
                        face.getRightEyeOpenProbability()
                ));
            }
        }
    }
}
To enable emotion classification, set up the FaceDetectorProcessor in the CameraXLivePreviewActivity class and subscribe to receive the emotion state. Then we transform the probabilities into boolean flags. For testing, let's add a TextView to the layout, in which we will show emotions through emoticons.

Full step diff.
Divide and play
Since we are making a game, we need a place to draw the elements. Let's assume that it runs on the phone in portrait mode. So, let's divide the screen into two parts: the camera on top and the game on the bottom.
Controlling a character with a smile is difficult, and there is little time at the hackathon to implement advanced mechanics. Therefore, our character will collect nishtyaks along the way, being either at the top of the playing field, or at the bottom. We will add actions with closed or open eyes as a complication of the game: if you catch a nishtyak with a closed eye, the points are doubled (
If you want to implement a different gameplay, then I can suggest a few interesting options:
- Guitar Hero / Just Dance - analogue, where you need to show a certain emotion to the music;
- a race with overcoming obstacles, where you need to reach the finish line in a certain time or without crashing;
- shooter where the player winks and shoots the enemy.
We will display the game in a custom Android View - there, in the onDraw method, we will draw a character on Canvas. In the first prototype, we will restrict ourselves to geometric primitives.
Player

Our character is a square. During initialization, we will set its size and position to the left, since it will be in place. The Y-axis position will depend on the player's smile. All absolute values will be calculated relative to the size of the game area. It's easier than choosing specific sizes - and we will get an acceptable look on new devices.
private var playerSize = 0
private var playerRect = RectF()
//       View
private fun initializePlayer() {
    playerSize = height / 4
    playerRect.left = playerSize / 2f
    playerRect.right = playerRect.left + playerSize
}
//
private var flags: EmotionFlags
//
private fun movePlayer() {
    playerRect.top = getObjectYTopForLine(playerSize, isTopLine = flags.isSmile).toFloat()
    playerRect.bottom = playerRect.top + playerSize
}
//   top     size,
//
private fun getObjectYTopForLine(size: Int, isTopLine: Boolean): Int {
    return if (isTopLine) {
        width / 2 - width / 4 - size / 2
    } else {
        width / 2 + width / 4 - size / 2
    }
}
//  paint   ,
private val playerPaint = Paint(Paint.ANTI_ALIAS_FLAG).apply {
    style = Paint.Style.FILL
    color = Color.BLUE
}
//     Canvas
private fun drawPlayer(canvas: Canvas) {
    canvas.drawRect(playerRect, playerPaint)
}
Cake
Our character "runs" and tries to catch cakes in order to score as many points as possible. We use the standard technique with the transition to the reference system relative to the player: he will stand still, and the cakes will fly towards him. If the square of the cake intersects with the square of the player, then the point is counted. And if at the same time at least one eye of the user is closed - two points ¯ \ _ (ツ) _ / ¯
Also in our universe there will be only one
//
private fun initializeCake() {
    cakeSize = height / 8
    moveCakeToStartPoint()
}
private fun moveCakeToStartPoint() {
    //
    cakeRect.left = width + width * Random.nextFloat()
    cakeRect.right = cakeRect.left + cakeSize
    //
    val isTopLine = Random.nextBoolean()
    cakeRect.top = getObjectYTopForLine(cakeSize, isTopLine).toFloat()
    cakeRect.bottom = cakeRect.top + cakeSize
}
//
private fun moveCake() {
    val currentTime = System.currentTimeMillis()
    val deltaTime = currentTime - previousTimestamp
    val deltaX = cakeSpeed * width * deltaTime
    cakeRect.left -= deltaX
    cakeRect.right = cakeRect.left + cakeSize
    previousTimestamp = currentTime
}
//     ,
private fun checkPlayerCaughtCake() {
    if (RectF.intersects(playerRect, cakeRect)) {
        score += if (flags.isLeftEyeOpen && flags.isRightEyeOpen) 1 else 2
        moveCakeToStartPoint()
    }
}
//    ,
private fun checkCakeIsOutOfScreenStart() {
    if (cakeRect.right < 0) {
        moveCakeToStartPoint()
    }
}
What happened
Let's make the display of points very simple. We will display the number in the center of the screen. You just need to take into account the height of the text and indent the top for beauty.
private val scorePaint = Paint(Paint.ANTI_ALIAS_FLAG).apply {
    color = Color.GREEN
    textSize = context.resources.getDimension(R.dimen.score_size)
}
private var score: Int = 0
private var scorePoint = PointF()
private fun initializeScore() {
    val bounds = Rect()
    scorePaint.getTextBounds("0", 0, 1, bounds)
    val scoreMargin = resources.getDimension(R.dimen.score_margin)
    scorePoint = PointF(width / 2f, scoreMargin + bounds.height())
    score = 0
}
Let's see what kind of toy we made:
Full step diff.
Graphonium
To make it not ashamed to show the game at the presentation of the hackathon, let's add some grafonium!

Images
We proceed from the fact that we cannot draw impressive graphics. Fortunately, there are sites with free gaming assets. I liked this one , although now it is not available directly for a reason unknown to me.

Animation
We draw on Canvas, which means we need to implement the animation ourselves. If there are pictures with animation, it will be easy to program. We introduce a class for an object with changing images.
class AnimatedGameObject(
private val bitmaps: List<Bitmap>,
private val duration: Long
) {
fun getBitmap(timeInMillis: Long): Bitmap {
val mod = timeInMillis % duration
val index = (mod / duration.toFloat()) * bitmaps.size
return bitmaps[index.toInt()]
}
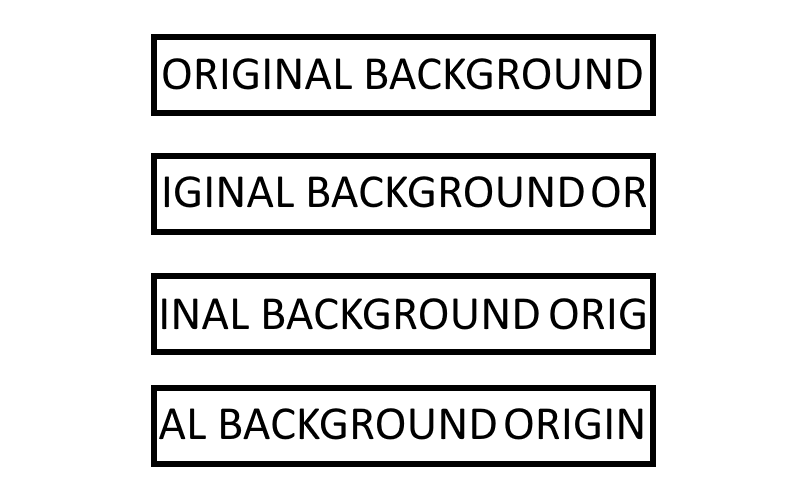
}To get the effect of movement, the background must also be animated. Having a series of background frames in memory is an overhead story. Therefore, let's do it more cunningly: we will draw one image with a time shift. Idea outline:
Complete step diff.
Final result
It’s hard to call it a masterpiece, but it’s fine for a prototype in the evening. The code can be found here . Runs locally without additional shenanigans.
In conclusion, I will add that ML Kit Face Detection can be useful for other scenarios.
For example, to take perfect selfies with friends: you can analyze all the people in the frame and make sure that everyone smiled and opened their eyes. Detecting multiple faces in a video stream works out of the box, so the task is not difficult.
Using face contour recognition from the Face Detection module, it is possible to replicate masks that are now popular in almost all camera applications. And if you add interactive - through the definition of a smile and a wink - then using them will be doubly fun.
This functionality - facial contouring - can be used for more than entertainment. Those who have tried to cut out a photo for documents themselves will appreciate it. We take the face contour, automatically cut out the photo with the desired aspect ratio and the correct head position. The gyroscope sensor will help determine the correct shooting angle.