While the parts for the Crawford bomb are being sharpened, we will prepare for the tests: prepare mini-checkers, cook a new type of fuel and make electronics.

Caramel Fuel v.2
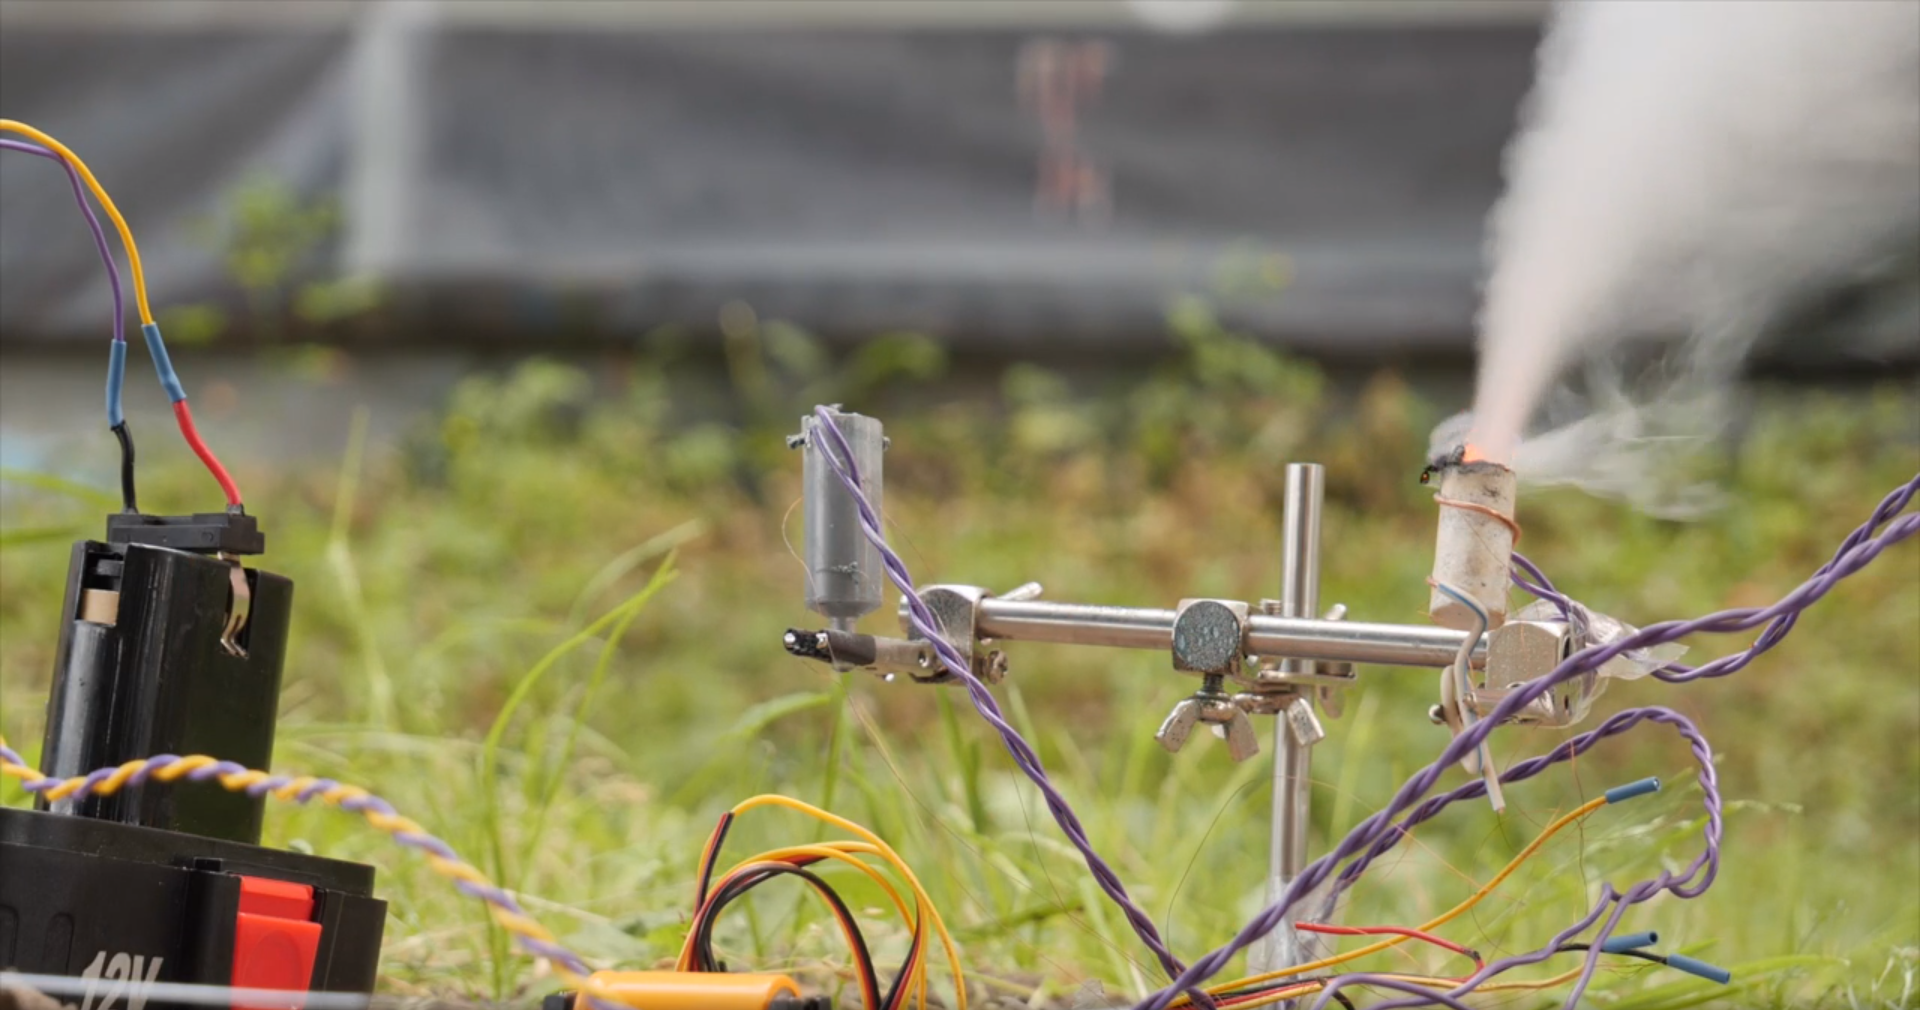
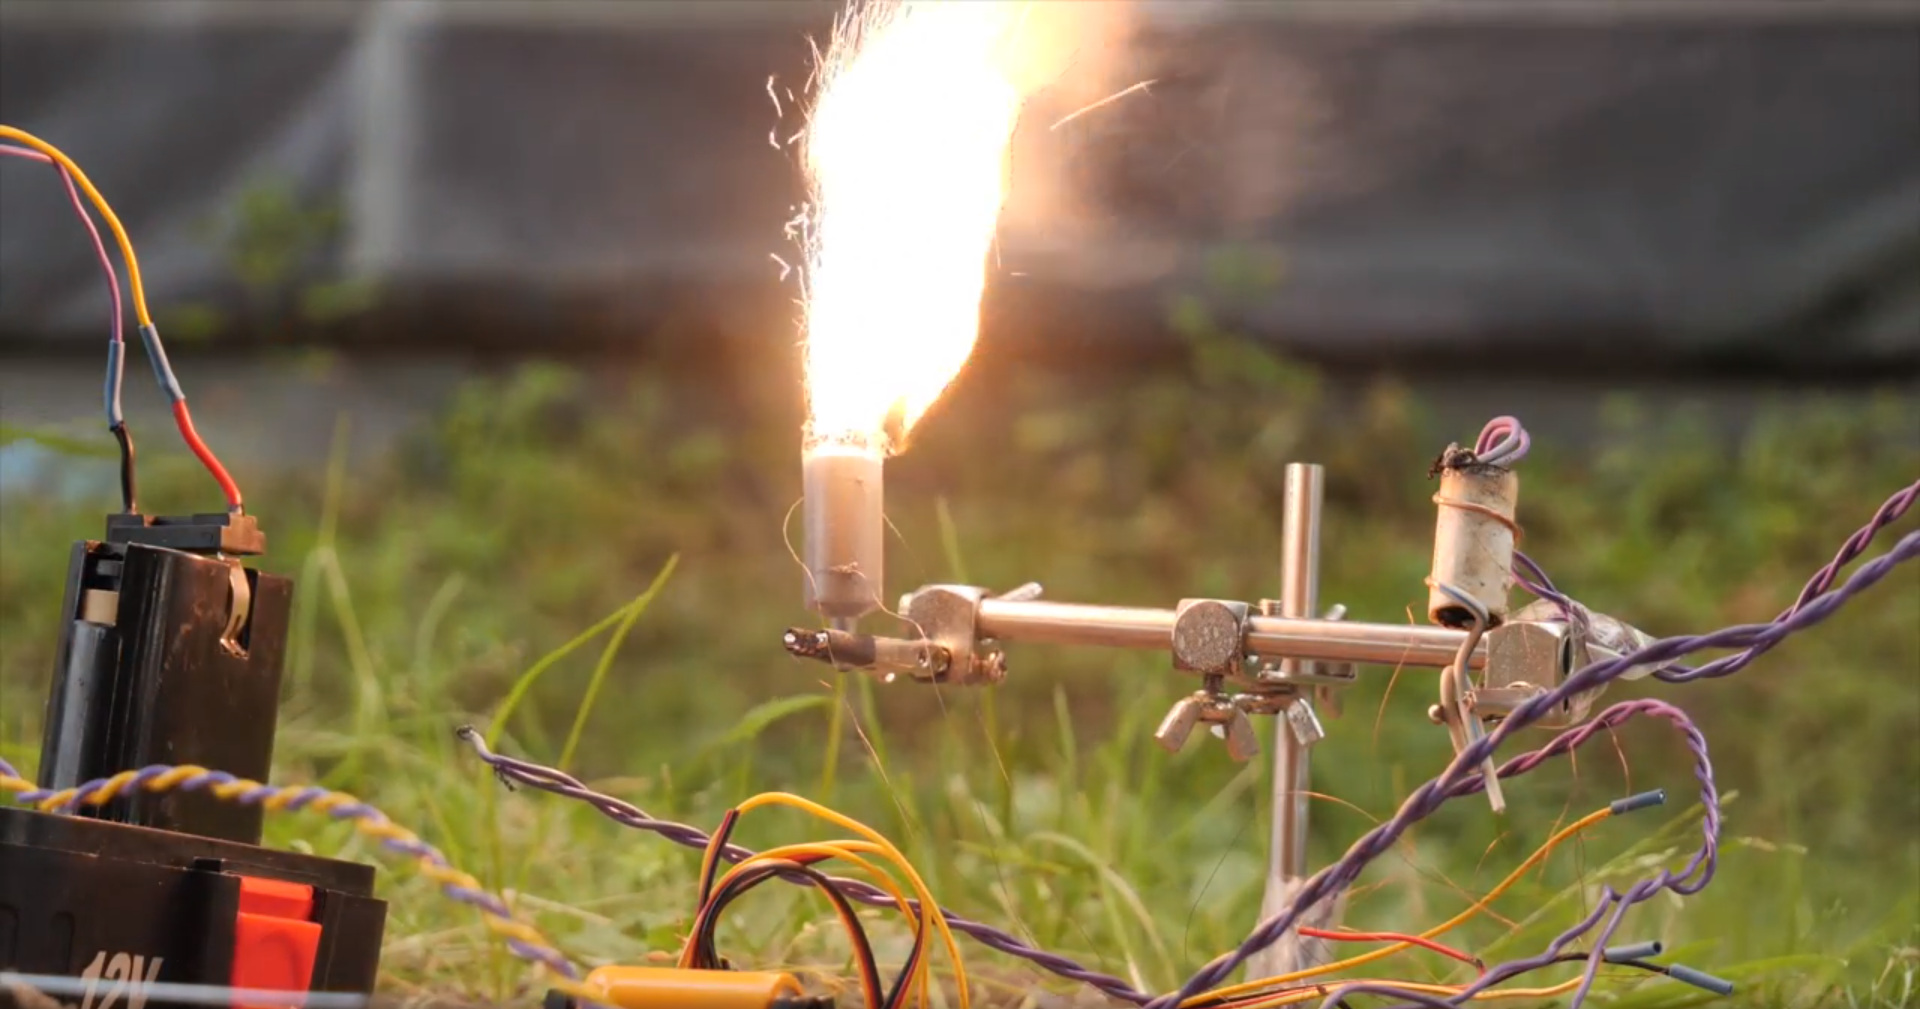
In the previous issue, we decided to conduct tests of the combustion rate of fuel under pressure, as test subjects there will be small (about 3-4 cm in length) fuel sticks. The idea is as follows: we cast mini-charges and insert thin (0.1mm) copper wires into them perpendicular to the axis, then set fire to the checker from the end. When the fuel burns, the first wire will melt, which will be a signal to start timing. Then, when the second wire burns out, we get a second time stamp. Knowing the distance between the wires and the fact that the fuel burns on the surface, making simple mathematical calculations, we get the burning speed in mm / s, and the arduino will count the time and count.
It's clear with the logic of the process, let's move on to casting the checkers. Their bodies are made of paper impregnated with silicate glue, which is wound on a smooth steel bar (we took the one used for the stand guides for measuring the engine thrust). As we were told earlier, such a design is quite suitable for preventing combustion on the surface where this combustion is not required, that is, armor comes out. We will fill it with fuel.
The first purchased reagents came to an end, we bought new ones. In Ruskhim, for some reason, there was no chemically pure potassium nitrate, so we had to take the analytical grade. For some reason, she turned out to have a yellowish tint. An attempt to boil fuel with it was not crowned with much success - the product turned out to be too brown and did not want to completely harden, the surface remained shiny and sticky, as if it were wet. They began to sin on the purity of saltpeter and the inability to completely evaporate the water. Evacuated - the same result. Moreover, during evacuation, the material emitted a significant number of bubbles.
The next iteration was to try not to add water, but to melt sorbitol directly by adding dry saltpeter to it. After boiling, the fuel turned out to be of about the same quality, only this time there were visible inclusions of saltpeter in the fuel. Both fuels burned weakly and reluctantly, with some of the material melting and flowing out. We found a few of the original reagents from the first purchase, tried to cook, as they did before - the same effect.
Thoughts began to creep into my head about the humidity of the atmosphere in the room and / or the humidity of the initial reagents. We found and bought saltpeter with a purity of 99.5%, dried it and sorbitol (separately, of course) for 6 hours at a temperature of about 60 degrees to remove moisture, evacuated and placed in sealed containers. The presence of saltpeter crystals in the version of the fuel, cooked without adding water pushed to the idea of grinding it before adding sorbitol to the melt. An electric coffee grinder helped very well in this matter - saltpeter turned into dust. We were also advised that the color change to brown and poor fuel quality may be due to overheating of sorbitol.
So, empirically, we have derived the technology for producing the best fuel in our conditions:
- the purest reagents
- drying of reagents before cooking + evacuation
- storage of reagents in a sealed container
- grinding potassium nitrate before use
- melting temperature should not exceed 120 degrees
- cooking without adding water
The result surprised us very pleasantly. Firstly, the process of cooking itself has significantly accelerated, since there is no need to evaporate water from the melt (we do not take into account the time spent on drying - this is an almost automatic process, vacuuming also does not take long). Secondly, the quality of the fuel (type, color, solidification time) has also improved markedly. It looked like it looked like the photo on Wikipedia. Thirdly, the fuel burns much better, evenly, without residue and without molten droplets. This technology will be used in the future.
In our sleeves for mini-checkers with a sewing needle, we make through holes perpendicular to the axis in diameter, thread the wire through the holes, fill in fuel and gently ram, taking care not to damage the wires. Control of filling is carried out by weighing empty checkers and full ones. Knowing the volume of fuel inside the checker and its density, it is easy to calculate whether the sleeve is completely filled or there are still voids left.
Perchlorate fuel
Since the idea was to conduct tests of the burning rate, it was decided to test immediately the fuel based on ammonium perchlorate, the manufacture of which they started. This type of fuel, on the one hand, is easier to manufacture, because does not require heating and melting, but on the other hand, it is more dangerous due to its instability and more complex in terms of components.
And the components you need are:
- ammonium perchlorate - oxidizing agent
- aluminum powder - fuel
- Elastex - polyurethane binder
- Castor oil - hardener for binder
PHA was purchased from Ruskhim, the rest of the components - from Pyrohobby. Yes, we did not use the previously purchased aluminum powder, instead of it we took spherical dispersed aluminum of the ASD-6 grade with a grain size of <10 microns in order to increase the surface area of the reagents. Ammonium perchlorate was ground in the same electric coffee grinder, but it was done in a different way: the button was fixed in the on state, and the coffee grinder was plugged into the socket from a distance - after all, PHA is a dangerous thing. We strongly recommend everyone to follow safety precautions.

So, for the preparation of fuel, you need to take the following ratio of components by weight:
- oxidizing agent - 70%
- — 15%
- — 15%
It should be borne in mind that in the latter case, the binder is understood as a mixture of Elastex and castor oil in a ratio of 1: 1, which is where the preparation begins: the components of the binder must be thoroughly mixed in a container (preferably plastic or glass) and mixed until a homogeneous state. Then add fuel and oxidizer to it sequentially. For safety reasons, add in small portions, carefully mixing the previous one. Hopefully, there is no need to remind you that when cooking, there should be no heating devices, sources of fire or sparks nearby - this can lead to fuel ignition. The final mixing is convenient to do with your hands (it is obligatory - with gloves, since PHA is a strong oxidant and does not spare the skin at all), kneading the resulting plasticine-like mass of dark gray color.Also, an analogy in appearance and consistency is fine kinetic sand.
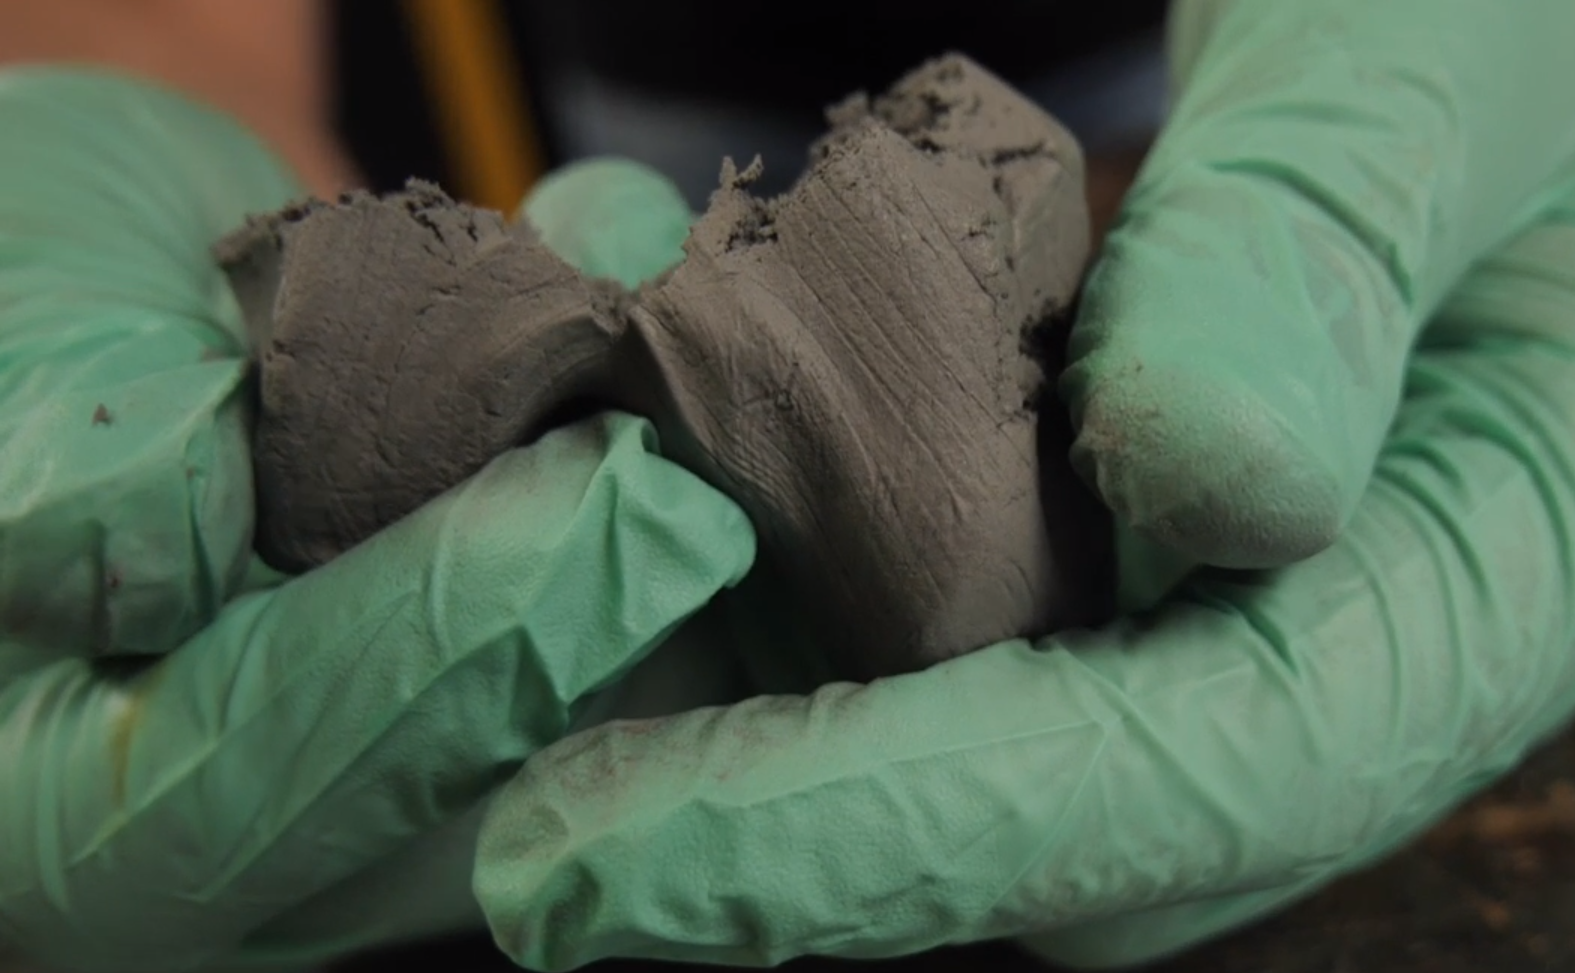
There is no need to rush - such a composition retains its plasticity for up to 6 hours, and finally hardens after 24 hours, turning into a fairly solid material. Care should also be taken with solidified fuel: it is undesirable to machine it (cut, drill, etc.) - this can lead to a fire. The resulting fuel was tested immediately. Burning resembles a sparkler.

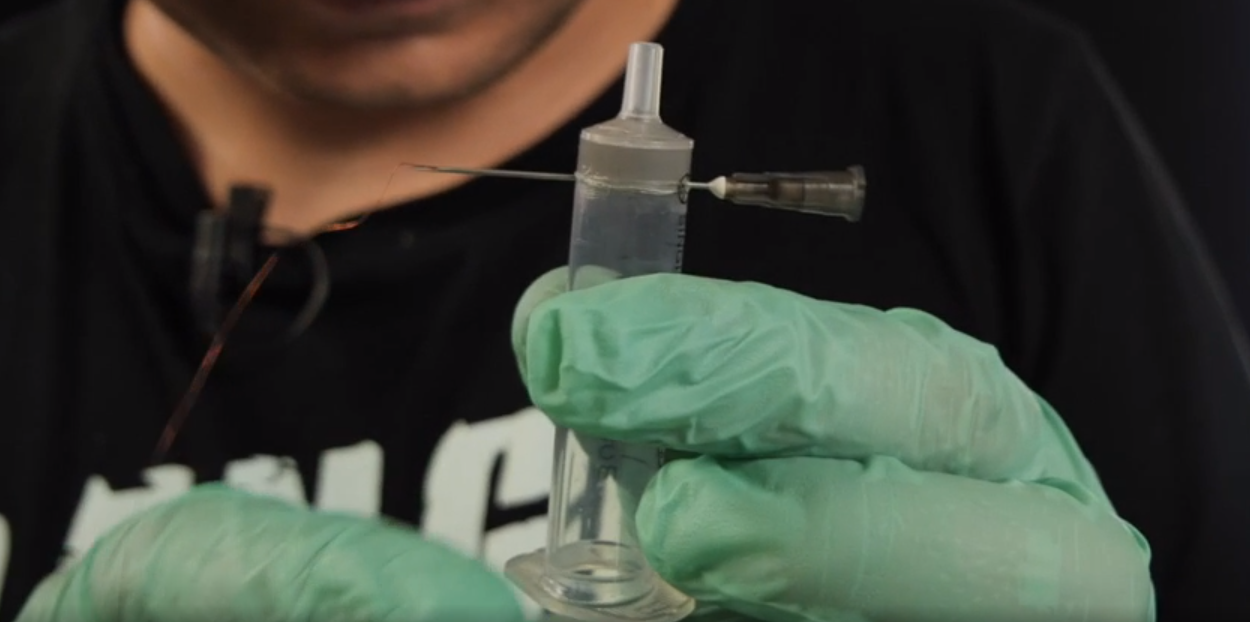
For the PHA fuel, we used ordinary medical syringes for 5 cubic meters as sleeves, and the wire was inserted into them using needles from the same syringes: we fill the fuel to the level of the wire, pierce the syringe body through and through with a needle, pass the wire through the needle, take out the needle, leaving the wire inside the syringe and continue to fill the fuel further.
For us personally, working with perchlorate fuel seemed easier and more convenient than with caramel fuel. The main thing is to observe all precautions.
Stand Electronics
The principle of operation of the combustion rate meter has already been described above - I will not return to this, but we will consider the software and hardware in more detail. For the stand we need:
- WiFi-Slot
- Slot Expander
- OLED display
- Power switch N-Channel - 2 pcs.
- Battery ET ICR16340C
- Power cell
- wires, solder, flux, connectors
- 12V battery from a screwdriver
Almost all components are connected together without soldering thanks to the Troyka form factor. Communication is carried out via WiFi, the data is displayed on the web interface. The sketch is a slightly modified version of the firmware that was used for the stand measuring engine thrust, in particular, the script from Highcharts was taken from there, which displays data in the form of a graph. A link to the firmware will be at the end of the article.
At the moment, the pressure readings are entered manually, but we plan to supply a digital pressure sensor and pick up the results directly from it. If everything goes as planned, we will update the information on the sketch, but it will be in the next release.
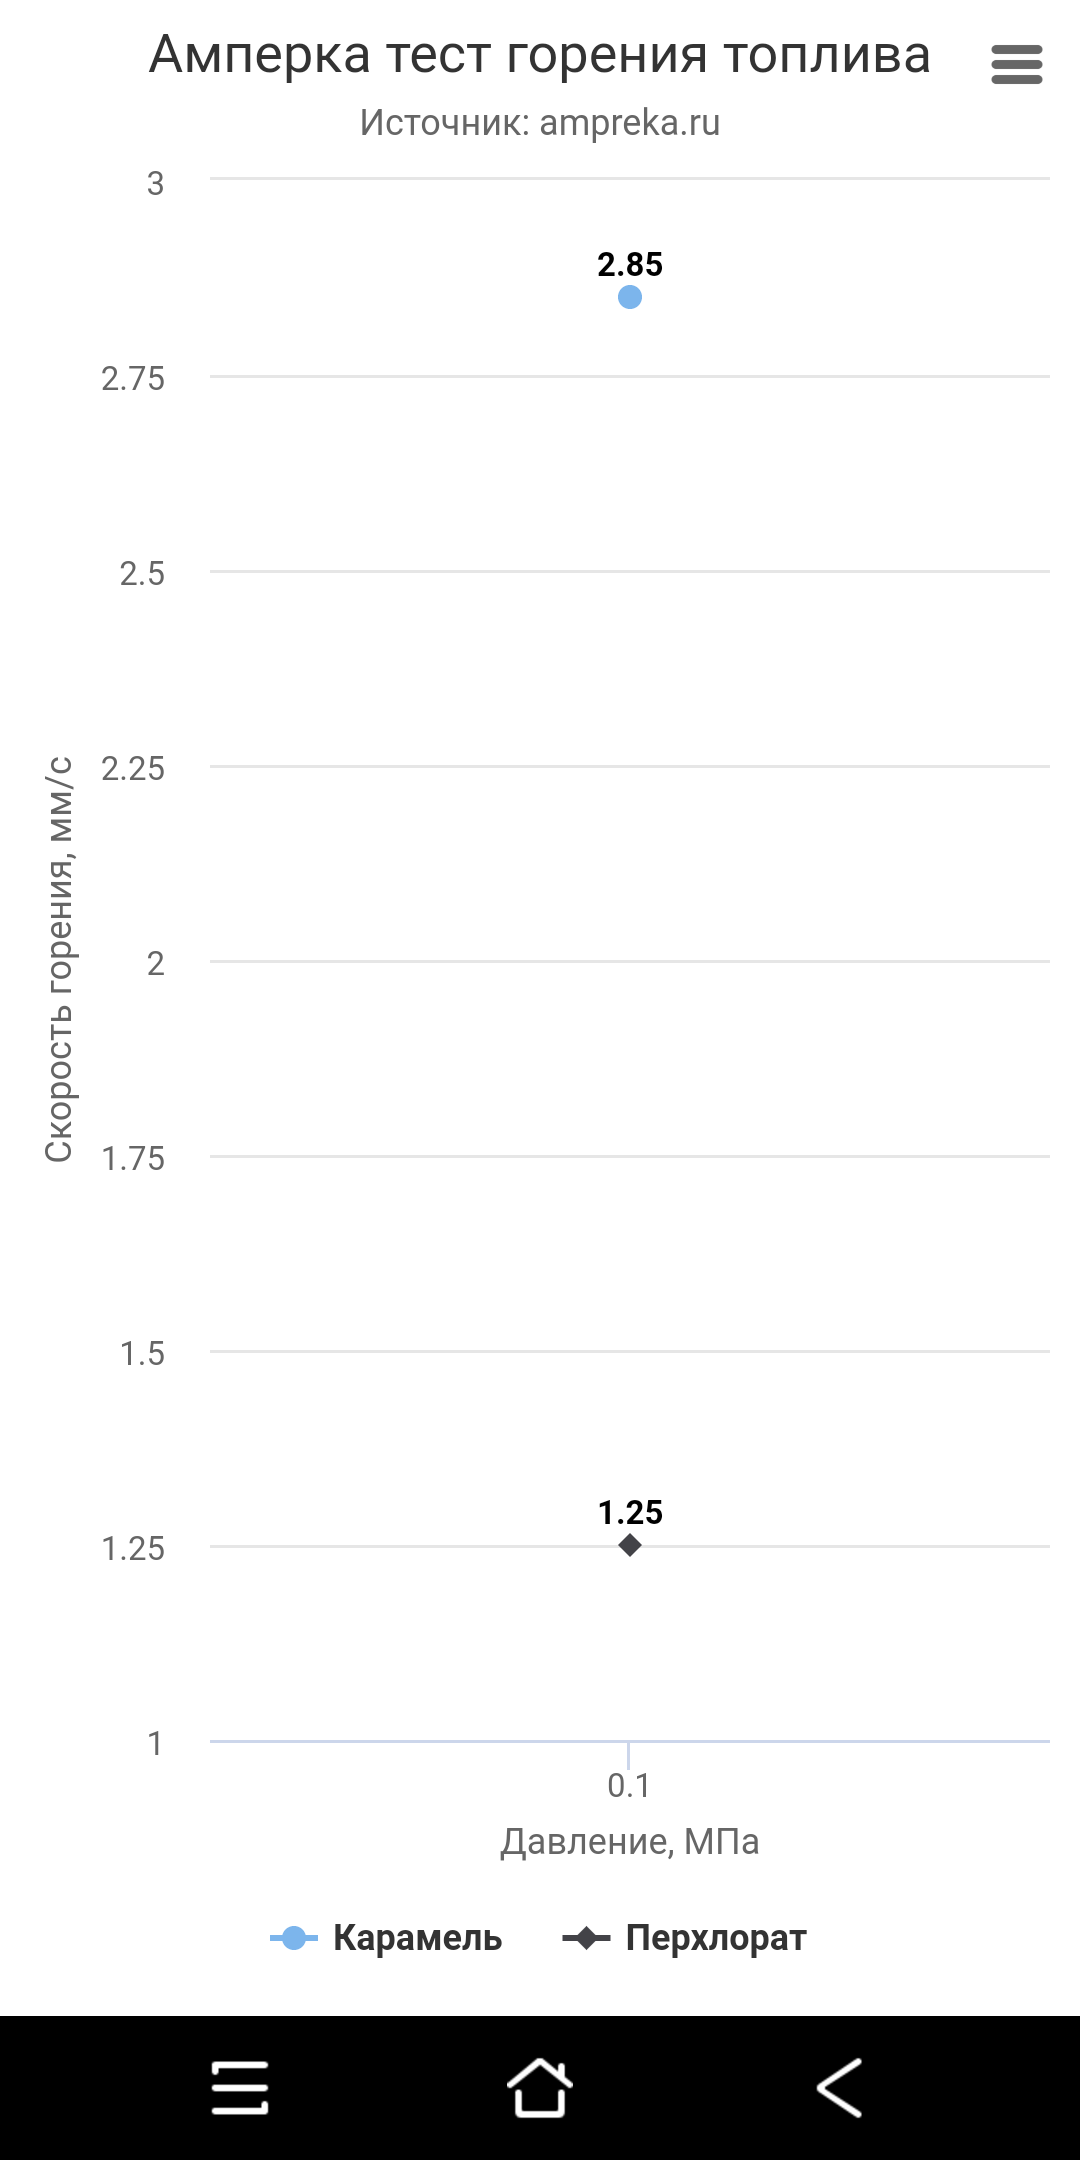
So, the electronics are assembled, pre-tested, which means you can carry out tests at atmospheric pressure. We connect the contact wires of the checkers to the stand, connect the fuses and go to test. The results came out like this: As expected, at atmospheric pressure, PHA fuel loses to caramel in burning speed (1.25mm / s versus 2.85mm / s), but this fuel shows its greatest efficiency at elevated pressure. Well, we just have to wait for the manufacture of fittings and adapters for our cylinder, carry out work with it to introduce all the necessary fittings and carry out pressure tests. This is what we will do in the next part. Thank you all for your attention. Video by article:
Sketch for the stand for measuring the fuel burning rate.