In the first part of the article, we will use the QEMU emulator for aarch64, in the second part, we will launch the Raspberry emulator and check the functionality of the application in it.
On my own behalf, I want to note that all this is not done quickly, and if you try to do all this, then the full cycle will take you several days!)
Building from Qt sources on CentOS ARM
To install on a host system, we need to install the QEMU emulator. On Debian based distributions, this is the qemu-system-arm package. To manage the virtual machine in graphical mode, you can install virt-manager.
After starting, create a virtual machine:
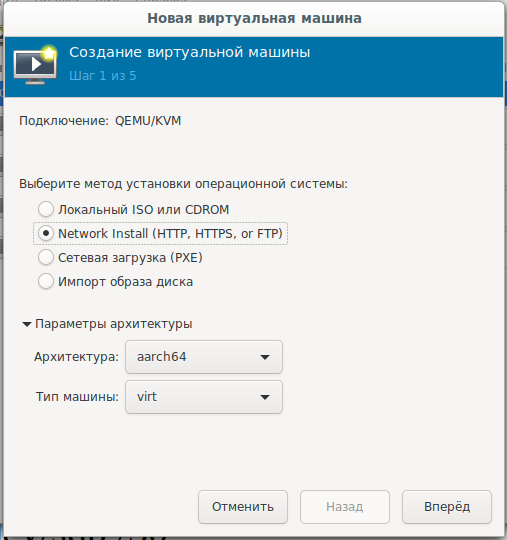
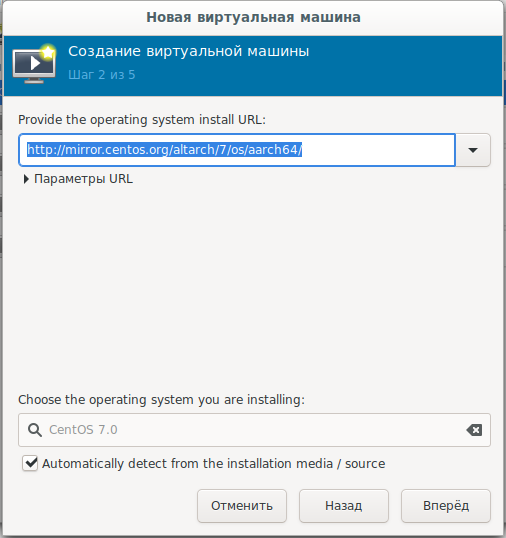
and select the network boot c url:
mirror.centos.org/altarch/7/os/aarch64 Set the
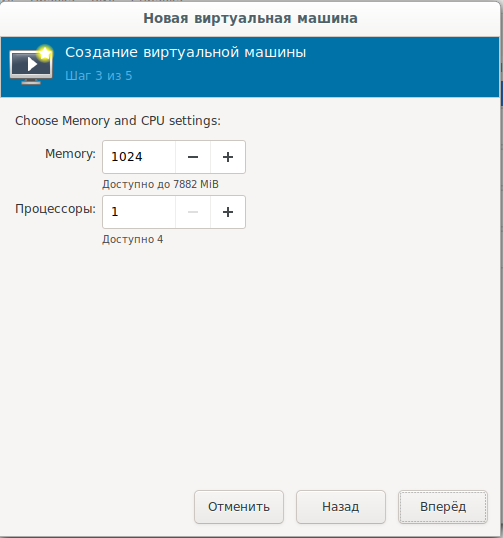
number of processors and RAM:
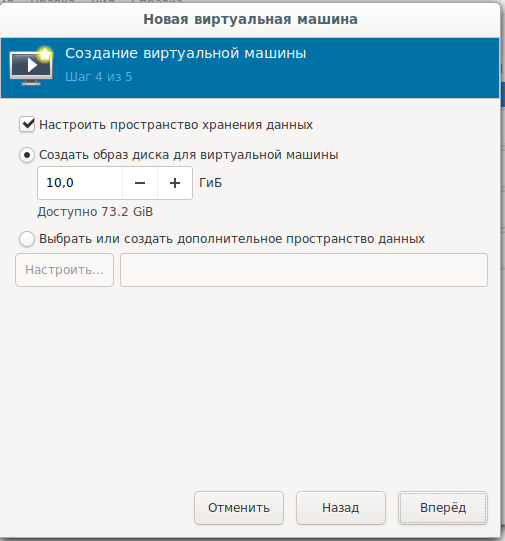
Set the size of the system disk:
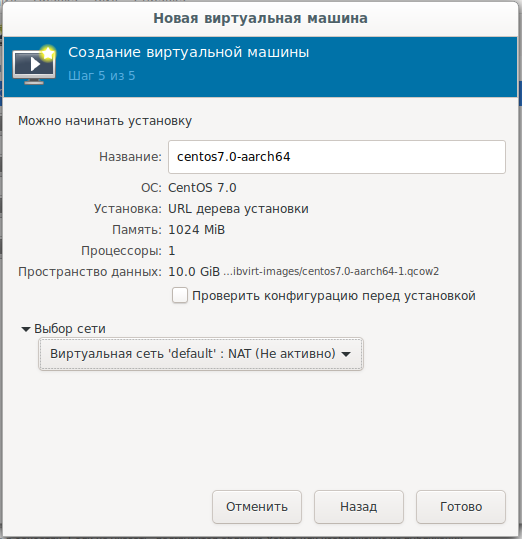
Final settings, network selection:
For those who want to download or install offline, there is a disk image:
arm64
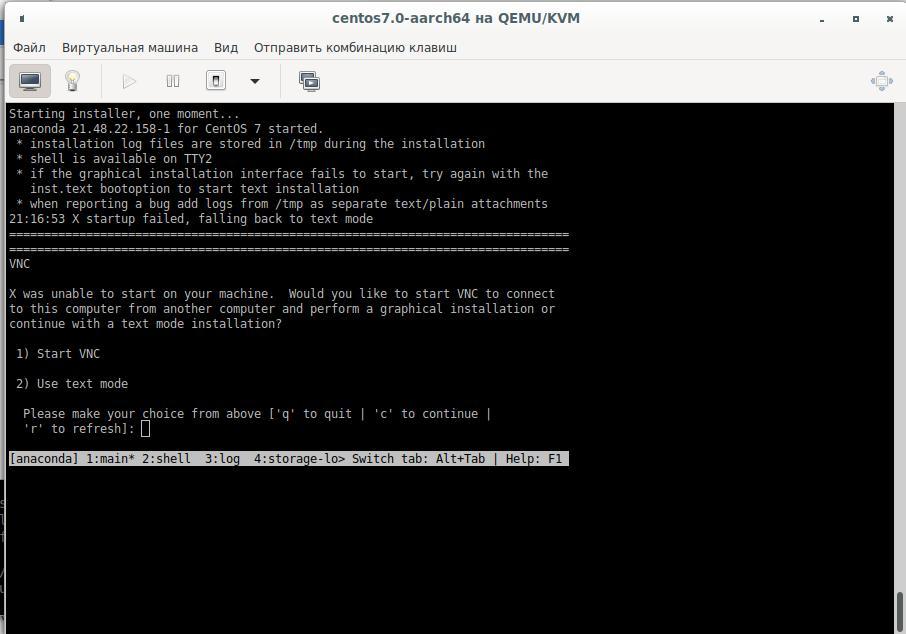
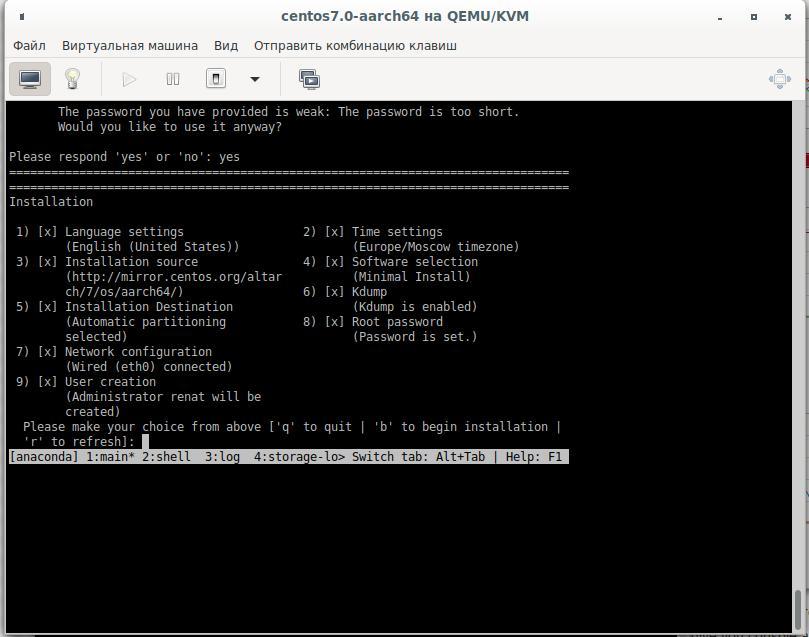
Next, you need to install the system on the hard disk in text mode, choosing the necessary answer options, and confirming with yes answers:
The assembly will be done on the second virtual disk, for this we will need a 25-30 Gb disk. We create a new hard disk by shutting down the virtual machine and connecting it to it and after that we start again. Let's break our hard drive and format it:
cfdisk /dev/sdb
mkfs.ext4 /dev/sdb1 -L Qt_Rebuild
mount /dev/sdb1 /30
Why is the file system not XFS
XFS, Raspberry, .. XFS.
After installation, we connect to the virtual machine and install the packages we need :
yum install centos-release-scl
yum install devtoolset-9-gcc.aarch64
yum install git
export PATH=/opt/rh/devtoolset-9/root/bin/:$PATH
echo clone from git
cd /30
git clone --recursive --single-branch --branch 5.15 git://github.com/qt/qt5.git
cd qt5
Configuring:
./configure -skip qt3d -no-warnings-are-errors -release -recheck-all --prefix /Qt/5.15.0 -opensource -confirm-license -nomake examples -nomake tests -c++std c++17 -I /usr/include/xcb/ -L /usr/lib/x86_64-linux-gnu/ -xcb-xlib -xcb -feature-thread -feature-xkbcommon -qt-libpng -qt-libjpeg -qt-zlib -I /usr/include/xcb/ -L /usr/lib/x86_64-linux-gnu/ --recheck-all
...
You need perl in your PATH to make a build from GIT.
Cannot proceed.

#yum install perl
We repeat the launch of the configuration and get:
Creating qmake...
gmake: g++: Command not found
gmake: *** [main.o] Error 127
Install the compiler and configure again:
yum install devtoolset-9-gcc-c++.aarch64
...
ERROR: Feature 'xcb' was enabled, but the pre-condition 'features.thread && libs.xcb && tests.xcb_syslibs && features.xkbcommon-x11' failed.

ERROR: Feature 'xcb-xlib' was enabled, but the pre-condition 'features.xlib && libs.xcb_xlib' failed.

ERROR: Feature 'xkbcommon' was enabled, but the pre-condition 'libs.xkbcommon' failed.

ERROR: The OpenGL functionality tests failed!
You might need to modify the include and library search paths by editing QMAKE_INCDIR_OPENGL[_ES2],
QMAKE_LIBDIR_OPENGL[_ES2] and QMAKE_LIBS_OPENGL[_ES2] in the mkspec for your platform.
We search and deliver the necessary packages:
yum install libxkbcommon-x11-devel
yum install xcb-util-renderutil-devel
yum install libxcb libxcb-devel libXrender libXrender-devel xcb-util-wm xcb-util-wm-devel xcb-util xcb-util-devel xcb-util-image xcb-util-image-devel xcb-util-keysyms xcb-util-keysyms-devel
We configure, and we already get one error:
ERROR: Feature 'xcb-xlib' was enabled, but the pre-condition 'features.xlib && libs.xcb_xlib' failed.Add more packages and look at the configuration log:
 yum install libxcb libxcb-devel xcb-util xcb-util-devel mesa-libGL-devel libxkbcommon-devel
...
Checking for XCB ICCCM >= 0.3.9... yes
Checking for XCB SHM... yes
Checking for XCB Image >= 0.3.9... yes
Checking for XCB Keysyms >= 0.3.9... yes
Checking for XCB RandR... yes
Checking for XCB XRender... yes
Checking for XCB Renderutil >= 0.3.9... yes
Checking for XCB Shape... yes
Checking for XCB Sync... yes
Checking for XCB Xfixes... yes
Checking for XCB Xinerama... yes
Checking for XCB XKB... yes
Checking for XCB (extensions)... yes
Checking for xkbcommon >= 0.5.0... yes
Checking for xkbcommon-x11... yes
…
Checking for XCB Xlib... yes
Checking for XCB GLX... yes
...
Qt is now configured for building. Just run 'gmake'.
Once everything is built, you must run 'gmake install'.
Qt will be installed into '/Qt/5.15.0'.

Prior to reconfiguration, make sure you remove any leftovers from
the previous build.
Well, everything is ready, but we need to check the options that may be useful to us:
  OpenGL:
    Desktop OpenGL ....................... yes
    OpenGL ES 2.0 ........................ no
    OpenGL ES 3.0 ........................ no
    OpenGL ES 3.1 ........................ no
    OpenGL ES 3.2 ........................ no

  OpenSSL ................................ no
    Qt directly linked to OpenSSL ........ no
  OpenSSL 1.1 ............................ no
And all the same, we probably need the application's network interaction, we don't work only via http:
yum install openssl-devel

Dependencies Resolved

================================================================================
 Package                   Arch          Version               Repository  Size
================================================================================
Installing:
 openssl-devel             aarch64       1:1.0.2k-19.el7       base       1.5 M
Installing for dependencies:
 keyutils-libs-devel       aarch64       1.5.8-3.el7           base        37 k
 krb5-devel                aarch64       1.15.1-46.el7         base       272 k
 libcom_err-devel          aarch64       1.42.9-17.el7         base        31 k
 libkadm5                  aarch64       1.15.1-46.el7         base       175 k
 libselinux-devel          aarch64       2.5-15.el7            base       186 k
 libsepol-devel            aarch64       2.5-10.el7            base        76 k
 libverto-devel            aarch64       0.2.5-4.el7           base        11 k
 pcre-devel                aarch64       8.32-17.el7           base       479 k
 zlib-devel                aarch64       1.2.7-18.el7          base        49 k

Transaction Summary
================================================================================
Install  1 Package (+9 Dependent packages)

Total download size: 2.8 M
Installed size: 6.4 M
Is this ok [y/d/N]:
Version 1.0.2k, which is less than what Qt asks for ( Increased the minimum supported version of OpenSSL to 1.1. )
We'll have to build OpenSSL and then build Qt from source:
wget https://www.openssl.org/source/openssl-1.1.1g.tar.gz
-bash: wget: command not found
cd /
curl https://www.openssl.org/source/openssl-1.1.1g.tar.gz -o openssl-1.1.1.g.tar.gz
tar -xvf openssl-1.1.1.g.tar.gz
cd /openssl-1.1.1g
perl Configure
echo   ,   ARM:
perl Configure linux-aarch64
Configuring OpenSSL version 1.1.1g (0x1010107fL) for linux-aarch64
Using os-specific seed configuration
Creating configdata.pm
Creating Makefile

**********************************************************************
***                                                                ***
***   OpenSSL has been successfully configured                     ***
***                                                                ***
***   If you encounter a problem while building, please open an    ***
***   issue on GitHub <https://github.com/openssl/openssl/issues>  ***
***   and include the output from the following command:           ***
***                                                                ***
***       perl configdata.pm --dump                                ***
***                                                                ***
***   (If you are new to OpenSSL, you might want to consult the    ***
***   'Troubleshooting' section in the INSTALL file first)         ***
***                                                                ***
**********************************************************************
make && make install
Then we again configure Qt and start building it with the make or make -j4 command , according to the number of processors (if you decide to create a VM with 4 processors), which are specified in the virtual machine settings.
Application build crashes on:
make[3]: Entering directory `/30/qt5/qtsvg/src/svg'
g++ -c -include .pch/Qt5Svg -pipe -O2 -std=c++1z -fvisibility=hidden -fvisibility-inlines-hidden -fno-exceptions -Wall -Wextra -Wvla -Wdate-time -Wshift-overflow=2 -Wduplicated-cond -Wno-stringop-overflow -Wno-format-overflow -D_REENTRANT -fPIC -DQT_NO_LINKED_LIST -DQT_NO_FOREACH -DQT_NO_USING_NAMESPACE -DQT_NO_NARROWING_CONVERSIONS_IN_CONNECT -DQT_BUILD_SVG_LIB -DQT_BUILDING_QT -DQT_NO_CAST_TO_ASCII -DQT_ASCII_CAST_WARNINGS -DQT_MOC_COMPAT -DQT_USE_QSTRINGBUILDER -DQT_DEPRECATED_WARNINGS -DQT_DISABLE_DEPRECATED_BEFORE=0x050000 -DQT_DEPRECATED_WARNINGS_SINCE=0x060000 -DQT_NO_EXCEPTIONS -D_LARGEFILE64_SOURCE -D_LARGEFILE_SOURCE -DQT_NO_DEBUG -DQT_WIDGETS_LIB -DQT_GUI_LIB -DQT_CORE_LIB -DQT_ZLIB_LIB -I. -I../../include -I../../include/QtSvg -I../../include/QtSvg/5.15.0 -I../../include/QtSvg/5.15.0/QtSvg -I/30/qt5/qtbase/include/QtWidgets/5.15.0 -I/30/qt5/qtbase/include/QtWidgets/5.15.0/QtWidgets -I/30/qt5/qtbase/include/QtGui/5.15.0 -I/30/qt5/qtbase/include/QtGui/5.15.0/QtGui -I/30/qt5/qtbase/include/QtCore/5.15.0 -I/30/qt5/qtbase/include/QtCore/5.15.0/QtCore -I/30/qt5/qtbase/include -I/30/qt5/qtbase/include/QtWidgets -I/30/qt5/qtbase/include/QtGui -I/30/qt5/qtbase/include/QtCore -I/30/qt5/qtbase/include/QtZlib -I/30/qt5/qtbase/include/QtZlib/5.15.0 -I/30/qt5/qtbase/include/QtZlib/5.15.0/QtZlib -I.moc -I/usr/include/libdrm -I/usr/include/xcb -I/usr/include/xcb -I/30/qt5/qtbase/mkspecs/linux-g++ -o .obj/qsvgfont.o qsvgfont.cpp
In file included from /30/qt5/qtbase/include/QtGui/qopenglversionfunctions.h:1,
                 from /30/qt5/qtbase/include/QtGui/../../src/gui/kernel/qopenglcontext.h:61,
                 from /30/qt5/qtbase/include/QtGui/qopenglcontext.h:1,
                 from /30/qt5/qtbase/include/QtGui/QtGui:49,
                 from ../../include/QtSvg/QtSvgDepends:4:
/30/qt5/qtbase/include/QtGui/../../src/gui/opengl/qopenglversionfunctions.h: In instantiation of ‘class QVector<double>’:
qsvgstyle_p.h:696:20:   required from here
/30/qt5/qtbase/include/QtGui/../../src/gui/opengl/qopenglversionfunctions.h:201:5: internal compiler error: in tsubst_function_decl, at cp/pt.c:12967
  201 |     QAbstractOpenGLFunctionsPrivate()
      |     ^~~~~~~~~~~~~~~~~~~~~~~~~~~~~~~
Please submit a full bug report,
with preprocessed source if appropriate.
See <http://bugzilla.redhat.com/bugzilla> for instructions.
make[3]: *** [.obj/qsvgfont.o] Error 1
make[3]: Leaving directory `/30/qt5/qtsvg/src/svg'
make[2]: *** [sub-svg-make_first-ordered] Error 2
make[2]: Leaving directory `/30/qt5/qtsvg/src'
make[1]: *** [sub-src-make_first] Error 2
make[1]: Leaving directory `/30/qt5/qtsvg'
make: *** [module-qtsvg-make_first] Error 2
We install additional versions of packages and on try 3 we get it:
-
yum install harfbuzz-devel yum install at-spi2-atk-devel at-spi2-core-devel dbus-devel glib2-devel graphite2-devel keyutils-libs-devel krb5-devel libcom_err-devel libicu-devel libselinux-devel libsepol-devel libverto-devel pcre-devel zlib-devel-
yum install mesa-libGLw-devel
Configuration and assembly is in progress. We create a test application in QtCreator (with assembly qmake), copy the sources to the virtual machine and build the application. Binar is ready, it remains to test it on Raspberry.
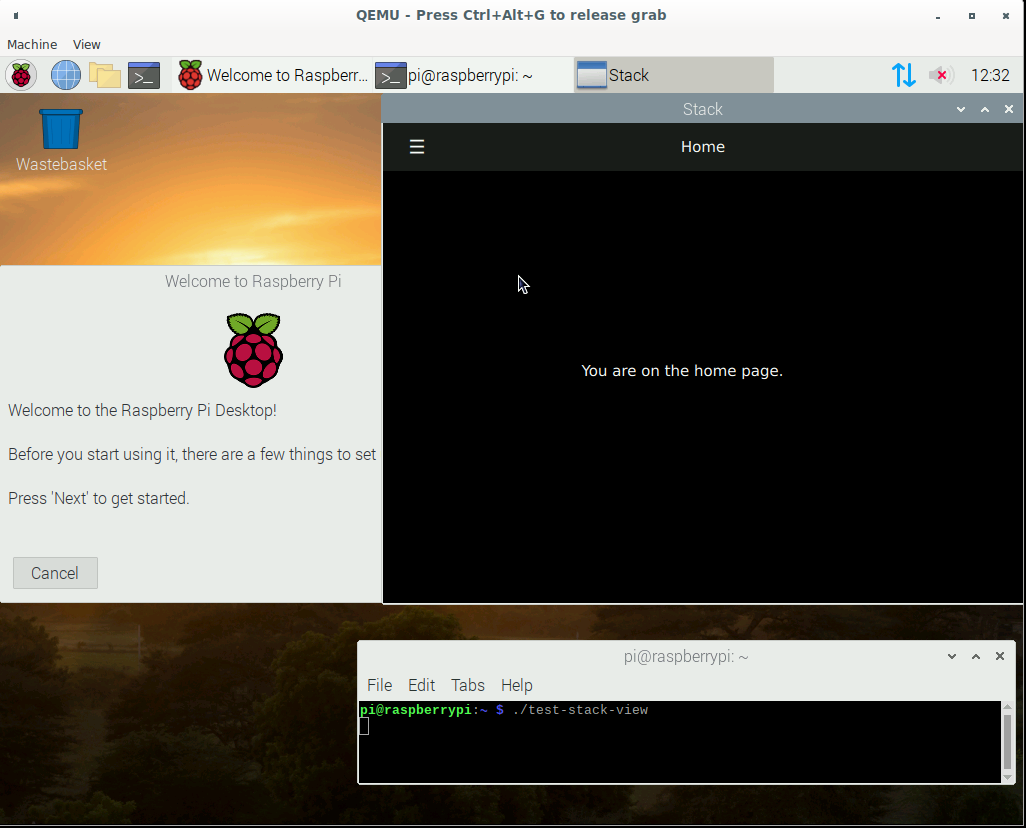
2. Run in the Raspberry emulator
Since within the framework of this article we are emulating an ARM processor, it means that we will also run in a virtual machine link 1 link 2 link 3 :
Download the official image from the Raspberry website, the kernel for the emulator and run (I created such a startup file):
echo create disk for Qt sources and Projects
qemu-img create -f qcow2 qt-rebuild-25gb-disk.qcow2 25G
cat start-emul.sh
#!/bin/bash

path_img=/home/user/Project/qemu
path_kernel=/home/user/qemu/qemu-rpi-kernel
sudo qemu-system-arm -kernel $path_kernel/kernel-qemu-4.19.50-buster -dtb $path_kernel/versatile-pb-buster.dtb \
-cpu arm1176 -m 256 -M versatilepb -append "root=/dev/sda2 rw" -net nic -net user,hostfwd=tcp::5022-:22 \
-net tap,ifname=vnet0,script=no,downscript=no -hdb $path_img/qt-rebuild-25gb-disk.qcow2 -no-reboot -hda $path_img/2020-05-27-raspios-buster-armhf.img
Trying to launch our application:
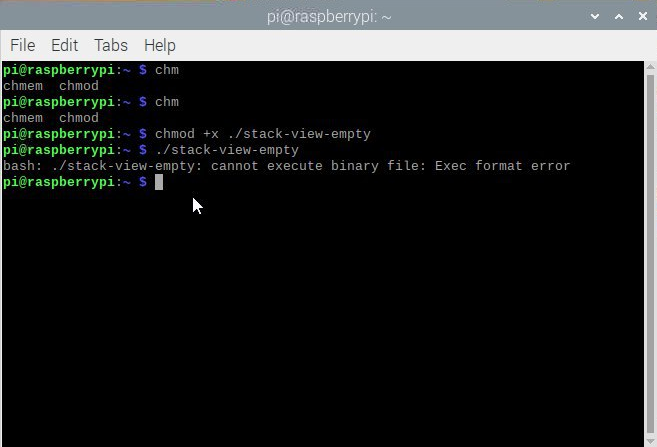
Why is that? We look at the processor:
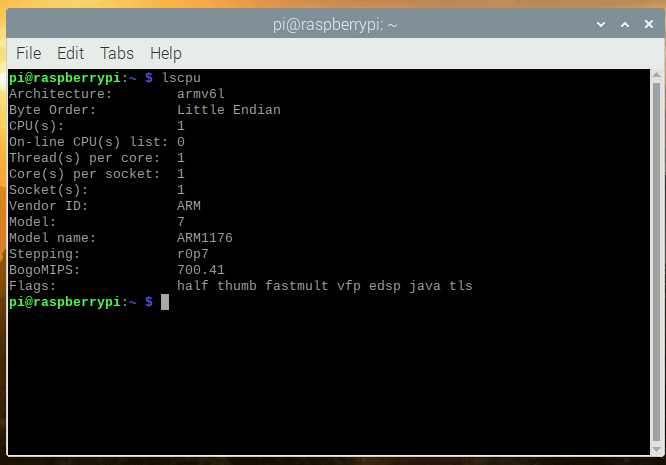
We look at the configuration file in CentOS:
[root@aaarch-qemu qt5]# cat config.summary |grep CPU
Build type: linux-g++ (arm64, CPU features: cx16 neon)
Well, we have compiled a 64-bit armv8 application and are trying to run it in a 32-bit emulator with an armv6 processor. I hope that owners of real devices with new 64-bit processors will be able to unsubscribe in the comments whether they managed to run the application on a real device or not.
Well, it doesn't matter, we can now collect in the Raspberry emulator? We find that we have very little free disk space after calling the df -h command. The easiest way was to copy the image file, enlarge it, start a virtual machine with two file systems by increasing the root partition on the second machine, and then use the second image. Go:
qemu-img convert 2020-05-27-raspios-buster-armhf.img 2020-05-27-raspios-buster-armhf-10gb.qcow2 -O qcow2 -p
qemu-img resize 2020-05-27-raspios-buster-armhf-10gb.qcow2 +6G
Add another hard drive to the startup script:
-hdc 2020-05-27-raspios-buster-armhf-10gb.qcow2
After starting, edit this hard drive sudo cfdisk / dev / sdc:
Resize:

Write and confirm yes:
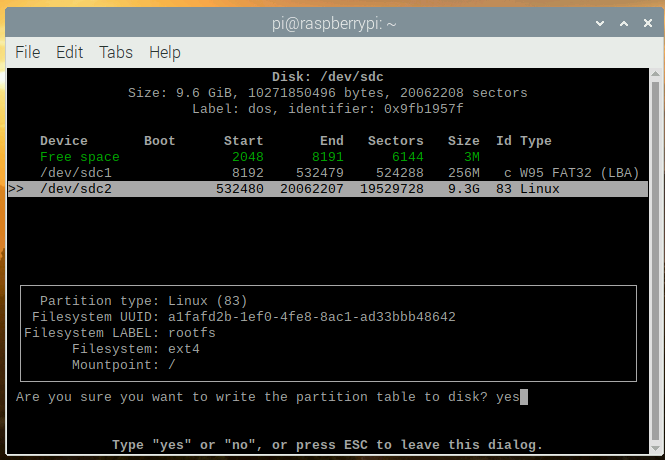
Do not forget to check, that the disk has become the size we need:
sudo mkdir /test
sudo mount /dev/sdc2 /test
df -h
Filesystem      Size  Used Avail Use% Mounted on
/dev/root       3.2G  2.8G  257M  92% /
devtmpfs        124M     0  124M   0% /dev
tmpfs           124M     0  124M   0% /dev/shm
tmpfs           124M  2.0M  122M   2% /run
tmpfs           5.0M     0  5.0M   0% /run/lock
tmpfs           124M     0  124M   0% /sys/fs/cgroup
/dev/sdc1       253M   51M  202M  21% /boot
tmpfs            25M     0   25M   0% /run/user/1000
/dev/sdc2       3.2G  2.7G  358M  89% /test
Something the size of the sdc disk connected to the / test folder was not added, let's fix it:
sudo umount /test
sudo fsck -f /dev/sdc2
sudo resize2fs /dev/sdc2
resize2fs 1.44.5 (15-Dec-2018)
Please run 'e2fsck -f /dev/sdc2' first.

pi@raspberrypi:~ $ e2fsck -f /dev/sdc2
e2fsck 1.44.5 (15-Dec-2018)
e2fsck: Permission denied while trying to open /dev/sdc2
You must have r/w access to the filesystem or be root
pi@raspberrypi:~ $ sudo e2fsck -f /dev/sdc2
e2fsck 1.44.5 (15-Dec-2018)
Pass 1: Checking inodes, blocks, and sizes
Pass 2: Checking directory structure
Pass 3: Checking directory connectivity
Pass 4: Checking reference counts
Pass 5: Checking group summary information
rootfs: 106640/217296 files (0.3% non-contiguous), 729343/868352 blocks
pi@raspberrypi:~ $ sudo resize2fs /dev/sdc2
resize2fs 1.44.5 (15-Dec-2018)
Resizing the filesystem on /dev/sdc2 to 2441216 (4k) blocks.
The filesystem on /dev/sdc2 is now 2441216 (4k) blocks long.

sudo mount /dev/sdc2 /test
pi@raspberrypi:~ $ df -h
Filesystem      Size  Used Avail Use% Mounted on
/dev/root       3.2G  2.8G  259M  92% /
devtmpfs        124M     0  124M   0% /dev
tmpfs           124M     0  124M   0% /dev/shm
tmpfs           124M  2.0M  122M   2% /run
tmpfs           5.0M     0  5.0M   0% /run/lock
tmpfs           124M     0  124M   0% /sys/fs/cgroup
/dev/sdc1       253M   51M  202M  21% /boot
tmpfs            25M     0   25M   0% /run/user/1000
/dev/sdc2       9.2G  2.7G  6.0G  31% /test
Turn off the virtual machine. Edit the start-emul.sh file again, replacing the hda hard drive with a new one, and removing the link to the third hard drive -hdc. We now have a file system with more space.
Now we can connect the hard drive with Qt sources from the first virtual machine.
Advice: it is best to "clean up sources" from temporary files, i.e. return our state of the git, which was at the time of cloning the repository before configuring:
cd /30/qt5
git reset --hard
git submodule foreach --recursive 'git reset HEAD . || :'
git submodule foreach --recursive 'git checkout -- . || :'
git clean -d -f -f -x
git submodule foreach --recursive git clean -d -f -f -x
So in Debian we need:
sudo apt install gcc-arm-none-eabi
sudo apt install wget build-essential \
 ^libxcb.*-dev \
libopenal-dev \
flite1-dev   libspeechd-dev \
libudev-dev \
libinput-dev \
libxkbcommon-x11-dev curl libssl-dev time -y

sudo apt install libx11-dev -y \
    libfontconfig1-dev \
    libfreetype6-dev \
    libx11-dev \
    libxext-dev \
    libxfixes-dev \
    libxi-dev \
    libxrender-dev \
    libxcb1-dev \
    libx11-xcb-dev \
    libxcb-glx0-dev \
    libxkbcommon-x11-dev \
    mesa-common-dev \
libgl1-mesa-dev
Configuring:
cd /30/qt5
./configure -skip qt3d -no-warnings-are-errors -release -recheck-all -prefix /Qt/5.15.0 -opensource -confirm-license -nomake examples -nomake tests -c++std c++17 -I /usr/include/xcb/ -L /usr/lib/x86_64-linux-gnu/ -xcb-xlib -xcb -feature-thread -feature-xkbcommon -qt-libpng -qt-libjpeg -qt-zlib -I /usr/include/xcb/ -L /usr/lib/x86_64-linux-gnu/ --recheck-all -skip wayland -skip qtwebengine -skip qtwayland
Also getting errors:
ERROR: Feature 'xcb-xlib' was enabled, but the pre-condition 'features.xlib && libs.xcb_xlib' failed.

ERROR: The OpenGL functionality tests failed!
You might need to modify the include and library search paths by editing QMAKE_INCDIR_OPENGL[_ES2],
QMAKE_LIBDIR_OPENGL[_ES2] and QMAKE_LIBS_OPENGL[_ES2] in the mkspec for your platform.
Council. Did you type these commands in the QEMU graphical window? Do not forget, we have ssh: you need to start in the ssh server virtual machine : sudo systemctl start ssh && sudo systemctl enable ssh and connect to the virtual machine from the local computer ssh pi @ localhost -p 5022 user pi password raspberry
Install another dev packages:
sudo apt install wget build-essential  ^libxcb.*-dev libopenal-dev flite1-dev   libspeechd-dev libudev-dev libinput-dev libxkbcommon-x11-dev curl libssl-dev time -y
sudo apt install libasound2-dev libavcodec-dev libclipper-dev libdbus-1-dev libdrm-dev libegl-dev libgles2-mesa-dev
sudo  apt install libx11-dev libfontconfig1-dev libfreetype6-dev libx11-dev libxext-dev libxfixes-dev libxi-dev libxrender-dev libxcb1-dev libx11-xcb-dev libxcb-glx0-dev libxkbcommon-x11-dev mesa-common-dev libgl1-mesa-dev
We configure and get the output of the configuration results:
time ./configure -skip qt3d -no-warnings-are-errors -release -recheck-all -prefix /Qt/5.15.0 -opensource -confirm-license -nomake examples -nomake tests -c++std c++17 -I /usr/include/xcb/ -L /usr/lib/x86_64-linux-gnu/ -xcb-xlib -xcb -feature-thread -feature-xkbcommon -qt-libpng -qt-libjpeg -qt-zlib -I /usr/include/xcb/ -L /usr/lib/x86_64-linux-gnu/ --recheck-all -skip wayland -skip qtwebengine -skip qtwayland
............Done.
Info: creating super cache file /30/qt5/.qmake.super
Info: creating cache file /30/qt5/.qmake.cache
Info: creating stash file /30/qt5/.qmake.stash
This is the Qt Open Source Edition.
You have already accepted the terms of the Open Source license.
Running configuration tests…
…
Note: Option 'cache_use' with value 'none' was specified twice
Note: Also available for Linux: linux-clang linux-icc
Note: Disabling X11 Accessibility Bridge: D-Bus or AT-SPI is missing.
WARNING: QDoc will not be compiled, probably because libclang could not be located. This means that you cannot build the Qt documentation.
Either ensure that llvm-config is in your PATH environment variable, or set LLVM_INSTALL_DIR to the location of your llvm installation.
On Linux systems, you may be able to install libclang by installing the libclang-dev or libclang-devel package, depending on your distribution.
On macOS, you can use Homebrew's llvm package.
On Windows, you must set LLVM_INSTALL_DIR to the installation path.
Qt is now configured for building. Just run 'make'.
Once everything is built, you must run 'make install'.
Qt will be installed into '/Qt/5.15.0'.
Prior to reconfiguration, make sure you remove any leftovers from
the previous build.
real 91m49.471s
user 78m43.608s
sys 7m22.934s
Displaying information about the result of the configuration
Those who have read to this point and still have the enthusiasm to try it, it would be interesting to get your
Now 1 core of your computer will take a lot of time to build Qt and possibly build, and perhaps an error appears that there is not enough memory or an error during the build. To do this, I recommend creating a swap file for 1-1.5 Gb and connecting it:
sudo dd if=/dev/zero of=/30/swap1500 bs=256M count=6 status=progress
dd: memory exhausted by input buffer of size 268435456 bytes (256 MiB)

sudo dd if=/dev/zero of=/30/swap1500 bs=128M count=12 status=progress
1610612736 bytes (1.6 GB, 1.5 GiB) copied, 82 s, 19.6 MB/s
12+0 records in
12+0 records out
1610612736 bytes (1.6 GB, 1.5 GiB) copied, 82.223 s, 19.6 MB/s

sudo chmod 600 /30/swap1500
sudo mkswap /30/swap1500
Setting up swapspace version 1, size = 1.5 GiB (1610608640 bytes)
no label, UUID=af79f154-6904-4b6d-8c1d-61890bdda556

sudo swapon /30/swap1500

free
              total        used        free      shared  buff/cache   available
Mem:         252228       24652      142532         536       85044      179184
Swap:       1675256       69888     1605368
We collect and install:
make && sudo make installIf additional modules are needed, then we can always add them, for example, for qtquickcontrols2:
export PATH=/Qt/5.15.0/bin:$PATH
cd /30/qt5/qtuickcontrols2/
qmake
make && sudo make install
After that, we collect the application and launch it:
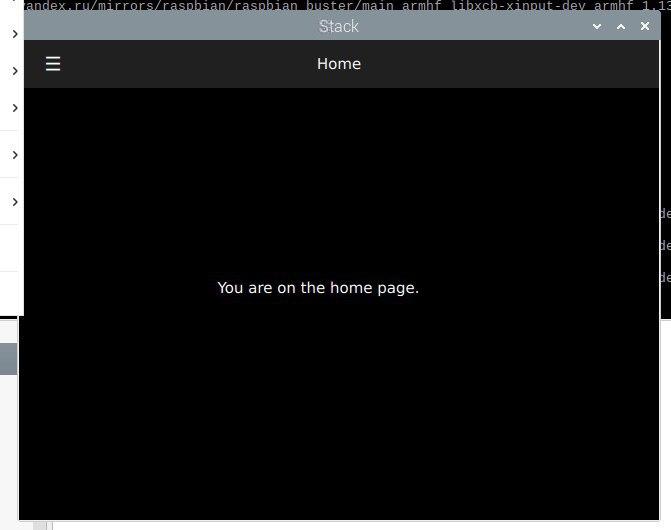
Conclusion
It is possible to build applications for ARM on x86 devices using the QEMU emulator. I thought that I would write this article in one week, but the process dragged on for almost three weeks, because each of the stages takes a very long time (installing the system, updating the system, installing dev packages, as well as getting the Qt source codes from github). For example, building the static version of Qt in the Raspberry emulator took me 1426 minutes.
Is it faster? Yes, it's called Cross build. To do this, configure sysroot, install an ARM compiler, configure and build Qt on your host system. Then they configure QtCreator to use this version of Qt and build the application on their x86 computer / laptop, get a version that will work in embedded linux. link 1 link 2Because this is already beyond the scope of this article, maybe I will write about this if I have time or inspiration, but maybe someone else will write how to do this for the latest version of Qt 5.15.
Well, I repeat, if someone wants to repeat the steps from the second chapter for the ARM Raspberry emulator, you can write how long it takes you to build qmake and the configuration stage, indicating your processor in the comments.
Thank you for attention. Good luck with your creativity!