
→ Vue.js beginners lesson 1: instance Vue
→ Vue.js for beginners, lesson 2: binding attributes
→ Vue.js beginners lesson 3: conditional rendering
→ Vue.js beginners lesson 4: lists rendering
→ Vue .js for beginners lesson 5: event processing
→ Vue.js beginners lesson 6: binding classes and styles
→ Vue.js beginners lesson 7: calculated properties
→ Vue.js beginners lesson 8: components
→ Vue. js for beginners lesson 9: custom events
The purpose of the lesson
We want the component
productto be able to tell the parent entity, the root Vue instance, that an event has occurred. In this case, it productmust send, along with the notification of the occurrence of the event, some data.
Initial code
The
index.htmltutorial project file now contains the following code:
<div id="app">
  <product :premium="premium"></product>
</div>
Here is the content of the file
main.js:
Vue.component('product', {
  props: {
    premium: {
      type: Boolean,
      required: true
    }
  },
  template: `
  <div class="product">
    <div class="product-image">
      <img :src="image" />
    </div>

    <div class="product-info">
      <h1>{{ title }}</h1>
      <p v-if="inStock">In stock</p>
      <p v-else>Out of Stock</p>
      <p>Shipping: {{ shipping }}</p>

      <ul>
        <li v-for="detail in details">{{ detail }}</li>
      </ul>
      <div
        class="color-box"
        v-for="(variant, index) in variants"
        :key="variant.variantId"
        :style="{ backgroundColor: variant.variantColor }"
        @mouseover="updateProduct(index)"
      ></div>

      <button
        v-on:click="addToCart"
        :disabled="!inStock"
        :class="{ disabledButton: !inStock }"
      >
        Add to cart
      </button>

      <div class="cart">
        <p>Cart({{ cart }})</p>
      </div>
    </div>
  </div>
  `,
  data() {
    return {
      product: 'Socks',
      brand: 'Vue Mastery',
      selectedVariant: 0,
      details: ['80% cotton', '20% polyester', 'Gender-neutral'],
      variants: [
        {
          variantId: 2234,
          variantColor: 'green',
          variantImage: './assets/vmSocks-green.jpg',
          variantQuantity: 10
        },
        {
          variantId: 2235,
          variantColor: 'blue',
          variantImage: './assets/vmSocks-blue.jpg',
          variantQuantity: 0
        }
      ],
      cart: 0,
    }
  },
    methods: {
      addToCart() {
        this.cart += 1;
      },
      updateProduct(index) {
        this.selectedVariant = index;
        console.log(index);
      }
    },
    computed: {
      title() {
        return this.brand + ' ' + this.product;
      },
      image() {
        return this.variants[this.selectedVariant].variantImage;
      },
      inStock() {
        return this.variants[this.selectedVariant].variantQuantity;
      },
      shipping() {
        if (this.premium) {
          return "Free";
        } else {
          return 2.99
        }
      }
    }
})

var app = new Vue({
  el: '#app',
  data: {
    premium: true
  }
})
Task
Now that it
productis presented as a standalone component, it productmakes no sense that the code related to the cart is in it. If each product has its own basket that we need to monitor the status of, our application will become a big mess. Instead, we would like the cart to exist at the root of the Vue instance. We also need the component to productinform the root Vue instance about adding items to the cart, that is, about clicks on the button Add to cart.
Decision
Let's move the data related to the cart back to the root Vue instance:
var app = new Vue({
  el: '#app',
  data: {
    premium: true,
    cart: 0
  }
})
Next, let's move the cart template back to
index.html, bringing its code to this form:
<div id="app">
  <div class="cart">
    <p>Cart({{ cart }})</p>
  </div>

  <product :premium="premium"></product>
</div>
Now, if you open the application page in a browser and click on the button
Add to cart, nothing happens as expected.
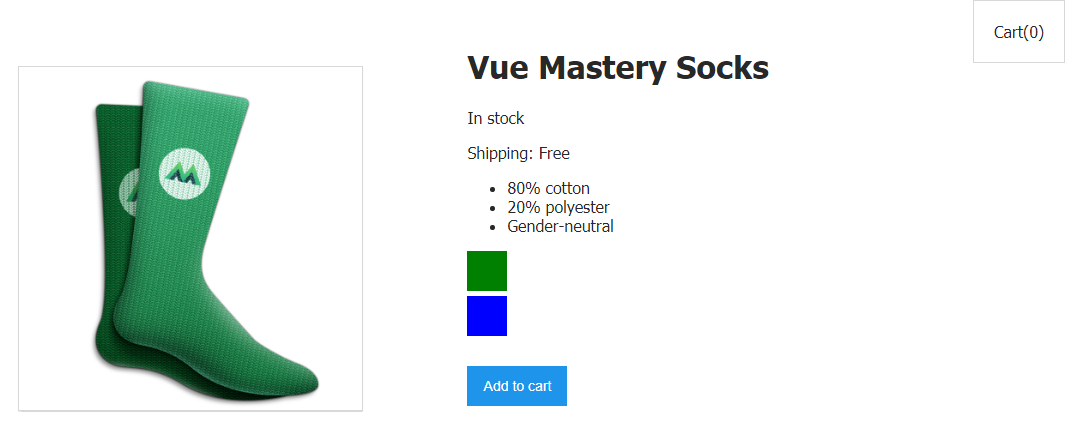
Clicking on the Add to cart button does not lead to anything yet
. What should happen when you click on this button? We need that when clicking on it, the root Vue instance would receive a notification that would call a method that brings the cart up to date, that is, updates the value that is stored in
cart.
In order to achieve this, let's first rewrite the
addToCartcomponentmethod codeproduct.
Now it looks like this:
addToCart() {
  this.cart += 1;
},
Let's bring it to this form:
addToCart() {
  this.$emit('add-to-cart');
},
What does all this mean?
So that's what it is. When the method is called
addToCart, a custom named event is generated add-to-cart. In other words, when the button Add to cartis clicked, a method is called that generates an event indicating that the button has just been pressed (that is, that the event triggered by the button click has just occurred).
But right now, nothing in the application is waiting for this event, not listening for it. Let's add an event listener to
index.html:
<product :premium="premium" @add-to-cart="updateCart"></product>
Here we use the view construct in the
@add-to-cardsame way as we use the construct :premium. But if it :premiumis a "pipeline" through which data can be transmitted to the child component from the parent, then @add-to-cartit can be compared to the "radio receiver" of the parent component, which receives information from the child component that a button has been pressed Add to cart. Since the "radio" is in a tag <product>nested in <div id="app">, this means that when information about a click arrives , the Add to cartmethod updateCartlocated in the root Vue instance will be called . Translated into ordinary language, the
code
@add-to-cart=«updateCart»looks like this: "When you hear that an event has occurred add-to-cart, call the method updateCart."
This method, which will now be declared in the options object used when instantiating Vue, you've probably seen somewhere:
methods: {
  updateCart() {
    this.cart += 1;
  }
}
In fact, this is exactly the same method that was used earlier in
product. But now it is in the root Vue instance and is called on a button click Add to cart.

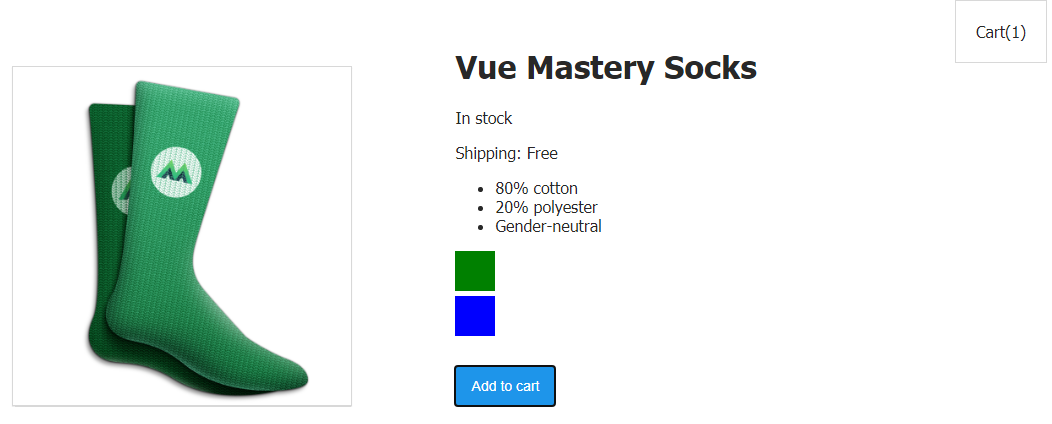
Button works again
When you click on a button that is in a component
product, a method is calledaddToCartthat generates an event. The root Vue instance, "listening to the radio," learns that this event has occurred and calls a methodupdateCartthat increments the number stored incart.
We achieved our goal, but in a real application, knowing that an event has occurred, that a certain product has been added to the cart, will not bring much benefit. In reality, you need to know at least which product was added to the cart. This means that in the event that is generated in response to pressing the button, you also need to transfer some data.
The data passed in the event can be described as the second argument passed
$emitin the code of theaddToCartcomponentmethodproduct:
this.$emit('add-to-cart', this.variants[this.selectedVariant].variantId);
Now the event passes the identifier (
variantId) of the product that the user wants to add to the cart. This means that instead of just increasing the number of items in the cart, we can go further and store more detailed information about the items added to it in the cart. To do this, we first convert the basket to an array by writing an empty array to cart:
cart: []
Next, let's rewrite the method
updateCart. Firstly - it will now accept id- the same product identifier that is now passed in the event, and secondly - it will now put what it received into an array:
methods: {
  updateCart(id) {
    this.cart.push(id);
  }
}
After a single click on the button, the product identifier is added to the array. The array is displayed on the page.

The array with the product ID is displayed on the page
We do not need to display the entire array on the page. We will be satisfied with the output of the number of products added to the cart, that is, to the array
cart. Therefore, we can rewrite the tag code<p>, which displays information about the number of products added to the cart, like this:
<p>Cart({{ cart.length }})</p>
The page displays information about the number of items added to the cart.
Now we simply display the length of the array on the page, or, in other words, the number of items in the cart. Externally, the cart looks the same as before, but now, instead of simply increasing the value of a numeric property
cart, we store in an arraycartinformation about which item was added to the cart.
Workshop
Add a button to the project that removes the
cartproduct added there earlier from the array . By clicking on this button, an event should be generated containing information about the identifier of the item to be removed from the cart.
- Here is a template you can use to solve this problem.
- Here is the solution to the problem.
Outcome
Here's what you learned today:
- A component can inform the parent entity that something has happened in it using the construct
$emit. - A parent component can use an event handler defined using the directive
v-on(or its shorthand version@) to organize a response to events generated by child components. If an event occurs, an event handler can be called in the parent component. - , , .
If you are studying the course and have come to this lesson, please tell us about the purpose for which you are doing, what you want to achieve by mastering Vue.
→ Vue.js for Beginners Lesson 1: Vue Instance
→ Vue.js for Beginners, Lesson 2: Attribute Binding
→ Vue.js for Beginners, Lesson 3: Conditional Rendering
→ Vue.js for Beginners, Lesson 4: Rendering Lists
→ Vue .js for beginners lesson 5: event processing
→ Vue.js beginners lesson 6: binding classes and styles
→ Vue.js beginners lesson 7: calculated properties
→ Vue.js beginners lesson 8: components
→ Vue. js for beginners lesson 9: custom events
