Introduction
A short course on how to create a simple web application using ASP.NET Core technologies, Entity Framework, Microsoft SQL Server DBMS, and Angular framework. We will test the Web API through the Postman application .
The course consists of several parts:
- Build Web APIs with ASP.NET Web API and Entity Framework Core.
- Implementation of the user interface in Angular.
- Adding authentication to the application.
- Extend the application model and explore additional features of the Entity Framework.
Part 1. Build Web APIs with ASP.NET Web API and Entity Framework Core
As an example, we will consider the now classic application of a to-do list. To develop the application, I will be using Visual Studio 2019 (the process is similar in Visual Studio 2017).
Project creation
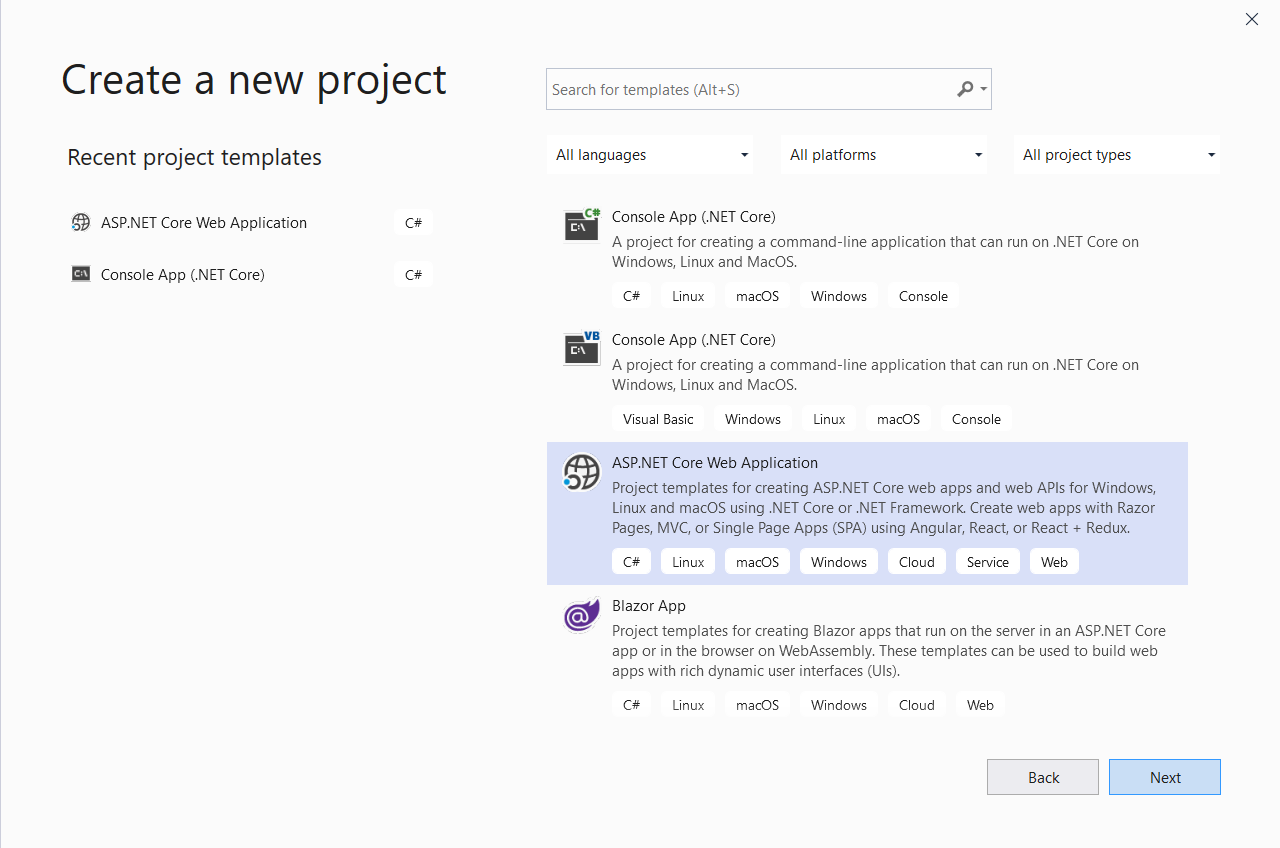
Create a new ASP.NET Core Web Application project in Visual Studio:

Name the application and specify the path to the directory with the project:

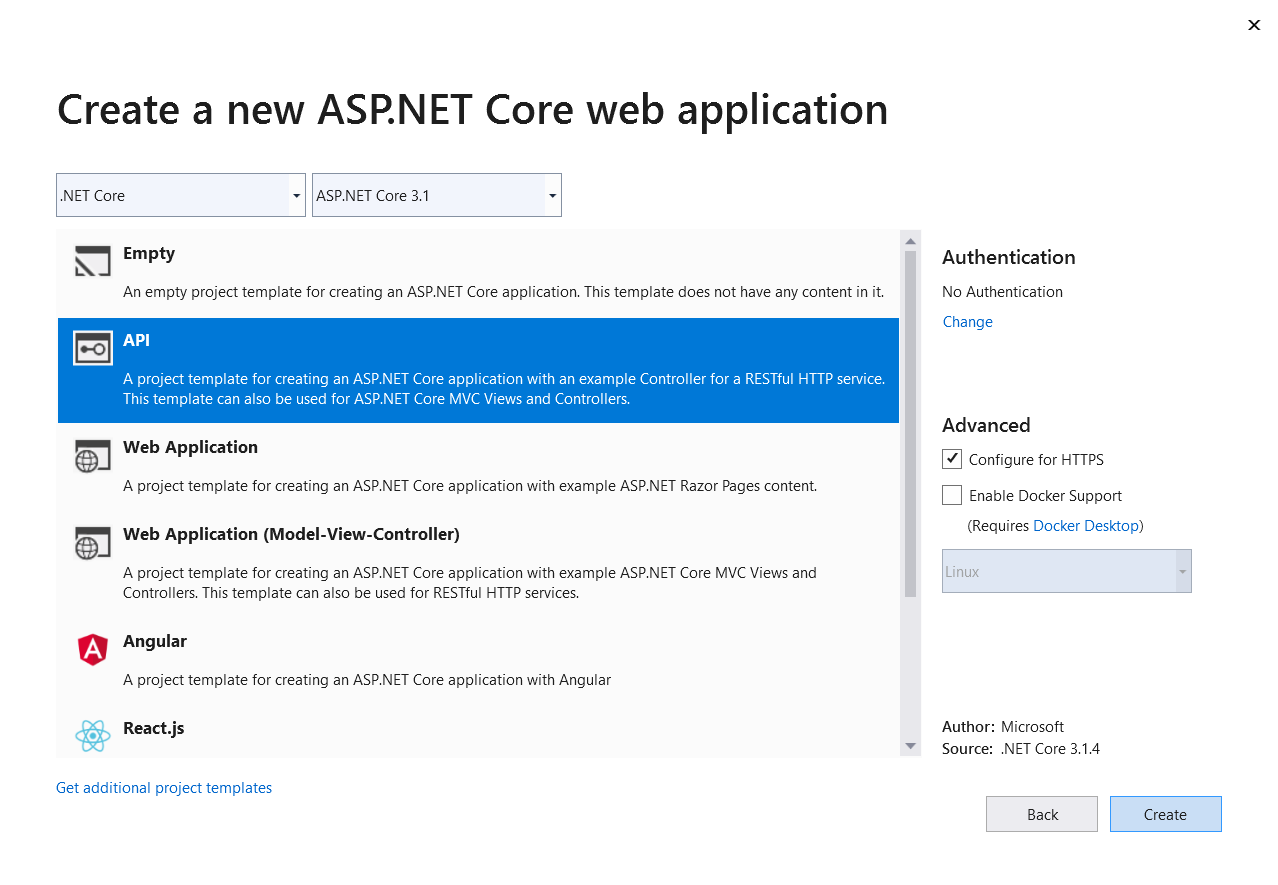
And select the API application template:

Model
Let's create a Models catalog and add the first TodoItem.cs class to the new catalog, the objects of which will describe some tasks of the to-do list in the application:
public class TodoItem
{
    public int Id { get; set; }
    public string TaskDescription { get; set; }
    public bool IsComplete { get; set; }
}
We will use Sql Server as a DBMS, and the database will be accessed through Entity Framework Core, and first we will install the framework through the built-in NuGet package manager:

One approach to working with the Entity Framework is the "Code-First" approach. The essence of the approach is that based on the application model (in our case, the model represents a single class - TodoItem.cs), the structure of the database (tables, primary keys, links) is formed, all this work happens “behind the scenes” and directly with We don't work with SQL. A prerequisite for the model class is the presence of a primary key field; by default, Entity Framework looks for an integer field in the name of which there is a substring "id" and forms a primary key based on it. You can override this behavior using custom attributes or using the capabilities of the Fluent API.
The main component in working with Entity Framework is the database context class, through which the data in the tables is actually accessed:
public class EFTodoDBContext : DbContext
{
    public EFTodoDBContext(DbContextOptions<EFTodoDBContext> options) : base(options)
    { }
    public DbSet<TodoItem> TodoItems{ get; set; }
}
The base class DbContext creates the database context and provides access to the functionality of the Entity Framework.
We will use SQL Server 2017 Express to store application data . Connection strings are stored in a JSON file called appsettings.json:
{
  "ConnectionStrings": {
    "DefaultConnection": "Server=.\\SQLEXPRESS;Database=Todo;Trusted_Connection=true"
  }
}
Next, you need to modify the Startup.cs class by adding the following code to the ConfigureServices () method:
services.AddDbContext<EFTodoDBContext>(options => options.UseSqlServer(Configuration["ConnectionStrings:DefaultConnection"]));
The AddDbContext () method configures the services provided by the Entity Framework Core for the EFTodoDBContext database context class. The argument to the AddDbContext () method is a lambda expression that receives an options object that configures the database for the context class. In this case, the database is configured using the UseSqlServer () method and specifying a connection string.
Let's define the basic operations for working with tasks in the ITodoRepository interface:
 public interface ITodoRepository
 {
    IEnumerable<TodoItem> Get();
    TodoItem Get(int id);
    void Create(TodoItem item);
    void Update(TodoItem item);
    TodoItem Delete(int id);
 }
This interface allows us not to think about the specific implementation of the data warehouse, perhaps we did not exactly decide on the choice of a DBMS or ORM framework, now it does not matter, the class describing data access will inherit from this interface.
Let's implement a repository, which, as mentioned earlier, will inherit from ITodoRepository and use EFTodoDBContext as a data source:
public class EFTodoRepository : ITodoRepository
{
    private EFTodoDBContext Context;
    public IEnumerable<TodoItem> Get()
    {
        return Context.TodoItems;
    }
    public TodoItem Get(int Id)
    {
        return Context.TodoItems.Find(Id);
    }
    public EFTodoRepository(EFTodoDBContext context)
    {
        Context = context;
    }
    public void Create(TodoItem item)
    {
        Context.TodoItems.Add(item);
        Context.SaveChanges();
    }
    public void Update(TodoItem updatedTodoItem)
    {
        TodoItem currentItem = Get(updatedTodoItem.Id);
        currentItem.IsComplete = updatedTodoItem.IsComplete;
        currentItem.TaskDescription = updatedTodoItem.TaskDescription;

        Context.TodoItems.Update(currentItem);
        Context.SaveChanges();
        }

    public TodoItem Delete(int Id)
    {
        TodoItem todoItem = Get(Id);

        if (todoItem != null)
        {
            Context.TodoItems.Remove(todoItem);
            Context.SaveChanges();
        }

        return todoItem;
    }
}
Controller
The controller, the implementation of which will be described below, will not know anything about the data context of EFTodoDBContext, but will only use the ITodoRepository interface in its work, which allows changing the data source without changing the controller. This approach Adam Freeman in his book "Entity Framework Core 2 for ASP.NET Core MVC for professionals" called the "Storage" pattern.
The controller implements handlers for standard HTTP request methods: GET, POST, PUT, DELETE, which will change the state of our tasks described in the TodoItem.cs class.
Add the TodoController.cs class to the Controllers directory with the following content:
[Route("api/[controller]")]
public class TodoController : Controller
{
    ITodoRepository TodoRepository;

    public TodoController(ITodoRepository todoRepository)
    {
        TodoRepository = todoRepository;
    }

    [HttpGet(Name = "GetAllItems")]
    public IEnumerable<TodoItem> Get()
    {
        return TodoRepository.Get();
    }

    [HttpGet("{id}", Name = "GetTodoItem")]
    public IActionResult Get(int Id)
    {
        TodoItem todoItem = TodoRepository.Get(Id);

        if (todoItem == null)
        {
            return NotFound();
        }

        return new ObjectResult(todoItem);
    }

    [HttpPost]
    public IActionResult Create([FromBody] TodoItem todoItem)
     {
        if (todoItem == null)
        {
            return BadRequest();
        }
        TodoRepository.Create(todoItem);
        return CreatedAtRoute("GetTodoItem", new { id = todoItem.Id }, todoItem);
    }

    [HttpPut("{id}")]
    public IActionResult Update(int Id, [FromBody] TodoItem updatedTodoItem)
    {
        if (updatedTodoItem == null || updatedTodoItem.Id != Id)
        {
            return BadRequest();
        }

        var todoItem = TodoRepository.Get(Id);
        if (todoItem == null)
        {
            return NotFound();
        }

        TodoRepository.Update(updatedTodoItem);
        return RedirectToRoute("GetAllItems");
    }

    [HttpDelete("{id}")]
    public IActionResult Delete(int Id)
    {
        var deletedTodoItem = TodoRepository.Delete(Id);

        if (deletedTodoItem == null)
        {
            return BadRequest();
        }

        return new ObjectResult(deletedTodoItem);
    }
 }
An attribute describing the route template for accessing the controller is specified before the class definition: [Route ("api / [controller]")]. The TodoController will be accessible via the following route: https: // <host ip>: <port> / api / todo. [Controller] specifies the name of the controller class in lowercase, omitting the "Controller" part.
Before each method is defined in the TodoController, a special attribute of the form is specified: [<HTTP method> ("parameter", Name = "method alias")]. The attribute determines which HTTP request will be processed by this method, the parameter that is passed in the request URI and the alias of the method with which the request can be re-sent. If you do not specify the attribute, then by default the MVC framework will try to find the most appropriate method in the controller to process the request based on the name of the method and the specified parameters in the request, so if you do not specify an attribute for the Get () method in the TodoController controller, then in an HTTP request using the GET method: https: // <host ip>: <port> / api / todo, the infrastructure will define the Get () method of the controller to process the request.
In its constructor, the controller receives a reference to an object of type ITodoRepository, but so far the MVC infrastructure does not know which object to substitute when creating the controller. We need to create a service that uniquely resolves this dependency, for this we will make some changes to the Startup.cs class by adding the following code to the ConfigureServices () method:
services.AddTransient<ITodoRepository, EFTodoRepository>();
The AddTransient <ITodoRepository, EFTodoRepository> () method defines a service that creates a new instance of the EFTodoRepository class whenever an instance of the ITodoRepository type is required, for example in a controller.
The complete code for the Startup.cs class:
public class Startup
{
    public Startup(IConfiguration configuration)
    {
        Configuration = configuration;
    }

    public IConfiguration Configuration { get; }

    public void ConfigureServices(IServiceCollection services)
    {
        services.AddControllers();
        services.AddMvc().SetCompatibilityVersion(CompatibilityVersion.Version_3_0);
        services.AddDbContext<EFTodoDBContext>(options => options.UseSqlServer(Configuration["ConnectionStrings:DefaultConnection"]));
        services.AddTransient<ITodoRepository, EFTodoRepository>();
    }

    public void Configure(IApplicationBuilder app, IWebHostEnvironment env)
    {
        if (env.IsDevelopment())
        {
            app.UseDeveloperExceptionPage();
        }

        app.UseHttpsRedirection();
        app.UseRouting();
        app.UseAuthorization();
        app.UseEndpoints(endpoints =>
        {
            endpoints.MapControllers();
        });
    }
 }
Migrations
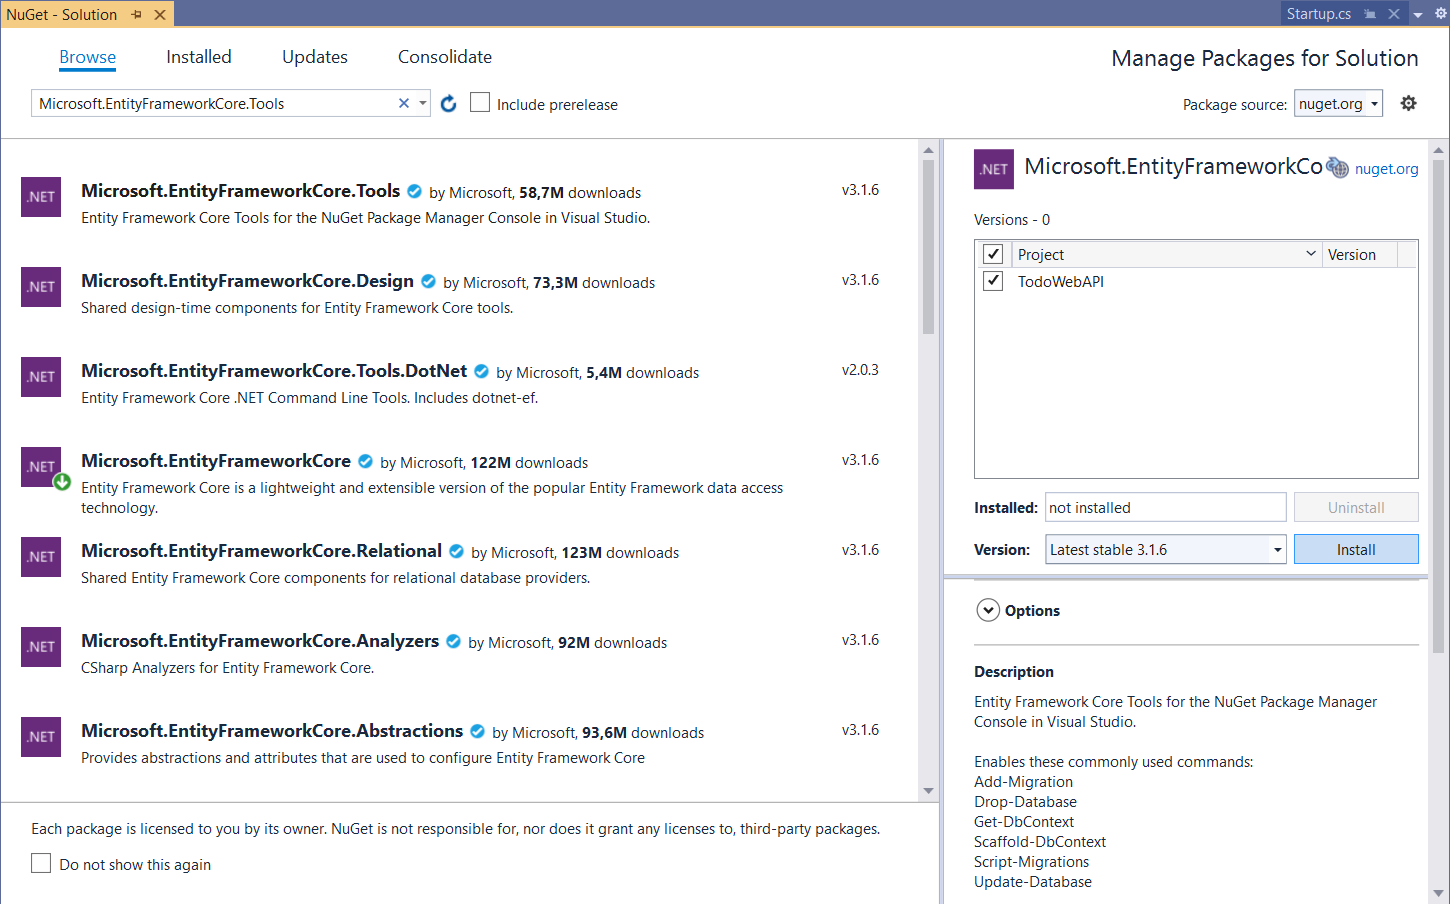
In order for the Entity Framework to generate the database and tables from the model, you must use the database migration process. Migrations are a group of commands that prepares the database to work with the Entity Framework. They are used to create and synchronize the database. Commands can be executed both in the Package Manager Console and in the Power Shell (Developer Power Shell). We will be using the Package Manager Console, to work with the Entity Framework we will need to install the Microsoft.EntityFrameworkCore.Tools package:

Launch the Package Manager Console and run the Add-Migration Initial command :


A new directory will appear in the project - Migrations, in which migration classes will be stored, on the basis of which objects in the database will be created after the Update-Database command is executed:

Web API is ready, by running the application on local IIS Express, we can test the controller's operation.
Testing WebAPI
Let's create a new collection of requests in Postman called TodoWebAPI:

Since our database is empty, let's test the creation of a new task first. In the controller, the Create () method is responsible for creating tasks, which will process an HTTP request sent by the POST method and will contain a serialized TodoItem object in JSON format in the request body. The [FromBody] attribute before the todoItem parameter in the Create () method tells the MVC framework to deserialize the TodoItem object from the request body and pass it as a parameter to the method. Let's create a request in Postman that will send a request to the webAPI to create a new task:

The Create () method after successful creation of the task redirects the request to the Get () method with the alias "GetTodoItem" and passes the Id of the newly created task as a parameter, as a result of which we will receive the created task object in JSON format in response to the request.
By sending an HTTP request using the PUT method and specifying an already created object in the URI Id (https: // localhost: 44370 / api / todo / 1), and passing an object with some changes in the JSON format in the request body, we will change this object in the database :

With an HTTP request with the GET method without specifying parameters, we will receive all objects in the database:

An HTTP request with the DELETE method and specifying the Id of the object in the URI (https: // localhost: 44370 / api / todo / 2), will delete the object from the database and return JSON with remote task:

That's all, in the next part we will implement the user interface using the Angular JavaScript framework.