
In the field of industrial automation, there is an unspoken paradigm in which many manufacturers of industrial equipment make controllers separately and modems separately. As a rule, each device is placed in its own case, has its own power supply, large dimensions and high cost. This version of functional separation has its advantages and disadvantages, but, in our opinion, it leads, rather, to greater commercialization than due to some objective reasons. Therefore, we decided to take a slightly different path and made a universal device , which is a freely programmable Linux-based controller with a modem in a single case. This allowed us in our projects to practically completely abandon the usual automation panels and come to more mobile solutions.
Under the cut of this article, we will share with you the intricacies of setting up the modem and several useful scripts for a more stable 3G connection.
Prerequisites and solutions
When developing our device, we were guided by the fact that it must connect to the mobile Internet in order to connect to cloud platforms. There were two ways: to solder the modem to the board, or to use mPCIe connectors. We settled on the second option and provided two mPCIe connectors at once (Figure 1), since this option seemed to us more interesting and flexible. After all, the installation and replacement of the modem takes a matter of seconds, plus the necessary variability appears for the user and he can use such combinations of mPCIe modules that he needs for a specific project. In addition to a 3G modem, it can be LoraWan or Wi-Fi modules. Plus, mPCIe solutions have proven to be quite reliable and of high quality.
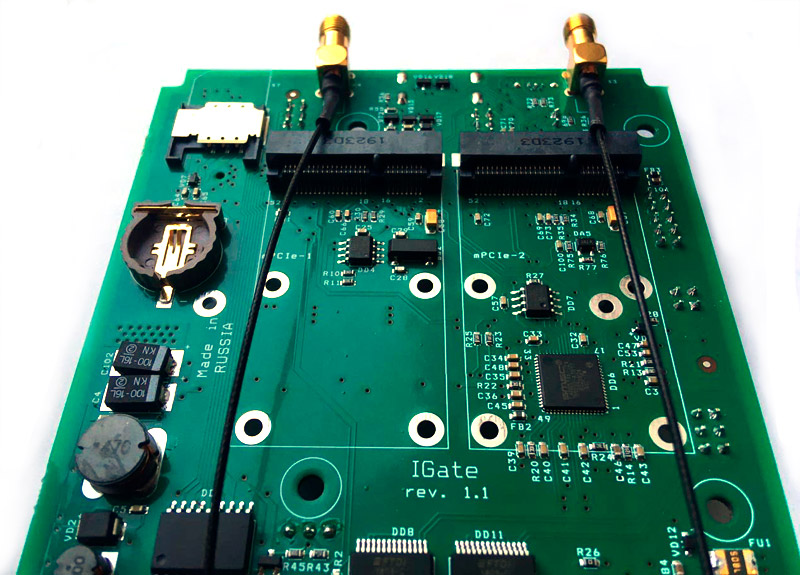
Figure 1 - mPCIe connectors
We considered the following options as the main 3G module for our device:
- MikroTik R11e-LTE6
- Quectel EC25-E
- YUGA CLM920 TE5
- HUAWEI MU709s-2p
However, after the tests, the HUAWEI modem turned out to be the most preferable for us in terms of reliability and price-quality ratio (Figure 2). We took it as a basis and install it optionally in our devices. Therefore, in the future we will consider the configuration and scripts of the relative modem of this model. Perhaps this script will be universal and useful for other modems, however, stability with other models is not guaranteed. For Rasbian Buster and HUAWEI MU709s-2p everything works fine.
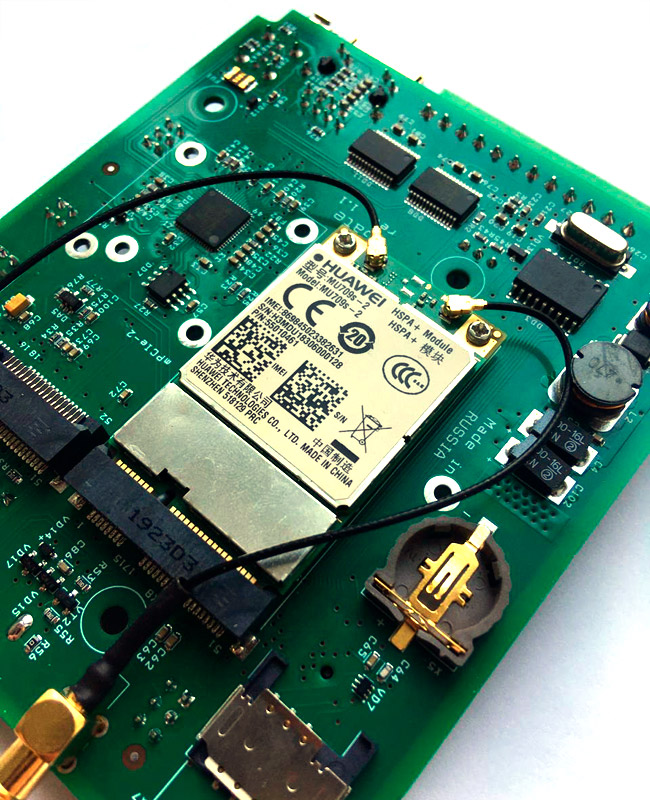
Figure 2 - HUAWEI MU709s-2p modem installed on the device board
Using a script to reboot a 3G modem
For more stable and trouble-free operation, we wrote a script that will ping the specified IP address, and if the number of pings specified in the settings has not passed, then the GSM modem will reboot, thereby restoring the hung network connection. It should be noted that the modem is defined in the system as lan1 network card.
The archive with all the necessary files can be downloaded from this link . Also, the text of the scripts themselves is presented below.
The check_inet.sh file is required to check for internet connection. If the specified IP address does not ping, then we jerk the 19 leg and restart the modem on power. The code is as follows:
#!/bin/bash
#count=0;
#echo "Start script"
#echo 19 > '/sys/class/gpio/export'

while [ true ]; do
# sleep 30
. /home/pi/igate.conf
#echo $usb_port
#echo 'AT^NDISDUP=1,1,''"'$apn'"''\r\n'
#echo 'AT^NDISDUP=1,1,"internet.mts.ru"\r\n'
flag=0

for ((i = 1; i <= $ping_count; i++)); do
#for i in {1..$ping_count}; do # 5
#ping -I eth1 -c 1 8.8.8.8 > /dev/null || flag=$(($flag+1))
ping -I $interface -c 1 $ping_ip || flag=$(($flag+1))
sleep 1
done

if [ "$flag" -ge "$ping_error" ]; then #    3
#echo "  - "
#count=$((count+1))
#echo $count
#
sudo ifconfig eth1 down
echo 19 > '/sys/class/gpio/export'
echo out > '/sys/class/gpio/gpio19/direction'
echo 0 > '/sys/class/gpio/gpio19/value'
sleep 1
echo 1 > '/sys/class/gpio/gpio19/value'
sleep 15
sudo ifconfig eth1 up
sleep 1
#echo -en 'AT^NDISDUP=1,1,"internet.mts.ru"\r\n' > /dev/ttyUSB3
#       APN
echo -en 'AT^NDISDUP=1,1,''"'$apn'"''\r\n' > $usb_port
#echo "  - "
fi
sleep $timeout
done
Start_inet.sh file starts check_inet.sh after device reboot:
#!/bin/bash

### BEGIN INIT INFO
# Provides:          start_inet
# Required-Start:    $remote_fs $syslog
# Required-Stop:     $remote_fs $syslog
# Default-Start:     2 3 4 5
# Default-Stop:      0 1 6
# Short-Description: Example initscript
# Description:       This service is used to manage a servo
### END INIT INFO


case "$1" in
    start)
        echo "Starting check_inet"
        sudo /home/pi/check_inet.sh > /dev/null 2>&1 &
        #/home/pi/check_inet.sh
        ;;
    stop)
        echo "Stopping check_inet"
        #killall servod
        sudo kill -USR1 $(ps ax | grep 'check_inet' | awk '{print $1}')
        ;;
    *)
        echo "Usage: /etc/init.d/check_inet start|stop"
        exit 1
        ;;
esac

exit 0
The archive also contains the igate.conf configuration file. Configuration
sequence:
1. Add a rule for matching the physical connection of the modem's COM port to the USB hub. To do this, edit the file in the following path:
sudo nano /etc/udev/rules.d/99-com.rules2. Add the following line to the file:
KERNEL==”ttyUSB*”, KERNELS==”1-1.5:2.4″, SYMLINK+=”GSM”3. Save the rules and reboot the device. Now the port of your modem will be determined by the convenient alias / dev / GSM;
4. Download the archive from the above link, or create the check_inet.sh, start_inet.sh and igate.conf files yourself;
5. Copy the check_inet.sh file to the folder:
/home/pi/6. Make check_inet.sh executable:
sudo chmod +x /home/pi/check_inet.sh7. Copy the start_inet.sh file to the folder:
/etc/init.d/8. Make the start_inet.sh file executable:
sudo chmod +x /etc/init.d/start_inet.sh9. Update the startup configuration by running the command:
sudo update-rc.d start_inet.sh defaults10. Copy the igate.conf file to the folder:
/home/pi/11. Set up the configuration file. Below is the config file with comments:
#ip- .      ip-,     [ping_error]    ,    GSM-,      .

ping_ip=”8.8.8.8″

#  APN.      -,     -.

apn=”internet.mts.ru”

#   3G ( ).   .  30     .

timeout=30

# .   .

ping_count=5

#     .   ,      .      [ping_count].            .

ping_error=3

#LAN  .   ,    AntexGate   [eth1],      ifconfig

interface=eth1

#USB  .  USB      ,    AntexGate   [ttyUSB4]

usb_port=”/dev/GSM”
Script control
Running the check_inet.sh script file in the background:
/etc/init.d/start_inet.sh startStop check_inet.sh:
/etc/init.d/start_inet.sh stopThe script is also automatically launched after a device reboot.
Applications of the device
Let's consider the main tasks for which the device can be used:
- Controller with Internet access for data transfer to the cloud;
- A 3G router for field tasks;
- Smart home controller with redundant 3G channel. That is, you can use the LAN port as the main communication channel, and 3G as a backup, so that you always have access to the device;
- LoRaWAN base station, that is, polling devices via LoRaWAN and transferring data to the cloud via 3G or LTE;
- Vehicle monitoring device (CAN connection and docking with various services)
In fact, there can be a lot of applications for such a device, and its undoubted advantage is its completeness, versatility and mobility. One device can replace the familiar automation cabinet and become an irreplaceable solution in your projects.