Why do you need panoramic videos?
Most of my blog posts are geared towards game developers. If you are one of them, you may be wondering what you might be interested in creating 360 ° videos. Virtual reality is a very successful industry with more games being released on various platforms every year. Many players learn about VR games through trailers, which are unfortunately recorded in 2D.
If you want to take it a step further, you can create an optional panoramic trailer to showcase the full potential of your game. While VR usually requires an expensive headset to play, panoramic videos are natively supported by YouTube without the need for additional hardware. And if you have a phone, you can very easily turn it into a VR headset using Google Cardboard .
This can provide people with a much more immersive experience and give them a sense of what the point of your game is. Movies such as It (see trailer below) and The Conjuring took full advantage of this by creating VR games (with trailers in panoramic video) for a more interactive experience.
Finally, panoramic videos are great for educational purposes, as seen in All Discovered Exoplanets: A Narrated 360 VR Journey .
Dealing with panoramic videos
You are most likely familiar with YouTube and how it works. However, panoramic videos are not familiar to many. Most video is recorded on a camera that captures only a small portion of the environment. Panoramic videos simultaneously record everything that happens in all directions. This usually requires special cameras called omnidirectional cameras . They either use curved mirrors to reflect their surroundings into a traditional camera (much like a fisheye lens) or have multiple cameras facing in different directions. One such camera is the GoPro Omni (see below), which is essentially a device containing six standard fisheye cameras.

It is easy to see why the equipment needed to record panoramic videos is usually more expensive than traditional cameras. However, this is not the only reason limiting their distribution. Proper playback of panoramic videos requires special software and hardware. Screens, like cameras, are designed to recreate only a small portion of the environments. YouTube was able to get around this limitation by allowing viewers to "rotate" the video so they can look around. If you are watching a panoramic video from a phone or tablet, you usually move it in space to see different parts of the "sphere" in 360 °.
YouTube supports two types of panoramic videos: mono and stereo (the latter are often referred to as VR videos). The difference between the two is that stereo video is intended for VR headsets and can convey a sense of depth that cannot be felt in traditional videos. This is realized by having not one, but two videos, one for each eye. These two videos are simultaneously recorded by two cameras, the distance between which is comparable to the distance between the eyes. As a result, VR-videos can "trick" the brain into perceiving the true distance, as in everyday life.
The table shows the requirements that these two types of videos have.
| Name | 360 ° video | Virtual Reality Video |
| Mono | Stereo | |
| 2D | 3D | |
| Link | Support | Support |
| Frame frequency | 24, 25, 30, 48, 50, 60 | 25, 30, 50, 60 |
| Format | Equidistant
Aspect Ratio 2: 1 |
Above-Below Equidistant
Aspect Ratio 1: 1 |
| Resolution | Recommended: 7168 x 3584, up to 8192 x 4096 | 5120 x 5120 to 8192 x 8192 |
Please note that YouTube is constantly working to improve support for panoramic videos, so this may change in the future. Read the referenced information in the table before following these specifications.
Project video
The first tricky part of panoramic videos is how to encode the sphere into a flat surface. This is necessary because although omnidirectional cameras can record in all directions, each frame still needs to be converted to a traditional flat image.
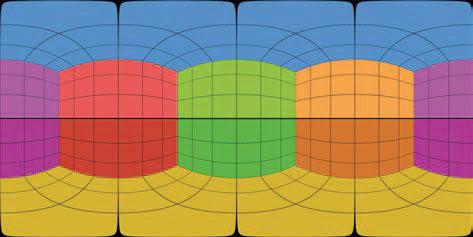
There are many ways to transform (strictly speaking, project ) a sphere onto a rectangle. Probably the most famous is the cylindrical projection , which became popular after the cartographer Gerard Mercator began using it in 1569 to transform the surface of the planet into flat maps.
However, equirectangular projection is most often used in panoramic videos (see below).
Spatial sound
Panoramic videos, both mono and stereo, can support spatial audio . Standard videos have two audio channels (left and right) that are used to create a sense of direction when listening with stereo headphones. Spatial audio allows you to encode the true direction of the sound source, rather than just left / right. This means that with the right equipment, you can feel completely immersed and understand the directions of the surrounding sounds.
Despite its name, VR videos are not as good as “real” VR games because even though a VR headset can track head movements, the video is rendered from a fixed point. It is impossible to move and see what is behind the object, as it would be in a VR game. This can be a little disorienting, especially when combined with surround sound. When you've been working on a VR project (game or video) for a long time, you can get used to it. It is important to conduct a sufficiently detailed playtesting to ensure the convenience of the finished product and to find limitations that cause discomfort to players or spectators.
Panoramic video does not need to have spatial audio. YouTube supports two formats:
- First-Order Ambisonics
- First-Order Ambisonics with Head-Locked Stereo
Ambisonics is a sound format used to record not only the sound but the direction it comes from. First-Order Ambisonics (FOA) uses four audio channels to encode sound source directivity. To get a rough idea of how this works, I will say that recording FOA sound is a bit like recording with four microphones. The common misconception is that these four microphones are located at cardinal points (one in front of the viewer, one behind, third on the left and fourth on the right). This is not how Ambisonics works, but we can talk about it in other posts.
Although FOA uses 4 channels, YouTube also supports a 6-channel version, which simply adds the traditional left and right stereo channels. This format is called FOA with Head-Locked Stereo...
Particular attention should be paid to encoding panoramic video (stereo or mono) because not all formats support 4 or 6 audio channels. YouTube recommends the following:
- Format: MP4, MOV
- Codec: H.264, ProRes, DNxHR
If you are using Premiere Pro 2018 or newer, it is best to encode your video as a Quicktime ProRes codec. You can read more about YouTube's supported spatial audio formats here .
How to create panoramic video in Unity
One of the many features added in Unity 2018.1 is the ability to take screenshots from the camera in a format compatible with YouTube panoramic videos. This feature is briefly described in a post on the Unity website: Stereo 360 Image and Video Capture . Unfortunately, there is no scene reference in it for testing.
Theory
Most often, game clips are recorded while the game is running. This is fine for standard videos, but usually not for panoramic videos. The main reason is that a much larger area is required to render a panoramic game, which causes the frame rate to drop dramatically. A more standard approach is to render and export each frame in the background so that they can be edited later in third-party software such as ffmpeg or Premiere Pro. This is what we will do in our tutorial.
Rendering a panoramic scene in Unity is a fairly simple three-step process:
- Render a scene to a cube map texture (Unity's preferred format for panoramic textures)
- Converting a cube map to an equirectangular projection (preferred format for YouTube panoramic videos)
- Save Equidistant Projection as PNG
The first two steps are necessary due to the way cameras work in Unity.
If you are familiar with Unity, you probably know that the preferred way to store panoramic textures is with a cube map , which is a way to package six different images without warping (see below). Cubic maps are often used for skyboxes and reflection probes, so chances are you have encountered them before.
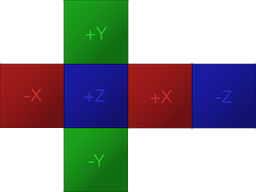
To create a panoramic texture, Unity renders the scene six times, each time at a different angle. The camera pans as if it were aligned with one of the six sides of the cube. As a result, each panoramic screenshot is six traditional ones linked together.
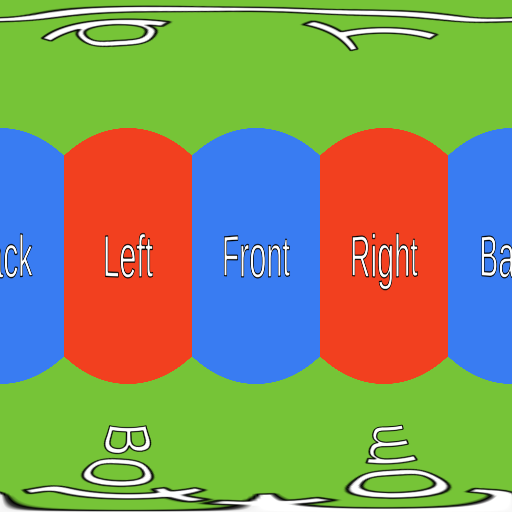
After filling out the cube map, the second step is to convert it to a YouTube compatible format. As we saw earlier, YouTube requires equirectangular panoramic videos. This transformation usually requires coding complex shaders, but luckily a function has been added to Unity specifically for this.
The final step will be to export the equidistant texture to a PNG file. After all the video frames have been rendered, you can merge them using a program like ffmpeg or Premiere Pro.
The code
The first step is to create a script (called it in the snippets below
Camera360) and attach it to the camera that is to render. However, the code will change depending on whether we want to render the video in mono (360 ° / mono / 2D) or in stereo (VR / stereo / 3D).
Mono
Let's start with the mono version:
public class Camera360 : MonoBehaviour
{
    public Camera Camera;

    public RenderTexture EyeCubemap;
    public RenderTexture EquirectTexture;

    void Update ()
    {
        Camera.RenderToCubemap(EyeCubemap, 63, Camera.MonoOrStereoscopicEye.Mono);
        EyeCubemap.ConvertToEquirect(EquirectTexture, Camera.MonoOrStereoscopicEye.Mono);
    }
}
The above script will render each frame in a render texture titled
Equirect, which will contain a panoramic screenshot saved in an equirectangular projection.
The value
63used in the method RenderToCubemapmeans that we want to take screenshots from all six sides of the cube.
Both
EyeCubemap, and EquirectTexturecan be created either in the editor or in code.
Stereo
The stereo version code is very similar, but requires an additional step:
    void Start ()
    {
        Camera.stereoSeparation = 0.064f; // 64mm
    }

    void Update ()
    {
        Camera.RenderToCubemap(EyeCubemap, 63, Camera.MonoOrStereoscopicEye.Left);
        EyeCubemap.ConvertToEquirect(EquirectTexture, Camera.MonoOrStereoscopicEye.Left);

        Camera.RenderToCubemap(EyeCubemap, 63, Camera.MonoOrStereoscopicEye.Right);
        EyeCubemap.ConvertToEquirect(EquirectTexture, Camera.MonoOrStereoscopicEye.Right);
    }
To render a stereo image, you need to render two cube maps.
stereoSeparationsets the distance between these cube maps. The standard value is 64 mm, which is approximately equal to the distance between the left and right eyes.

Creating and saving textures
The two code snippets above just write to the texture, but they don't save it anywhere. If we want frames to be saved to disk, then this must be done manually.
Unfortunately, exporting a render texture to a PNG file is not as easy as it should be. The first problem is that Unity does not allow you to directly access individual pixels
RenderTexture. First, the render texture needs to be copied to an object Texture2D.
The code snippet below performs exactly this task, using the method,
ReadPixelscopies the pixels from the currently active render texture .
public string FileName;

void Update ()
{
    ...

    // Creates buffer
    Texture2D tempTexture = new Texture2D(EquirectTexture.width, Equirect.height);

    // Copies EquirectTexture into the tempTexture
    RenderTexture currentActiveRT = RenderTexture.active;
    RenderTexture.active = EquirectTexture;
    TempTexture.ReadPixels(new Rect(0, 0, EquirectTexture.width, EquirectTexture.height), 0, 0);

    // Exports to a PNG
    var bytes = tempTexture.EncodeToPNG();
    System.IO.File.WriteAllBytes(FileName, bytes);

    // Restores the active render texture
    RenderTexture.active = currentActiveRT;
}
Provided it
FileNamecontains the correct path to the PNG file, the above code will do the job. Only one small change will need to be made: to make sure that the script does not overwrite the same file over and over again. To do this, simply add the file name counter to repeated rewriting frame.png, he was writing in frame_0.png, frame_1.pngand so on.
Problems
There are problems with this solution. The most important of these is that some post-processing effects may not work as intended.
Performance
Rendering panoramic frames in Unity is a very expensive task. In my solution, the scene is rendered 6 or 12 times (depending on the video format - mono or stereo). The post-processing required to merge images and save each frame to disk can reduce performance by a factor of 10-15. If you render a video in high quality (8192 x 8192 pixels), then each individual frame can be over 100 MB in size. Obviously, if you do not have a very powerful machine, you will not be able to simultaneously play in real time and export panoramic shots.
Post-processing
Vignetting , for example, adds a dark halo around the camera. Since Unity creates a panoramic image by rendering the scene six times, a vignetting effect will be applied to each image. As a result, a strange black halo will be present at the junctions of the images.

Likewise, blur and bloom effects also cause errors at the edges, demonstrating the existence of seams. There are no easy solutions to this problem, because none of the post-processing stacks created by Unity are designed to work with panoramic images.
However, blur and bloom effects can still be applied in moderation. If you need these effects, then it is best to apply them in post production using Premiere Pro.
Line renderers
A huge problem with panoramic images is that line renderers may not display correctly . If a line is set up so that it must always be looking at the camera, then when rendering it in a panoramic image, Unity will simply discard it. This is extremely annoying because there is no real reason for it.
Unity has developed an alternative version of the line renderer called XRLineRenderer that works correctly. Although it does not support all the functionality of the standard Line Renderer component, you will be able to implement most of the functionality.
The XRLineRenderer also has the ability to create simple glow effects, which can reduce the importance of the problems described in the previous section.
See also: