I'm not a huge fan of Arduino infrastructure. Yes, today we already have more options - for example, pro IDE and Platform IO . However, from the original IDE I always get heartburn. And I only appreciated its full extent the day before, when I wanted to do something very simple: increase the receive buffer of the ATmega32 serial port. In the end, I came up with a solution that can help you with other problems as well - so even if you don't specifically need this feature, you might find it helpful to see what exactly I did.
This experience left me with a double impression. On the one hand, I despise this nondescript editor for hiding too much from me and providing very few useful tools. On the other hand, I was impressed with how flexible it is when you dig into the details of its internal structure.
First, you are probably asking why I am using an IDE. In short, I don't use it. However, if you do something that others will use, it is almost impossible to ignore. However you set up your own IDE, as soon as your code goes online, someone will try to use it with the IDE. I once wrote about a $ 4 Z80 based computer . I rarely have time to build what I'm writing about, but I really wanted to try building this little computer. For a while, everything was in a half-disassembled state, and then they sent me a payment for him. I received it, and - as you may have guessed - it still lay a little half-disassembled. But I finally found the time to finish the project and downloaded CP / M.
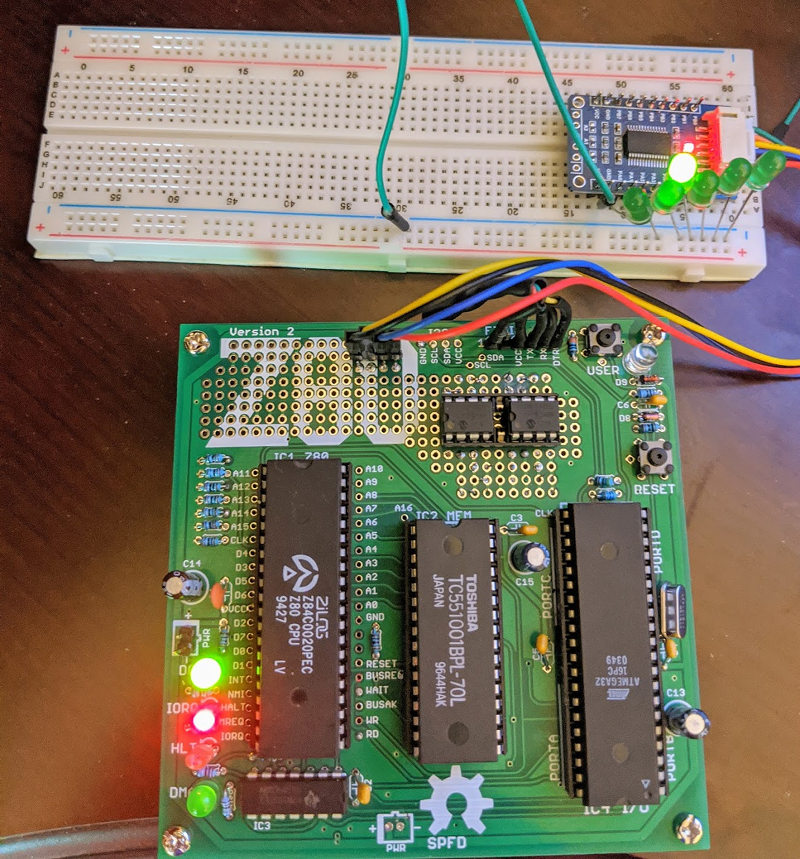
The only problem with the project was the lack of good options for transferring data from it to the PC and vice versa. It seemed like the best thing to do was to make Intel hex files and copy / paste them through the terminal. I wanted something better and ended up in a rabbit hole on Saturday morning. As a result, I came up with a way to add my own menu items to the Arduino IDE in order to edit the compiler settings depending on the hardware used in the project. This trick is worth learning as it can be useful outside of this particular task.
Problem: Arduino serial port buffer size limit
I will not bother you with details on how to make the board work, as you will only be interested if you have one. All the details are in the discussion on Hackaday.io if you really need it. As a result, the Arduino serial port buffer was not large enough for transmission through XModem to be considered reliable. Everything seemed to work with the default 64-byte buffer, but XModem is sending more data and it's easy to imagine the buffer overflowing.
How difficult can it be to update a buffer? On the other hand, this is a trivial task. On the other hand, it is very difficult, because your tools are trying very hard to help you.
Set of tools
The small computer project uses a real Z80 chip and an ATMega32A for almost all auxiliary functions. It provides clock speed, serial port, storage, etc. However, the Arduino IDE does not directly support ATMega32A, so you have to install a toolbox to do this. The situation required MightyCore , so I used it.
The serial port libraries are configured with #define statements so you can correct the buffer size. By default, if nothing is configured, you will get values based on the amount of available RAM:
#if !defined(SERIAL_TX_BUFFER_SIZE)
#if ((RAMEND - RAMSTART) < 1023)
#define SERIAL_TX_BUFFER_SIZE 16
#else
#define SERIAL_TX_BUFFER_SIZE 64
#endif
#endif
#if !defined(SERIAL_RX_BUFFER_SIZE)
#if ((RAMEND - RAMSTART) < 1023)
#define SERIAL_RX_BUFFER_SIZE 16
#else
#define SERIAL_RX_BUFFER_SIZE 64
#endif
#endif
Making changes
It's simple, isn't it? Define symbols before loading HardwareSerial.h. Shit - this file is loaded into Arduino.h. The SP wants to add it to your program and makes it boot first. It seems that some versions of the IDE checked to see if you had already enabled it so as not to re-enable it, but version 1.8.5 does not. Maybe I can pass some settings to the compiler? Nope. At least not through the IDE.
I've tried a lot of things. I wanted, of course, just to change the main libraries. But this is not good. Later, you may need the default settings. If you update the toolbox, then all updates are lost. I wanted to avoid this. Someone on the Internet advised making a copy of the platform files and modifying them. Not a perfect solution.
Checking the assumptions with
I could see that what I was doing was not working as I was temporarily inserting #if and #error statements in HardwareSerial.cpp. For instance:
#if SERIAL_RX_BUFFER_SIZE==256
#error 256
#endif
Now, if error 256 crashes when compiling, I know the size is set. If not, then the system resists my changes.
Tradeoff: adding settings to the board-level menus
I really wanted to come up with a way to change the settings only in a specific project, and thus set the size of the serial buffer. I didn’t succeed. But I managed to change boards.txt from Mighty Core. Yes, I will have to make sure that updates do not overwrite my edits, but they are simple, and if something is missing in the file, it will be obvious.
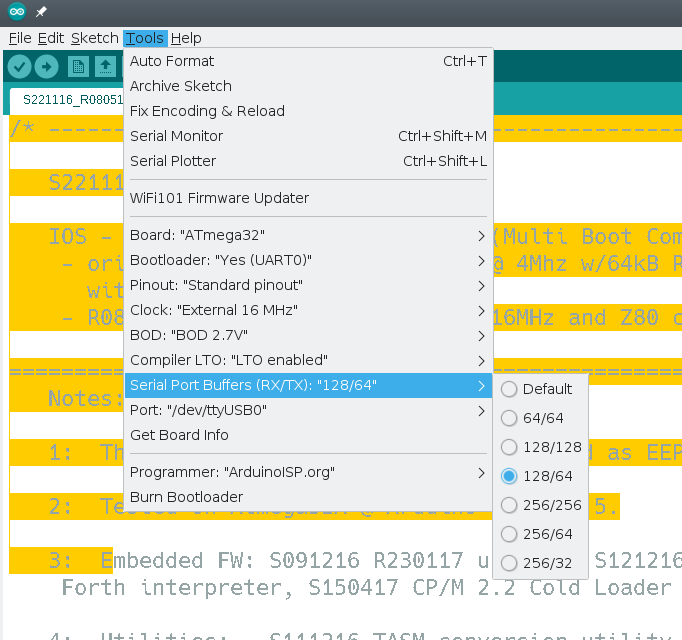
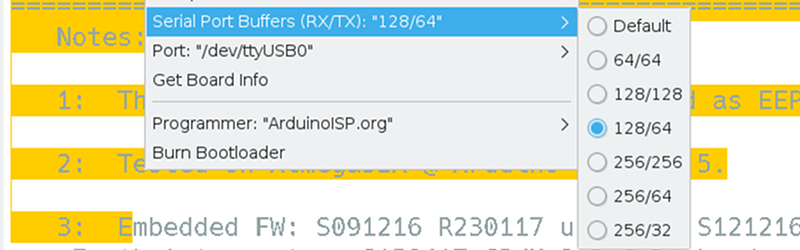
Obviously this will be because I have created a menu for the IDE, which only appears when using ATMega32 for Mighty Core. In the menu, you can select one of the preset buffer sizes.
To achieve this result, you need to take three steps:
- Tell the IDE that you have a new menu item and describe what it looks like.
- The new item should change the compiler settings.
- Since the existing system also changes the compiler settings, you need to make sure they don't get corrupted.
The first step is easy. My boards.txt file was in ~ / .arduino15 / packages / MightyCore / hardware / avr / 2.0.5 / boards.txt. Almost at the very top there is a list of menu items, and at the end I added mine:
# Menu options
menu.clock=Clock
menu.BOD=BOD
menu.LTO=Compiler LTO
menu.variant=Variant
menu.pinout=Pinout
menu.bootloader=Bootloader
menu.SerialBuf=Serial Port Buffers (RX/TX)
Then I moved the lines down and added my menu in front of the existing LTO setup for ATMega32:
32.menu.SerialBuf.disabled=Default
32.menu.SerialBuf.disabled.compilerSB.c.extra_flags=
32.menu.SerialBuf.disabled.compilerSB.cpp.extra_flags=

32.menu.SerialBuf.SB64=64/64
32.menu.SerialBuf.SB64.compilerSB.c.extra_flags=-DSERIAL_RX_BUFFER_SIZE=64 -DSERIAL_TX_BUFFER_SIZE=64
32.menu.SerialBuf.SB64.compilerSB.cpp.extra_flags=-DSERIAL_RX_BUFFER_SIZE=64 -DSERIAL_TX_BUFFER_SIZE=64

32.menu.SerialBuf.SB128=128/128
32.menu.SerialBuf.SB128.compilerSB.c.extra_flags=-DSERIAL_RX_BUFFER_SIZE=128 -DSERIAL_TX_BUFFER_SIZE=128
32.menu.SerialBuf.SB128.compilerSB.cpp.extra_flags=-DSERIAL_RX_BUFFER_SIZE=128 -DSERIAL_TX_BUFFER_SIZE=128

32.menu.SerialBuf.SB12864=128/64
32.menu.SerialBuf.SB12864.compilerSB.c.extra_flags=-DSERIAL_RX_BUFFER_SIZE=128 -DSERIAL_TX_BUFFER_SIZE=64
32.menu.SerialBuf.SB12864.compilerSB.cpp.extra_flags=-DSERIAL_RX_BUFFER_SIZE=128 -DSERIAL_TX_BUFFER_SIZE=64

32.menu.SerialBuf.SB256=256/256
32.menu.SerialBuf.SB256.compilerSB.c.extra_flags=-DSERIAL_RX_BUFFER_SIZE=256 -DSERIAL_TX_BUFFER_SIZE=256
32.menu.SerialBuf.SB256.compilerSB.cpp.extra_flags=-DSERIAL_RX_BUFFER_SIZE=256 -DSERIAL_TX_BUFFER_SIZE=256

32.menu.SerialBuf.SB25664=256/64
32.menu.SerialBuf.SB25664.compilerSB.c.extra_flags=-DSERIAL_RX_BUFFER_SIZE=256 -DSERIAL_TX_BUFFER_SIZE=64
32.menu.SerialBuf.SB25664.compilerSB.cpp.extra_flags=-DSERIAL_RX_BUFFER_SIZE=256 -DSERIAL_TX_BUFFER_SIZE=64

32.menu.SerialBuf.SB25632=256/32
32.menu.SerialBuf.SB25632.compilerSB.c.extra_flags=-DSERIAL_RX_BUFFER_SIZE=256 -DSERIAL_TX_BUFFER_SIZE=32
32.menu.SerialBuf.SB25632.compilerSB.cpp.extra_flags=-DSERIAL_RX_BUFFER_SIZE=256 -DSERIAL_TX_BUFFER_SIZE=32
Menu structure
You can see that the 32.menu object groups all the items together for a given processor. Next comes our menu key (SerialBuf). This is followed by unique keys for each menu item. It is important not to reuse them. If, for example, you have two SB64 keys, then only one of them will work.
If you assign an equal sign to this key, you can assign text to this menu item. For example, "Default" or "64/64". You can also add a property to the key and it will be assigned when the item is activated.
If, for example, choose 256/256, then the compiler sets the compilerSB.c.extra_flags property. Why I came up with such a name for the property, you will understand a little later.
Peaceful coexistence
The compilerSB.c.extra_flags property is not present. Correctly it is called compiler.c.extra_flags. However, the Mighty Core LTO setup uses the same key. Therefore, it was important that the new menu appeared first and also set a fake property. Then you need to correct the LTO code:
# Compiler link time optimization
32.menu.LTO.Os=LTO disabled
32.menu.LTO.Os.compiler.c.extra_flags={compilerSB.c.extra_flags}
32.menu.LTO.Os.compiler.c.elf.extra_flags=
32.menu.LTO.Os.compiler.cpp.extra_flags={compilerSB.cpp.extra_flags}
32.menu.LTO.Os.ltoarcmd=avr-ar

32.menu.LTO.Os_flto=LTO enabled
32.menu.LTO.Os_flto.compiler.c.extra_flags={compilerSB.c.extra_flags} -Wextra -flto -g
32.menu.LTO.Os_flto.compiler.c.elf.extra_flags=-w -flto -g
32.menu.LTO.Os_flto.compiler.cpp.extra_flags={compilerSB.cpp.extra_flags} -Wextra -flto -g
32.menu.LTO.Os_flto.ltoarcmd=avr-gcc-ar
The main change is that each set of flags is added to the preset menu. This adds all flags to the correct property, compiler.c.extra_flags.
I configured error trapping for all cases to ensure that everything is assigned correctly.
Customization for yourself
You can of course change the options if you need something different. You can also use this trick to set other parameters before the Arduino.h file gets control. There is documentation on how to configure various platform parameters, including boards.txt.
It might be better to create my own separate boards.txt file with the same information, but then I would have to take the rest of Mighty Core with me. Instead, I just saved a copy of that file under the name boards.txt.custom, and if my menu disappears, I'll just compare its contents with boards.txt to see what has changed.
Naturally, if you do not need to deal with supporting people using the IDE, then you can just forget about it. Better to use the Pro IDE, even with some of its disadvantages. Well, you can always refer to Platform.io.
See also: