I want to note right away that here I put more emphasis on setting up the CA than on OpenVPN.
Before we start, I will tell someone who can use it with my example.
I had a task to create a system for a large company in such a way that only one person signed the OpenVPN server certificates, there are a lot of VPN servers, several VPN servers were installed for each department. There are even more employees (clients) and control (issue / revoke) certificates every time an employee comes / leaves a very heavy burden (not to mention temporary employees). The employees of each department are supervised by the head of the department, who issues or revokes certificates for new / old employees, respectively.
For what certificates and digital keys are needed, a lot has been said and I will not repeat other authors, but in short:
- to verify reliability (a "double handshake" occurs), the client and the server make sure who they are, whether they can trust each other and establish a connection;
- encryption / decryption;
- Exceptions "Man in the middle (MITM)" to make sure that someone does not intercept messages / traffic;
- to create encrypted passwords, which increases security and makes it harder for attackers to access the host.
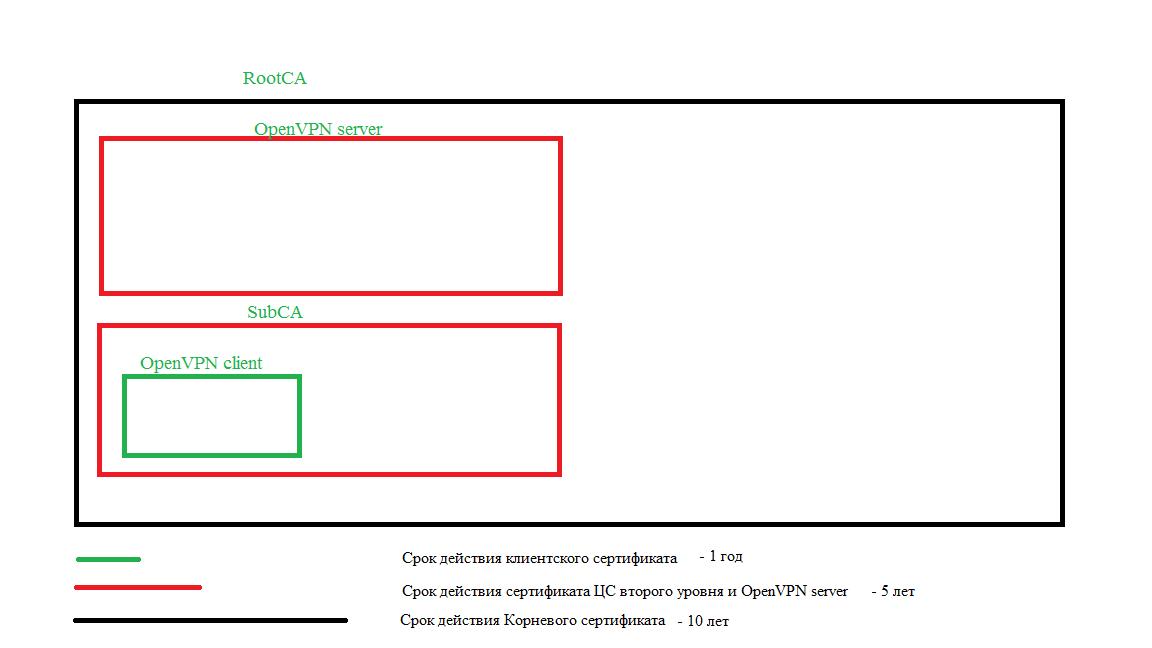
The principle of operation of the multi-level CA hierarchy is that the top-level CA (RootCA) signs its certificate for itself for a sufficiently long period of time (but this is a purely individual matter), each next lower in the CA hierarchy or service signs its certificates with a superior CA (usual bureaucracy) with the proviso that the lower-level certificate must have a validity period of no more than half the validity period of the higher-level certificate.
When creating a CA, two files are created: ca.crt - the public key and ca.key - the private key.
The private key must be protected and must not be shared with third parties.
When we need to create a subordinate / signing CA, we create a private key on it and a request for signing from RootCA.
How will computers and users around the world know they can trust a service or site, you ask? It's simple (well, in theory), the CA Public Key (RootCA) is placed on the user's computers and these computers trust all the certificates that were issued by this CA. In practice, this is certainly more difficult and not cheap. But within your own company it is quite easy to do.
For implementation, we need three servers. In this tutorial we will use debian 9. We will name the servers according to their application: OpenVPN, SubCA, RootCA.
All actions are performed under the user not root.
To do this, your user must be in the sudo group.
If sudo is not installed on the server, then log in as root:
# su - root
# apt-get install sudo -y
# usermod -aG sudo username
# exit
Install the necessary utilities on all servers (utilities may differ depending on beliefs and beliefs, wget, ufw, vim are mandatory, since here I have given commands with these utilities):
# sudo apt-get update
# sudo apt-get upgrade
# sudo apt-get install wget curl net-tools ufw vim -y
# cd ~
# wget -P ~/ https://github.com/OpenVPN/easy-rsa/releases/download/v3.0.4/EasyRSA-3.0.4.tgz
# tar xvf EasyRSA-3.0.4.tgz
Install openvpn on the OpenVPN server:
# sudo apt-get install openvpn -yGo to the RootCA server. Here we need to create a file from which easyrsa will take the values of the variables:
# mv ~/EasyRSA-3.0.4 ~/easyrsa/
# cd ~/easyrsa/
# cp vars.example vars
# vim vars
Find the block, delete # and substitute our values. In order not to enter our data when signing certificates, we will write them here:
#set_var EASYRSA_REQ_COUNTRY	"US"
#set_var EASYRSA_REQ_PROVINCE	"California"
#set_var EASYRSA_REQ_CITY	"San Francisco"
#set_var EASYRSA_REQ_ORG	"Copyleft Certificate Co"
#set_var EASYRSA_REQ_EMAIL	"me@example.net"
#set_var EASYRSA_REQ_OU		"My Organizational Unit"
Next, find the following settings, delete # and edit their values. These directives are responsible for the lifetime of certificates (the first is for the lifetime of the CA certificate, the second is for the lifetime of the certificate that is being signed):
#set_var EASYRSA_CA_EXPIRE	3650         #-->  3650
#set_var EASYRSA_CERT_EXPIRE	3650         #-->  1825
Further:
# ./easyrsa init-pkiRunning the next command will ask for CN. You can leave the default, but it is better to enter a hostname identifying name (RootCA). The value "nopass" means that you do not need to create a password:
# ./easyrsa build-ca nopassGo to the SubCA server and follow the same steps with minor changes:
# mv ~/EasyRSA-3.0.4 ~/easyrsa/
# cd ~/easyrsa/
# cp vars.example vars
# vim vars
Find the block, delete # and substitute our values:
#set_var EASYRSA_REQ_COUNTRY	"US"
#set_var EASYRSA_REQ_PROVINCE	"California"
#set_var EASYRSA_REQ_CITY	"San Francisco"
#set_var EASYRSA_REQ_ORG	"Copyleft Certificate Co"
#set_var EASYRSA_REQ_EMAIL	"me@example.net"
#set_var EASYRSA_REQ_OU		"My Organizational Unit"
Next, we find the following settings, delete # and edit their values:
#set_var EASYRSA_CA_EXPIRE	3650         #-->  1825
#set_var EASYRSA_CERT_EXPIRE	3650         #-->  365
Further:
# ./easyrsa init-pkiRunning the next command will ask for CN. You can leave the default, but it is better to enter a host identifier name (SubCA). The value "subca" means that we are creating a subordinate CA and we need to create a certificate signing request:
# ./easyrsa build-ca subca nopassNext, we find the file ~ / easyrsa / pki / reqs / ca.req (this is the very request) and transfer it to the RootCA server (you can use two methods: WinSCP and scp):
# scp ~/easyrsa/pki/reqs/ca.req user@ip_RootCA:/tmpGo to the RootCA server and sign the request. Before signing the request, we must import it into the working directory. to sign the certificate for the subordinate CA, we use the "ca" attribute and the name of the certificate (you can call it ca, but in order not to get confused, we will call it the name of the server to which we are signing it, and when we transfer it to the server, we will rename it):
# cd ~/easyrsa/
# ./easyrsa import-req /tmp/ca.req SubCA
# ./easyrsa sign-req ca SubCA
Confirmation will be requested, you must enter "yes".
We return the SubCA signed certificate.
# scp ~/easyrsa/pki/issued/SubCA.crt user@ip_SubCA:/tmpGo to the SubCA server and move the certificate to the easyrsa working directory:
# mv /tmp/SubCA.crt ~/easyrsa/pki/ca.crtAt this point, we already have a root CA and a signed root secondary CA.
Now let's get into the OpenVPN server. In setting it up, some of the previous steps are repeated. Go to the OpenVPN server.
# cd ~/easyrsa/
# ./easyrsa init-pki
Now let's start creating certificates for signing. We will create a Diffie-Hellman key (dh.pem / dh2048.pem / dh1024.pem) to be used in key exchange, and we will create an HMAC signature (ta.key) to enhance the TLS integrity check function.
We will sign certificates for the OpenVPN server on RootCA, and we will sign certificates for users on SubCA. Immediately create a directory where we will add keys, certificates and client configurations.
# mkdir -p ~/client-configs/files/
# mkdir ~/client-configs/keys/
# chmod 700 ~/client-configs/
# sudo mkdir /etc/openvpn/vpnsrv1/

# ./easyrsa gen-req vpnsrv1 nopass
# ./easyrsa gen-req dumasti nopass
# ./easyrsa gen-dh
# sudo openvpn --genkey --secret ta.key
# cp /home/dumasti/easyrsa/pki/private/dumasti.key ~/client-configs/keys/
# sudo cp /home/dumasti/easyrsa/pki/dh.pem /etc/openvpn/vpnsrv1/
# sudo cp /home/dumasti/easyrsa/ta.key /etc/openvpn/vpnsrv1/
# sudo cp /home/dumasti/easyrsa/ta.key ~/client-configs/keys/
# sudo cp /home/dumasti/easyrsa/pki/private/vpnsrv1.key /etc/openvpn/vpnsrv1/
# scp ~/easyrsa/pki/reqs/vpnsrv1.req user@ip_RootCA:/tmp
# scp ~/easyrsa/pki/reqs/dumasti.req user@ip_SubCA:/tmp
Go to the RootCA server and sign the certificate. To sign the certificate for the server, use the "server" attribute, for the client "client":
# cd ~/easyrsa/
# ./easyrsa import-req /tmp/vpnsrv1.req vpnsrv1
# ./easyrsa sign-req server vpnsrv1
Confirmation will be requested, you must enter "yes".
# scp ~/easyrsa/pki/issued/vpnsrv1.crt user@ip_OpenVPN:/tmp
# scp ~/easyrsa/pki/ca.crt user@ip_OpenVPN:/tmp/RootCA.crt
Go to the SubCA server and sign the certificate:
# cd ~/easyrsa/
# ./easyrsa import-req /tmp/dumasti.req dumasti
# ./easyrsa sign-req client dumasti
Confirmation will be requested, you must enter "yes".
# scp ~/easyrsa/pki/issued/dumasti.crt user@ip_OpenVPN:/tmp
# scp ~/easyrsa/pki/ca.crt user@ip_OpenVPN:/tmp/SubCA.crt
We return to the OpenVPN server and transfer the signed certificates to the required directories:
# cd /tmpIn order for the OpenVPN server to accept client keys, we must combine the public keys of the client and the subordinate / signing CA into one file:
# cat dumasti.crt SubCA.crt > ~/client-configs/keys/dumasti.crt
# cp /tmp/RootCA.crt ~/client-configs/keys/ca.crt
# sudo mv /tmp/RootCA.crt /etc/openvpn/vpnsrv1/
# sudo mv /tmp/vpnsrv1.crt /etc/openvpn/vpnsrv1/
We now have all the required certifications in the right places. It remains to create the configuration of the OpenVPN server and client (each may have their own beliefs and views in this matter, but for an example there will be the following configuration).
You can use the server and client configuration template and edit for yourself:
# sudo cp /usr/share/doc/openvpn/examples/sample-config-files/server.conf.gz /etc/openvpn/
# sudo gzip -d /etc/openvpn/server.conf.gz
# cp /usr/share/doc/openvpn/examples/sample-config-files/client.conf ~/client-configs/base.conf
But below I will give the contents of the ready-made configuration files (symbols; and # comment out the line):
# sudo cat /etc/openvpn/vpnsrv1.conf

port 1194
proto udp
dev tun
ca vpnsrv1/RootCA.crt
cert vpnsrv1/vpnsrv1.crt
key vpnsrv1/vpnsrv1.key
dh vpnsrv1/dh.pem
server 10.8.0.0 255.255.255.0
ifconfig-pool-persist ipp.txt
;push "route 192.168.10.0 255.255.255.0"
;push "route 192.168.20.0 255.255.255.0"
;client-config-dir ccd
;client-config-dir ccd
push "redirect-gateway def1 bypass-dhcp"
push "dhcp-option DNS 208.67.222.222"
push "dhcp-option DNS 208.67.220.220"
client-to-client
;duplicate-cn
keepalive 10 120
tls-auth vpnsrv1/ta.key 0
key-direction 0
cipher AES-256-CBC
auth SHA256
max-clients 100
user nobody
group nogroup
persist-key
persist-tun
status /var/log/openvpn/openvpn-status.log
log-append /var/log/openvpn/openvpn.log
verb 3
;mute 20
explicit-exit-notify 1

# cat ~/client-configs/base.conf

client
dev tun
proto udp
remote your_server_ip 1194
;remote my-server-2 1194
;remote-random
resolv-retry infinite
nobind
user nobody
group nogroup
persist-key
persist-tun
remote-cert-tls server
;tls-auth ta.key 1
cipher AES-256-CBC
auth SHA256
key-direction 1
verb 3
;mute 20
# script-security 2
# up /etc/openvpn/update-resolv-conf
# down /etc/openvpn/update-resolv-conf
We also need to configure the firewall and packet forwarding. It is possible to configure iptables, but here we will look at ufw.
First, let's find out the name of our interface:
# ip addr Let's open the following ports (I have ssh on port 22, and openvpn on 1194, if you have others, then act accordingly):
# sudo ufw allow 1194
# sudo ufw allow 22
Next, open the ufw config file and paste the following before the start of the filter chain (replace my values with your own):
# sudo vim /etc/ufw/before.rules

# START OPENVPN RULES

# NAT table rules

*nat

:POSTROUTING ACCEPT [0:0]

# Allow traffic from OpenVPN client to eth0 (change to the interface you discovered!)

-A POSTROUTING -s 10.8.0.0/8 -o ens192 -j MASQUERADE

COMMIT

# END OPENVPN RULES
Before that:
# Don't delete these required lines, otherwise there will be errors
*filter
You need to enable UFW forwarding of packets by default. Find the required line and change the value "DROP" to "ACCEPT":
# sudo vim /etc/default/ufw

DEFAULT_FORWARD_POLICY="ACCEPT"
Configuring packet forwarding. Find the line # net.ipv4.ip_forward = 0 or # net.ipv4.ip_forward = 1, delete #, if the value is 0, then change it to 1:
# sudo vim /etc/sysctl.conf

net.ipv4.ip_forward=1

# sudo sysctl -p
# sudo ufw enable
Next, we launch our VPN:
# sudo systemctl start openvpn@vpnsrv1Checking the launch:
# ip addrThere should be a new tun0 network interface with ip 10.8.0.1
# sudo systemctl status openvpn@vpnsrv1If you need the VPN to start on its own after reboot, add the service to autorun:
# sudo systemctl enable openvpn@vpnsrv1Next, we create a client configuration. Earlier, we placed all keys and certificates in the ~ / client-configs / keys / directory.
Let's create a script that will collect configuration, keys and certificates into one file user.ovpn:
# cd ~/client-configs/
# vim configs-maker.sh

#!/bin/bash
# First argument: Client identifier
KEY_DIR=/home/dumasti/client-configs/keys
OUTPUT_DIR=/home/dumasti/client-configs/files
BASE_CONFIG=/home/dumasti/client-configs/base.conf
cat ${BASE_CONFIG} \
	<(echo -e '<ca>') \
	${KEY_DIR}/ca.crt \
	<(echo -e '</ca>\n<cert>') \
	${KEY_DIR}/${1}.crt \
	<(echo -e '</cert>\n<key>') \
	${KEY_DIR}/${1}.key \
	<(echo -e '</key>\n<tls-auth>') \
	${KEY_DIR}/ta.key \
	<(echo -e '</tls-auth>') \
	> ${OUTPUT_DIR}/${1}.ovpn
This script will take files with the name that you give it during startup and will configure one file in the files directory.
Let's make the file executable:
# chmod +x configs-maker.shLet's run it:
# sudo ./configs-maker.sh dumastiNow we transfer the client configuration to your computer from the / home / dumasti / client-configs / files / directory
. Launch VPN.
For security reasons, the servers hosting the CA should be turned off and turned on only for signing certificates.
We will not ignore the revocation of certificates. In order to revoke the certificate, we go to the CA server on which the certificate was signed and do the following (For example, we will revoke the user certificate (dumasti) that we signed on the SubCA server). We go to the SubCA server:
# cd ~/easyrsa/
# ./easyrsa revoke dumasti
You will be asked to confirm the revocation, enter "yes"
# ./easyrsa gen-crlThe crl.pem file has been generated. We need to put it on the OpenVPN server and add the directive and the path to the file in the server configuration:
# scp ~/easyrsa/pki/crl.pem user@ip_OpenVPN:/tmpGo to the OpenVPN server:
# sudo mv /tmp/crl.pem /etc/openvpn/vpnsrv1/
# sudo vim /etc/openvpn/vpnsrv1.conf
Add the following line where the keys and certificates are written:
crl-verify vpnsrv1/crl.pemRestart openvpn:
# sudo systemctl restart openvpn@vpnsrv1Now dumasti client will not be able to connect to VPN.
Thank you for attention!