Table of contents
1.
2. Backend
2.1. .
2.2. . SSL.
2.3. Dart.
…
3. Web
3.1. «Under construction»
…
4. Mobile
…
2. Backend
2.1. .
2.2. . SSL.
2.3. Dart.
…
3. Web
3.1. «Under construction»
…
4. Mobile
…
Introduction
As a Flutter developer, acquaintances often ask me: "What is the Dart language?" They shake their heads with the words: "But Petya writes serious transports in Java, and in Yandex there are generally pluses in the sale ...". Well, perhaps, really, Dart is far from the practice of " factories for creating factories " from Java. However, if the task is to implement client applications for several platforms at once, without drowning in the stream of tasks to synchronize developers of different target OS; to create a coherent UI, recognizable, but specific to Android, iOS and the web, and in general to meet an adequate budget and time frame - here Flutter has no competitors. And these questions are doubly important if you have ... a startup.
So, the legend: a certain startup decided to create a new service ... well, for example, for
sharing shopping lists
between service users. The goal of the startup is to release an MVP in three months on three platforms (plus the fourth is the server, of course).
, , ToDo , :)
10 years ago I would say that this case has no solution and would try to stay away from it, 3 years ago the ReactNative / React / NodeJs stack could become the solution, in 2020 there is Dart for this. Welcome to the atmosphere of the development of the alpha version of the service, I will try to visually go through and explain the entire development process. The code of all applications will be made public. Comments, including sketches and holivars, are welcome. You can ask the author "in essence" or just get some advice in the Telegram channel of our department.

Backend infrastructure
The typical way to host a server application is, of course, a VPS (virtual private server). In fact, this is a part of a physical server in a data center, the resources of which (processor cores and RAM) are separated using virtualization technology (you can read about the most common hardware virtualization technologies here XEN , KVM ). Attention: software virtualization technologies ( OpenVZ , Virtuozzo ) may not be suitable for our task due to conflicts with Docker and aggressive overselling(Often, upon careful reading of the lease agreement for such a VPS, you will find that providers guarantee "at least 5%" (!) utilization of the rented processor core. This means that the provider plans to sell our processor core 20 (!) times).
So, let's get a budget VPS with the following characteristics: 1 processor core, 1GB of RAM, 10GB of storage (in my case, this is a hybrid HDD). Let's choose Ubuntu as the operating system, preferably one of the LTS versions. After that, an e-mail will receive a message about server activation with a login and password for SSH access (encrypted access to the operating system console of our VPS) in SSH format:
IP address: 91.230.60.120
User: root
Password: <Password>
Let's check the connection by typing in the command line:
ssh root@91.230.60.120and, upon request:
password: <>The result should be the output of information about the virtual server and the input field at the bottom:
Server is hosted by xxxxxxxxxx
Hostname: 91.230.60.120
Kernel: 3.19.0-22-generic (Ubuntu xx.xx LTS)
Uptime: 09:07:06 up 3 days, 17:17, 1 user, load average: 0.00, 0.01, 0.05
CPU: Intel® Xeon® CPU 0 @ 2.00GHz (1 cores)
Memory: 989 MB total / 723 MB free
root@91.230.60.120: ~ $
Congratulations, our the virtual server is created and available for work.
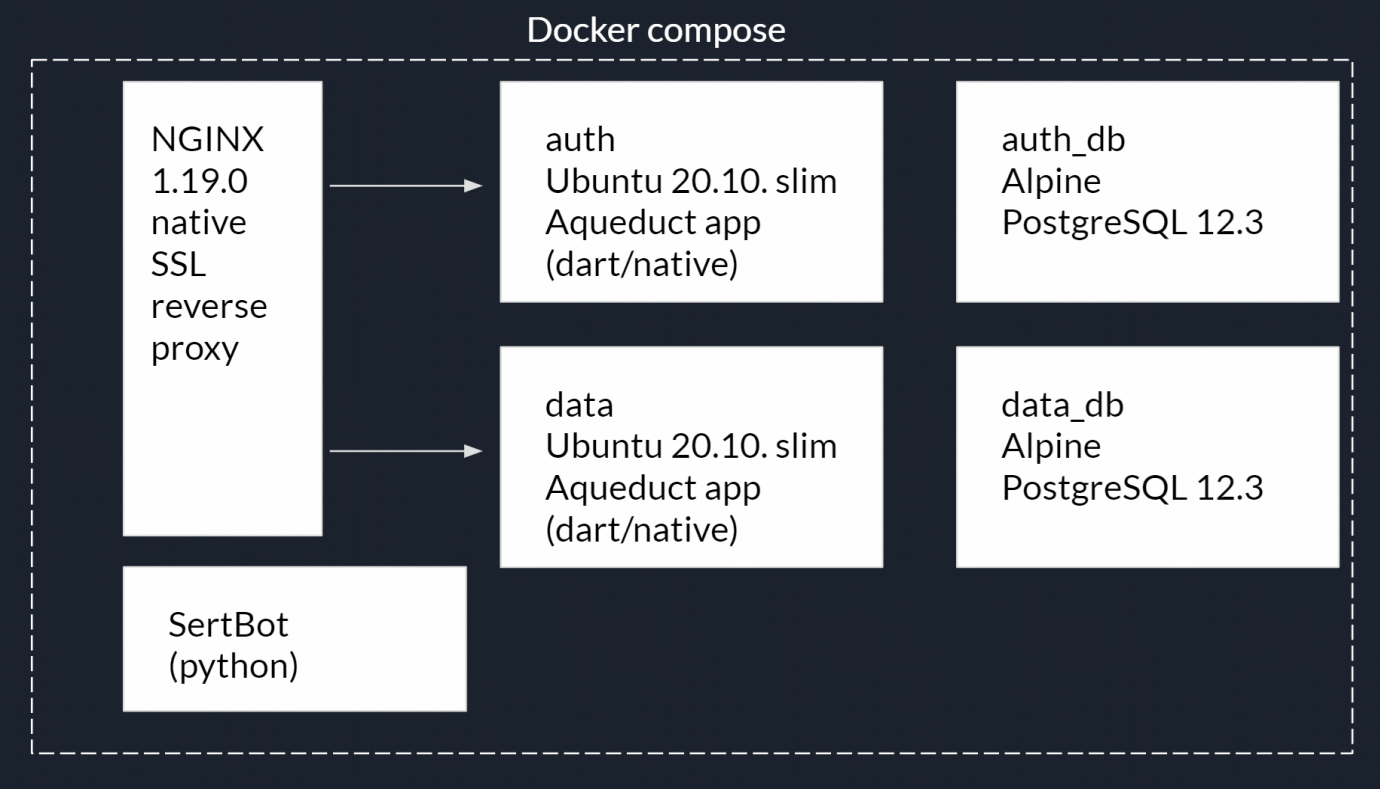
Now let's define the backend structure. We need an HTTP server. We will be using NGINX . Its tasks will be:
- Serving static files (web application files).
- Distribution of service resources, for example, files of proof of domain ownership for mobile applications, information about the owner for obtaining SSL certificates Let's encrypt, etc.
- Reverse proxy for accessing server applications.
- Encryption of connections - https.
Two server applications:
- User registration and authorization application. Let's call it auth_app.
- Application with data. Let's call it app.
- For each of the applications in item 2, we need a separate PostgreSQL database.
- Application for automatically obtaining and renewing SSL encryption certificates (in the next article).
Obviously, such a “zoo” of applications must be isolated from each other, and also blocked from outside. For this we will use the Docker containerization technology and the Docker compose container manager . In the form of a diagram, this can be represented as follows:
Development will be carried out in the Visual Studio Code IDE from Microsoft, which, thanks to the many available plugins, will allow you to work with all the necessary technologies. You also need to install the following extensions:
After restarting VScode, let's connect to our VPS. Press F1 and start entering the command:
Remote-SSH: connect to Host…then a new connection:
+ Add New Ssh Hostthen:
ssh root@<ip- >Open the VScode terminal window (Menu / Terminal / New terminal) and check the system resources with the command:
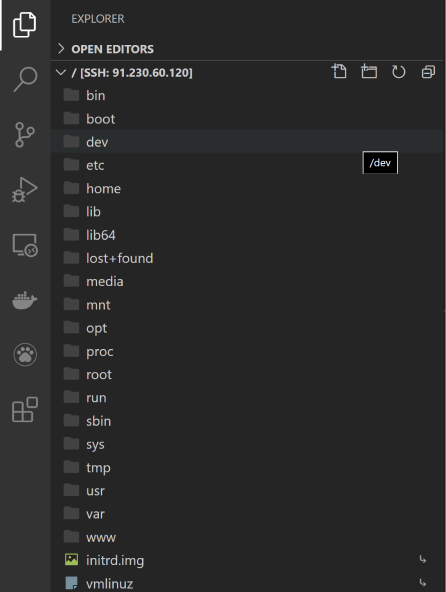
topDone, access to the console and the VPS file system is obtained:
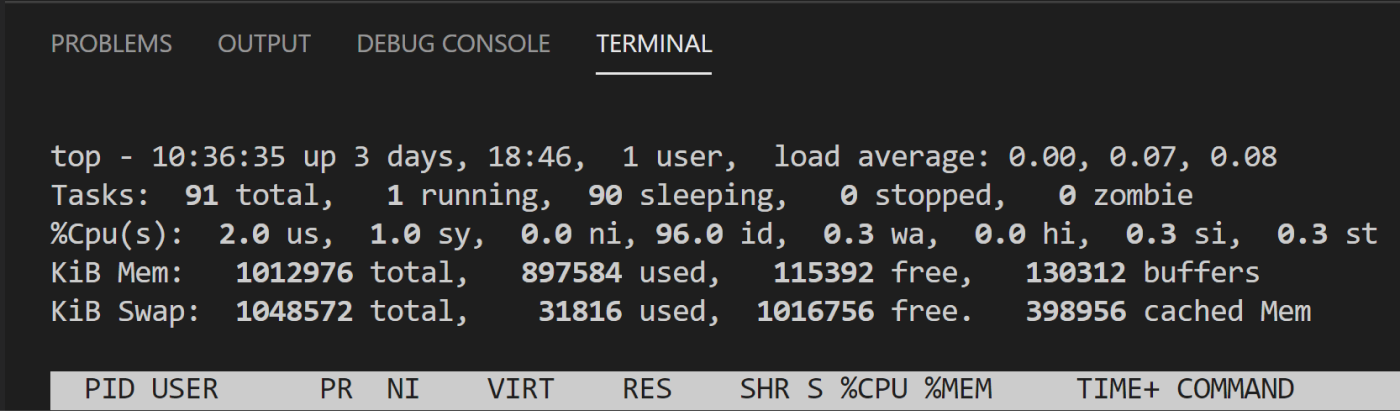
The top utility will be used quite often, so let's install its pseudo htop version:
Ctrl-C # topapt-get update # apt-get install htop # htop htop # 
Now you need to install Docker and Docker compose:
Ctrl-C # htopSince docker is not available in the official Ubuntu repository, we will install an additional repository
apt-get install apt-transport-https ca-certificates curl gnupg-agent software-properties-common # curl -fsSL https://download.docker.com/linux/ubuntu/gpg | sudo apt-key add - # docker add-apt-repository "deb [arch=amd64] https://download.docker.com/linux/ubuntu $(lsb_release -cs) stable" # apt-get install docker-ce docker-ce-cli containerd.io #curl -L "https://github.com/docker/compose/releases/download/1.26.1/docker-compose-$(uname -s)-$(uname -m)" -o /usr/local/bin/docker-compose # Docker compose chmod +x /usr/local/bin/docker-compose # « »ln -s /usr/local/bin/docker-compose /usr/bin/docker-compose # docker --version #docker-compose --versionGreat, the server is ready to test deploy the service.
Now let's install the Docker desktop on our local development PC. Installer for Windows 10 , MacOS version here . Not only Docker will be installed, but also the Docker toolbox, which includes Docker compose and graphical utilities for working with containers.
Open a new VScode window, Menu / File / Open folder ... Create a new folder for our project, for example, Srv and open it. In this folder, create a docker-compose.yaml file :

This file describes the script for starting the service containers, their dependencies, variables, commands, networks, storages, etc.
This is where we need to stop and clarify the difference between an image and a Docker container. A container is an application + its dependencies (for example, packages and libraries) + an operating system that you can run with Docker as a normal application. And an image is a container prepared for launch and packed into an archive. Thus, our entire backend will be a set of containers with a description of the script for their launch.
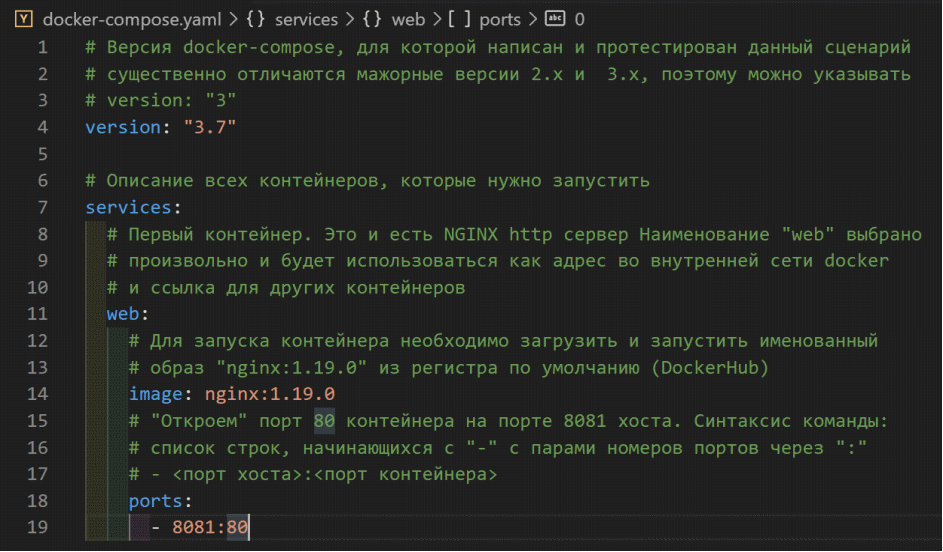
The first container that we have planned will be the NGINX HTTP server. And let's prepare the necessary image ... or not? The fact is that for many web applications and their runtime environments, the developers or the community have already collected the necessary images and placed them in the public DockerHub registry . Of course, such a widely used image has already been assembled and awaits us on thislink .
Pay attention to the list - these are different versions, they differ in both the versions of NGINX itself and additional tools (for example, installed by PERL). For development, you can use the "latest" tag (the latest stable version at the time of the image request), but for deployment on the server, of course, you should use a specific version. Currently this is the nginx image : 1.19.0 .
Hereinafter, I will indicate the necessary explanations to the contents of docker-compose.yaml in the comments in the file listing itself:
Save the changes in the file, open the VScode console and execute the script launch command
docker-compose upThis command not only ran the script, but also sent the container console output to the host console. Now, if you turn to the local host on port 8081 in the address bar of your browser, you will receive the standard NGINX response:

Our first container is already running. Typically, the script is run with the command:
docker-compose up -dthis allows containers to be started in service mode (without console output). Stopping script containers is done with the command:
docker-compose downFor testing http requests, VScode has a handy REST client extension .
Let's install it and write the first debug test of our service. To do this, create a client.http file in the test / http_dev / folder :

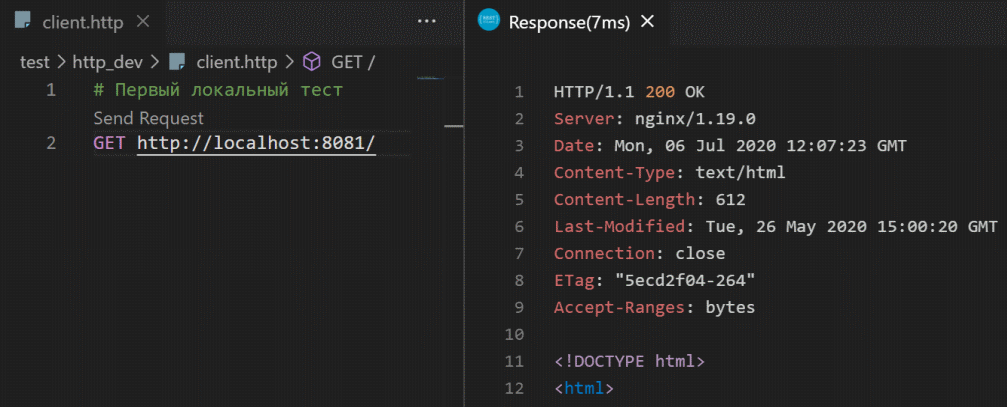
Thus, you can perform test requests by viewing the detailed information about the server's responses.
Now let's take a look inside the container. Stop the script execution in the console:
Ctrl-Cand run with a flag:
docker-compose up -dNow let's request a list of currently running containers (processes):
docker-compose ps
There is only one container in the list of executables. Let's open it up:
docker exec -it srv_web_1 bashThis command executes (exec) a bash application (Linux command shell) in the srv_web_1 container and prevents the console from closing (-it flags):

The command
lswill show the standard Linux folder structure:

We are interested in the /etc/nginx/conf.d/default.conf file - NGINX settings, you can use cat utility to view
cat /etc/nginx/conf.d/default.conf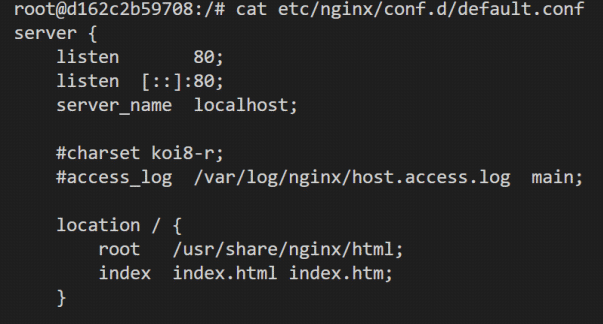
In the NGINX settings, there is one block (the so-called location ), in which listening on port 80 and serving static files from the container folder / usr / share / nginx / html are enabled . You can try to make changes to the NGINX configuration file and restart it, applying the changes, but when you restart the script, the container will be restored from the image and none of our changes will be saved. This is the wrong way.
Let's exit the container console:
Ctrl-DWe will write our configuration file and place our static files, and at startup we will mount them in the NGINX container. Create a default.conf file in the /conf.d folder of our project:
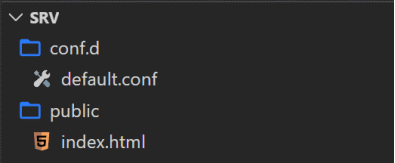
Create a stub for the static file /public/index.html :

Now, in the docker-compose.yaml startup script, mount our folders into the container file system:
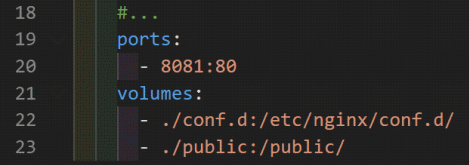
Note that the contents of the project folder. /conf.d will replace the contents of the container in /etc/nginx/conf.d/, and the ./public folder will be mounted to the root folder of the container folder.
Let's restart the script:
docker-compose restartTest Request:

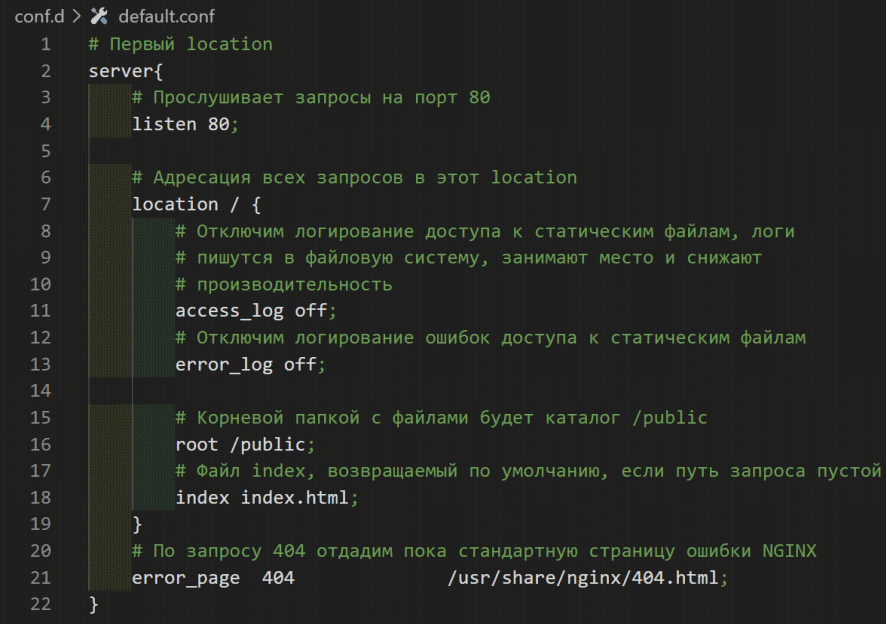
Let's take a look at the default.conf file . Please note that we have disabled the logging of access to static files access_log off . This is a good selling solution, but very inconvenient for testing and development. Let's create a test NGINX configuration file /conf.dev.d/default.conf and a docker-compose.dev.yaml script .


Let's stop the script:
docker-compose downand run it with filename flags:
docker-compose -f docker-compose.yaml -f docker-compose.dev.yaml upRunning the script in this way will first read the settings from the docker-compose.yaml file , and then add or replace matching fields from docker-compose.dev.yaml (ports, volumes). Let's check the logging by repeating the request:


So, we just need to copy and run on the server. Create a / opt / srv_0 / folder on the server (we haven't closed the VScode window with SSH connection to the VPS yet) and copy all the contents of our project into it with the command:
scp scp -r ./* root@91.230.60.120:/opt/srv_0/ 
Now on the server in the project folder / opt / srv_0 / run the command:
docker-compose up -dLet's write another http test, now for VPS:
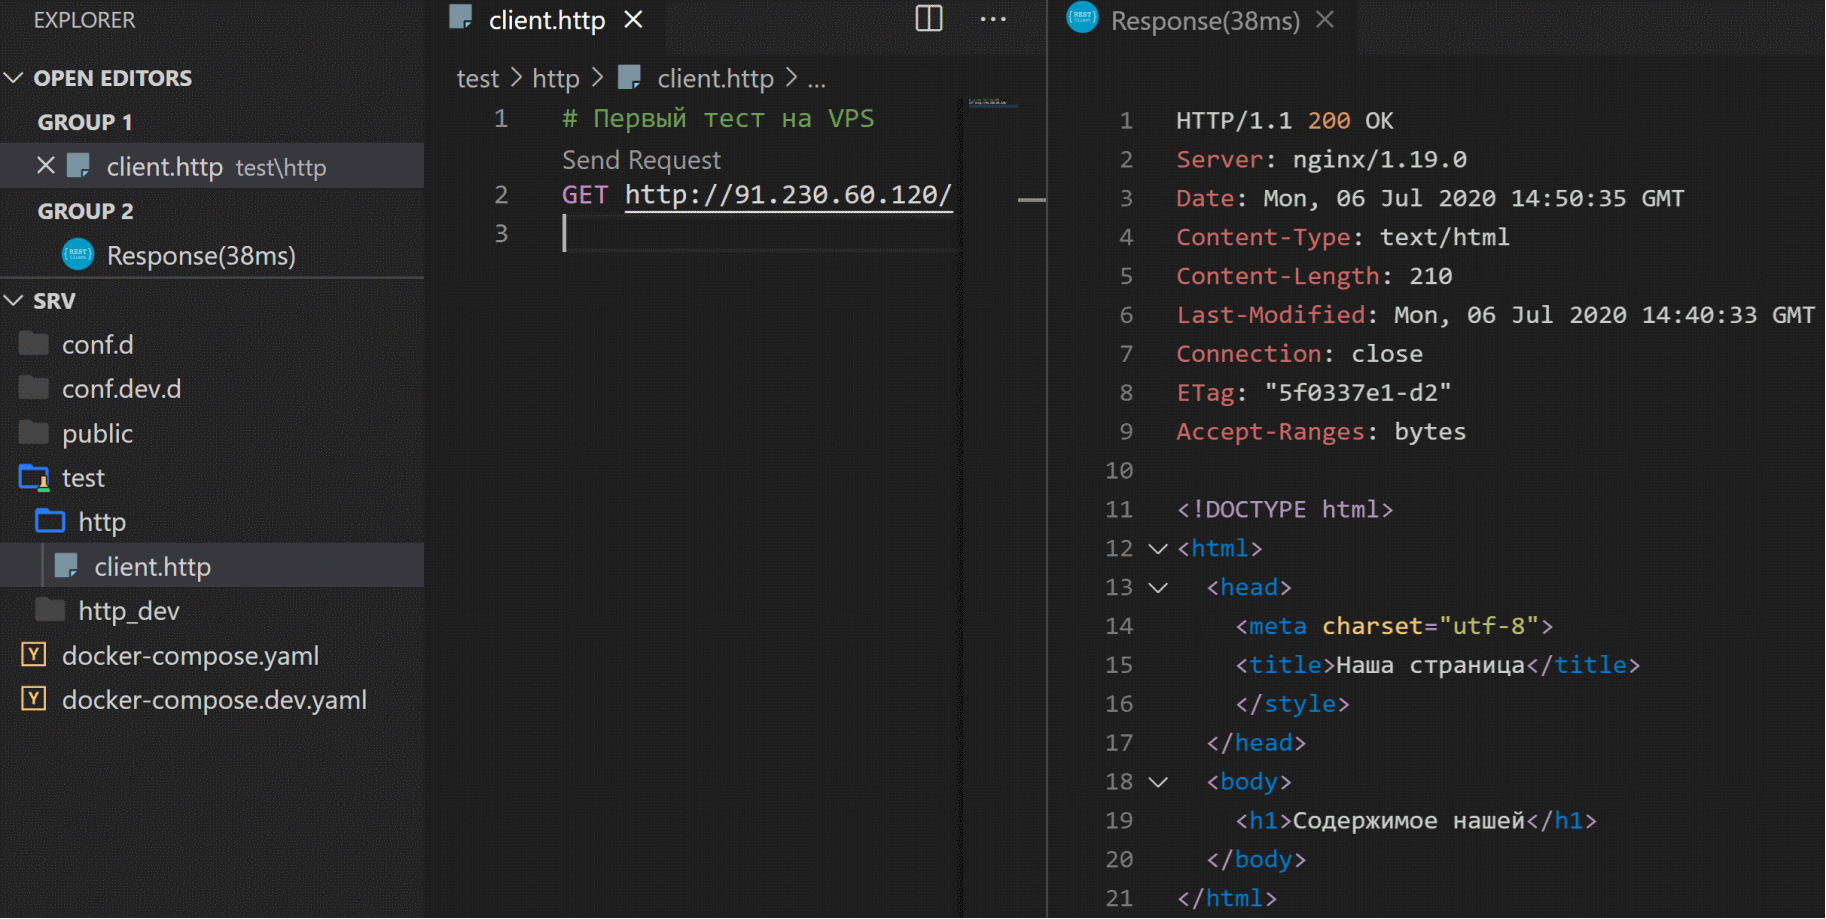
Or open the link in the browser .
-> Source code github
Instead of a conclusion
So, the first step has been taken. We have successfully rolled out the application to the production server. In the second article, we will continue configuring the server by assigning a domain name and installing an SSL encryption certificate. In the third article, we will write a flutter web application with a countdown to the launch of our service, collect it and place it on our server. In the fourth article, we will write and build a native Linux server in the Dart language, which will become the basis for authorization applications and data for our service.
Comments and suggestions are welcome. You can chat with the author in the Telegram channel .