 What medal is the title talking about? We are talking about public key infrastructure (Public Key Infrastructure - PKI / IEC) on the basis of public-key cryptography standards (the Public Key Cryptography Standards - the PKCS). Public key infrastructure includes many different objects and mechanisms for working with them, as well as protocols for object interaction with each other (for example, TLS, OCSP). PKI / PKI objects include x509 certificates and key pairs (private and public keys), signed and encrypted documents (pkcs # 7, CMS), secure containers for storing private keys (pkcs # 8) and private certificates with keys (pkcs # 12), etc. The mechanisms include not only cryptographic functions that allow you to encrypt and sign documents using various algorithms, but also functions that form PKI end objects in accordance with standards (certificates, requests, signed / encrypted documents, protocol packages, etc., etc.) .P.). Yes, and how not to remember the central PKI / PKI object -Certification Center (CA).
Any Internet user, unknowingly, uses various PKI / PKI mechanisms and objects, for example, the HTTPS protocol when accessing various sites, when he signs and / or encrypts his e-mails or uses an electronic signature in the workflow.
The most advanced tools for creating public key infrastructure, PKI / PKI software tools are OpenSSL and Network Security Services (NSS).
OpenSSL is a set of full-fledged open source cryptographic libraries and utilities that supports almost all low-level hashing, encryption and electronic signature algorithms, and also implements most of the popular cryptographic standards, including: allows you to create RSA, DH, DSA, EC keys, issue X.509 certificates, encrypt and sign data and create SSL / TLS connections.
It should be noted that the objects that the OpenSSL utility works with are stored in files (certificates, keys). Network Security Services (NSS) is the
same set of full-fledged open source cryptographic libraries and utilities .
The main difference between OpenSSL and NSS is that OpenSSL assumes that certificates and keys are stored in files, while NSS uses PKCS # 11 databases and tokens to store certificates and keys .
The most important thing is that both projects (OpenSSL and NSS) adhere strictly to standards and therefore there are no problems when they are used together in different projects. Such a good example of their commonwealth can be, for example, the use of the HTTPS protocol, when sites / portals are built on the basis of Apache with mod_ssl based on OpenSSL, and they are accessed, for example, through Firefox, which supports TLS 1.0 / TLS 1.2 and TLS 1.3 carried out using the NSS libraries.
It will be shown below how the OpenSSL and NSS utilities can be used to solve the same problems. In the future, everyone can use the utilities to their liking.
Anyone can get acquainted with the library functions by looking at the source code of this or that utility.
View certificates and other entities stored in files
There is one utility in the OpenSSL package - openssl , the first parameter of which is the command itself (Standard commands), which must be executed:
$ openssl help
Standard commands
asn1parse         ca                ciphers           cms
crl               crl2pkcs7         dgst              dhparam
dsa               dsaparam          ec                ecparam
enc               engine            errstr            exit
gendsa            genpkey           genrsa            help
list              nseq              ocsp              passwd
pkcs12            pkcs7             pkcs8             pkey
pkeyparam         pkeyutl           prime             rand
rehash            req               rsa               rsautl
s_client          s_server          s_time            sess_id
smime             speed             spkac             srp
ts                verify            version           x509

Message Digest commands (see the `dgst' command for more details)
blake2b512        blake2s256        gost              md2
md4               md5               rmd160            sha1
sha224            sha256            sha384            sha512

Cipher commands (see the `enc' command for more details)
aes-128-cbc       aes-128-ecb       aes-192-cbc       aes-192-ecb
aes-256-cbc       aes-256-ecb       base64            bf
bf-cbc            bf-cfb            bf-ecb            bf-ofb
camellia-128-cbc  camellia-128-ecb  camellia-192-cbc  camellia-192-ecb
camellia-256-cbc  camellia-256-ecb  cast              cast-cbc
cast5-cbc         cast5-cfb         cast5-ecb         cast5-ofb
des               des-cbc           des-cfb           des-ecb
des-ede           des-ede-cbc       des-ede-cfb       des-ede-ofb
des-ede3          des-ede3-cbc      des-ede3-cfb      des-ede3-ofb
des-ofb           des3              desx              idea
idea-cbc          idea-cfb          idea-ecb          idea-ofb
rc2               rc2-40-cbc        rc2-64-cbc        rc2-cbc
rc2-cfb           rc2-ecb           rc2-ofb           rc4
rc4-40            rc5               rc5-cbc           rc5-cfb
rc5-ecb           rc5-ofb           seed              seed-cbc
seed-cfb          seed-ecb          seed-ofb          zlib
$
As you can see, when the openssl help command is executed, in addition to the list of commands itself, a list of supported hash algorithms and encryption algorithms is displayed (their list includes the compression and base64 functions).
To view the certificate (x509), request (req), or certificate revocation list (crl), just run the following command:
openssl x509 [| req | crl] [-nameopt utf8] -inform PEM | DER -noout -in <file name> ...
For example, the command:
$openssl x509 -text -nameopt utf8 -inform PEM -noout -in cert.pemwill display on the computer screen the contents of the certificate in technical form (x509 -text) stored in the file cert.pem (-in cert.pem) encoded in PEM (base64) (-inform PEM) and containing characters in utf-8 encoding (-nameopt utf8). In this case, the certificate itself in PEM encoding will not be displayed on the screen (-noout).
In the NSS package, the pp utility does the same .
The pp utility is a Pretty Print utility for a file containing an ASN.1 structure in DER or PEM encoding:
Usage: pp [-t type] [-a] [-i input] [-o output] [-w] [-u], - c - certificate;
- cr - certificate request;
- pk - public key;
- pk - public key file;
- crl - list of revoked certificates.
Note another type that applies to certificates, ci (certificate-identity). This type allows you to get identifying information from the certificate, such as subject (owner), issuer (publisher), serial number (serial number), fingerprint (SHA-1 and SHA-256 fingerprints). The openssl utility for x509 has similar parameters.
By default, all objects are assumed to be DER encoded. If the objects are in PEM encoding, then the "-a" parameter must be specified (analogous to the "-inform PEM" parameter for the openssl utility). And one more parameter "-u" is set if the object contains characters in UTF-8 encoding. Recall that the openssl utility has a similar parameter - "-nameopt utf8".
The NSS package also contains a utility for viewing the ASN.1-structure of an object, an analogue of the openssl utility asn1.parse. This is the derdump utility:
$derdump -i < > [-o < >]From the very name of the utility it follows that it works with files in DER-encoding. But that's okay. The package includes two utilities that convert files from PEM / BASE64 encoding to DER encoding and vice versa. These are the atob and btoa utilities.
For example, to convert a certificate from PEM format to DER format in OpenSSL, run the following command:
$openssl x509 -inform der -in CERT.der -out CERT.pem In NSS it would look like this:
$btoa -in CERT.der -out CERT.pem -w "CERTIFICATE"The "-w" option specifies which text to include at the beginning and end of the output file. In this case, "-w CERTIFICATE" will result in the PEM-standard OpenSSL header and trailer:
-----BEGIN CERTIFICATE-----
<    BASE64>
-----END CERTIFICATE-----
Both OpenSSL and NSS can work with pkcs # 12 containers. And they both allow not only creating, but also viewing the contents of the pkcs12 container. But, when using the openssl utility, you first need to parse the container and save the certificates from the container in separate files. After that, you can safely view them. In NSS, viewing the contents of a container can be done in a single pass. To do this, use the pk12util utility of the following form:
pk12util -l < pkcs12> [-W < pkcs12>] [-d < NSS>] [-h <>]For instance:
$ pk12util -l cert_RSA.p12 -W 01234567
Certificate(has private key):
    Data:
        Version: 3 (0x2)
        Serial Number: 3 (0x3)
        Signature Algorithm: PKCS #1 SHA-1 With RSA Encryption
        Issuer: "CN=CA-RSA"
        Validity:
            Not Before: Thu May 21 09:50:00 2020
            Not After : Fri May 21 16:17:00 2021
        Subject: "CN=soft.lissi.ru"
        Subject Public Key Info:
            Public Key Algorithm: PKCS #1 RSA Encryption
            RSA Public Key:
                Modulus:
                    a2:f3:e1:63:fd:4f:60:4e:a9:de:56:37:a6:be:54:f3:
                    3d:67:9a:68:9e:f1:47:69:e3:3a:10:b0:2e:88:0c:ef:
                    7c:7f:48:47:6b:c0:75:63:c7:13:23:88:9a:ff:9a:48:
                    30:6a:a0:52:53:6f:4e:e5:84:c0:a1:b0:50:a2:ab:3d:
                    f9:62:2c:d8:30:be:19:1b:c9:f4:b8:20:57:a1:8e:5e:
                    61:8c:a7:50:91:44:61:99:71:40:bb:dc:4c:b7:7c:67:
                    be:a0:71:26:9f:af:dd:69:63:84:7d:93:3f:92:1b:fb:
                    d1:78:d7:95:75:42:8e:14:a8:63:e2:7b:7d:ef:c8:74:
                    35:7c:39:44:82:ad:92:1f:98:0e:91:95:c8:d8:bd:41:
                    fc:44:7e:4d:f5:94:d1:cc:25:ea:df:69:d7:b1:d7:86:
                    ad:4d:03:f1:35:65:03:a6:84:f8:26:6e:9b:d3:c9:67:
                    d5:a5:a4:9e:c7:82:76:28:9f:90:14:f1:16:6a:29:5d:
                    f8:df:c6:6c:e4:21:0d:6f:c5:87:61:a0:65:e3:97:0f:
                    96:42:ad:7d:96:79:ef:1d:ab:6c:e3:a0:da:3a:65:d8:
                    39:69:f3:20:e2:b1:27:fe:cb:4c:8c:0c:f5:76:f2:65:
                    a0:c7:bb:08:b0:f5:50:c0:96:8a:30:e9:75:f7:56:65
                Exponent: 65537 (0x10001)
        Signed Extensions:
            Name: Certificate Basic Constraints
            Critical: True
            Data: Is not a CA.

            Name: Certificate Key Usage
            Usages: Digital Signature
                    Non-Repudiation
                    Key Encipherment

            Name: Certificate Subject Alt Name
            DNS name: "lissi.ru"

            Name: Certificate Type
            Data: <SSL Server>

            Name: Certificate Comment
            Comment: "xca certificate"

    Signature Algorithm: PKCS #1 SHA-1 With RSA Encryption
    Signature:
        12:8c:c3:7e:e9:18:5a:d7:ee:f8:10:8b:72:55:ba:ee:
        8b:85:6c:aa:e3:de:58:26:a2:da:15:c6:3b:15:d9:82:
        6d:02:33:16:cc:0c:84:9d:96:b0:67:d4:63:10:b5:42:
        a1:c3:de:cb:40:6f:9b:9b:eb:c1:98:b6:66:55:ae:88:
        56:14:02:5c:62:8c:bc:22:97:94:cf:53:da:2e:47:c1:
        c6:83:dc:39:6f:0b:b8:39:4e:66:89:a3:9d:51:c6:e3:
        bd:fc:9e:f3:7b:02:a4:77:bc:08:4e:89:e6:57:54:5c:
        c1:cc:83:93:9e:4e:f5:41:4e:b5:13:bc:64:29:a9:8d:
        ce:13:ae:48:6c:21:fc:da:2a:a2:87:67:f8:df:23:53:
        08:a3:11:93:69:91:84:40:4b:58:c1:f3:d0:78:dc:33:
        f6:a5:a6:6f:ed:39:a9:ec:f3:48:e8:06:09:4c:c3:9f:
        9c:0f:58:80:7f:f5:09:40:2a:f1:cf:42:d7:5b:57:62:
        99:e7:dc:a5:31:f3:9d:1f:5a:88:c2:30:1b:8c:ec:69:
        8b:87:dc:4c:08:9e:70:49:3d:5e:7b:8f:6f:98:50:8b:
        0d:b9:8f:c1:7e:9b:1f:c2:76:3a:ca:c5:e3:3d:ea:93:
        81:c0:3b:e2:b7:d1:5d:e4:fd:48:d6:1b:8f:96:e2:18
    Fingerprint (SHA-256):
        D3:38:99:C9:8B:A5:49:96:BC:26:7B:10:1E:2A:7C:4B:55:15:E5:94:47:C6:D0:49:44:2E:48:58:1B:CF:83:7E
    Fingerprint (SHA1):
        D5:26:80:B7:CE:40:5B:54:85:F6:B2:31:58:C3:3E:9D:A4:3D:C1:F3

    Friendly Name: soft.lissi.ru

Certificate:
    Data:
        Version: 3 (0x2)
        Serial Number: 1 (0x1)
        Signature Algorithm: PKCS #1 SHA-1 With RSA Encryption
        Issuer: "CN=CA-RSA"
        Validity:
            Not Before: Wed May 20 16:12:00 2020
            Not After : Tue May 21 16:12:00 2030
        Subject: "CN=CA-RSA"
        Subject Public Key Info:
            Public Key Algorithm: PKCS #1 RSA Encryption
            RSA Public Key:
                Modulus:
                    a3:ca:c1:3b:ac:17:1b:32:69:90:8c:70:3b:95:3e:78:
                    4c:90:55:27:2a:25:05:16:54:d3:88:69:b0:43:a0:20:
                    3d:ca:0d:a2:f9:a5:2f:8c:e1:69:b6:df:79:bd:25:7d:
                    aa:71:2b:f2:9f:82:f1:e7:49:cf:fa:3c:b6:6f:80:09:
                    b2:ee:d5:18:e3:3d:96:67:38:cb:9c:e8:e5:76:c4:a8:
                    0b:b9:ad:dd:42:25:c7:da:cf:d4:15:41:bf:b0:0e:4f:
                    d1:9c:b7:d0:b1:32:a0:c7:14:67:ba:a2:9a:e7:23:26:
                    d7:7e:32:d9:5d:15:47:9e:4b:b0:b1:8b:04:38:1e:c3:
                    b2:fc:17:fe:8e:d1:cb:de:de:fd:13:17:b3:0e:5b:58:
                    e1:37:c7:12:32:b6:94:82:77:b8:4c:87:99:c6:c3:7d:
                    51:ed:3c:41:73:31:aa:13:de:26:84:e7:f7:a9:34:e9:
                    b3:9e:7d:aa:91:65:79:a7:14:9d:fc:45:42:de:e6:43:
                    9d:67:96:94:66:38:0b:2e:32:0a:4d:c3:3d:14:b9:06:
                    6b:e0:92:e2:35:0c:8f:78:7f:2c:ad:ec:dc:67:66:0b:
                    8c:47:82:c5:0e:39:a5:35:75:b5:fb:7f:2d:07:97:ef:
                    15:d8:fc:d4:72:6a:da:32:86:9e:64:ea:4a:e3:37:5b
                Exponent: 65537 (0x10001)
        Signed Extensions:
            Name: Certificate Basic Constraints
            Critical: True
            Data: Is a CA with no maximum path length.

            Name: Certificate Key Usage
            Usages: Certificate Signing
                    CRL Signing

            Name: Certificate Type
            Data: <SSL CA,S/MIME CA,ObjectSigning CA>

            Name: Certificate Comment
            Comment: "xca certificate"

    Signature Algorithm: PKCS #1 SHA-1 With RSA Encryption
    Signature:
        24:90:ac:91:3f:13:f6:1a:d4:3c:1b:de:33:e1:4a:0c:
        d8:27:a0:00:d2:43:c8:1b:13:90:93:d3:d2:f0:fe:79:
        da:14:fd:34:2e:3a:f4:fc:c8:71:c9:4f:0d:65:c0:fd:
        40:04:92:ef:7e:72:35:09:4a:08:1e:ed:21:53:06:03:
        73:f9:13:e7:a3:9c:e2:17:9c:25:b2:a5:f9:dc:07:7d:
        32:9f:cd:82:85:6c:26:79:dd:ee:e7:31:4e:10:55:19:
        d6:ac:1e:70:39:01:d2:37:00:3b:41:de:a9:c2:bd:bf:
        b4:c1:f8:8d:bd:d4:6b:95:6d:53:f3:17:76:40:d4:05:
        a4:1e:69:e8:54:92:91:bf:89:b6:ba:45:c5:14:89:bb:
        f4:44:cf:91:ca:16:44:55:86:8f:b9:37:4e:9e:9e:04:
        cd:48:e7:57:ec:c8:e2:72:f3:df:34:49:0a:9b:3f:67:
        a4:01:dd:f3:a3:bb:ec:b5:b8:20:f5:7e:45:8e:ae:53:
        7e:b8:92:38:0a:b7:41:8e:81:15:ab:72:42:f7:37:4a:
        6d:d7:4f:aa:0a:99:ee:9b:49:16:54:03:42:d6:fe:c1:
        ee:63:71:28:b1:84:c2:e6:d4:7b:f6:10:4c:a0:7a:39:
        9d:03:30:ff:78:24:ce:5b:ac:fe:ac:6d:f6:61:77:a6
    Fingerprint (SHA-256):
        AA:1F:B9:29:D2:F9:CC:AB:3D:F7:8C:26:26:4B:51:A3:71:01:1A:94:F8:FE:47:1D:BD:E3:72:DD:63:17:FE:6C
    Fingerprint (SHA1):
        B3:7A:A1:65:01:E2:A0:09:F4:55:17:EC:40:88:5C:42:9A:45:F5:36

Key(shrouded):
    Friendly Name: soft.lissi.ru

    Encryption algorithm: PKCS #12 V2 PBE With SHA-1 And 3KEY Triple DES-CBC
        Parameters:
            Salt:
                08:0b:8d:be:fa:fc:a5:a3
            Iteration Count: 2048 (0x800)
$
The utility is convenient, but not without a fly in the ointment. The fly in the ointment is that Russian letters, or rather, UTF-8 encoding, are displayed as dots (.....). And if the pp utility has the -u parameter (utf-8 encoding is present), then they forgot about it here (we will face this again when considering the certutil utility). It is not difficult to fix this: it is enough to add one line to the P12U_ListPKCS12File function located in the pk12util.c file:
PRIntn
P12U_ListPKCS12File(char *in_file, PK11SlotInfo *slot,
                    secuPWData *slotPw, secuPWData *p12FilePw)
{
    SEC_PKCS12DecoderContext *p12dcx = NULL;
    SECItem uniPwitem = { 0 };
    SECStatus rv = SECFailure;
    const SEC_PKCS12DecoderItem *dip;
/*    UTF-8*/
    SECU_EnableUtf8Display(PR_TRUE);

.   .   .   .   .

}
After that, there will be no problems with Russian letters.
$ pk12util -l 1000.p12 -d "." -W 01234567
Certificate(has private key):
Data:
Version: 3 (0x2)
Serial Number: 4096 (0x1000)
Signature Algorithm: PKCS #1 SHA-256 With RSA Encryption
Issuer: «E=ca@test.ru,OGRN=1111111111111,INN=222222222222,CN=
,OU=
,O= ,STR
EET=». , . 0",L=,ST=
,C=RU"
Validity:
Not Before: Tue Jul 07 08:40:14 2020
Not After: Fri Aug 06 08:40:14 2021
Subject: «E=test@rsa.ru,CN= »
Subject Public Key Info:
Public Key Algorithm: PKCS #1 RSA Encryption
RSA Public Key:
Modulus:
9a:9f:6c:60:94:f7:ec:f7:94:b3:51:01:e2:1a:c5:25:
28:bb:02:77:49:52:4d:99:8a:6e:26:12:55:8f:71:34:
04:da:39:24:f9:b4:6b:d0:0a:42:27:1b:b2:d7:9b:d9:
c3:76:b0:e0:1c:7c:21:ce:79:9f:d5:2b:17:63:cb:94:
5b:d9:b2:53:ff:b9:bf:4f:3d:cf:b7:8d:8a:37:ba:02:
8c:da:d2:0d:fd:46:5b:45:1d:95:64:07:6e:fa:88:0d:
a4:bd:b3:4a:ed:99:f1:fd:73:c5:b6:05:a0:e5:ee:6b:
c3:83:5b:d0:64:05:77:6a:18:d8:c8:28:a1:d0:06:41:
23:0d:bb:87:8a:77:14:fb:6c:5d:af:db:2b:0b:11:a3:
16:1b:2b:05:18:26:a9:b5:00:4a:40:da:b3:05:aa:2a:
67:c0:18:0d:03:f7:d2:b9:ba:7c:36:f9:95:2e:56:81:
a3:09:99:5e:20:10:95:38:10:c9:c1:6f:c3:6c:a6:1b:
78:51:c6:e4:4f:11:bc:c0:22:4b:ca:59:16:f2:45:95:
0d:fd:7b:46:cf:c7:ac:1c:3d:d7:26:fc:ad:80:3e:2c:
21:93:29:32:a6:79:e2:a8:c6:e9:5e:45:34:d3:38:57:
8f:cd:95:5e:91:09:84:34:21:d2:16:29:69:75:4d:a3
Exponent: 65537 (0x10001)
Signed Extensions:
Name: Certificate Basic Constraints
Critical: True
Data: Is not a CA.
Name: Certificate Key Usage
Usages: Digital Signature
Key Encipherment
Key Agreement
Name: Certificate Type
Data: <SSL Client,S/MIME>
Name: Extended Key Usage
TLS Web Client Authentication Certificate
E-Mail Protection Certificate
Name: Certificate Subject Key ID
Data:
26:a1:b3:98:1c:fe:62:ba:23:81:96:37:3f:08:bd:70:
d6:f2:b1:46
Name: Certificate Authority Key Identifier
Key ID:
0a:b6:f6:87:64:1d:8e:b3:63:08:29:9f:21:59:ad:47:
d8:ea:07:f4
Issuer:
Directory Name: «E=ca@test.ru,OGRN=1111111111111,INN=22222222
2222,CN= ,OU=
,O=
,STREET=».
, . 0",L=,ST=
,C=RU"
Serial Number:
00:a2:9b:22:32:3e:a7:3d:d8
Name: Certificate Subject Alt Name
RFC822 Name: «test@rsa.ru»
Name: Certificate Issuer Alt Name
Error: Parsing extension: Certificate extension value is invalid.
Data: Sequence {
}
Signature Algorithm: PKCS #1 SHA-256 With RSA Encryption
Signature:
2f:75:7e:71:9e:15:5c:97:fe:a2:e1:2a:52:39:56:55:
e0:62:60:bc:5f:6d:c2:b6:ec:cd:8b:10:b3:b1:3f:e5:
d6:d1:5f:a5:fa:61:c1:ce:3e:db:6a:2f:b2:13:46:8d:
67:cf:18:09:61:97:01:45:bc:99:bb:0c:d6:0a:a3:03:
87:0a:8e:10:3a:d5:e3:94:6d:4a:24:fa:c3:40:0b:43:
c2:3b:00:56:06:c4:d2:fc:b2:7e:e9:00:e5:2f:4b:e2:
3a:91:49:ce:f8:c3:60:ec:01:74:d8:1a:3b:af:e6:f6:
91:db:c5:f1:d7:de:be:18:38:47:41:8a:e2:ef:80:91:
10:54:41:ae:55:22:6f:d7:8c:fa:46:b6:b6:2a:ee:6a:
0c:c9:03:18:af:4e:93:6c:61:f3:b4:78:0c:61:93:f1:
d8:1b:00:c3:e5:29:9a:08:0a:f8:31:67:88:3d:c3:88:
7a:60:c0:c4:52:94:25:56:e5:a3:df:7d:58:c5:df:9a:
c7:22:7e:2c:f6:fb:2c:bf:b7:7f:c5:ca:2b:0f:8c:20:
77:b9:1f:e0:62:5a:3d:d4:6f:12:ea:c8:51:67:a5:75:
ad:e9:ac:9e:4e:2e:2d:34:80:e7:d8:64:f6:8f:2f:33:
32:1f:8b:bc:9c:e8:77:4a:ee:7b:84:31:ec:28:e9:70
Fingerprint (SHA-256):
96:F4:A5:FA:6D:8A:F8:7E:A6:10:49:BD:43:34:C1:92:C6:7D:FF:63:41:8E:69:C0:AC:34:6B:CB:63:7B:56:31
Fingerprint (SHA1):
B6:91:9B:C6:7A:45:9C:92:FD:E7:C7:33:00:FA:91:DF:7D:5F:00:21
Friendly Name:
Certificate:
Data:
Version: 3 (0x2)
Serial Number:
00:a2:9b:22:32:3e:a7:3d:d8
Signature Algorithm: PKCS #1 SHA-256 With RSA Encryption
Issuer: «E=ca@test.ru,OGRN=1111111111111,INN=222222222222,CN=
,OU=
,O= ,STR
EET=». , . 0",L=,ST=
,C=RU"
Validity:
Not Before: Tue Jul 07 08:08:11 2020
Not After: Fri Jul 05 08:08:11 2030
Subject: «E=ca@test.ru,OGRN=1111111111111,INN=222222222222,CN=
,OU=
,O= ,STR
EET=». , . 0",L=,ST=
,C=RU"
Subject Public Key Info:
Public Key Algorithm: PKCS #1 RSA Encryption
RSA Public Key:
Modulus:
e7:08:ed:83:08:10:7b:48:56:37:8b:e2:4a:31:1a:7b:
0d:4e:d2:a2:67:d7:04:60:a0:09:db:06:64:21:01:4e:
0d:41:d8:61:15:c6:58:83:66:7e:6b:65:72:0d:2b:c3:
50:26:11:04:82:4b:1a:12:d0:dc:e1:13:1c:76:69:0f:
c2:59:e2:5d:60:6d:fe:8a:48:fa:8b:1e:05:07:34:6d:
8a:e3:76:23:42:9e:7b:64:0b:6a:fb:36:63:31:96:df:
ed:d3:e8:7c:6e:39:d4:7d:da:b8:f4:ec:53:57:60:f1:
d8:a4:3a:3f:3b:4a:63:6c:2a:55:90:21:15:23:4a:37:
21:31:a0:c4:bb:84:0d:96:18:3c:3b:ba:92:e3:e2:17:
56:e5:d9:8c:58:24:8a:a3:53:b6:4f:02:4d:30:a6:0f:
34:ad:20:cf:6f:03:ca:23:1e:d3:15:bc:80:09:d8:1e:
90:07:da:90:a9:34:9e:6e:ed:6b:10:b7:a1:a4:a9:b4:
04:ac:6a:40:d8:00:52:d6:6a:28:f2:8c:c6:84:81:8a:
cd:63:a6:53:82:d2:4e:11:ec:94:81:d7:9c:79:8a:30:
9c:40:75:4d:d9:88:0b:cc:a4:0c:5d:6d:23:a6:ac:56:
8c:49:d9:1f:2b:63:cb:50:fc:a3:e0:3e:35:4e:f4:03
Exponent: 65537 (0x10001)
Signed Extensions:
Name: Certificate Basic Constraints
Critical: True
Data: Is a CA with no maximum path length.
Name: Certificate Subject Key ID
Data:
0a:b6:f6:87:64:1d:8e:b3:63:08:29:9f:21:59:ad:47:
d8:ea:07:f4
Signature Algorithm: PKCS #1 SHA-256 With RSA Encryption
Signature:
17:7d:29:dc:4d:6e:4c:99:7a:bc:b2:2a:a5:80:f9:5f:
0c:60:00:2b:f3:f4:ef:19:d7:ed:56:07:5d:24:e1:b3:
f6:43:e2:05:9b:75:ce:cd:cf:27:1e:1c:cd:d8:cc:43:
77:16:04:7e:8a:dd:89:c4:b2:75:ae:f4:84:23:53:18:
fe:be:c5:1d:40:55:aa:91:9f:f5:96:06:5d:07:22:a8:
1c:b9:29:c4:49:2e:75:10:75:22:95:36:16:58:2f:77:
f5:fa:6d:de:c4:67:ca:f3:e1:98:51:b4:ba:b7:2a:7f:
06:db:33:5a:a6:bb:53:57:f4:18:93:16:9c:0e:43:d0:
46:e6:84:55:bb:ff:68:fe:fa:32:d5:23:2a:d5:65:9b:
d9:63:45:6b:53:71:64:dd:da:e1:40:fa:89:30:b1:73:
8b:f8:7c:3c:2f:72:24:ad:e8:5c:07:89:2f:3a:0d:37:
48:29:1f:0d:5f:9e:11:73:56:b8:d9:24:eb:2d:2e:18:
c7:9b:90:62:09:20:61:75:b9:a1:9a:3f:99:34:8e:06:
30:ce:7d:60:42:7d:e0:14:f2:88:f2:41:a0:46:4d:55:
17:d4:c2:15:64:c9:3e:f5:cc:0a:41:f7:c0:d0:94:96:
ea:64:e0:45:3a:e0:a3:d6:22:a9:d1:e3:c4:51:e8:96
Fingerprint (SHA-256):
F5:DF:15:79:5E:1E:41:84:96:8C:8C:CA:37:0C:A6:BB:C3:21:AE:3D:32:42:8C:63:C2:64:BA:0A:74:DC:37:F8
Fingerprint (SHA1):
CF:C6:B9:D4:3C:16:6F:31:91:2A:09:2F:FE:4C:57:89:0F:5A:F1:DB
Friendly Name:
Key(shrouded):
Friendly Name:
Encryption algorithm: PKCS #12 V2 PBE With SHA-1 And 3KEY Triple DES-CBC
Parameters:
Salt:
c4:fa:4a:6a:4f:54:a1:7a
Iteration Count: 2048 (0x800)
$
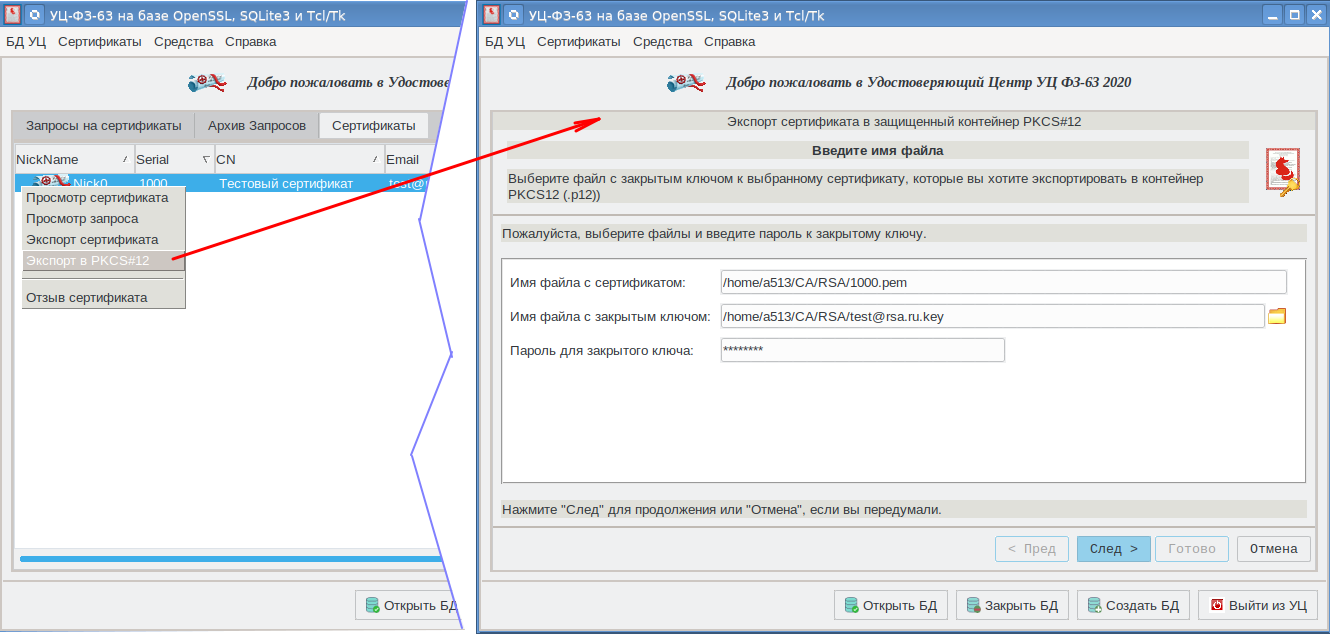
When creating a PKCS # 12 container with the openssl utility, we used the CAFL63 graphical shell :
Now is the time to talk about the NSS repository.
NSS storage
The NSS repository is the directory in which three databases are stored.
The database (DB) cert8.db / cert9.db stores certificates. The key3.db / key4.db database stores private keys. And finally, the secmod.db / pkcs11.txt database stores information (primarily the path to the library) that allows you to work with third-party tokens / smartcards / clouds with the PKCS # 11 interface .
The modutil utility is designed to create an NSS repository in the following format:
modutil -create -force [-dbdir < NSS>] ,
< NSS> := [<  >:]<  NSS>
<  > := dbm|sql , :
$modutil -create -force -dbdir "sql:/~/TEST_NSS"
The dbm database type assumes the creation of Berkeley databases (cert8.db, key3.db, and secmod.db). The sql type assumes the creation of SQLite3 databases (cert9.db, key9.db and a text file pkcs11.txt). SQLite3 databases are created by default. The NSS repository directory must be created in advance. By default (unless the -dbdir or -d parameter is specified), the ".netscape" store in the user's home folder is used. This storage is used, for example, by the google-chrome browser.
It is also easy to create a store in a new format (SQLite3) (cert9.db, key4.db and pkcs11.txt) from the old format (DBM) certificate store (cert8.db, key3.db and secmod.db). To do this, just run the utility for working with certificates certutil in the mode of viewing keys (-K) or certificates (-L) with the -X parameter, for example:
$certutil -K -X -d ~/TEST_NSSor
$certutil -L -X -d ~/TEST_NSSNote that such repositories are available in all projects built on NSS, including Firefox, Thunderbird, Seamonkey, GoogleChrome, LibreOffice .
After creating the NSS storage, the built-in "NSS Internal PKCS # 11 Module" with two built-in tokens automatically becomes available:
$modutil -list -dbdir ~/TEST_NSS
Listing of PKCS #11 Modules
-----------------------------------------------------------
  1. NSS Internal PKCS #11 Module
           uri: pkcs11:library-manufacturer=Mozilla%20Foundation;library-description=NSS%20Internal%20Crypto%20Services;library-version=3.52
         slots: 2 slots attached
        status: loaded

         slot: NSS Internal Cryptographic Services
        token: NSS Generic Crypto Services
          uri: pkcs11:token=NSS%20Generic%20Crypto%20Services;manufacturer=Mozilla%20Foundation;serial=0000000000000000;model=NSS%203

         slot: NSS User Private Key and Certificate Services
        token: NSS Certificate DB
          uri: pkcs11:token=NSS%20Certificate%20DB;manufacturer=Mozilla%20Foundation;serial=0000000000000000;model=NSS%203
-----------------------------------------------------------
$
The "NSS Generic Crypto Services" token implements cryptographic functions and mechanisms, and the "NSS Certificate DB" token is designed to store certificates and keys and other additional information (for example, about trusting root certificates). The "NSS Certificate DB" token (internal NSS token) uses the cert8.db / cert9.db database to store certificates, and stores the private keys in the key3.db / key4.db database.
You can get information about the built-in tokens of the NSS Internal PKCS # 11 Module, including the cryptographic mechanisms supported by default, by running the following command:
$ modutil -list 'NSS Internal PKCS # 11 Module' -dbdir ~ / TEST_NSS
— Name: NSS Internal PKCS #11 Module
Library file: **Internal ONLY module**
Manufacturer: Mozilla Foundation
Description: NSS Internal Crypto Services
PKCS #11 Version 3.0
Library Version: 3.52
Cipher Enable Flags: None
Default Mechanism Flags: RSA:ECC:DH:RC2:RC4:DES:AES:CAMELLIA:SEED:SHA1:SHA256:SHA512:MD5:MD2:SSL:TLS
Slot: NSS Internal Cryptographic Services
Slot Mechanism Flags: RSA:ECC:DH:RC2:RC4:DES:AES:CAMELLIA:SEED:SHA1:SHA256:SHA512:MD5:MD2:SSL:TLS
Manufacturer: Mozilla Foundation
Type: Software
Version Number: 3.52
Firmware Version: 1.0
Status: Enabled
Token Name: NSS Generic Crypto Services
Token Manufacturer: Mozilla Foundation
Token Model: NSS 3
Token Serial Number: 0000000000000000
Token Version: 4.0
Token Firmware Version: 0.0
Access: Write Protected
Login Type: Public (no login required)
User Pin: NOT Initialized
Slot: NSS User Private Key and Certificate Services
Slot Mechanism Flags: None
Manufacturer: Mozilla Foundation
Type: Software
Version Number: 3.52
Firmware Version: 1.0
Status: Enabled
Token Name: NSS Certificate DB
Token Manufacturer: Mozilla Foundation
Token Model: NSS 3
Token Serial Number: 0000000000000000
Token Version: 0.0
Token Firmware Version: 0.0
Access: NOT Write Protected
Login Type: Public (no login required)
User Pin: Initialized
— $
The connection of an additional module for working with external PKCS # 11 devices is done by the same modutil utility:
$modutil -add < > -libfile < > [-dbdir < NSS>]For example, to work with RUToken tokens that support Russian cryptography, just run the following command:
$modutil -add "ruTokenECP" -libfile /usr/lib64/librtpkcs11ecp_2.0.so -dbdir $HOME/.netscape To get a list of modules that support a particular NSS repository, with information about each module (library, list of supported slots and tokens connected to them), run the following command:
$modutil -list [-dbdir < NSS>]
To obtain complete information about the connected tokens for a specific module, you will need to run the following command:
$modutil -list < > [-dbdir < NSS>]We already used it when we received information about the built-in (internal) NSS tokens.
And, if you can add a module, you can also remove the module from the database:
$modutil -delete < > [-dbdir < NSS>] Access to external tokens is usually PIN protected . By default, access to the built-in NSS Certificate DB token is not password protected (PIN-code). But it is not difficult to establish it, for example:
$modutil -dbdir $HOME/.netscape -changepw "NSS Certificate DB" In the same way, you can change the PIN-code of the external token.
Now is the time to move on to working with tokens, their mechanisms and objects.
Accessing PKCS # 11 Token Objects
The certutil utility is used to access objects (keys, certificates) of PKCS # 11 tokens. Note that the certutil utility is as functional as the openssl utility. To view the functionality of the certutil utility, just run the command:
$certutil -HBut now we are only interested in access to certificates and keys . Recall that when stored on a PKCS # 11 token, both are usually assigned the CKA_ID and CKA_LABEL attributes. To view the list of certificates on a particular token, run the following command:
$certutil -L [-d < NSS>] [-h < >]The real token label or one of the keywords - all or internal - can be specified as a token label. In the first case (token label all), all tokens connected to the NSS storage are searched, and in the second case (internal or "NSS Certificate DB"), the internal token of the "NSS Certificate DB" storage will be viewed.
For example, to get a list of certificates on a token labeled "LS11SW2016", the access module for which is registered in the NSS repository "/ home / a513 / tmp / TEST_NSS", run the following command:
$ certutil -L -d /home/a513/tmp/TEST_NSS -h "LS11SW2016"
Enter Password or Pin for "LS11SW2016":
Certificate Nickname                                  Trust Attributes
                                                      SSL,S/MIME,JAR/XPI
LS11SW2016:TestCA_P11                                 u,u,u
LS11SW2016:clientnss from CryptoArmPKCS               u,u,u
LS11SW2016:                                   u,u,u
LS11SW2016:Thenderbird-60.3.0 from 32                 u,u,u
LS11SW2016:  from  12_512             u,u,u
LS11SW2016:Text4Key                                   u,u,u
LS11SW2016:KmailKleopatra  GnuPG-2001               u,u,u
LS11SW2016:setvernss from CryptoArmPKCS               u,u,u
LS11SW2016:   from  12_512                       u,u,u
LS11SW2016:Test 12 512                                u,u,u
LS11SW2016:Kleopatra  GnuPG-2001                    ,,
$
The list of certificates on the token is displayed in two columns. The first column gives the nickname of the certificate, and the second contains the trust attributes of that certificate.
Moreover, if the certificate has a private key on the token where it is located, then this column will contain the value "u, u, u" .
If the attributes were not set, the column will contain the value ",,".
Certificates with “u, u, u” trust attributes (they have a private key) can be used for authentication or for generating an electronic signature.
Other trust attribute values can be set for certificates located on the embedded “NSS Certificate DB” token. But more on that later.
What is the nickname of a certificate in NSS?
<nickname> := [< >:]<CKA_LABEL>For an internal token ("NSS Certificate DB"), the token label in the nickname may be missing.
If we consider the mechanisms of PKCS # 11 tokens, we will see that the operations of generating keys, importing certificates and keys by themselves do not provide for setting the values of the CKA_ID and CKA_LABEL attributes. All this is passed on to the application software developer. But, if you use NSS utilities to work with tokens, then it turns out that they take care of this hassle.
The following command is used to view the list of private keys:
$certutil -K [-d < NSS>] [-h < >]This prints the key type, key CKA_ID and CKA_LABEL.
But back to the certificates. To view the certificate on the token in text form, just run the command:
$certutil -L [-d < NSS>] -n <nickname >For instance:
certutil -L -d '/ home / a513 / tmp / TEST_NSS' -n 'NSS Certificate DB: Test Certificate'
$ certutil -L -d "/home/a513/tmp/TEST_NSS" -n «NSS Certificate DB: »
Certificate:
Data:
Version: 3 (0x2)
Serial Number: 4096 (0x1000)
Signature Algorithm: PKCS #1 SHA-256 With RSA Encryption
Issuer: «E=ca@test.ru,OGRN=1111111111111,INN=222222222222,CN=
,OU=
,O= ,STR
EET=». , . 0",L=,ST=
,C=RU"
Validity:
Not Before: Tue Jul 07 08:40:14 2020
Not After: Fri Aug 06 08:40:14 2021
Subject: «E=test@rsa.ru,CN= »
Subject Public Key Info:
Public Key Algorithm: PKCS #1 RSA Encryption
RSA Public Key:
Modulus:
9a:9f:6c:60:94:f7:ec:f7:94:b3:51:01:e2:1a:c5:25:
28:bb:02:77:49:52:4d:99:8a:6e:26:12:55:8f:71:34:
04:da:39:24:f9:b4:6b:d0:0a:42:27:1b:b2:d7:9b:d9:
c3:76:b0:e0:1c:7c:21:ce:79:9f:d5:2b:17:63:cb:94:
5b:d9:b2:53:ff:b9:bf:4f:3d:cf:b7:8d:8a:37:ba:02:
8c:da:d2:0d:fd:46:5b:45:1d:95:64:07:6e:fa:88:0d:
a4:bd:b3:4a:ed:99:f1:fd:73:c5:b6:05:a0:e5:ee:6b:
c3:83:5b:d0:64:05:77:6a:18:d8:c8:28:a1:d0:06:41:
23:0d:bb:87:8a:77:14:fb:6c:5d:af:db:2b:0b:11:a3:
16:1b:2b:05:18:26:a9:b5:00:4a:40:da:b3:05:aa:2a:
67:c0:18:0d:03:f7:d2:b9:ba:7c:36:f9:95:2e:56:81:
a3:09:99:5e:20:10:95:38:10:c9:c1:6f:c3:6c:a6:1b:
78:51:c6:e4:4f:11:bc:c0:22:4b:ca:59:16:f2:45:95:
0d:fd:7b:46:cf:c7:ac:1c:3d:d7:26:fc:ad:80:3e:2c:
21:93:29:32:a6:79:e2:a8:c6:e9:5e:45:34:d3:38:57:
8f:cd:95:5e:91:09:84:34:21:d2:16:29:69:75:4d:a3
Exponent: 65537 (0x10001)
Signed Extensions:
Name: Certificate Basic Constraints
Critical: True
Data: Is not a CA.
Name: Certificate Key Usage
Usages: Digital Signature
Key Encipherment
Key Agreement
Name: Certificate Type
Data: <SSL Client,S/MIME>
Name: Extended Key Usage
TLS Web Client Authentication Certificate
E-Mail Protection Certificate
Name: Certificate Subject Key ID
Data:
26:a1:b3:98:1c:fe:62:ba:23:81:96:37:3f:08:bd:70:
d6:f2:b1:46
Name: Certificate Authority Key Identifier
Key ID:
0a:b6:f6:87:64:1d:8e:b3:63:08:29:9f:21:59:ad:47:
d8:ea:07:f4
Issuer:
Directory Name: «E=ca@test.ru,OGRN=1111111111111,INN=22222222
2222,CN= ,OU=
,O=
,STREET=».
, . 0",L=,ST=
,C=RU"
Serial Number:
00:a2:9b:22:32:3e:a7:3d:d8
Name: Certificate Subject Alt Name
RFC822 Name: «test@rsa.ru»
Name: Certificate Issuer Alt Name
Error: Parsing extension: Certificate extension value is invalid.
Data: Sequence {
}
Signature Algorithm: PKCS #1 SHA-256 With RSA Encryption
Signature:
2f:75:7e:71:9e:15:5c:97:fe:a2:e1:2a:52:39:56:55:
e0:62:60:bc:5f:6d:c2:b6:ec:cd:8b:10:b3:b1:3f:e5:
d6:d1:5f:a5:fa:61:c1:ce:3e:db:6a:2f:b2:13:46:8d:
67:cf:18:09:61:97:01:45:bc:99:bb:0c:d6:0a:a3:03:
87:0a:8e:10:3a:d5:e3:94:6d:4a:24:fa:c3:40:0b:43:
c2:3b:00:56:06:c4:d2:fc:b2:7e:e9:00:e5:2f:4b:e2:
3a:91:49:ce:f8:c3:60:ec:01:74:d8:1a:3b:af:e6:f6:
91:db:c5:f1:d7:de:be:18:38:47:41:8a:e2:ef:80:91:
10:54:41:ae:55:22:6f:d7:8c:fa:46:b6:b6:2a:ee:6a:
0c:c9:03:18:af:4e:93:6c:61:f3:b4:78:0c:61:93:f1:
d8:1b:00:c3:e5:29:9a:08:0a:f8:31:67:88:3d:c3:88:
7a:60:c0:c4:52:94:25:56:e5:a3:df:7d:58:c5:df:9a:
c7:22:7e:2c:f6:fb:2c:bf:b7:7f:c5:ca:2b:0f:8c:20:
77:b9:1f:e0:62:5a:3d:d4:6f:12:ea:c8:51:67:a5:75:
ad:e9:ac:9e:4e:2e:2d:34:80:e7:d8:64:f6:8f:2f:33:
32:1f:8b:bc:9c:e8:77:4a:ee:7b:84:31:ec:28:e9:70
Fingerprint (SHA-256):
96:F4:A5:FA:6D:8A:F8:7E:A6:10:49:BD:43:34:C1:92:C6:7D:FF:63:41:8E:69:C0:AC:34:6B:CB:63:7B:56:31
Fingerprint (SHA1):
B6:91:9B:C6:7A:45:9C:92:FD:E7:C7:33:00:FA:91:DF:7D:5F:00:21
Mozilla-CA-Policy: false (attribute missing)
Certificate Trust Flags:
SSL Flags:
User
Email Flags:
User
Object Signing Flags:
User
$
If the viewed certificate on the same token has a private key, then the Certificate Trust Flags will have the value User:
Certificate Trust Flags:
SSL Flags:
User
Email Flags:
User
Object Signing Flags:
User
To export a certificate from a token to standard output, just add an additional "-a" or "-r" parameter. The "-a" option instructs to output the certificate in PEM format:
$ certutil -L -d '/ home / a513 / tmp / TEST_NSS' -n 'NSS Certificate DB: Test Certificate' -a
-----BEGIN CERTIFICATE-----
MIIGiTCCBXGgAwIBAgICEAAwDQYJKoZIhvcNAQELBQAwggF2MQswCQYDVQQGEwJS
VTEsMCoGA1UECAwj0JzQvtGB0LrQvtCy0YHQutCw0Y8g0L7QsdC70LDRgdGC0Ywx
GzAZBgNVBAcMEtCl0LDQsdGA0LDQs9GA0LDQtDEqMCgGA1UECQwh0YPQuy4g0KXQ
sNCy0YDQvtCy0YHQutCw0Y8sINC0LiAwMTAwLgYDVQQKDCfQo9C00L7RgdGC0L7Q
stC10YDRj9GO0YjQuNC5INCm0LXQvdGC0YAxOzA5BgNVBAsMMtCe0YLQtNC10Lsg
0KPQtNC+0YHRgtC+0LLQtdGA0Y/RjtGI0LjQuSDQptC10L3RgtGAMTAwLgYDVQQD
DCfQo9C00L7RgdGC0L7QstC10YDRj9GO0YjQuNC5INCm0LXQvdGC0YAxGjAYBggq
hQMDgQMBARIMMjIyMjIyMjIyMjIyMRgwFgYFKoUDZAESDTExMTExMTExMTExMTEx
GTAXBgkqhkiG9w0BCQEWCmNhQHRlc3QucnUwHhcNMjAwNzA3MDg0MDE0WhcNMjEw
ODA2MDg0MDE0WjBMMS4wLAYDVQQDDCXQotC10YHRgtC+0LLRi9C5INGB0LXRgNGC
0LjRhNC40LrQsNGCMRowGAYJKoZIhvcNAQkBFgt0ZXN0QHJzYS5ydTCCASIwDQYJ
KoZIhvcNAQEBBQADggEPADCCAQoCggEBAJqfbGCU9+z3lLNRAeIaxSUouwJ3SVJN
mYpuJhJVj3E0BNo5JPm0a9AKQicbsteb2cN2sOAcfCHOeZ/VKxdjy5Rb2bJT/7m/
Tz3Pt42KN7oCjNrSDf1GW0UdlWQHbvqIDaS9s0rtmfH9c8W2BaDl7mvDg1vQZAV3
ahjYyCih0AZBIw27h4p3FPtsXa/bKwsRoxYbKwUYJqm1AEpA2rMFqipnwBgNA/fS
ubp8NvmVLlaBowmZXiAQlTgQycFvw2ymG3hRxuRPEbzAIkvKWRbyRZUN/XtGz8es
HD3XJvytgD4sIZMpMqZ54qjG6V5FNNM4V4/NlV6RCYQ0IdIWKWl1TaMCAwEAAaOC
AkcwggJDMAwGA1UdEwEB/wQCMAAwCwYDVR0PBAQDAgOoMBEGCWCGSAGG+EIBAQQE
AwIFoDAdBgNVHSUEFjAUBggrBgEFBQcDAgYIKwYBBQUHAwQwHQYDVR0OBBYEFCah
s5gc/mK6I4GWNz8IvXDW8rFGMIIBsAYDVR0jBIIBpzCCAaOAFAq29odkHY6zYwgp
nyFZrUfY6gf0oYIBfqSCAXowggF2MQswCQYDVQQGEwJSVTEsMCoGA1UECAwj0JzQ
vtGB0LrQvtCy0YHQutCw0Y8g0L7QsdC70LDRgdGC0YwxGzAZBgNVBAcMEtCl0LDQ
sdGA0LDQs9GA0LDQtDEqMCgGA1UECQwh0YPQuy4g0KXQsNCy0YDQvtCy0YHQutCw
0Y8sINC0LiAwMTAwLgYDVQQKDCfQo9C00L7RgdGC0L7QstC10YDRj9GO0YjQuNC5
INCm0LXQvdGC0YAxOzA5BgNVBAsMMtCe0YLQtNC10Lsg0KPQtNC+0YHRgtC+0LLQ
tdGA0Y/RjtGI0LjQuSDQptC10L3RgtGAMTAwLgYDVQQDDCfQo9C00L7RgdGC0L7Q
stC10YDRj9GO0YjQuNC5INCm0LXQvdGC0YAxGjAYBggqhQMDgQMBARIMMjIyMjIy
MjIyMjIyMRgwFgYFKoUDZAESDTExMTExMTExMTExMTExGTAXBgkqhkiG9w0BCQEW
CmNhQHRlc3QucnWCCQCimyIyPqc92DAWBgNVHREEDzANgQt0ZXN0QHJzYS5ydTAJ
BgNVHRIEAjAAMA0GCSqGSIb3DQEBCwUAA4IBAQAvdX5xnhVcl/6i4SpSOVZV4GJg
vF9twrbszYsQs7E/5dbRX6X6YcHOPttqL7ITRo1nzxgJYZcBRbyZuwzWCqMDhwqO
EDrV45RtSiT6w0ALQ8I7AFYGxNL8sn7pAOUvS+I6kUnO+MNg7AF02Bo7r+b2kdvF
8dfevhg4R0GK4u+AkRBUQa5VIm/XjPpGtrYq7moMyQMYr06TbGHztHgMYZPx2BsA
w+UpmggK+DFniD3DiHpgwMRSlCVW5aPffVjF35rHIn4s9vssv7d/xcorD4wgd7kf
4GJaPdRvEurIUWelda3prJ5OLi00gOfYZPaPLzMyH4u8nOh3Su57hDHsKOlw
-----END CERTIFICATE-----
For DER output, use the "-r" parameter.
Install a certificate for a token
Suppose you have a PKCS # 12 container with a personal certificate and private key that you generated using OpenSSL. To export a personal certificate to the NSS repository, use the pk12util command that looks like this:
$pk12util -i < pkcs12> [-d < NSS>] [-h < >]If you want to import a certificate for a specific token, then you need to set its label. Let's note one more peculiarity. If the container contains root certificates, then they will be saved on the internal token "NSS Certificate DB". This does not set the default trust attributes. If, for some reason, it is required to set trust attributes for certain certificates of registration authorities (root certificates) or SSL certificates, then the certutil utility of the following form is used:
$certutil -M -n <nickname-> -t < > [-d < NSS>]For each certificate, there are three available trust categories, expressed in the following order: SSL, S / MIME, Code Signing for each trust setting:
< > := x,y,z , - x - attributes for SSL,
- y - attributes for S / MIME,
- z - attributes for code signing.
Each x, y and z position can be empty (use ,, no explicit trust) or contain one or more attributes:
- p - Valid peer;
- P - trusted node (implies p)
- c - valid certificate of the registration authority (Valid CA)
- T - trusted CA for issuing client certificates (implies c)
- C - trusted CA for issuing server certificates (SSL only) (implied c)
Note that not all foreign tokens allow the operation of importing a private key to a token.
To install a simple certificate from a file, use the certutil utility of the following form:
$certutil -A -n < > -t < > [-d < NSS>] [-h < >] [-a] [-i < >]Unfortunately, in this context, <certificate label> is not equivalent to the certificate nickname discussed above. Here, the certificate label matches just CKA_LABEL, just labels without specifying a token label. Some kind of inconsistency.
By default, the certificate is assumed to be in a DER encoded file. If the certificate is PEM-encoded, then the "-a" parameter must be specified. If the "-i" parameter is not specified, then the certificate will be taken from the standard input (stdin). By default, certificates are installed to the "NSS Certificate DB" token, but you can install the certificate to an external token ("-h" parameter). When installing a certificate on an external token, the certificate will be installed on both the internal token ("NSS Certificate DB") and the external token. In this case, the trust attributes for the external token will be ignored, and a warning will be issued: "could not change trust on certificate".
A duplicate certificate on an internal token can be deleted if desired.
To remove a certificate from any token, use the following command:
$certutil -D [-d < NSS>] -n <nickname->For example, to remove the certificate with the label (CKA_LABEL) "User1" from the RuTokenECP20 token, just run the following command:
$certutil -D -d /home/a513/tmp/TEST_NSS -n "RuTokenECP20:1"When a certificate is deleted, its private key is not deleted (if there is one, of course). To delete a private key, you need to run a command like:
$certutil -F [-k < >] [-d < NSS>] -n <nickname->,
< > := rsa|dsa|ec
Now that we have an NSS repository, tokens with personal certificates, we can work with an electronic signature.
Formation and verification of electronic signature
There are three utilities for working with electronic signatures in the NSS package.
To generate an electronic signature, the p7sign utility is used:
$pksign -k <nickname  > [-d < NSS>] [-e] [-i <  >] [-o <   >],
<nickname  > := [< >:]<CKA_LABEL>
Unfortunately, the utility generates a signature without reference to the time of its formation. But this is easily fixed. It is enough to add a line to the SignFile function in the p7sign.c utility with a call to the function for adding the signature generation time:
SignFile(FILE *outFile, PRFileDesc *inFile, CERTCertificate *cert,
         PRBool encapsulated)
{
. . .
    /* XXX Need a better way to handle that usage stuff! */
    cinfo = SEC_PKCS7CreateSignedData(cert, certUsageEmailSigner, NULL,
                                      SEC_OID_SHA1,
                                      encapsulated ? NULL : &digest,
                                      NULL, NULL);
    if (cinfo == NULL)
        return -1;
/*   */
    SEC_PKCS7AddSigningTime(cinfo);

    if (encapsulated) {
        SEC_PKCS7SetContent(cinfo, (char *)data2sign.data, data2sign.len);
    }
 . . .
}
Now an electronic signature will be generated in the CAdes-BES format.
In NSS, it is accepted that a certificate and its private key are stored on the same token and their labels (CKA_LABEL), as well as CKA_ID, are the same. Accordingly, the nickname of the private key and the nickname of the certificate itself are the same. Recall that the presence of a private key in a certificate can be found by the value "u, u, u" of the trust attributes of the viewed certificate (command certutil -L).
By default, the p7sign utility generates a detached signature. If an appended signature is required, the "-e" parameter must be specified. It should be borne in mind that the signature will not be generated if in the NSS store, on its internal token, there is no root certificate chain for the signer's certificate or the trust attributes for them are not set.
The p7verify utility is used to verify the electronic signature:
$p7verify -c < > -s < > [-d < NSS>] [-u < >] The "-u" parameter is of interest. It instructs to check the type of the signer's certificate and if it does not match the specified type, then the signature is invalidated.
The value <certificate usage> can have the following values:
0 - certUsageSSLClient
1 - certUsageSSLServer
2 - certUsageSSLServerWithStepUp
3 - certUsageSSLCA
4 - certUsageEmailSigner
5 - certUsageEmailRecipient
6 - certUsageObjectSigner
7 - certUsageUserCertImport
8 - certUsageVerifyCA
9 - certUsageProtectedObjectSigner
10 - certUsageStatusResponder
11 - certUsageAnyCA
12 - certUsageIPsec
The default is certUsageEmailSigner (4).
The p7content utility allows you to get information about the time of signing the document, who signed it and the email address of the signer. If the signature was attached, then the content itself that was signed is also retrieved.
The p7content utility has the following format:
$p7content [-d < NSS>] [-i < >] [-o < >]For instance:
$ p7content -d "sql:/home/a513/tmp/TEST_NSS" -i "/home/a513/DATE_NSS.txt.p7s"
Content printed between bars (newline added before second bar):

#     ,    "-" ()
#
---------------------------------------------
  NSS

---------------------------------------------
Content was not encrypted.
Signature is valid.
The signer's common name is  1
The signer's email address is user1@mail.ru
Signing time: Fri Jul 17 10:00:45 2020
There were certs or crls included.
$
These are just a few of the utilities included in the NSS package. Naturally, both OpenSSL and NSS have utilities (or commands) that allow you to create certificate requests and issue certificates, i.e. it is possible to deploy a fully functional CA as it is done using openssl. You can raise the tls server with the selfserv utility (analogue of openssl s_server) and use the tls client tstclnt (analogue of openssl s-client) and much, much more.
By the way, the list of ciphersuites in NSS can be obtained with the listsuites utility. In OpenSSL, the openssl ciphers command serves this purpose. The mapping of OpenSSL cipher suite names to IANA cipher suits names can be found here .
Indeed, OpenSSL and NSS are two sides (two types of interfaces for the same protocols and standards) of the same coin - the Public Key Infrastructure.
If there is interest in this topic, the story will continue.
In conclusion, I would also like to dwell on the graphical shell for NSS. There are various graphical shells for OpenSSL. We will mention only two of them - XCA and CAFL63 .
Guinsspy GUI for the NSS package
The first question is what to develop on? It was decided in Python.
The second question is what to write a graphical interface on? The answer is Tkinter.
The gui was originally developed on PAGE . But then they moved away from him. But the context remained.
The utility's functionality is based on the utilities and commands discussed above. In addition to them, another function "Create certificate request" was added, which is based on the "certutil -R" command:
It was decided to use the Breeze theme for python3 and the Arc theme for python2 as the theme for the widgets, since the latter lacks the Breeze theme. To do this, you need to install a package with themes for pythona:
$pip install ttkthemesWe also need the fsb795 package to work with certificates:
$pip install fsb795The NSS utilities that guinsspy is based on very often ask for passwords or PINs through the console. The only way to interact with them through the GUI is using the pexpect package:
$pip install pexpectAs an example of using the pexpect package, here is the code for importing a PKCS # 12 container:
importP12
def importP12(frameManager):
    global readpw
    global filename
    tokname = frameManager.STCombobox1.get()
    fp12 = frameManager.SEntry1.get()
    if (fp12 == () or fp12 == ''):
        tkMessageBox.showinfo(title="  PKCS#12", message='  \n')
        return (-1, "", "")
    filename = fp12
    if sys.platform != "win32":
        cmd_import_p12 = '"' + patch_win + 'pk12util" -i "' + fp12 + '" -h "' + tokname + '"  -d "' + NSSname + '"'
        id = pexpect.spawn(cmd_import_p12, timeout=1)
    else:
        cmd_import_p12 = '"' + patch_win + 'pk12util" -i "' + fp12 + '" -h "'  + tokname + '"  -d "' + NSSname + '"'
        id = pexpect.popen_spawn.PopenSpawn(cmd_import_p12, timeout=10)
    while(True):
        ret = id.expect(["Enter Password or Pin", "Enter password for PKCS12 file",pexpect.EOF, pexpect.TIMEOUT])
        if (ret == 0 or ret == 1):
            root.update()
            if (ret == 0):
                password('', tokname, 0)
                pasP11 = readpw
            else:
                password('', os.path.basename(fp12), 1)
                pasP12 = readpw
            if (readpwok == 0):
                if sys.platform != "win32":
                    id.close()
                return (-3, fp12, "")
            if sys.platform != "win32":
                id.send(readpw)
                id.send("\r")
            else:
                id.sendline(readpw)
            lseek = 1
        elif (ret == 2):
            break
        elif (ret == 3):
            break
            if sys.platform != "win32":
                id.close()
            return (-1, fp12, "")
    if sys.platform != "win32":
        res = id.before.decode('UTF-8')
        id.close()
    else:
        res = id.before.decode('UTF-8')
    if (res.find("PKCS12 IMPORT SUCCESSFUL") != -1):
        ret = 0
    elif (res.find("SEC_ERROR_BAD_PASSWORD") != -1):
        ret = -1
        return (ret, fp12, "")
    else:
        ret = -2
    return (ret, fp12, res)
An endless loop (while (True) :) in the procedure waits for one of four events to occur:
ret = id.expect(["Enter Password or Pin", "Enter password for PKCS12 file",pexpect.EOF, pexpect.TIMEOUT])The first event is associated with an invitation to enter a password or PIN ("Enter Password or Pin").
When it occurs, a window for entering a PIN-code will be displayed on the screen (left window in the screenshot):
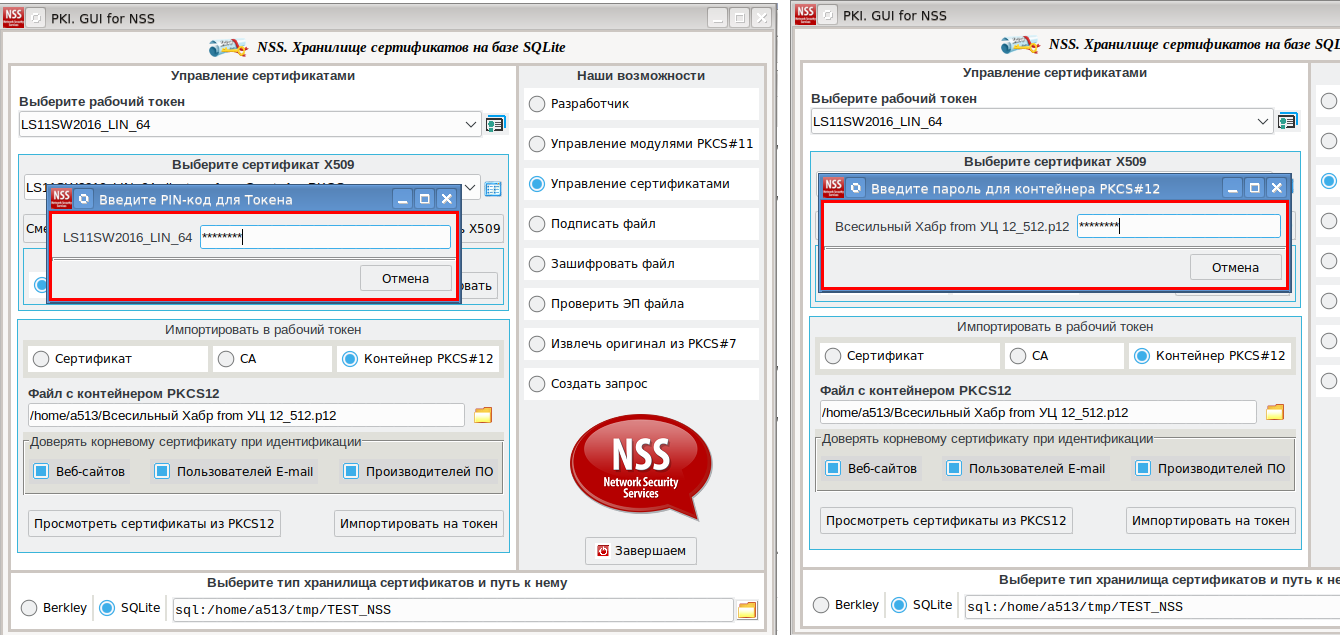
The second event is associated with entering the password for the PKCS # 12 container ("Enter password for PKCS12 file"). When it occurs, the screen will display a window for entering the password for the file with the PKCS # 12 container (right window in the screenshot).
The third event is associated with the termination of the pk12util utility (pexpect.EOF), and the fourth event is associated with the termination of the utility by timeout (pexpect.TIMEOUT).
The source code for guinsspy can be found here . The distribution kit of the NSS package for working with PKCS # 11 tokens with Russian cryptography for the Linux x86_64 platform can be found there.
To test Russian crypto tokens, copy the NSS_GOST_3.52.1_Linux_x86_64 folder to your home directory. Create a guinsspy_gost.sh script:
export LD_LIBRARY_PATH=~/NSS_GOST_3.52.1_Linux_x86_64:$LD_LIBRARY_PATH
export PATH=~/NSS_GOST_3.52.1_Linux_x86_64:$PATH
python3 guinsspy.py
Now run this script and work with Russian tokens.
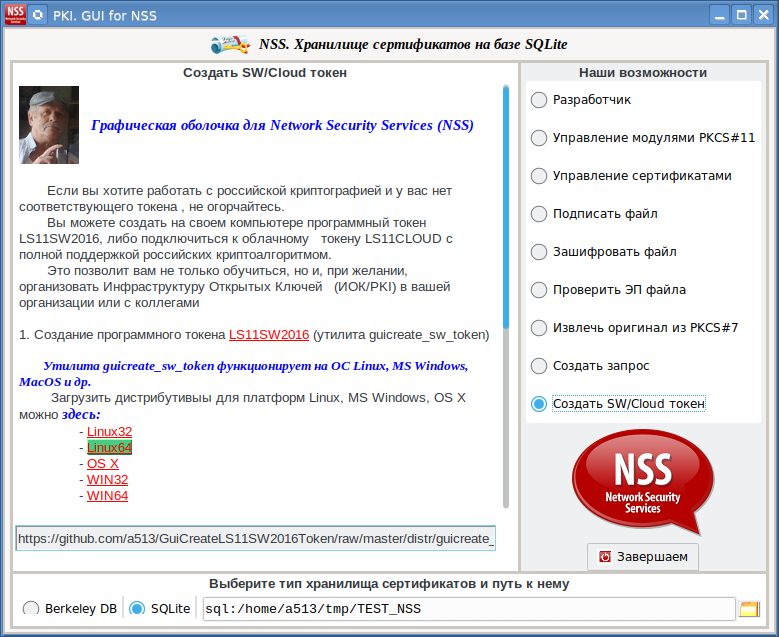
If you do not have a token with Russian cryptography at hand, then go to the "Create SW / Cloud token" tab, which will tell you how to create a software token on your computer or connect to a cloud token :
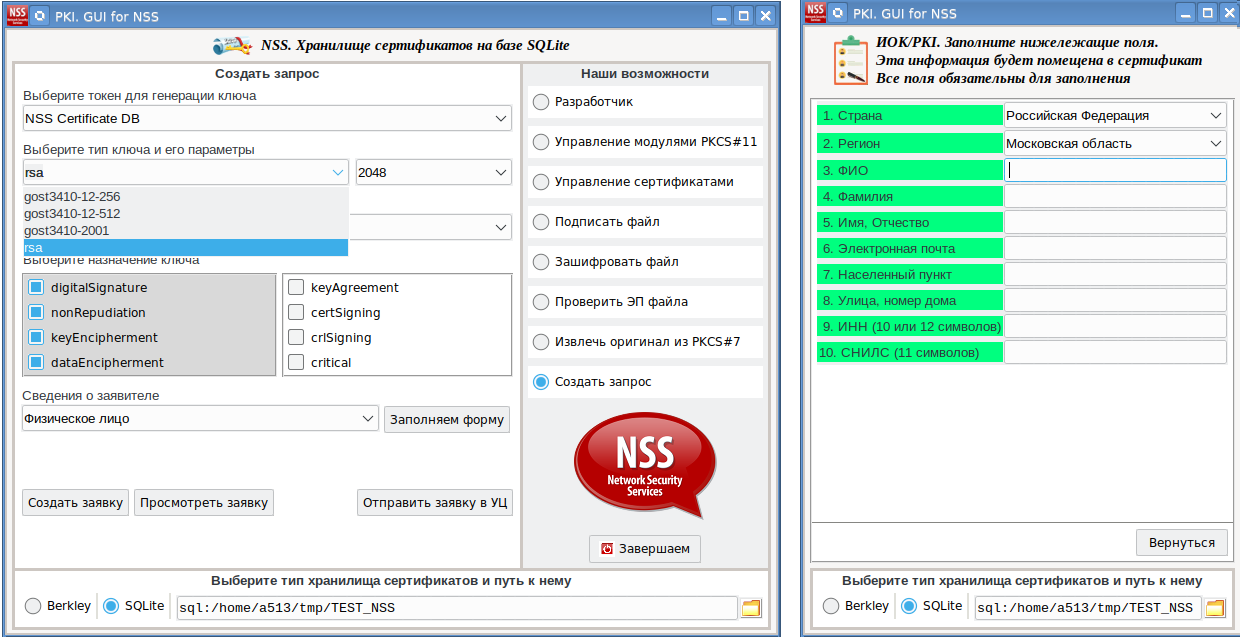
And finally, screenshots of creating a certificate
request : Received request can be transferred to CAFL63 , issued there a certificate, installed on the token on which the private key was created. And then use this certificate, for example, to sign documents.