I decided to find out if it is possible to buy a comfortable keyboard in 2020. Short answer: I had to solder myself.
I recently bought a Vortex Core RGB mechanical keyboard . I liked the mechanics, the new arrangement of cursors and parentheses, I'm normally used to fewer keys. But I didn’t have enough typing stability, so I started running the simulator. I had to put my hands "correctly", but they began to get tired of the unnaturally straight position.
I realized that the typos are a keyboard layout issue, not mine. The keys are shifted, as in a typewriter a hundred years ago, and not as convenient for our hand: exactly one above the other so as not to move our fingers to the side. The keyboards have changed a lot in appearance, but they did not add meaning. Even the iPhone copies the shift of the buttons, only in the Russian layout it gives up and draws the buttons exactly.

I figured I needed a new keyboard, but this time it should be comfortable, designed to be handy. Let it be very strange, I am ready to break all habits, if only it is convenient with the instrument, for which I spend 8-10 hours a day.
What am I looking for? To summarize the article on keyboard design:
- cursors right under the right hand;
- to press the brackets not with the little finger, but somehow more convenient;
- do not reach for numbers and signs;
- anatomically located keys so that the finger does not move left and right, but only vertically;
- more buttons for the thumb, just one space is not enough for him;
- bending the keyboard so that you can put your arms out of your shoulders correctly;
- entertainment and pleasure.
In search of ergonomics
Having knocked down the requirements, I started looking for a new keyboard.
- Microsoft Sculpt, , .

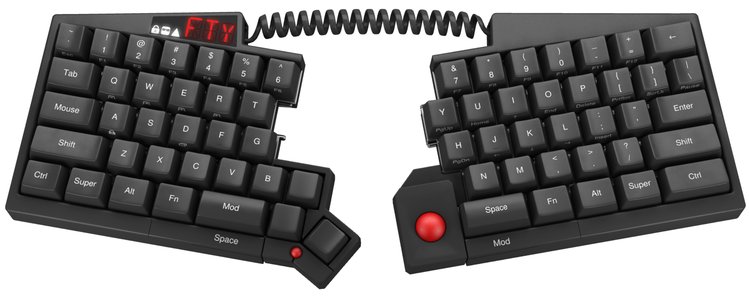
- , , , Ultimate hacking keyboard.
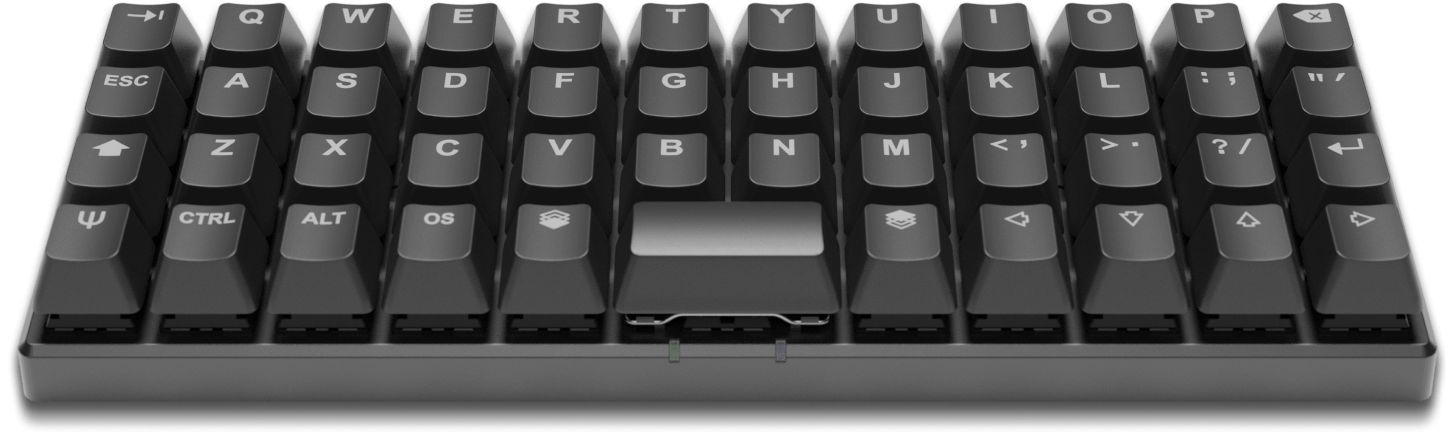
- , , , Plank EZ. , , .
- , , Levinson. , ?
, ? .
, . - Model 01 keyboard , , . $300, , .
- Ergodox EZ : , , . — $300+.
- , , . Atreus, ( -).
Half of these keyboards can only be purchased disassembled, you will have to solder yourself.
Making a keyboard is easy enough: you need a controller, buttons, keycaps, and a board to hold everything on. Even the board is not necessary, the buttons can be connected to the controller with wires.
It's also simple with software: the controller is an Arduino, and for it there is an open source QMK , which has become a standard with a bunch of functions.
DIY: all that remains is to solder
The market for build keyboards is quite diverse. There are ready-made boards and cases on sale, all that remains is to solder the buttons and the controller.
- Helix has a lot of buttons .
- Iris is average .
- Kyria has few buttons .
- Jian has very little , but it is adapted to the Russian layout.

- The fingers do not move in a straight line, but in an arc, is it possible to put the keys like this? Yes, if you have Dactyl-ManuForm. It will be necessary to print the case on a 3D printer, there is no board at all inside, everything is on wires. The assembly is not the easiest one .
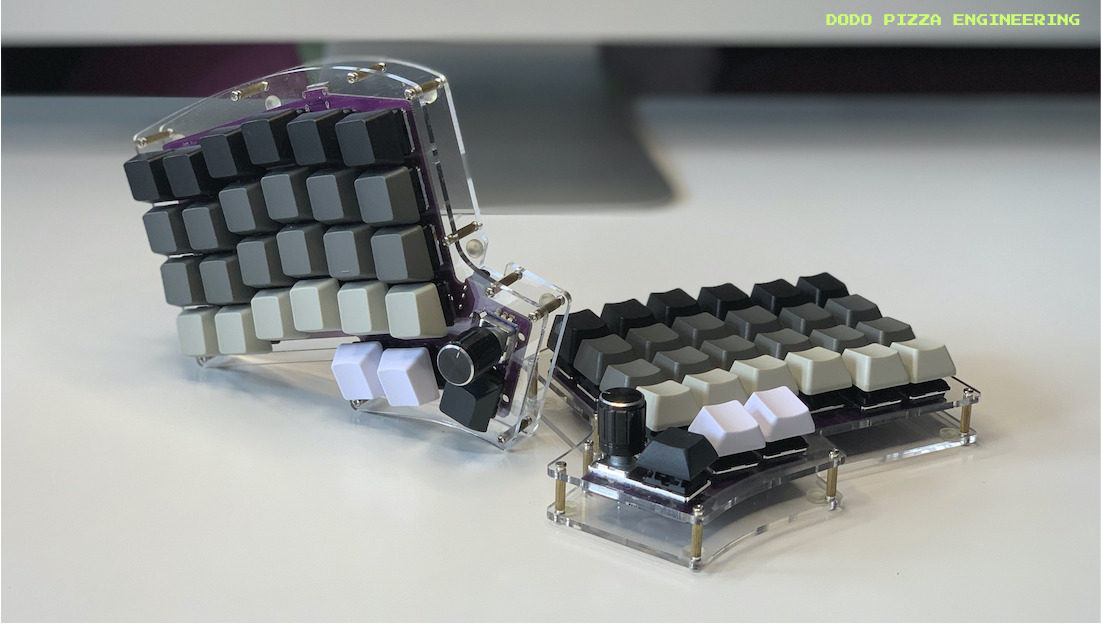
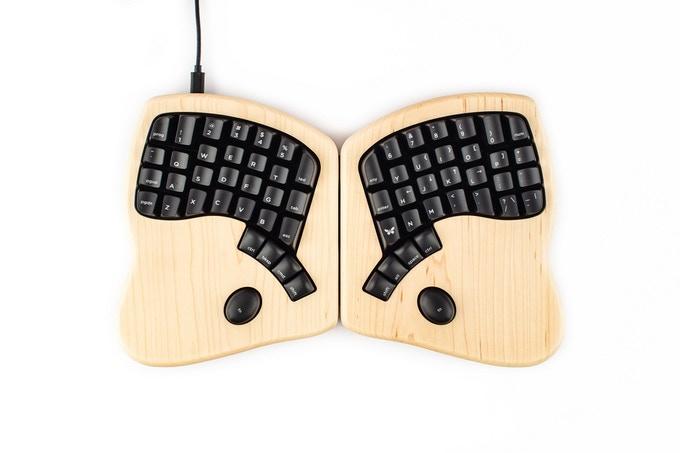
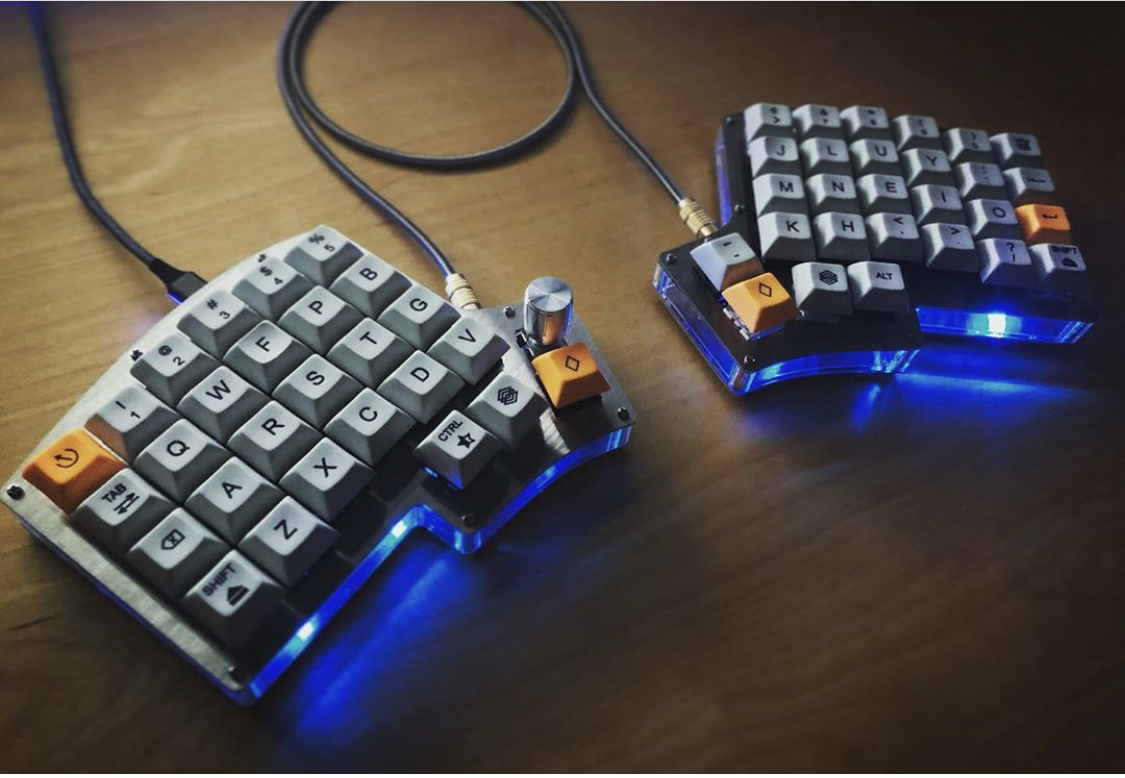
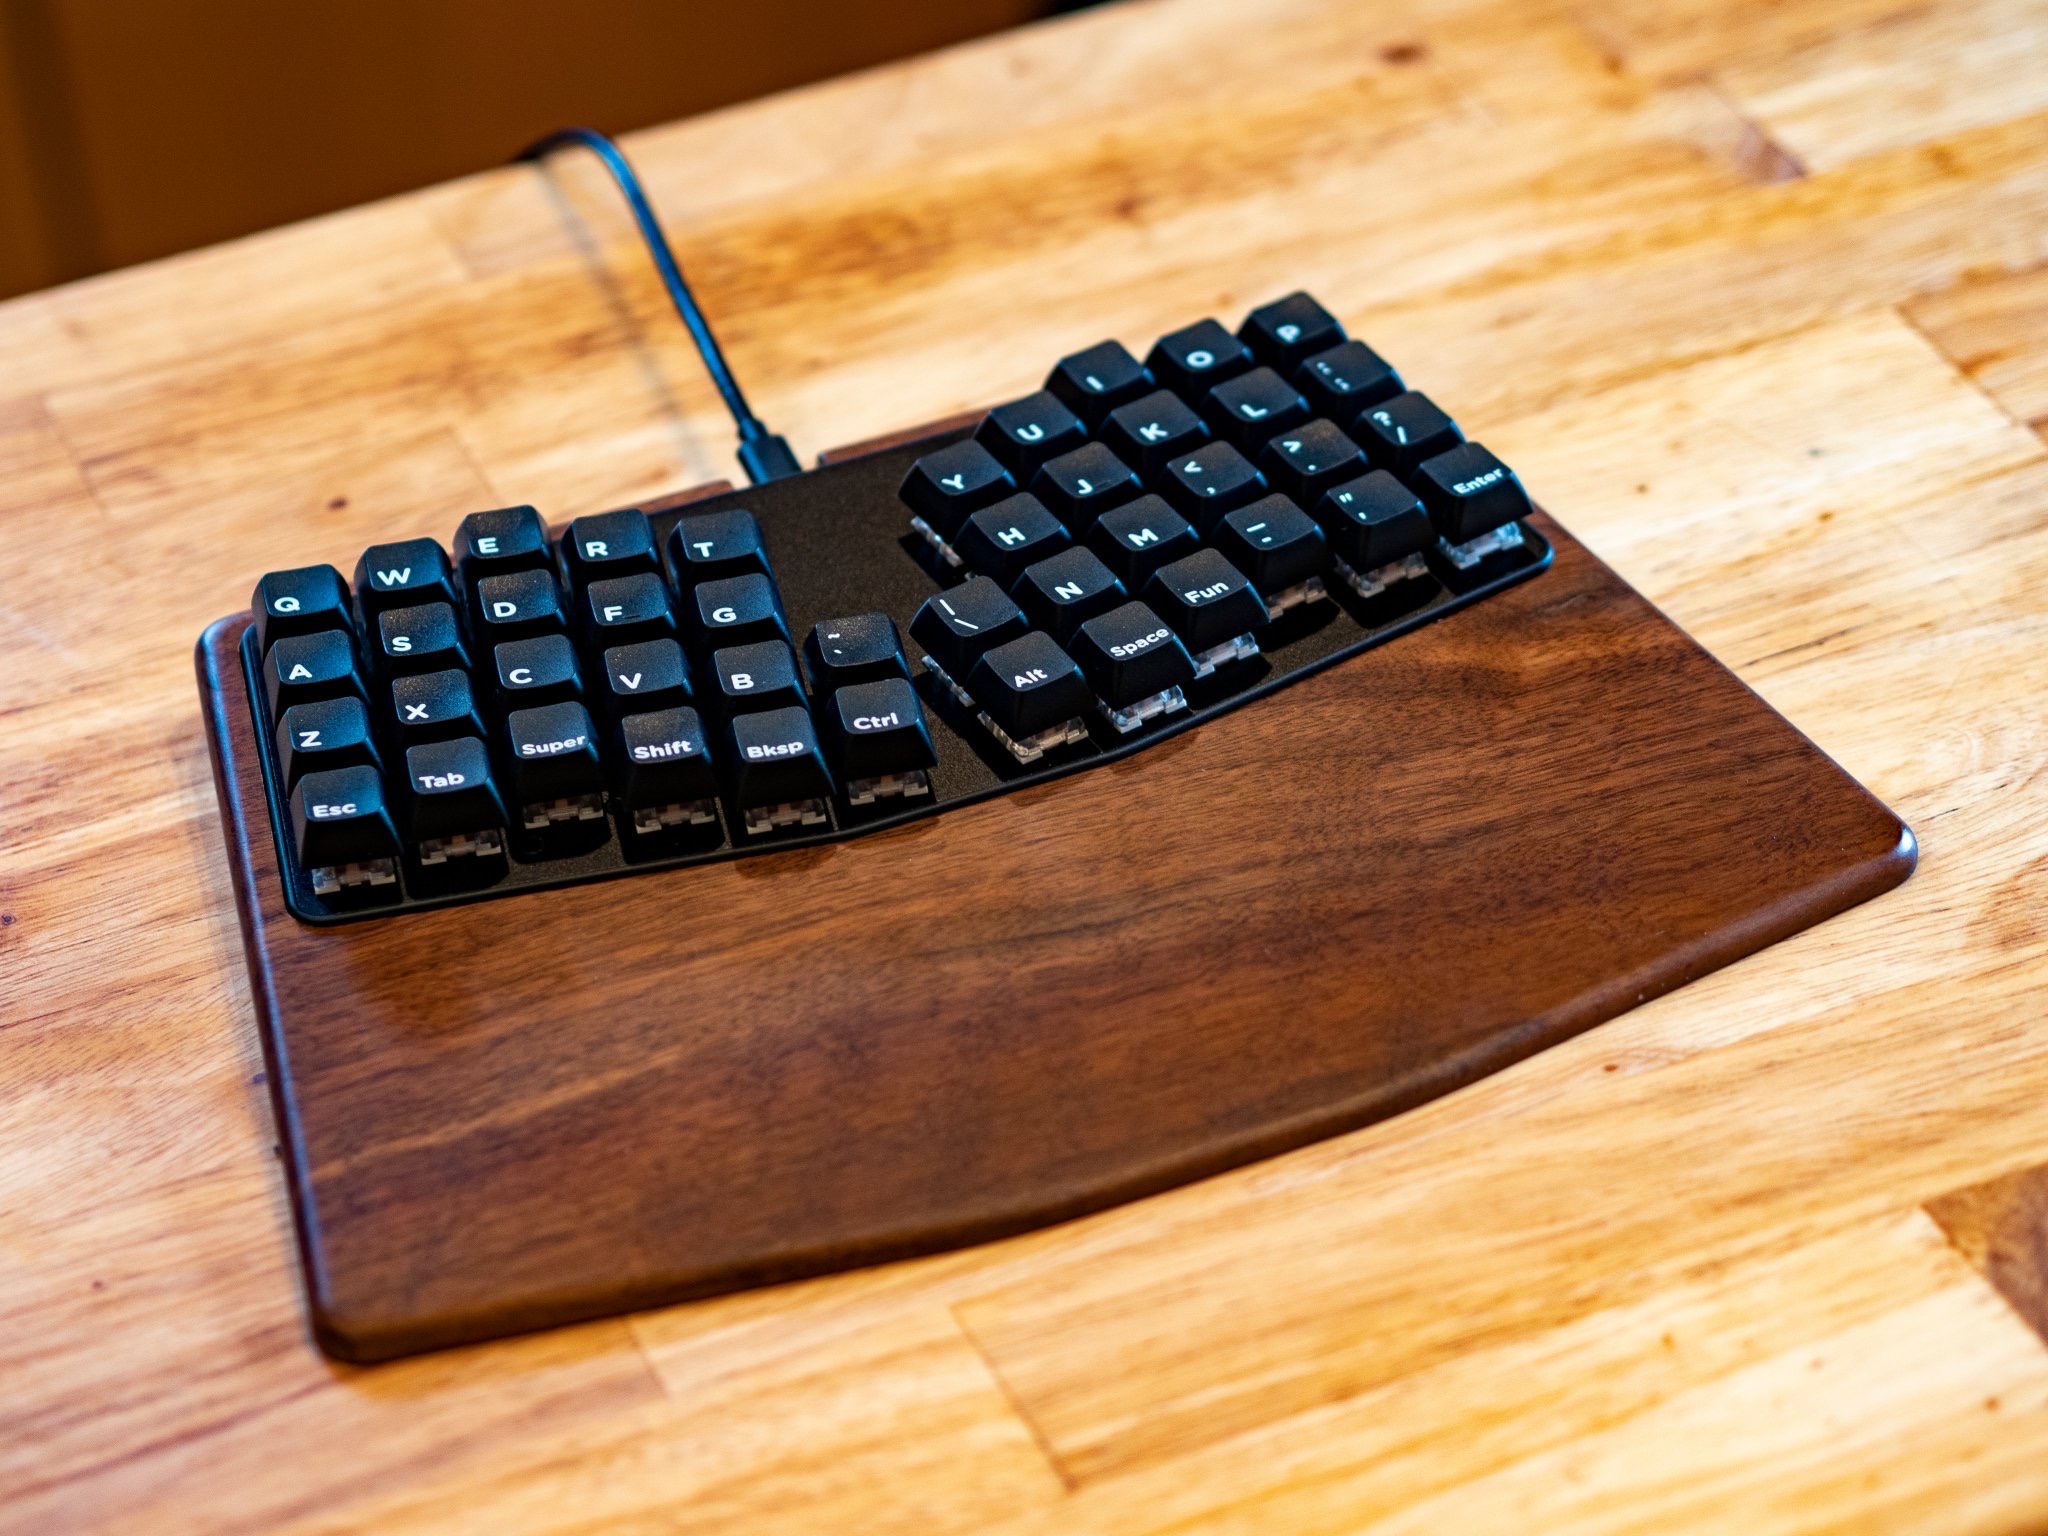
My favorite was the Iris keyboard (number 2 on this list). Boards of this type have been made for a long time, by the fourth version the board no longer needs a separate controller, the ATmega32U4 is built-in and does not take up space.
The keyboard has nice features: you can tilt, the keys under the thumb can be replaced with enlarged ones or put a couple of twists. Ordering.
Iris Keyboard: build yourself
How much does it cost?
You won't be able to buy all the components in one place. The board and the case are on the site from America , buttons on Gickboards , caps on Aliexpress . The buttons can also be found on Avito, in Moscow there is always plenty to choose from. All together it came out for 14 thousand rubles (but initially I forgot to buy the sidewall, which cost another 2 thousand).
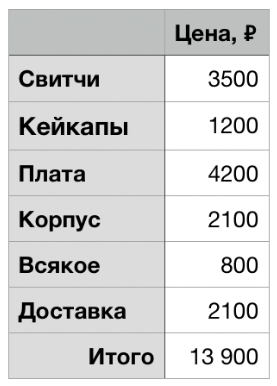
You can make it cheaper: do not buy a case, but take the switches on Avito, so it turns out to keep within 10 thousand rubles.
You can make it more expensive: take the coolest things. A set of beautiful keys can easily cost $ 150, the cool Zilents switches will cost another $ 60. This does not include shipping, which usually costs about $ 30 per item. As a result, you can assemble a keyboard for 30 thousand rubles (≈ $ 450, then evaluate at the rate).
How to solder it?
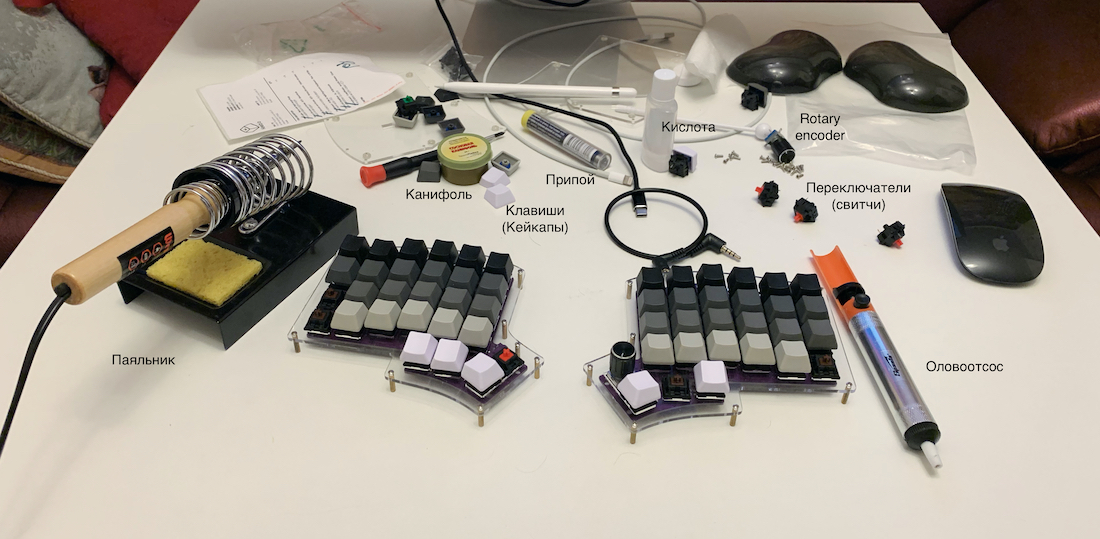
While all the parts were driving, I looked at the soldering course , everything is simple there. To work you need a little:
- a simple soldering iron and a stand for it;
- desoldering pump to re-solder buttons;
- solder to hold together;
- flux to clean the soldering iron;
- acid to prepare the board for soldering.
Desktop in progress
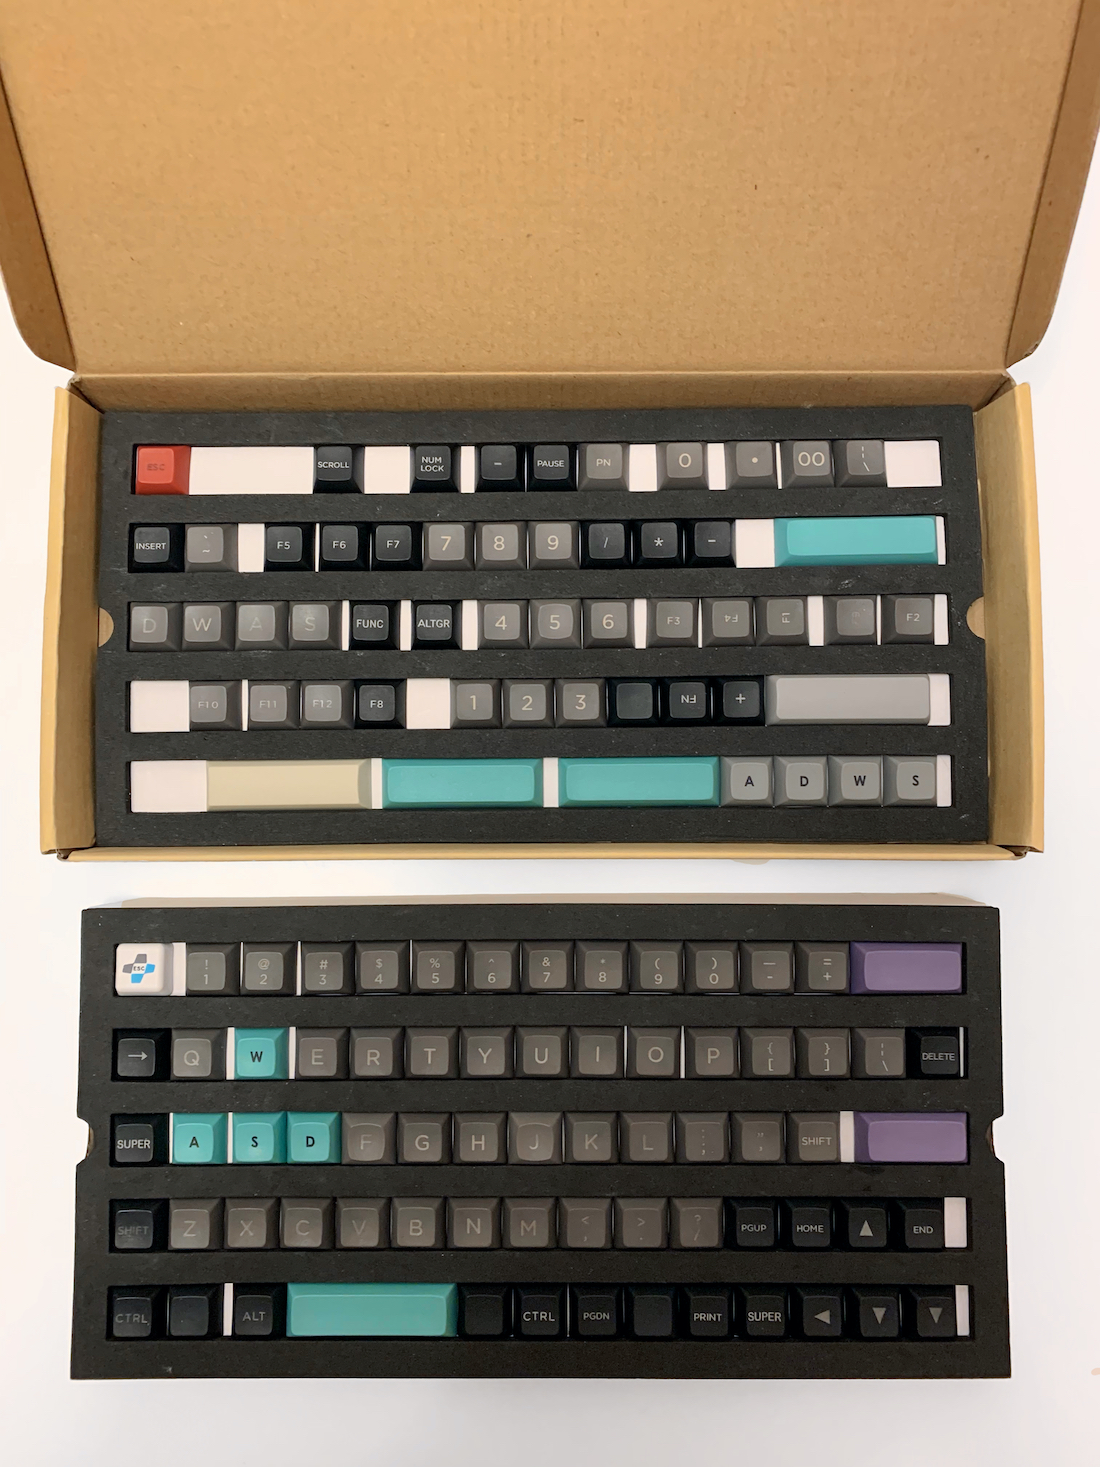
I received a flat envelope in my mail. For a couple of weeks I managed to forget what I ordered, so I was very surprised by the cardboard-like case. Strange, but there is something in this. As a gift, they put a keychain on one key.
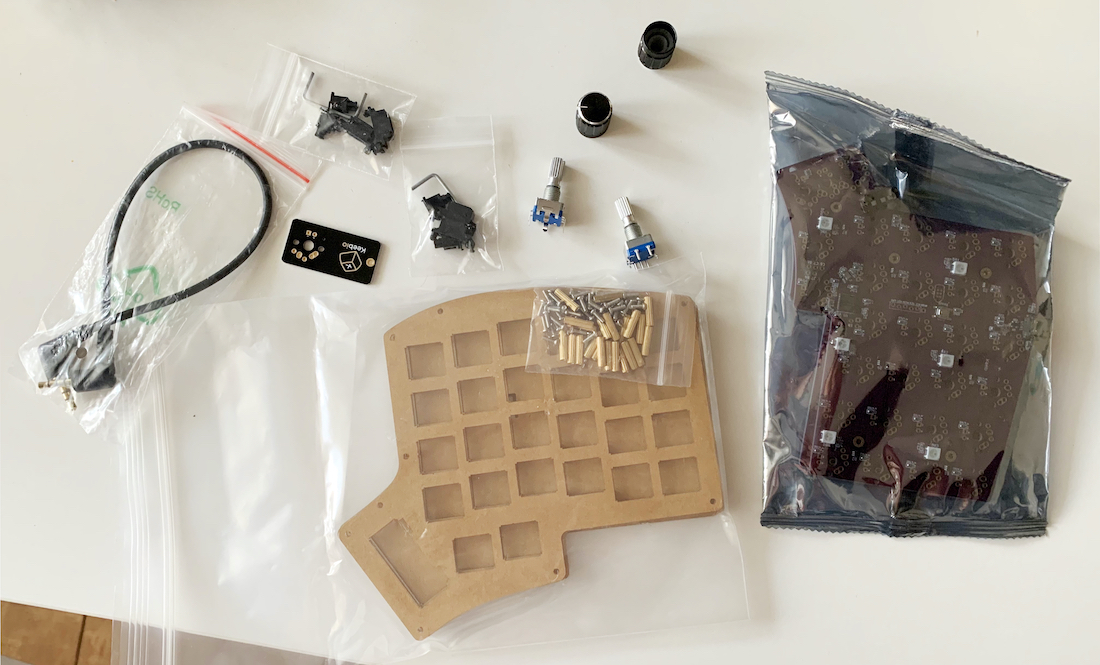
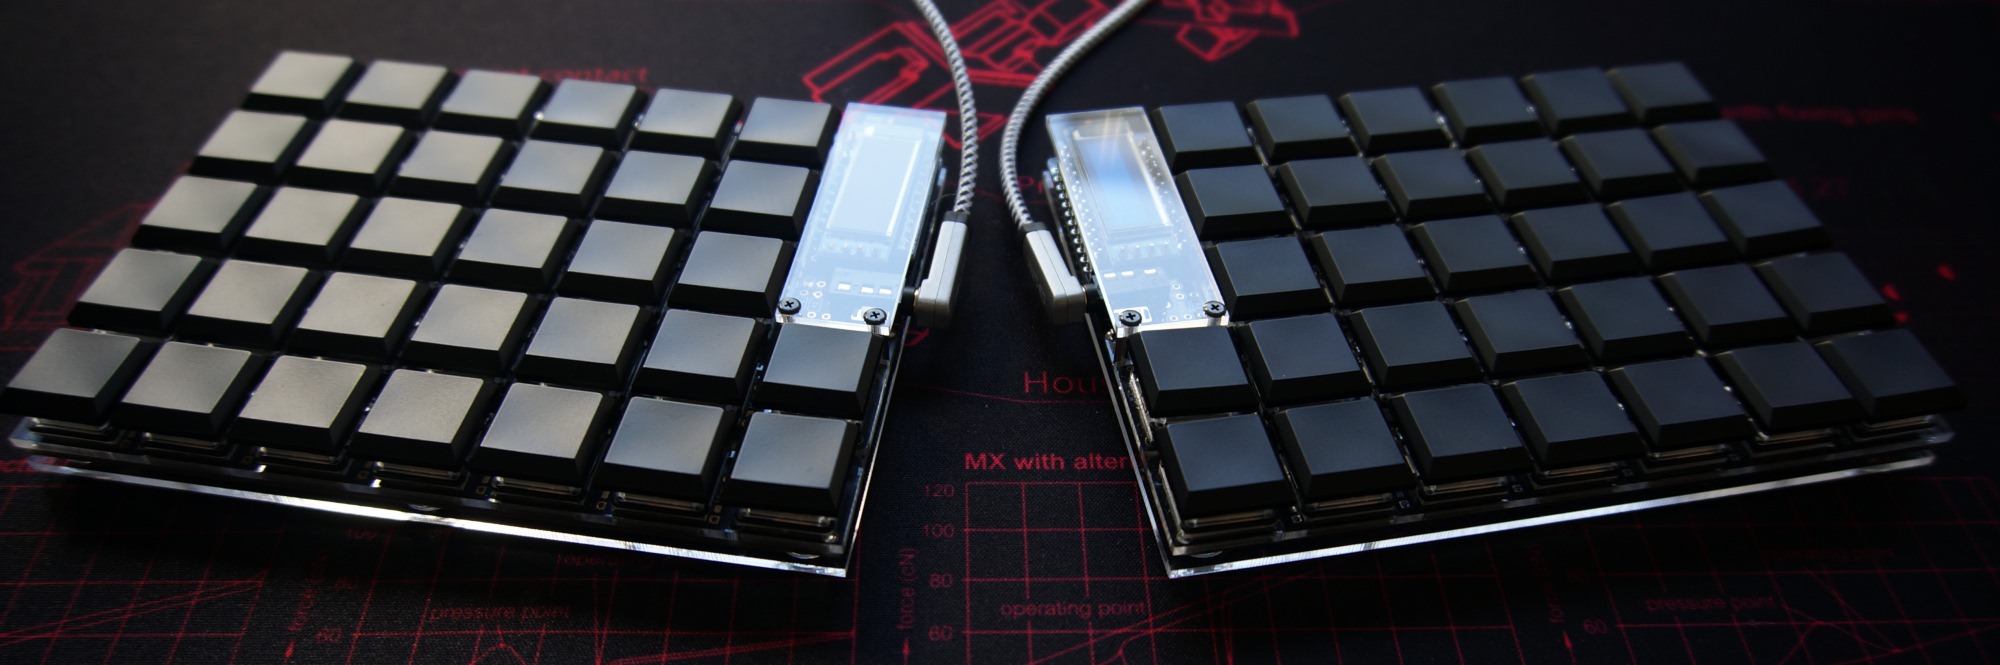
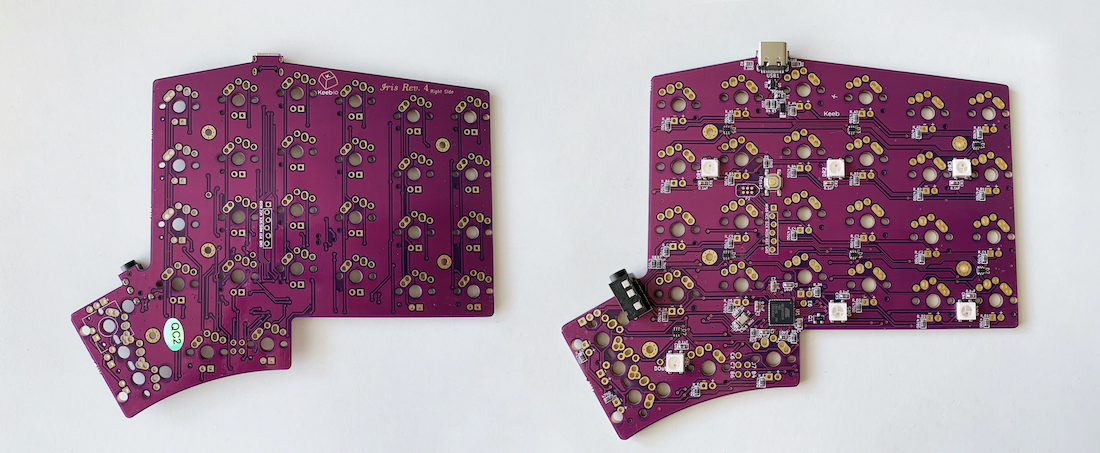
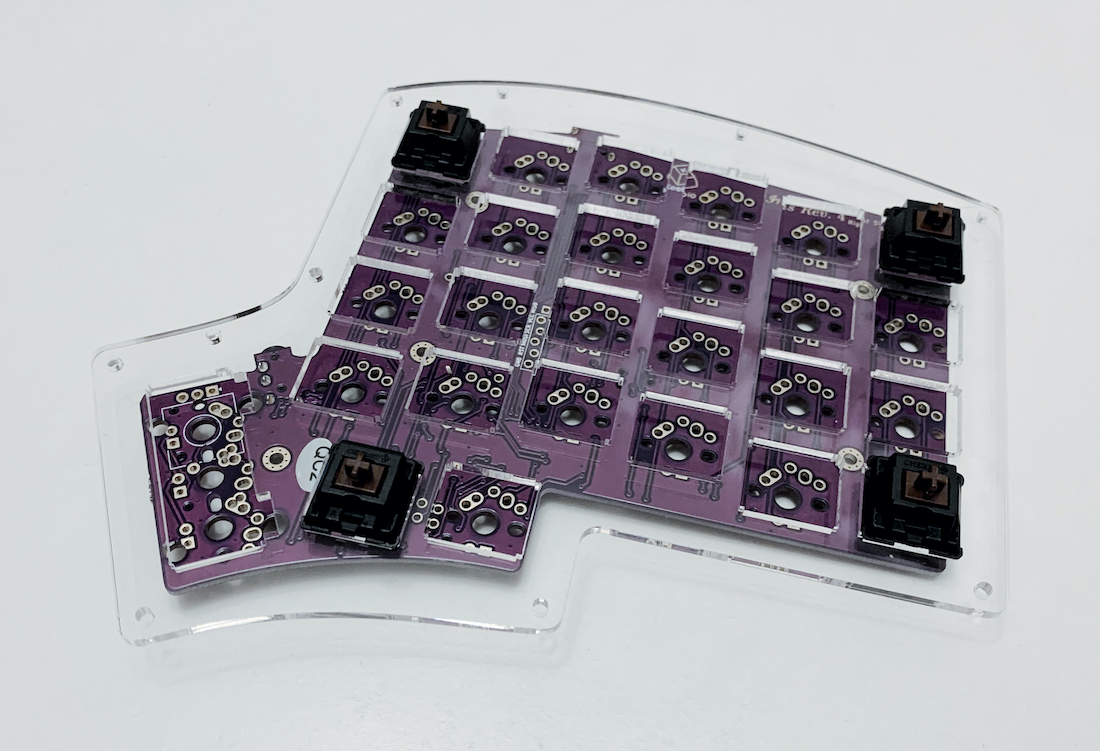
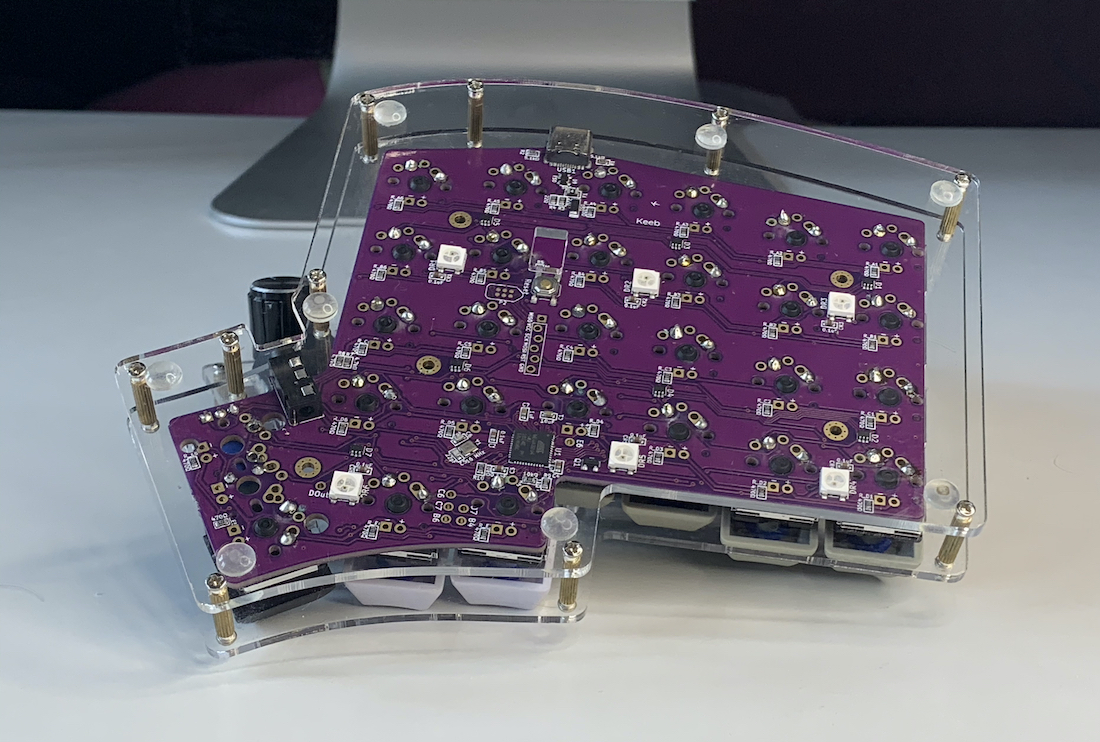
The board is cool.
Built-in processor. Most homemade keyboards require the Arduino to be soldered, and it takes up a lot of space, so you have to beat it right in the board design. Iris is much easier with this.
Six LEDs are already built into the board, but you can add more under each button.
Connection via USB-C, boards are connected via TRRS (this is a headphone jack).
Supports several types of switches: Cherry MX (and even PCB Mounted), low profile Kailh choc (but only the first version), Alps.
Well, just a beautiful color.
Without waiting for soldering, I inserted all the keys and clicked. Kaif, everything is at hand.
Later I realized that the case was not made of cardboard, but transparent, it was simply wrapped in anti-scratch paper. It also turned out that I forgot to order the side part, because I didn't bother to figure out what Clear Acrylic Middle - Tented means. You can work without this side panel, you just won't be able to put the keyboard at an angle.
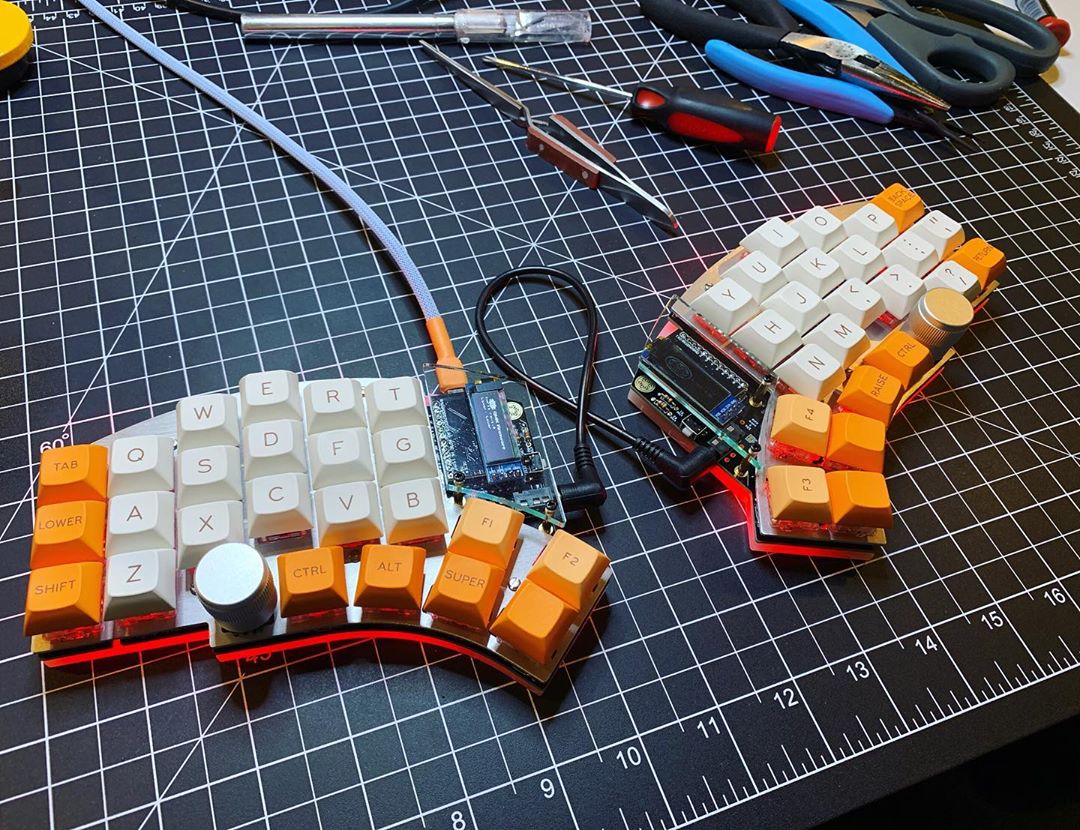
Step-by-step keyboard assembly
- Insert corner gears.
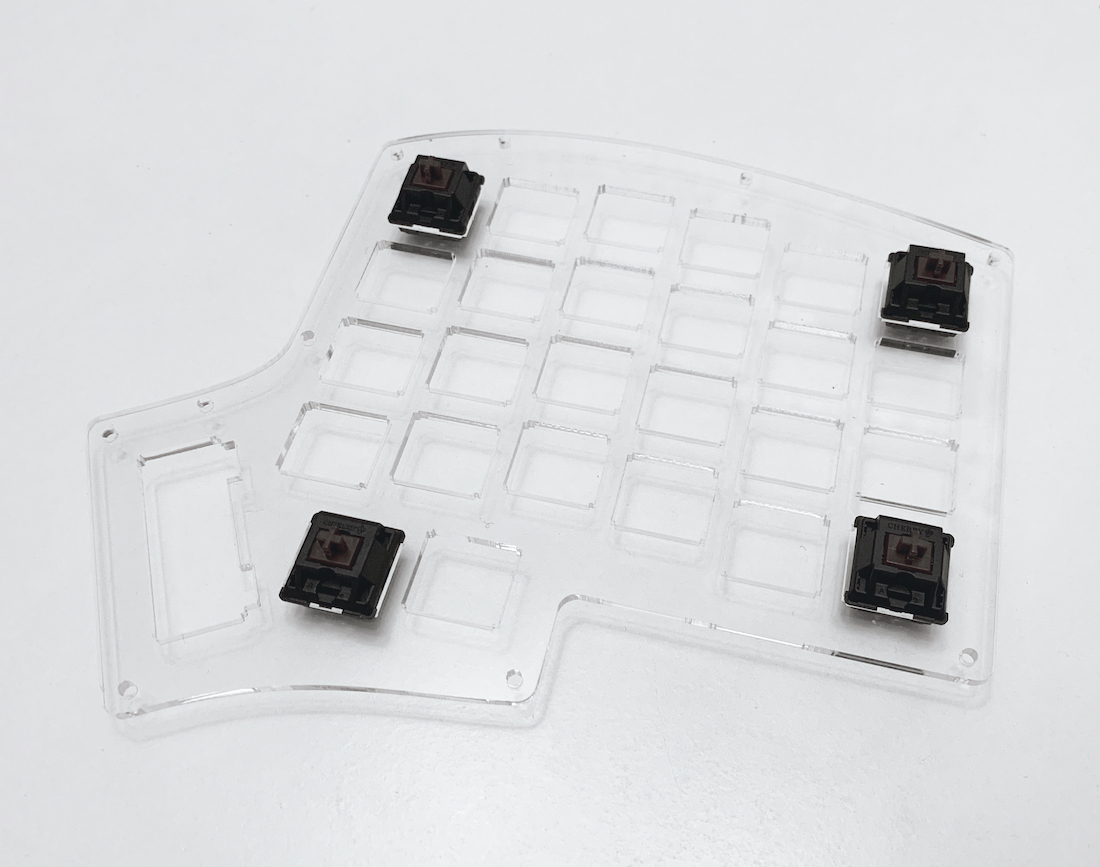
- You put it on the board, level it, solder it.
- Add the rest of the buttons, solder.
- Screw on the bottom of the case, add keycaps. Done!
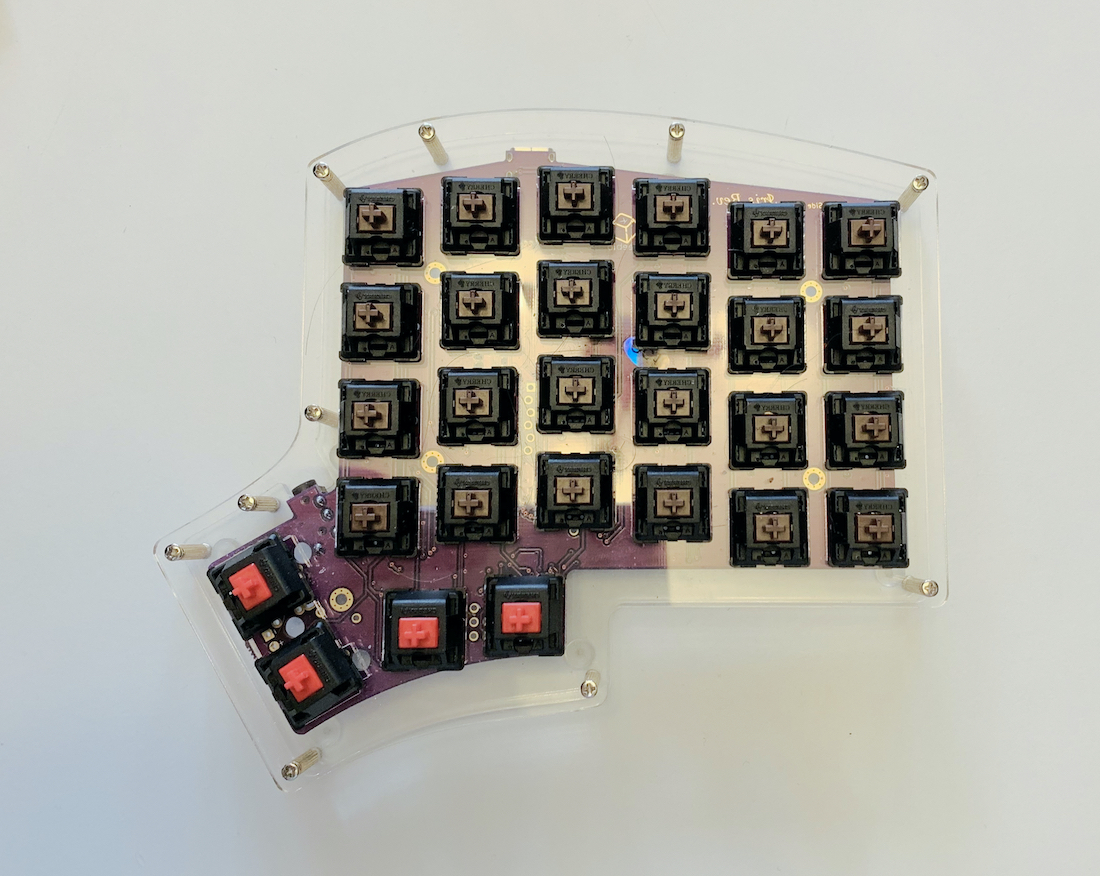
It took an hour and a half to solder the first half, but mostly I dealt with the soldering iron and the temperature. I collected the second half in 20 minutes.
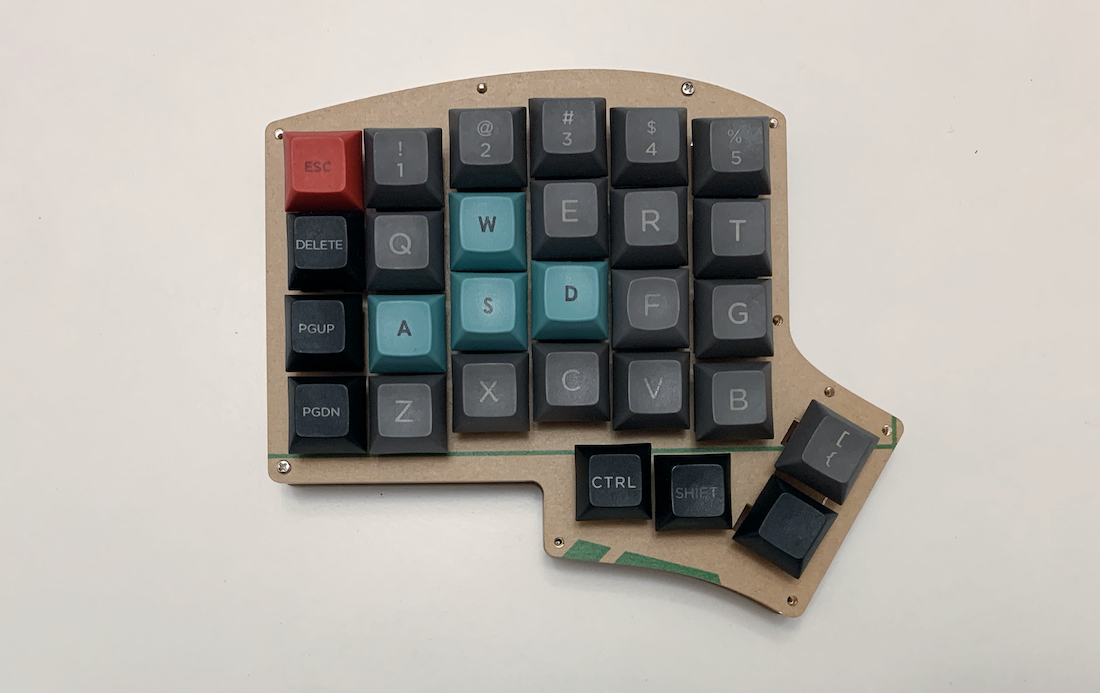
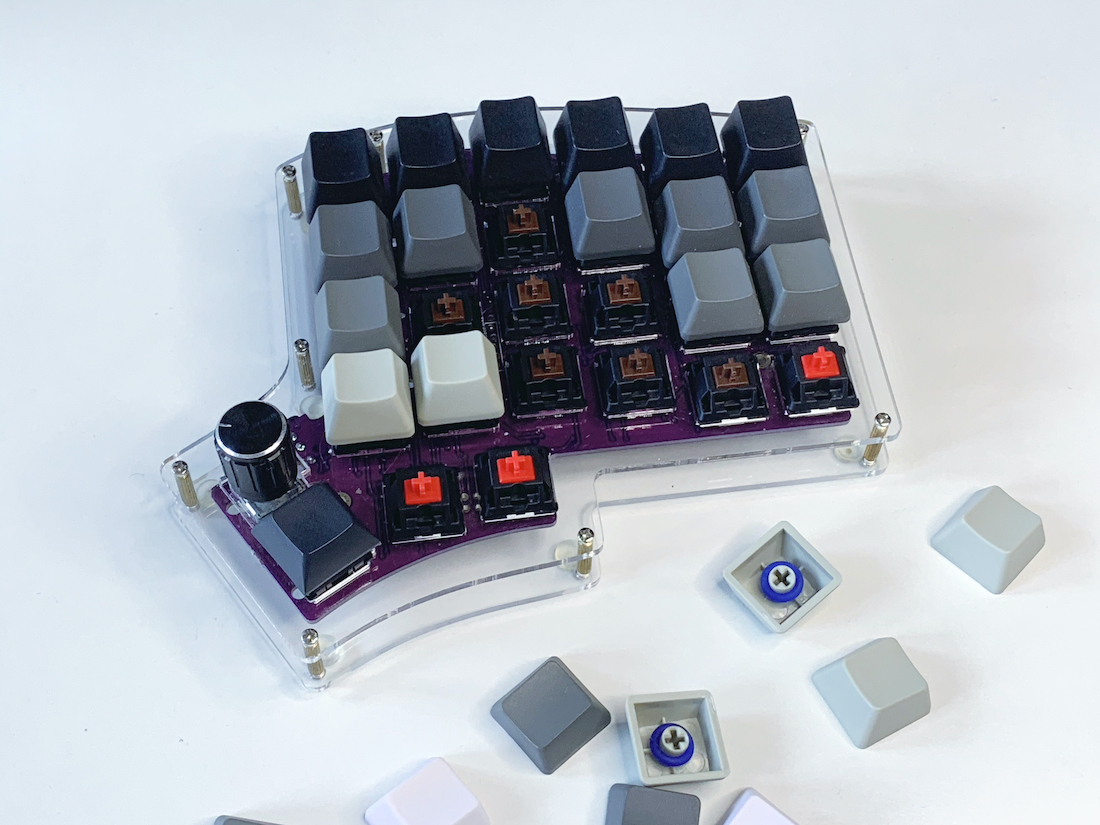
The photo shows switches of two colors, these are different types of buttons:
- red - linear, pressed smoothly;
- the brown ones have a bump, which is felt at the moment of operation; it is not necessary to squeeze the button all the way.
The point is this: the shift, control, alt buttons do not need a tubercle, these are auxiliary keys, they are pressed together with some other. I did not know in advance where they were, so later I had to re-solder it a couple of times, the desoldering pump came in handy.
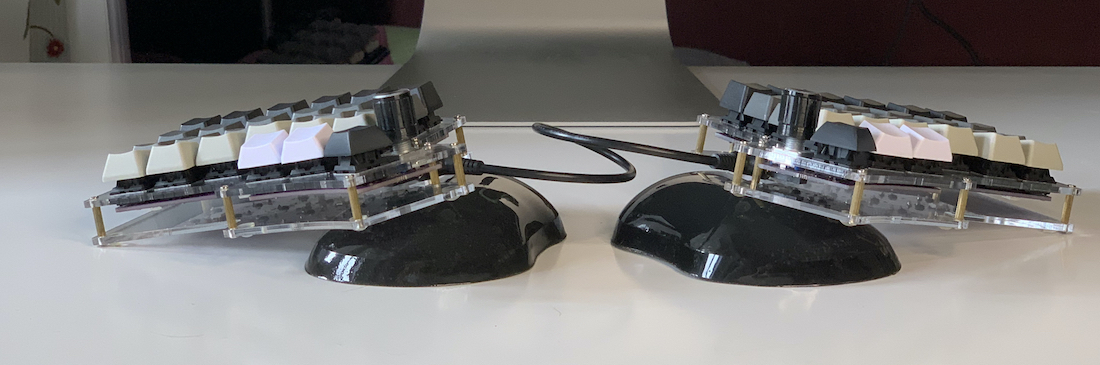
The bottom of the case is flat, and the keyboard is too light and glides on the table. The simplest silicone droplets will solve the problem.
As a result, I managed to assemble the keyboard on my own without having any skills in electronics and soldering.
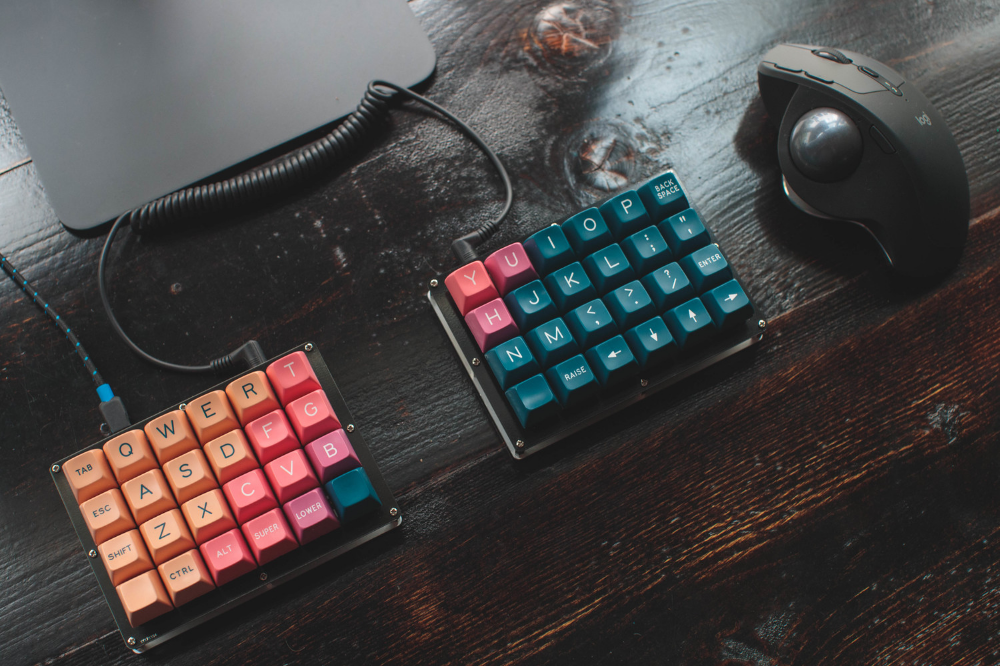
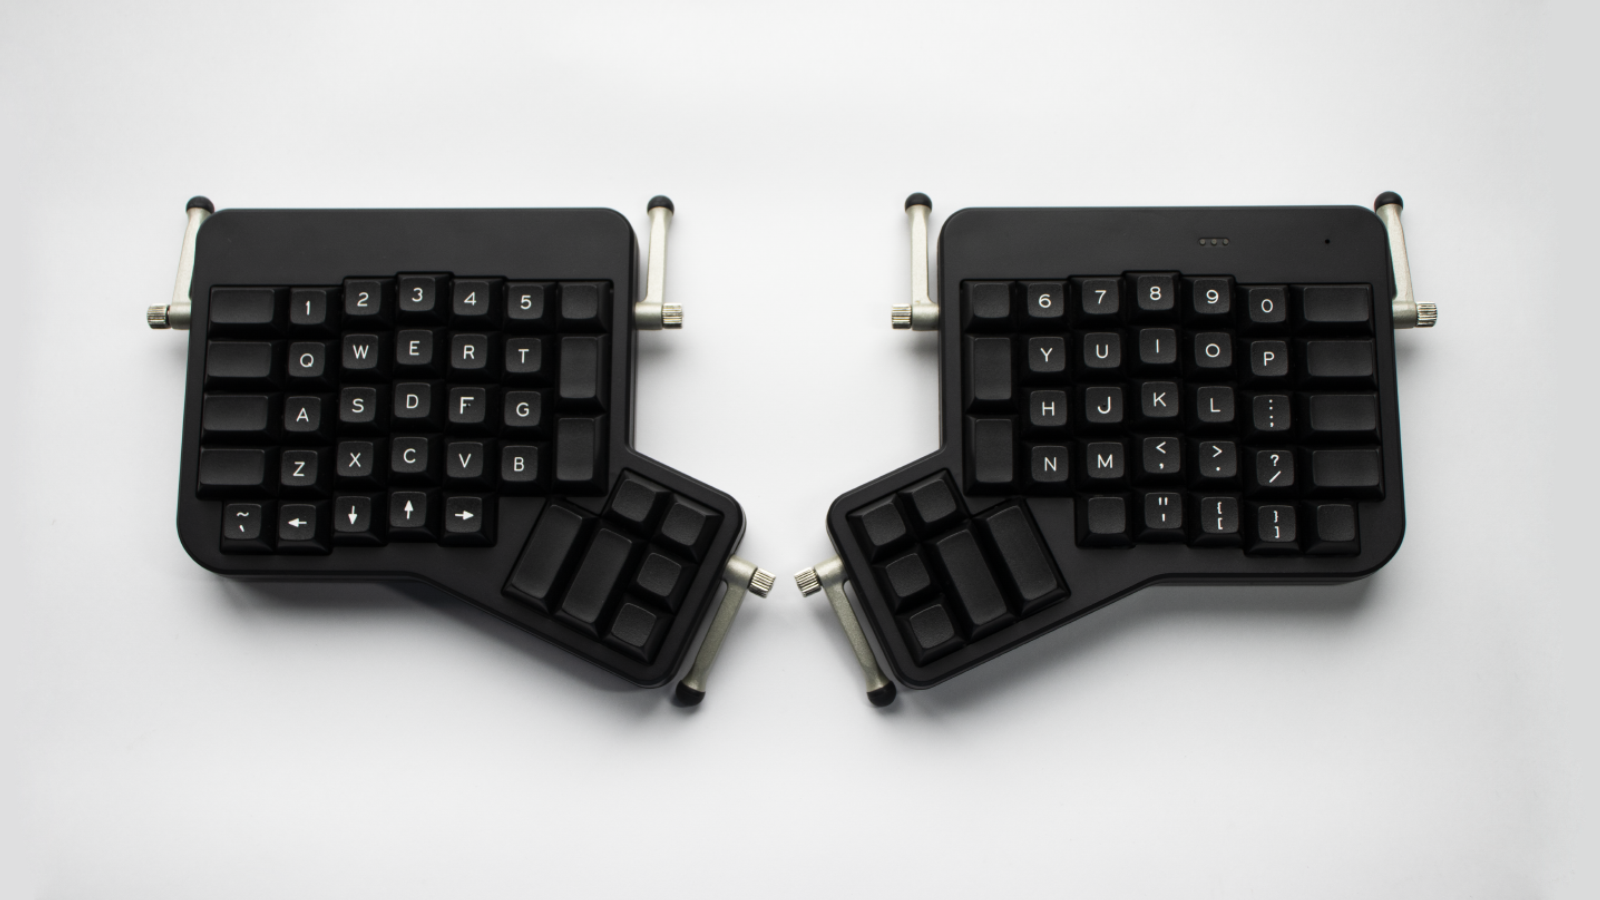
Iris Keyboard review: from ergonomics to goodies
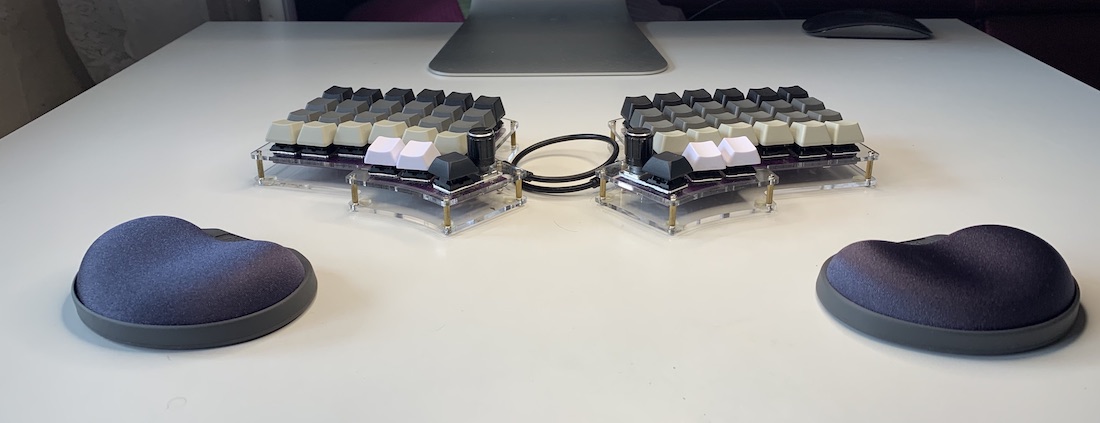
Divided into two
The first thing that catches your eye is that the keyboard is divided into two parts. So I can put my hands as I like: move the halves so that the arms are at an angle, or put them wide, but with straight arms from the shoulders. You can change the location on the go and move as you like.
So you can sit correctly, leaning on the back of a chair, hands on the armrests. There may be a mouse, microphone, or tea in the center of the table.
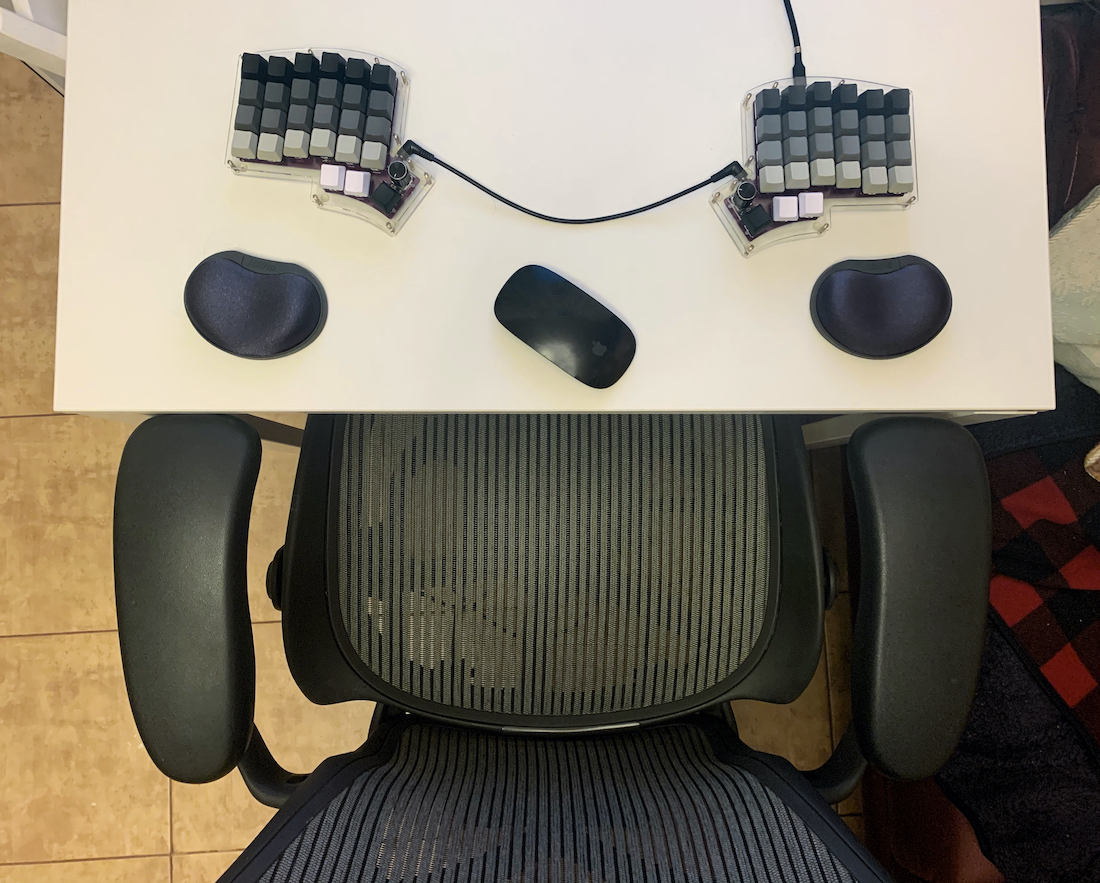
The correct placement of the keyboard removed the discomfort in the joints, which was after the usual keyboards.
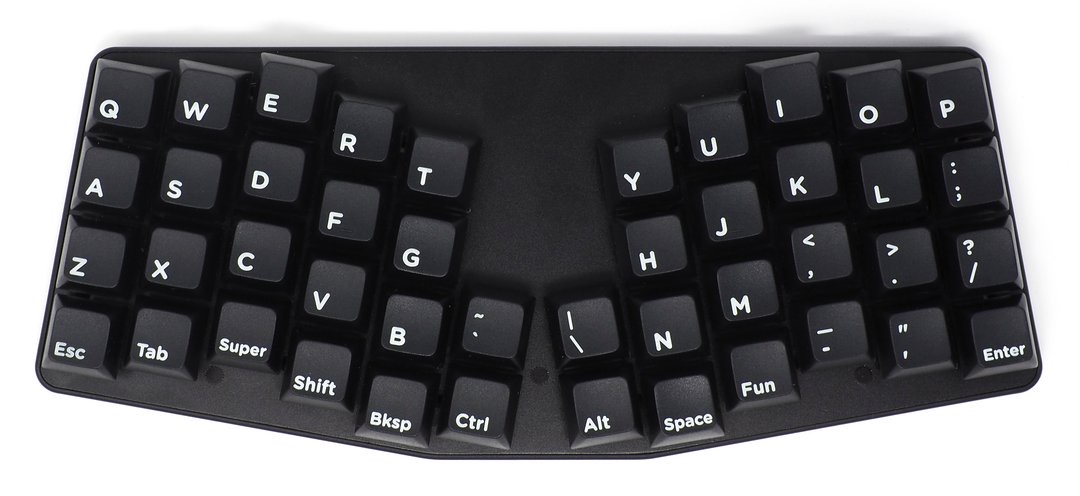
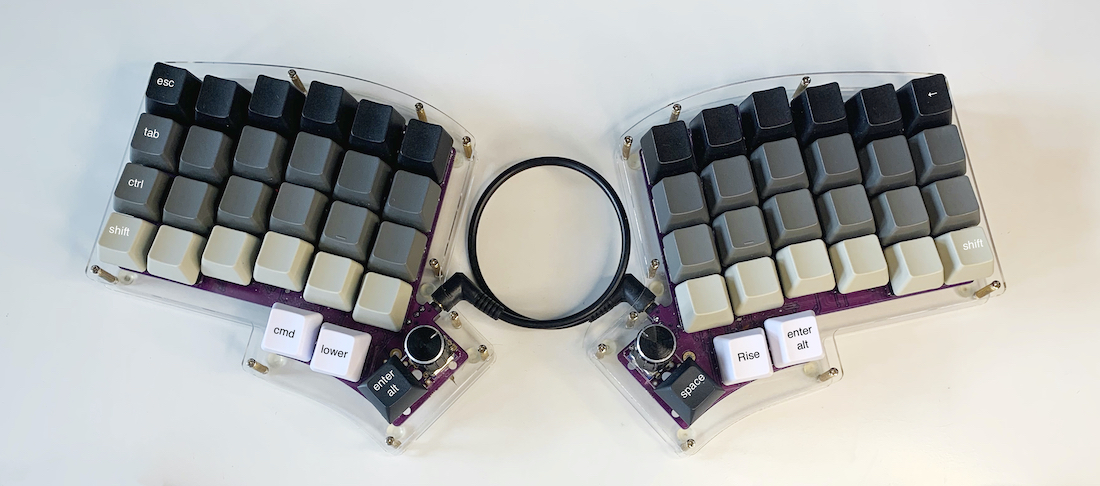
With special button alignment
The button keys are not aligned like on a regular keyboard: there are vertical columns, but the horizontal rows are shifted. This is much closer to the anatomy of our fingers. The fingers began to walk less often to the side, the little finger is much easier, and you no longer need to reach far for any key. Along with the separation of the keyboard, it racks my head a little, but by the evening I had no problems with typing, and it immediately became more comfortable.
Now all my typos are just my mistakes in my head. I have already begun to struggle with them, and the stability of my print has greatly increased. The speed also followed her. On the one hand, speed is not so important for programming, on the other hand, I stopped spending energy on correcting typos, and fell in love with typing. I began to actively collect meeting notes, articles, tests for programs.
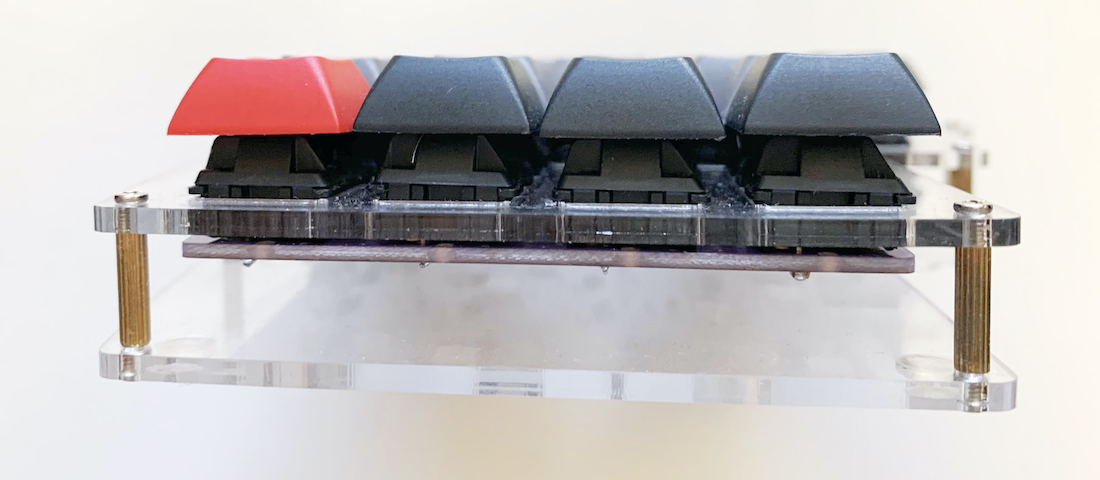
High
A surprise was the height of the keyboard - 3 centimeters. This is a monstrous amount for comfortable work. The height can be fought in three ways:
Reduce the body itself. Remove the bottom and glue the mouse pad to the board (!), Or simply reduce the distance by installing new spacers. The case itself may not be 3mm acrylic, but metal, it will turn out to be even thinner. Without the body, the height is reduced by a third.

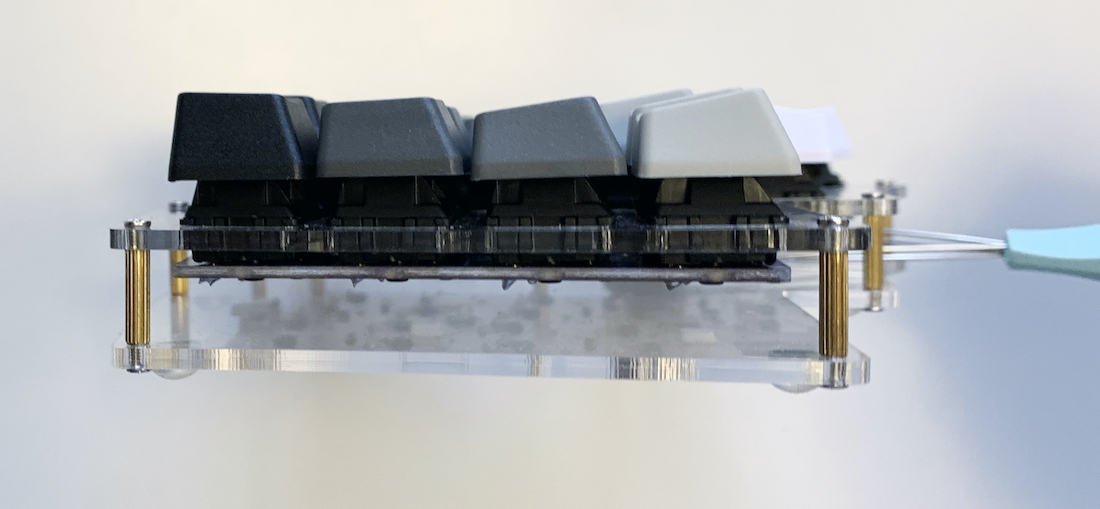
Replace switches with low-profile ones, buy low buttons for them. Kailh chock are supported, ordered, waiting. With the new keys and without the case, the height will be halved. It's almost like the Apple Magic Keyboard.
Raise your hands. I bought a couple of brush holders while I'm doing this. A bit annoying to correct them.
Raise the table base.I have never seen this for a split keyboard, but for Atreus you can order just such a stand.
You don't have to worry about the height and buy a side part, which will put the keyboard at an angle.
Ready to tilt
Top, bottom and side case can be ordered for the keyboard. If you order a tinted sidewall , you can add tilt feet.
I did not immediately understand the abundance of options and completely forgot to order a side, so I had to try to tilt it using the wrist rests.
The tilt of the keyboard is cool, but because of some "collective farm" of my decision, I couldn't work like that for a long time, it staggers. But this is a real thrill, I'm thinking of ordering a sidewall with an inclination. You can print it yourself on a 3D printer.
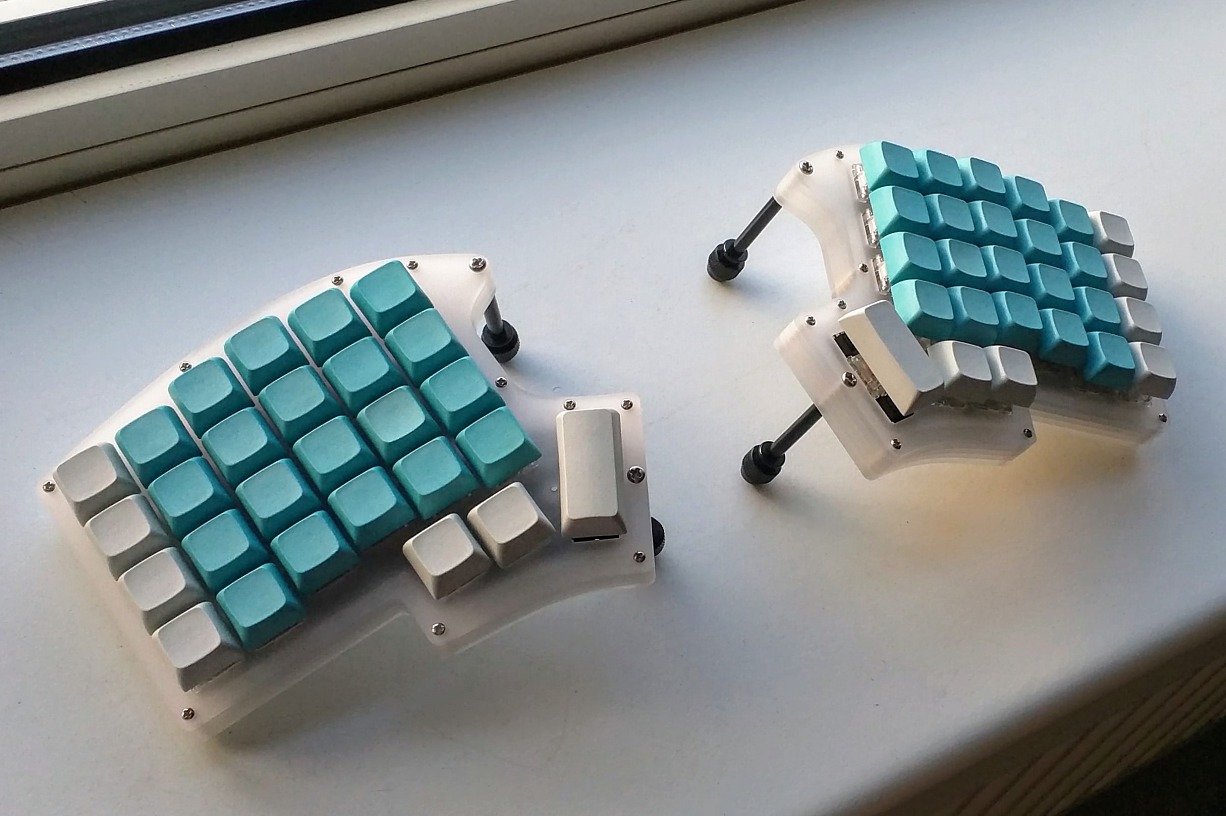
With custom buttons
I ordered the buttons first on Avito, then on Aliexpress. Simple sets cost about a thousand rubles, but the inscriptions on them will be erased. A set with keys might look like this.
Or to be simpler - absolutely without labels and additional buttons.
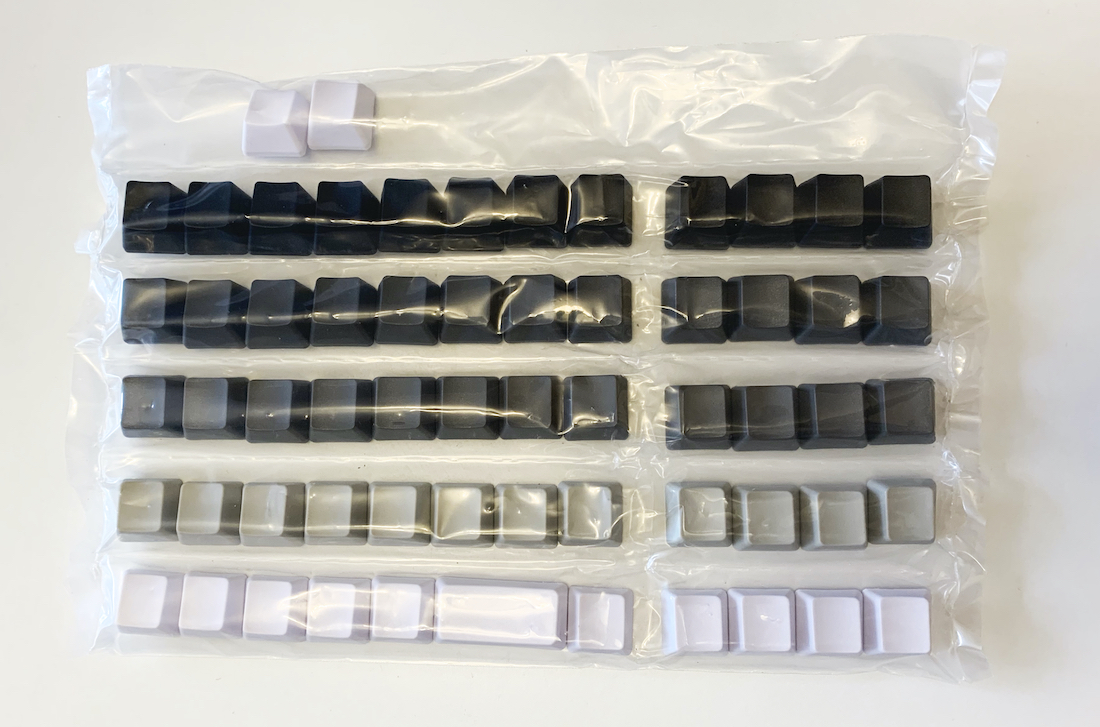
The most important characteristic of a button is its profile. There are many different ones.

The easiest way is to find flat DSA-profile keycaps on ortholinear keyboards.
I didn't like DSA very much, the keys are too identical. Tilted buttons are more interesting, for example, the OEM profile from Aliexpress.
For ortholinear keyboards, the choice of layouts is limited, because you need Shift, Control and Enter in the size of one button, and many where they are not included in the kit. In some sets, you can take the letter buttons from the basic set, and buy the rest separately. The price goes up significantly, usually above $ 100 just for the keys. For example, I liked the GMK Nautilus , but the required kit will cost $ 190. That's the same as the keyboard costs now.

60% of the usual size
The keyboard has fewer keys, there is no F1-F12 row, but a number of numbers remain, which means that you don't need to immediately break all habits. Sometimes it is more convenient to press a separate key than to go to another layer, where the numbers are under your fingers. If they were not there, the shortcut of the screenshot on Mac would have become even more difficult: instead of cmd + shift + 3, you must press cmd + shift + Fn + e.
Fewer buttons, so you don't have to reach for distant ones, everything is at hand. Additional keys are hidden on separate layers. The principle of operation is familiar to everyone: you hold down shift, and all buttons change their symbols, letters become uppercase, numbers change to signs. It's the same here, you just need to hold down not shift, but the layer change key, it's under your thumb.
But there are no signatures for these additional layers, so all that remains is to remember. It turned out to be easy for me to learn, but other people cannot use my keyboard.
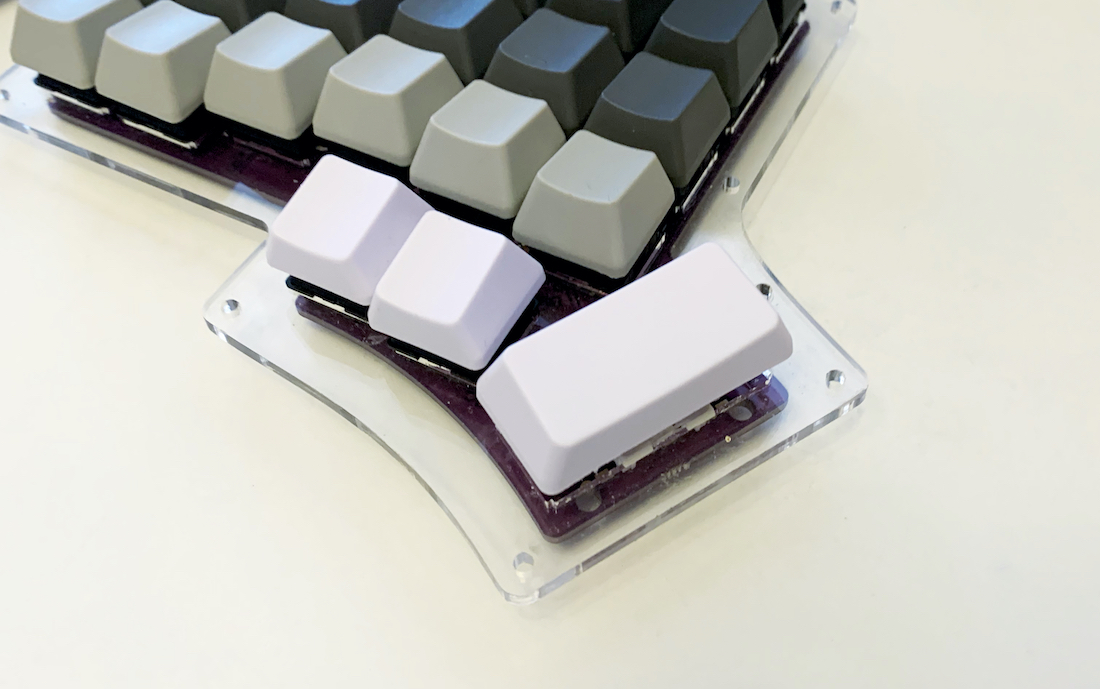
The thumb now not only presses the spacebar, but also changes layers, holds down modifiers, presses enter, there are only 6 buttons. You can choose any keys, it depends on your tasks.
The thumb buttons are replaceable, there are three options.
- You can just put buttons. The nuance is that these keys are rotated 90 degrees and look sideways. This is inconvenient in the case of curved keys, so I put the flat keys from a different set.
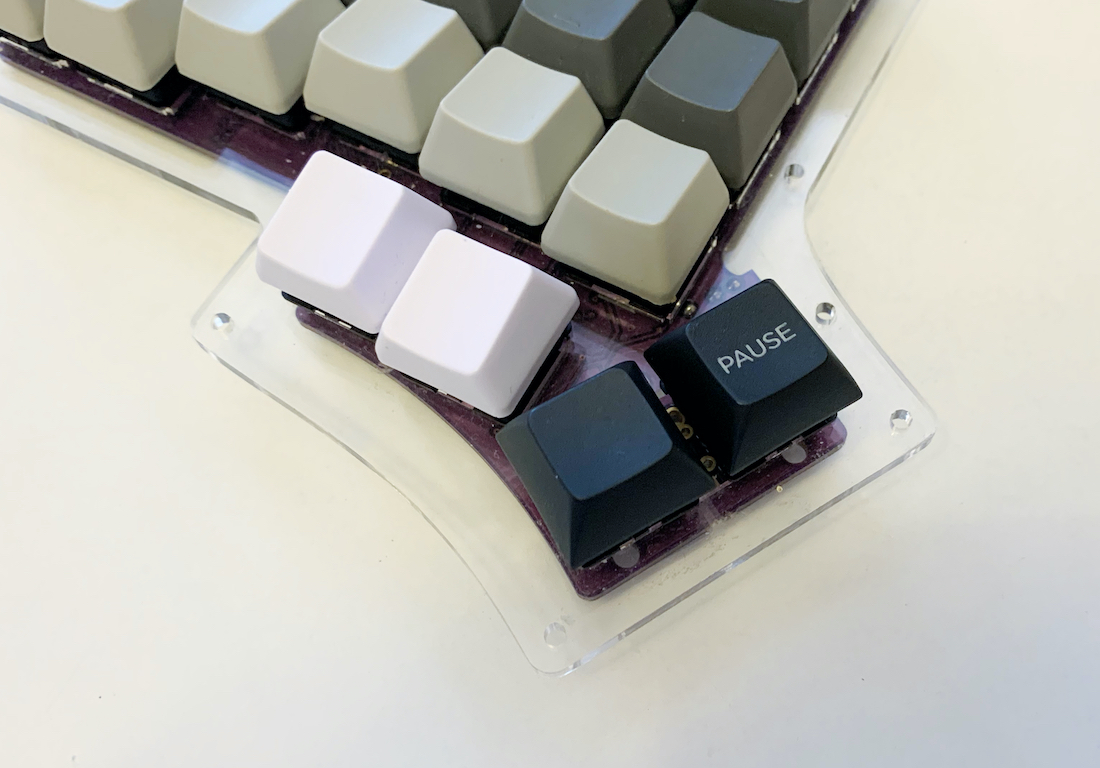
- Pressing the top button with your thumb is not very comfortable. If you don't need it, you can combine the buttons into one, but you will need to add a stabilizer. This will make the button click well wherever it is pressed. Apparently, this was the reason for turning the usual buttons.
- Or you can put a spinner instead of the top button. About this separately.
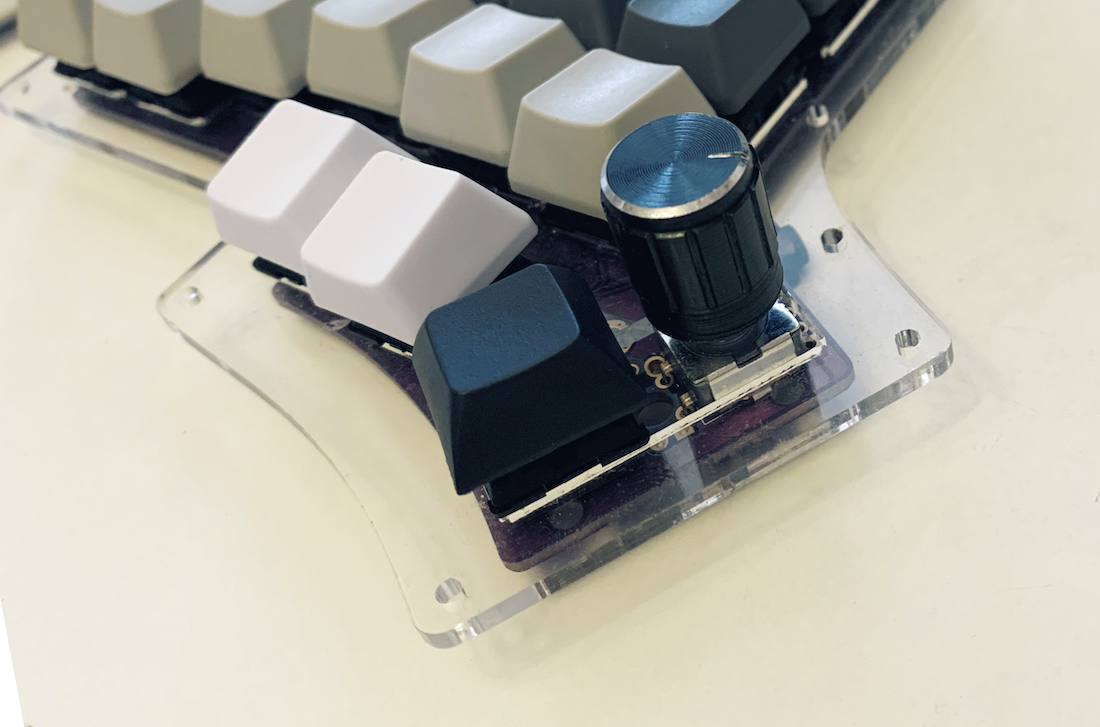
Twists
In place of the top key, you can put a twist, then it will not only be pressed, but also spin. Any action can be hung. Of adequate:
- scroll the page (simulate a mouse wheel);
- move the cursor;
- change the volume.
I selected the cursor movement and added volume to the second layer. The most fun turned out to be to twist Youtube, because the cursors scroll it.
Alas, you can twist it only by holding it with two fingers from above, you won't be able to swing one finger from the side, it's too tight, and the keyboard is light. I wanted to move the cursor over the text with twists, but because of the tightness it turned out to be inconvenient.
At first I added twists on both sides, but then left only on the right, there was no use for the left.
Layout
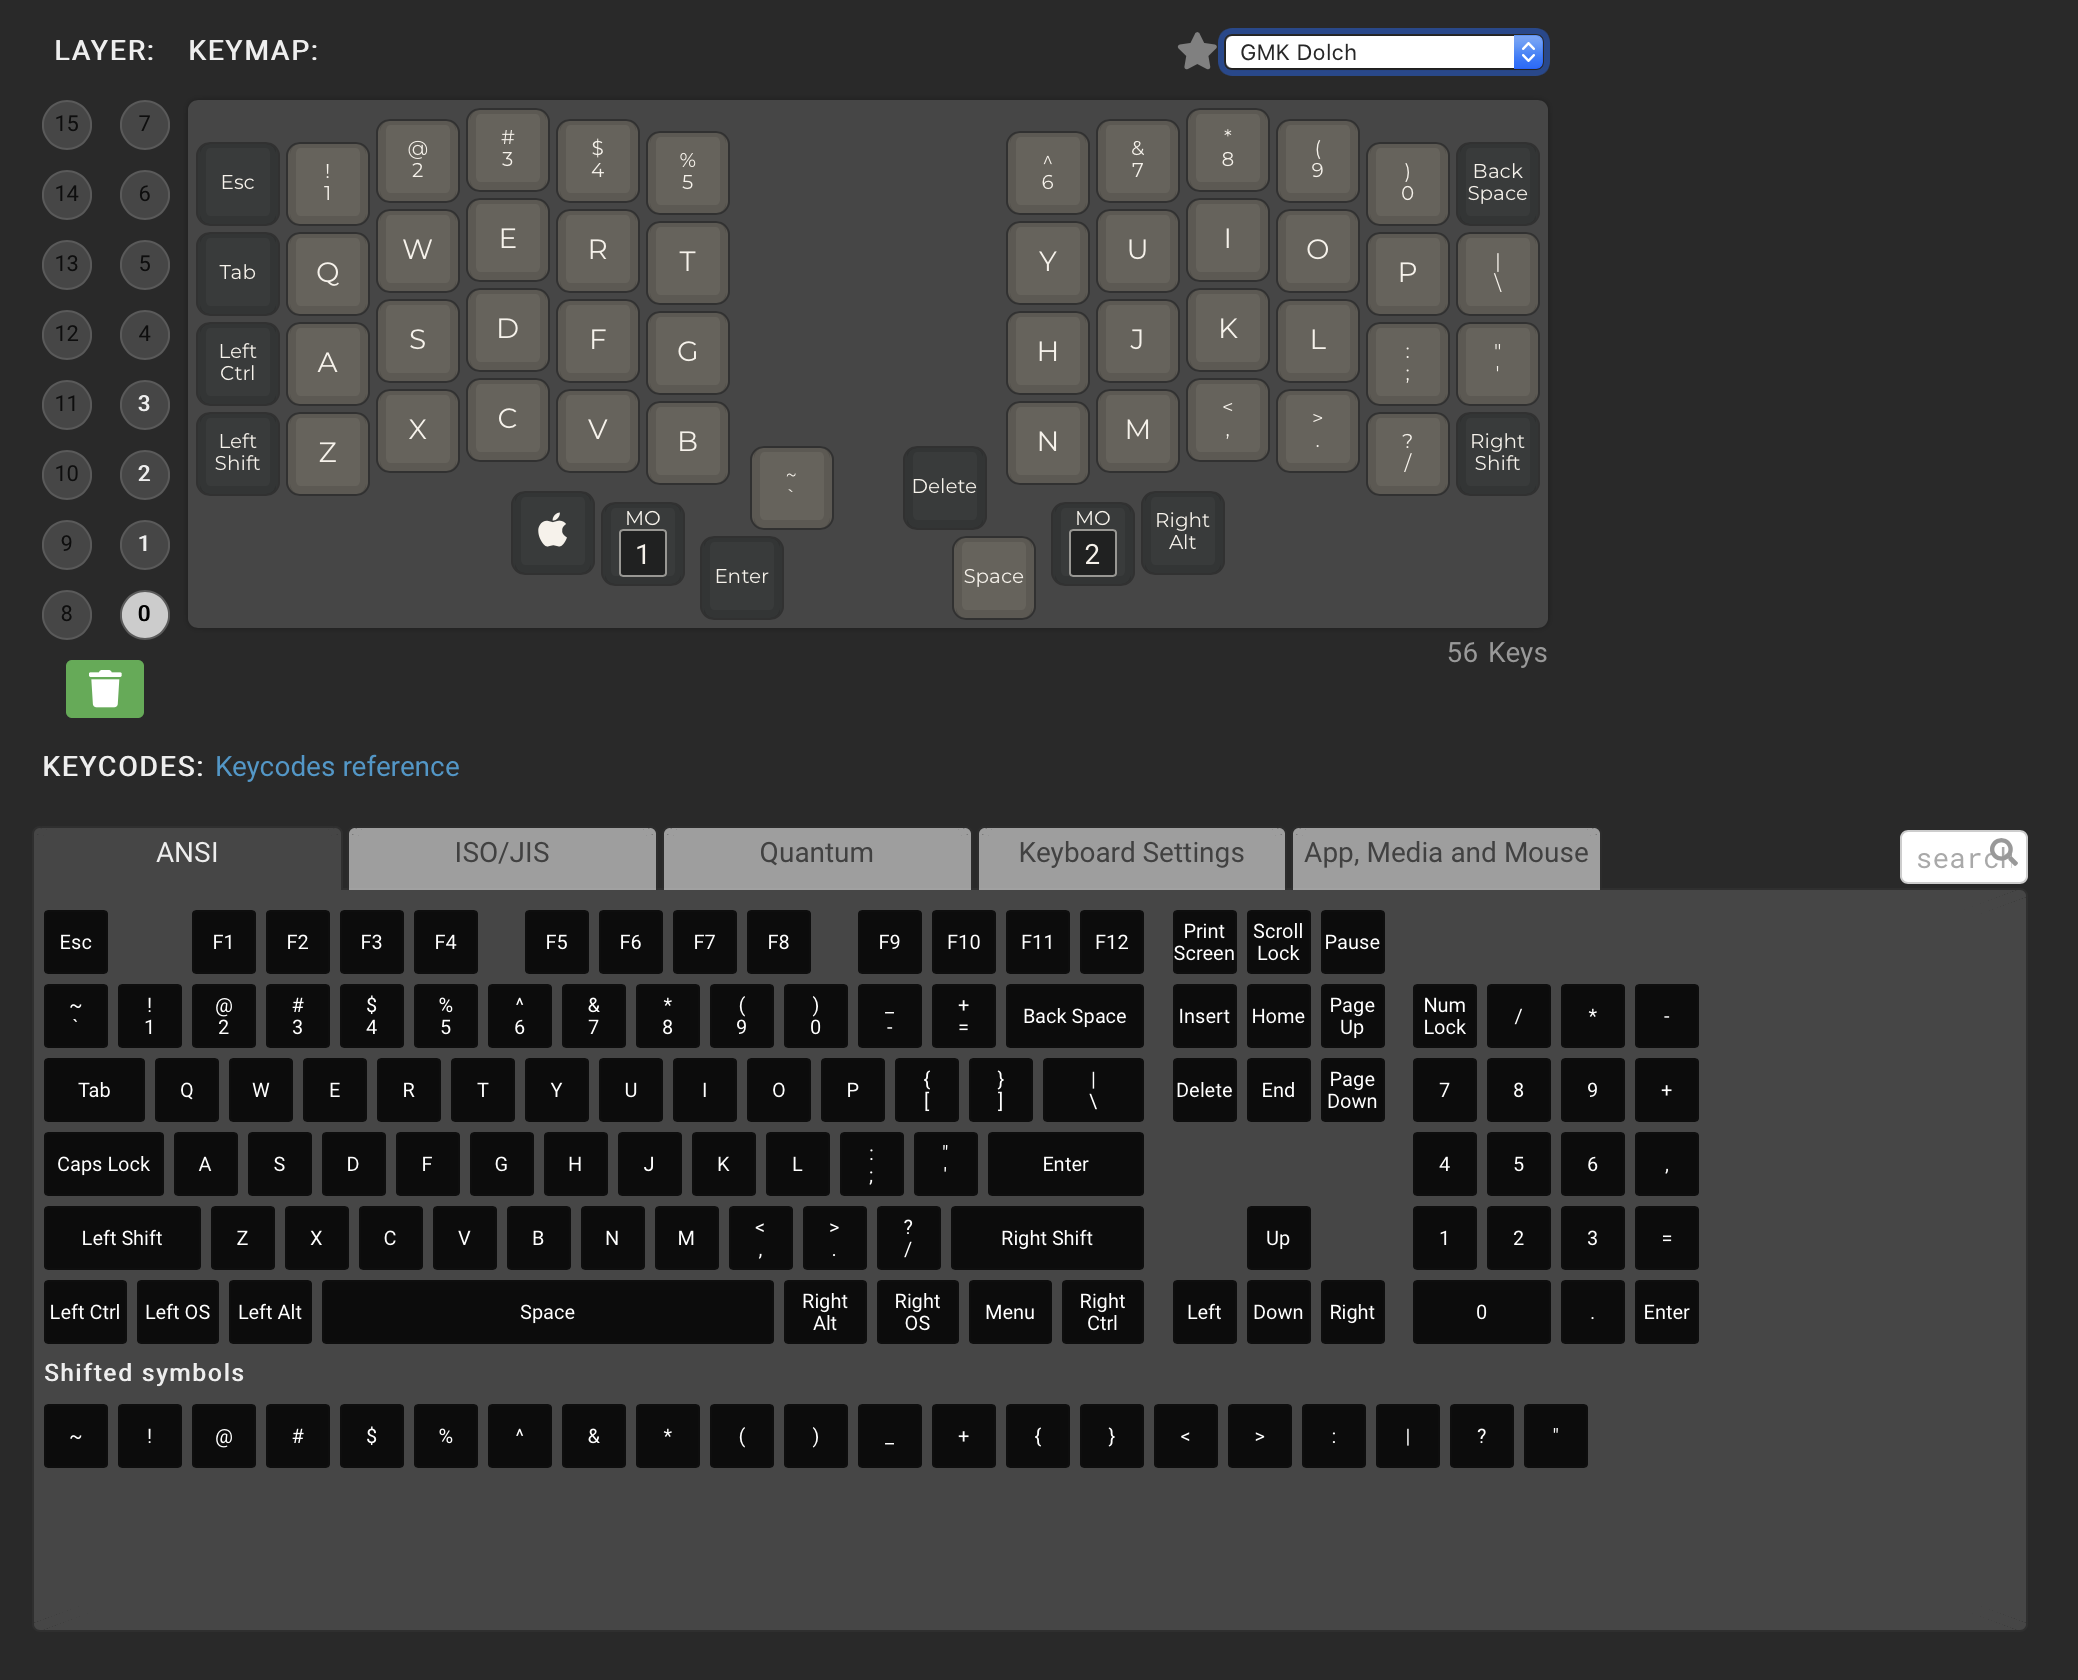
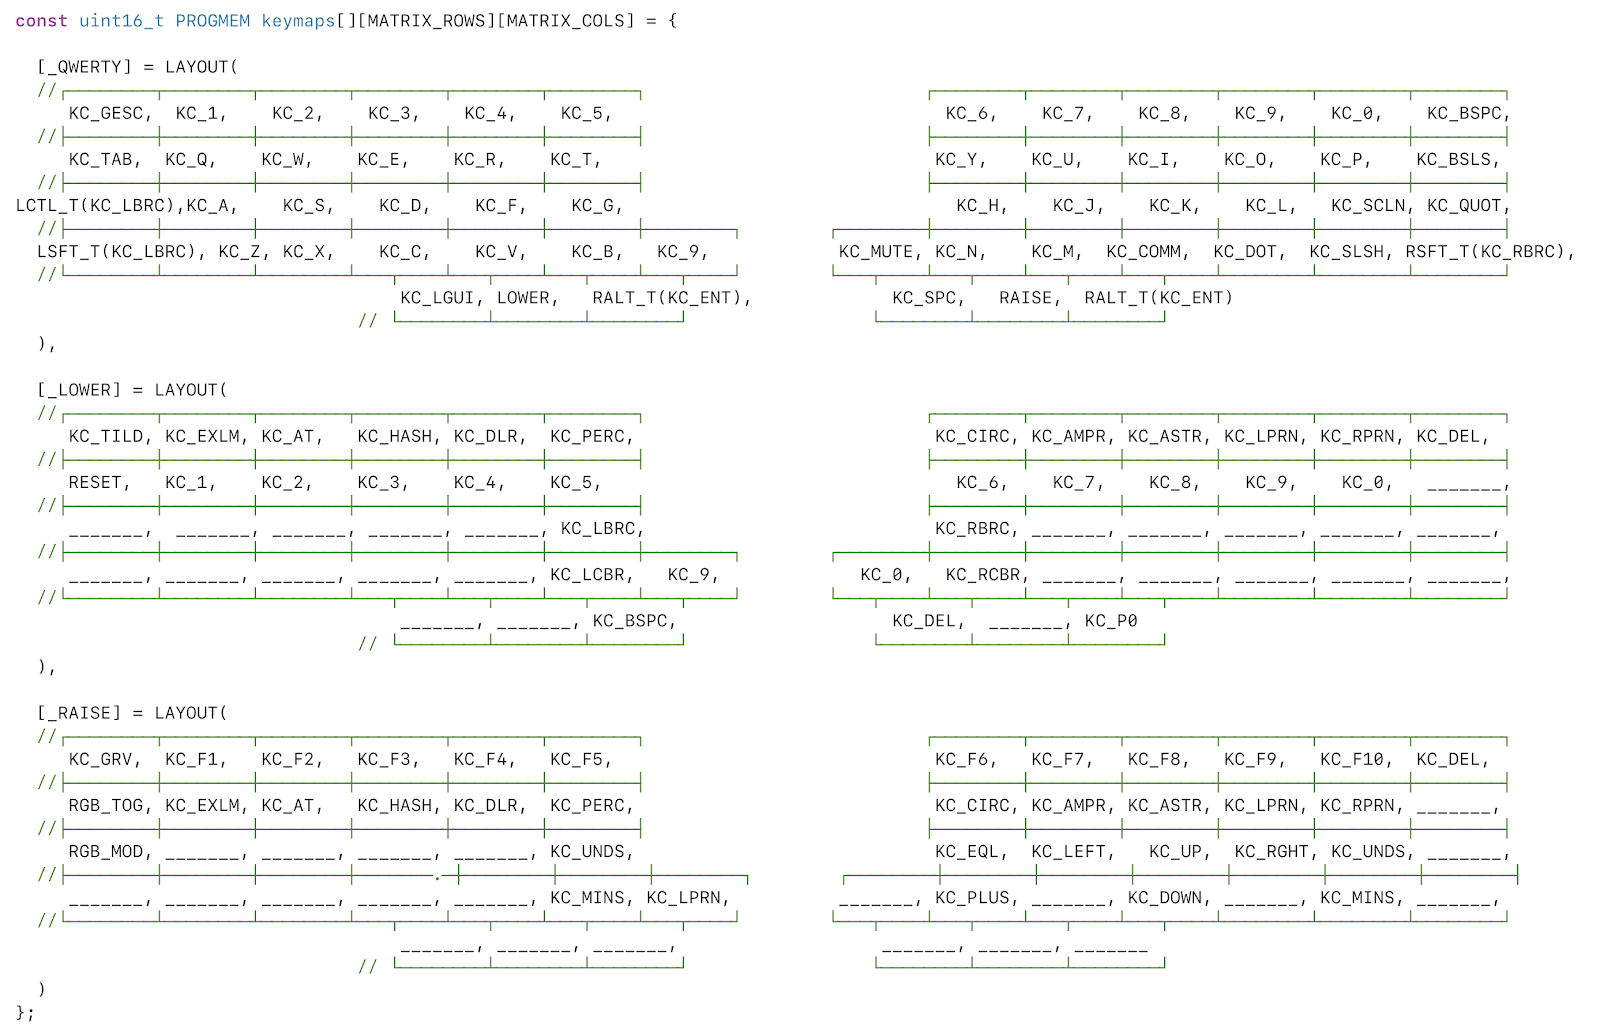
There are fewer keys on the keyboard, no F1-F12, no cursors and no number pad, you need to hold down the layer button to access them. By default, there are three layers: normal, numbers and cursors, media.
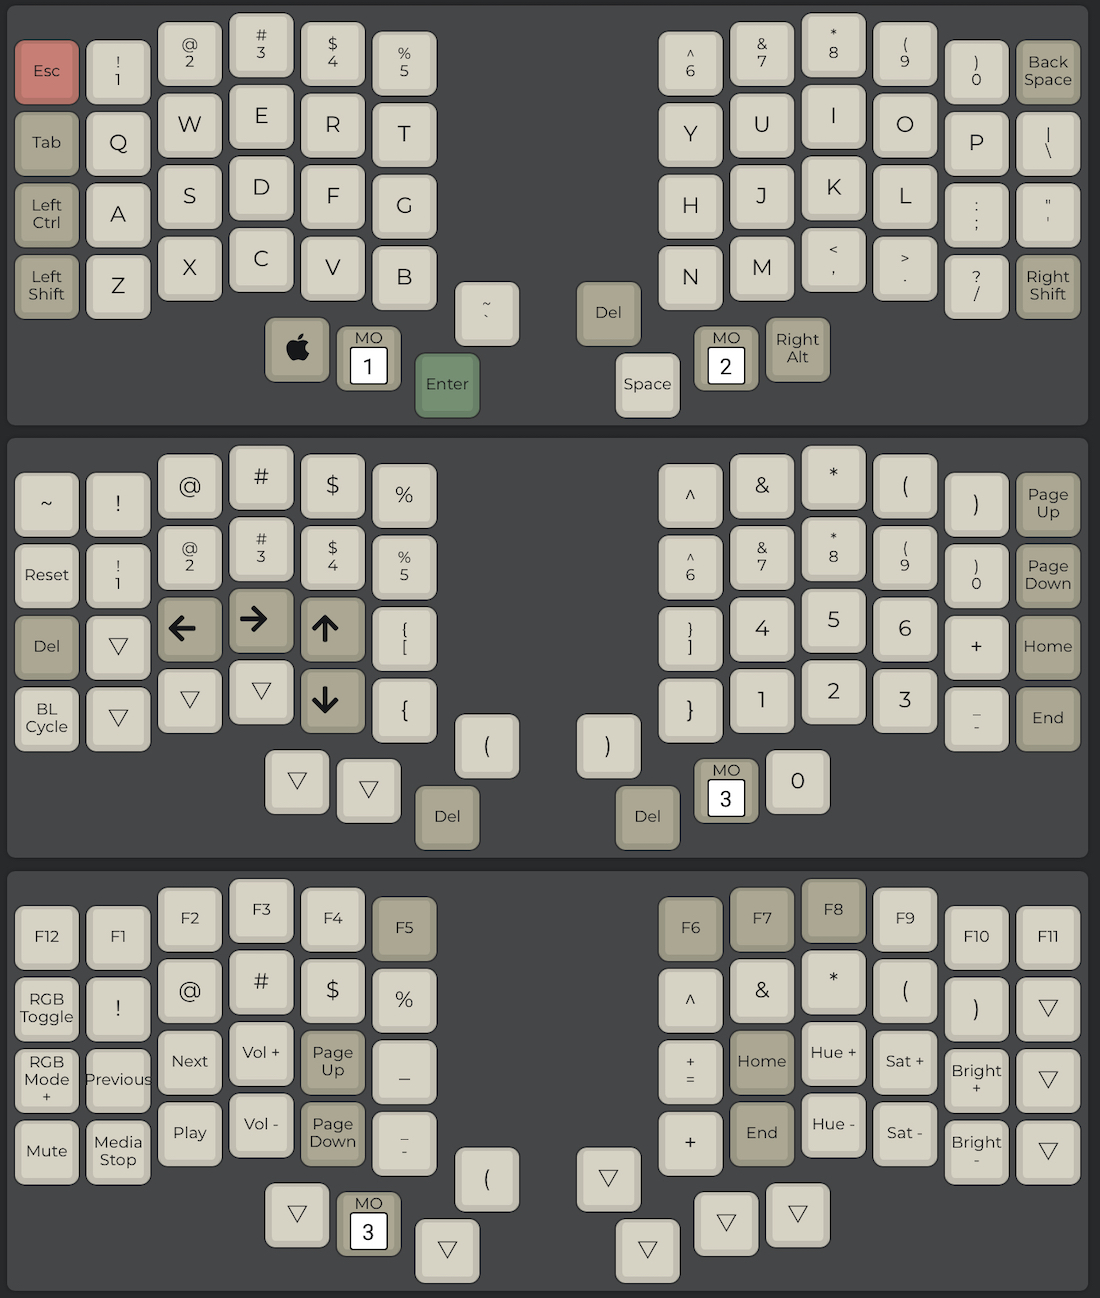
I didn't understand the standard layout at all: strange cursors on the left, a bunch of buttons for controlling the backlight, incomprehensible buttons for music. I tried to sit like this for a week, I could not get used to it, I did not find any reason to retrain.
But all buttons are customizable. Moved the cursors to the right side, removed the backlight buttons, transferred the volume change to the knob. It became good.
At first it seems impossible to remember. In fact, everything is divided into stages:
- remember cursors;
- you learn to switch to numbers, + = - signs, etc .;
- remember where the volume and pause are, the next track;
- change the position of modifiers for shortcuts.
I had to move shift, cmd, alt to other places. For example, I found it convenient to have an alt on each side, with the press acting as enter. It all depends on the shortcuts you need in your work.
Button labels
When the keyboard is programmed in three layers, it is not clear what to do with the captions on the buttons. Regular letters are useless (I already write blindly), and modifiers can only be signed by sticking something over the key. It is ugly, erases over time, and it changes too often at first. Therefore, I bought keys without signatures at all, and all additional buttons are learned gradually.
Brackets and Russian
For programming, I put brackets along the center. Conveniently, the Russian letters X and b moved along with them. Take them off the second layer very slowly.

In the firmware, you can make it so that a short press on the left shift dials [, and on the right], so there was a place for X and b. There is a new problem: to type a capital X, you need to press the right shift, and then press the left one. For Kommersant, on the contrary, but this has to be done infrequently. You can also type {and}.
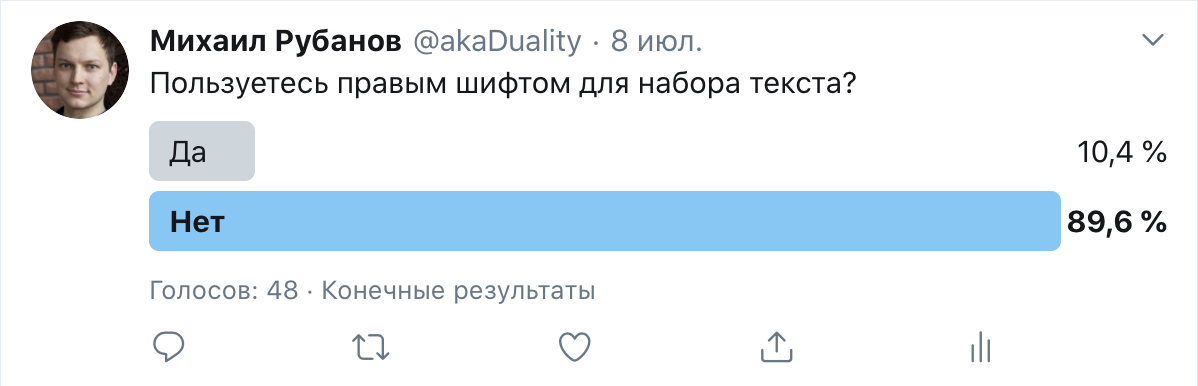
I am not used to using the right shift, 90% of the respondents are also not. I had to try it and I liked it! He breaks his head, but relieves his hands.
Soft - QMK
The keyboard is running QMK software - quantum mechanical keyboard. Open source, widely supported, beauty. You can customize the keyboard through the constructor on the site or reflash through the terminal.
Configurator on the site
You can make a layout on the config.qmk.fm configurator site .
It works very simply: drag the buttons from bottom to top, click Compile, download (Firmware).
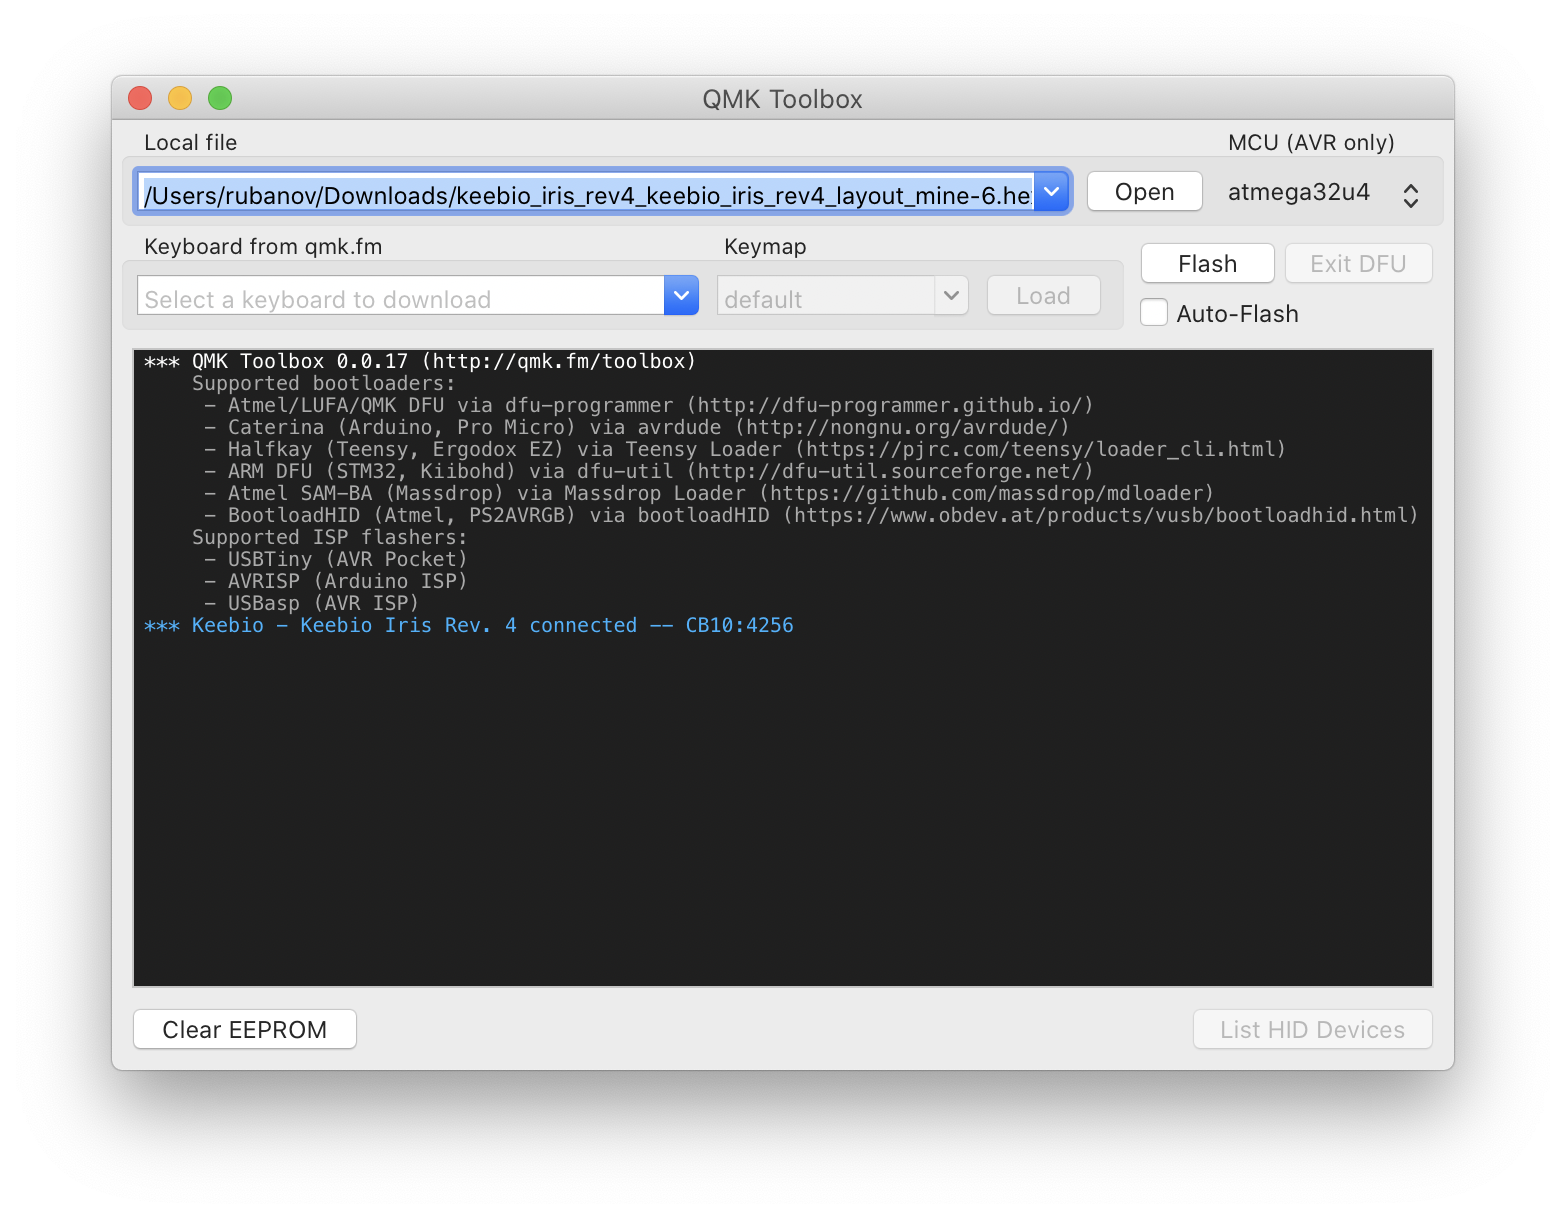
Update the firmware through the QMK Toolbox program: select the file, press flash, press the reset button on the keyboard. Done. The Iris keyboard has reset buttons on the bottom of the board, but you can also hang it on a regular button in some layer.
You won't be able to set up a spinner on the site, just programming . More about this.
Assembling on a computer
The configurator has enough capabilities to customize buttons, layers, but it does not work with twists, I had to install QMK itself. Hyde will explain everything even to those who have not worked with the command line.
To install QMK, you need to run 4 commands
brew:
:
:
brew install qmk/qmk/qmk
:
qmk setup
:
qmk config user.keyboard=clueboard/66/rev4
qmk config user.keymap=<github_username>
After installation, you will have a file with your layout.
A list of keys can be found on the QMK website .
If something has been changed, then it is enough to execute:
qmk compile //
qmk flash	//
And then press the reset button on the keyboard.
For the spinner, you need to add only one function and assign the keys to trigger. This is how the volume control looks like:
void encoder_update_user(uint8_t index, bool clockwise) {
    if (index == 1) { // Right encoder
        if (clockwise) {
            tap_code(KC_VOLU);
        } else {
            tap_code(KC_VOLD);
        }
    }
}
You can complicate things by adding layers
void encoder_update_user(uint8_t index, bool clockwise) {
    if (index == 1) { // Right encoder
        if (layer_state_cmp(layer_state, _LOWER)) {
            if (clockwise) { //  -
                tap_code(KC_DOWN);
            } else {
                tap_code(KC_UP);
            }
        } else if (layer_state_cmp(layer_state, _RAISE)) {
            if (clockwise) { //
                tap_code(KC_VOLU);
            } else {
                tap_code(KC_VOLD);
            }
        } else {
            if (clockwise) { //  -
                tap_code(KC_RGHT);
            } else {
                tap_code(KC_LEFT);
            }
        }
    }
}
What can you do with your firmware?
QMK has many unusual features. We've already covered three important ones: layers, support for split keyboards, and a rotary encoder (that's what the rotary encoder is called). But there are many interesting things inside. I'll tell you about a couple of unusual examples that I used.
Space cadet shift
In a conventional keyboard, shift or alt work only for clamping. In QMK, they can also add an action on pressing. For example, left shift will write opening [, and right - closing]. I also configured alt / enter like this.
Macros
You can hang on pressing a key to enter text or commands from the keyboard. Macros must be written directly into the firmware, you can even create a couple on the fly , but they will disappear when you turn off the power.
A couple of examples. Updating the firmware with two commands can be reduced to one key: enter qmk compile, wait a couple of seconds until it is completed, enter qmk flash and programmatically press the reset button. The whole process was reduced to one key.
Hoba
SEND_STRING("qmk compile\n");
SEND_STRING(SS_DELAY(2000));
SEND_STRING("qmk flash\n");
reset_keyboard();
A lot of programming can be reduced to entering such commands. For example, copy the name of the class to the buffer, and then declare the variable:
var SomeClassMock: SomeClassInterfaceProtocol!
The code for this
// write var ClassNameMock: ClassNameMock
SEND_STRING("var ");
SEND_STRING(SS_LGUI("v")); 	 // Past from buffer
SEND_STRING("Mock: ");
SEND_STRING(SS_LGUI("v")); 	 // Past from buffer
SEND_STRING("Mock");
It will not work to decrease the first letter of the variable, but you can move the cursor to it (alt + left twice) and delete (through del), you just have to enter the letter yourself.
We add
SEND_STRING(SS_LALT(SS_TAP(X_LEFT)));
SEND_STRING(SS_LALT(SS_TAP(X_LEFT)));
SEND_STRING(SS_TAP(X_DEL));
All the manual work is gone, it remains to copy the class, run the macro, enter the first small letter. The whole line was reduced to a couple of keys.
Then, using the same principle, you can initialize a variable:
someClassInterfaceMock = SomeClassInterface()And then generate a mock template in Spry:
lass SomeClassInterfaceMock: SomeClassInterfaceProtocol: Spryify {
    enum ClassFunction: String, StringRepresentable {
        case empty
    }

    enum Function: String, StringRepresentable {
        case <#empty#>
    }
}
As a result, writing a mock for a dependency looks like this for me:
Most likely, this can be done in some program, for example, Keyboard Maestro , but there is such an alternative. From the pros: by connecting the keyboard to any computer, you don't have to configure the environment, everything is already working.
There are many uses for macros, you just need to look for patterns in your work.
There are other chips, but I have not tried them yet: auto shift , combos , tap dance , leader key and a bunch of everything tied to hardware .
Outcome
Assembling your keyboard turned out to be simple and interesting, you need minimal knowledge of soldering. It is not necessary to program, everything basic can be configured on the site. The hardest part of the whole process is choosing a board that you like, picking up the switches and waiting for everything to arrive.
I'm happy with the keyboard. I really like the correct position of the buttons, I completed all my tasks: the cursors are under the right hand, the brackets are symmetrical in the center, I stopped confusing the buttons because of the displacement. I measured the speed and stability of printing, everything got better: faster and fewer errors.
There are also difficulties. It's not very difficult to get used to the new layout, but hotkeys can change significantly and become more difficult. I began to simplify how the hotkeys themselves (cmd + shift + G for running tests in Xcode is stupid), and changed the layout to make it easier to press them. 60% of the keyboard is a good compromise for those who are not ready to sacrifice numbers, as in 40% of the keyboard .
I tried to move back to the MacBook keyboard. It turned out that there was a huge difference behind the gradual addiction. On an ordinary keyboard, hands are close, keys are in strange places, something of their own is typed, in bulk of modifiers under the left hand. But after five minutes I can type as before, but it’s not fun.
Most importantly, I truly loved printing. At each meeting, I have a summary with the decisions made, unanswered questions, tasks for the week. It's a thrill for me to write an article, rewrite a paragraph, reveal a thought in slack. I spend less energy on typos, more on meaning. Satisfied.
Don't be afraid to try and change your familiar tools!
: . Atreus, , , 40% Jian , , .
, . , . .