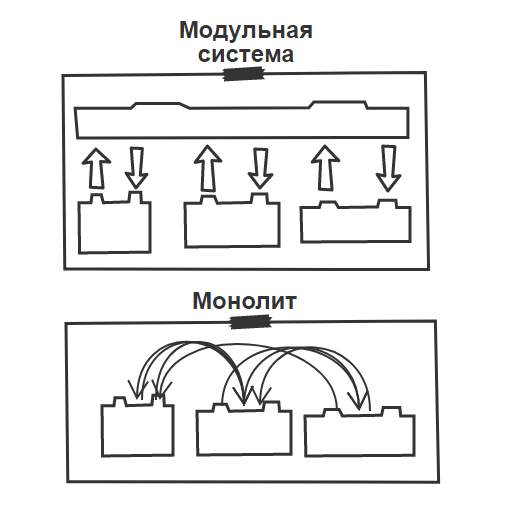
This article will consider a modular approach to the design and further implementation of a game on the Unity engine. The main pros, cons and problems that you had to face are described.
The term "modular approach" means a software organization that uses independent, pluggable, final assemblies internally that can be developed in parallel, changed on the fly, and achieve different software behavior depending on the configuration.
Module structure
It is important to first determine what the module is, what structure it has, which parts of the system are responsible for what and how they should be used.
The module is a relatively independent assembly that does not depend on the project. It can be used in completely different projects with proper configuration and the presence of a common core in the project. Mandatory conditions for the implementation of the module is the presence of a trace. parts:
Infrastructure assembly
This assembly contains models and contracts that can be used by other assemblies. It is important to understand that this part of the module must not have links to the implementation of specific features. Ideally, the framework can only reference the core of the project.
The assembly structure looks like the following. way:

- Entities - entities used inside the module.
- Messaging - request / signal models. You can read about them later.
- Contracts is a place to store interfaces.
It is important to remember that it is recommended that you minimize the use of references between infrastructure assemblies.
Build with features
Specific implementation of the feature. It can use inside itself any of the architectural patterns, but with the amendment that the system must be modular.
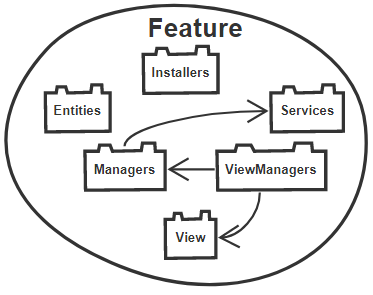
The internal architecture can look like this:

- Entities - entities used inside the module.
- Installers - classes for registering contracts for DI.
- Services is the business layer.
- Managers - the task of the manager is to pull the necessary data from the services, create a ViewEntity and return the ViewManager.
- ViewManagers - Receives a ViewEntity from the Manager, creates the required Views, forwards the required data.
- View - Displays the data that was passed from the ViewManager.
Implementing a modular approach
To implement this approach, at least two mechanisms may be required. We need an approach of dividing code into assemblies and a DI framework. This example uses the Assembly Definitions Files and Zenject mechanisms.
The use of the above specific mechanisms is optional. The main thing is to understand what they were used for. You can replace Zenject with any DI framework with an IoC container or something else, and Assembly Definitions Files - with any other system that allows you to combine code into assemblies or simply make it independent (For example, you can use different repositories for different modules that can be connected as peckages, submodules gita or something else).
A feature of the modular approach is that there are no explicit references from the assembly of one feature to another, with the exception of references to infrastructure assemblies in which models can be stored. The interaction between the modules is implemented using a wrapper over signals from the Zenject framework. The wrapper allows you to send signals and requests to different modules. It is worth noting that a signal means any notification by the current module of other modules, and a request means a request for another module that can return data.
Signals
Signal - a mechanism for notifying the system about some changes. And the easiest way to disassemble them is in practice.
Let's say we have 2 modules. Foo and Foo2. The Foo2 module should respond to some change in the Foo module. To get rid of the dependence of the modules, 2 signals are implemented. One signal inside the Foo module, which will inform the system about the state change, and the second signal inside the Foo2 module. The Foo2 module will react to this signal. The routing of the OnFooSignal signal in OnFoo2Signal will be in the routing module.
Schematically it will look like this:

Inquiries
Queries allow solving problems of communication of data receiving / transmitting by one module from another (others).
Let's consider a similar example that was given above for signals.
Let's say we have 2 modules. Foo and Foo2. The Foo module needs some data from the Foo2 module. In this case, the Foo module should not know anything about the Foo2 module. In fact, this problem could be solved using additional signals, but the solution with queries looks simpler and more beautiful.
It will look like this schematically:

Communication between modules
In order to minimize links between modules with features (including links Infrastructure-Infrastructure), it was decided to write a wrapper over the signals provided by the Zenject framework and create a module whose task would be to route different signals and map data.
PS In fact, this module has links to all Infrastructure assemblies that are not good. But this problem can be solved through the IoC.
Example of module interaction
Let's say there are two modules. LoginModule and RewardModule. RewardModule should give a reward to the user after the FB login.
namespace RewardModule.src.Infrastructure.Messaging.Signals
{
    public class OnLoginSignal : SignalBase
    {
        public bool IsFirstLogin { get; set; }
    }
}
namespace RewardModule.src.Infrastructure.Messaging.RequestResponse.Produce
{
public class GainRewardRequest : EventBusRequest<ProduceResponse>
{
public bool IsFirstLogin { get; set; }
}
}namespace MessagingModule.src.Feature.Proxy
{
public class LoginModuleProxy
{
[Inject]
private IEventBus eventBus;
public override async void Subscribe()
{
eventBus.Subscribe<OnLoginSignal>((loginSignal) =>
{
var request = new GainRewardRequest()
{
IsFirstLogin = loginSignal.IsFirstLogin;
}
var result = await eventBus.FireRequestAsync<GainRewardRequest, GainRewardResponse>(request);
var analyticsEvent = new OnAnalyticsShouldBeTracked()
{
AnalyticsPayload = new Dictionary<string, string>
{
{
"IsFirstLogin", "false"
},
},
};
eventBus.Fire<OnAnalyticsShouldBeTrackedSignal>(analyticsEvent);
});In the example above, there are no direct links between modules. But they are linked through the MessagingModule. It is very important to remember that there should be nothing in the routing other than signal / request routing and mapping.
Substitution of implementations
Using a modular approach and the Feature toggle pattern, you can achieve amazing results in terms of impact on your application. Having a certain configuration on the server, you can manipulate the enabling / disabling of different modules at the start of the application, changing them during the game.
This is achieved by checking the module availability flags during binding of modules in Zenject (in fact, into a container), and based on this, the module is either bound into a container or not. In order to achieve a change in behavior during a game session (for example, you need to change the mechanics during a game session. There is a Solitaire module and a Klondike module. And for 50 percent of users the kerchief module should work), a mechanism was developed which, when switching from one scene to another cleaned up a specific module container and bind new dependencies.
He worked on the trail. principle: if a feature was enabled, and then during the session were disabled, it would be necessary to empty the container. If the feature was enabled, you need to make all the changes to the container. It is important to do this on an "empty" stage so as not to violate the integrity of data and connections. It was possible to implement this behavior, but as a production feature it is not recommended to use such functionality, because it entails a greater risk of breaking something.
Below is the pseudocode of the base class, the descendants of which are required to register something in the container.
    public abstract class GlobalInstallerBase<TGlobalInstaller, TModuleInstaller> : MonoInstaller<TGlobalInstaller>
        where TGlobalInstaller : MonoInstaller<TGlobalInstaller>
        where TModuleInstaller : Installer
    {
        protected abstract string SubContainerName { get; }

        protected abstract bool IsFeatureEnabled { get; }

        public override void InstallBindings()
        {
            if (!IsFeatureEnabled)
            {
                return;
            }

            var subcontainer = Container.CreateSubContainer();
            subcontainer.Install<TModuleInstaller>();

            Container.Bind<DiContainer>()
                .WithId(SubContainerName)
                .FromInstance(subcontainer)
                .AsCached();
        }

        protected virtual void SubContainerCleaner(DiContainer subContainer)
        {
            subContainer.UnbindAll();
        }

        protected virtual DiContainer SubContainerInstanceGetter(InjectContext containerContext)
        {
            return containerContext.Container.ResolveId<DiContainer>(SubContainerName);
        }
    }
An example of a primitive module
Let's look at a simple example of how a module can be implemented.
Let's say you need to implement a module that will restrict the movement of the camera so that the user cannot take it beyond the "border" of the screen.
The module will contain an Infrastructure assembly with a signal that will notify that the camera has tried to go off-screen to the system.
Feature - feature implementation. This will be the logic for checking if the camera is out of range, notifying other modules about it, etc.

- BorderConfig is an entity that describes the boundaries of the screen.
- BorderViewEntity is an entity to be passed to the ViewManager and View.
- BoundingBoxManager - gets BorderConfig from the server, creates BorderViewEntity.
- BoundingBoxViewManager — MonoBehaviour'a. , .
- BoundingBoxView — , «» .
- . , , .
- .
- EventHell, , .
- — , . , , — .
- .
- .
- - , . , MVC, — ECS.
- , .
- , .