This article is about the problem and the analysis of options for its solution. I will not give you a silver bullet against all monsters, but I will show you how you can study a specific one in order to create a bullet specifically for him. I will analyze this using an example of how we made the animation of changing fragments become friends with the Bottom Sheet.
Diamond Checkout: Background
Diamond Checkout is the codename for our project. Its meaning is very simple - to reduce the time spent by the client at the last stage of ordering. Whereas the old version required at least four clicks on two screens to place an order (and each new screen is a potential loss of context by the user), the "diamond checkout" ideally requires just one click on one screen.
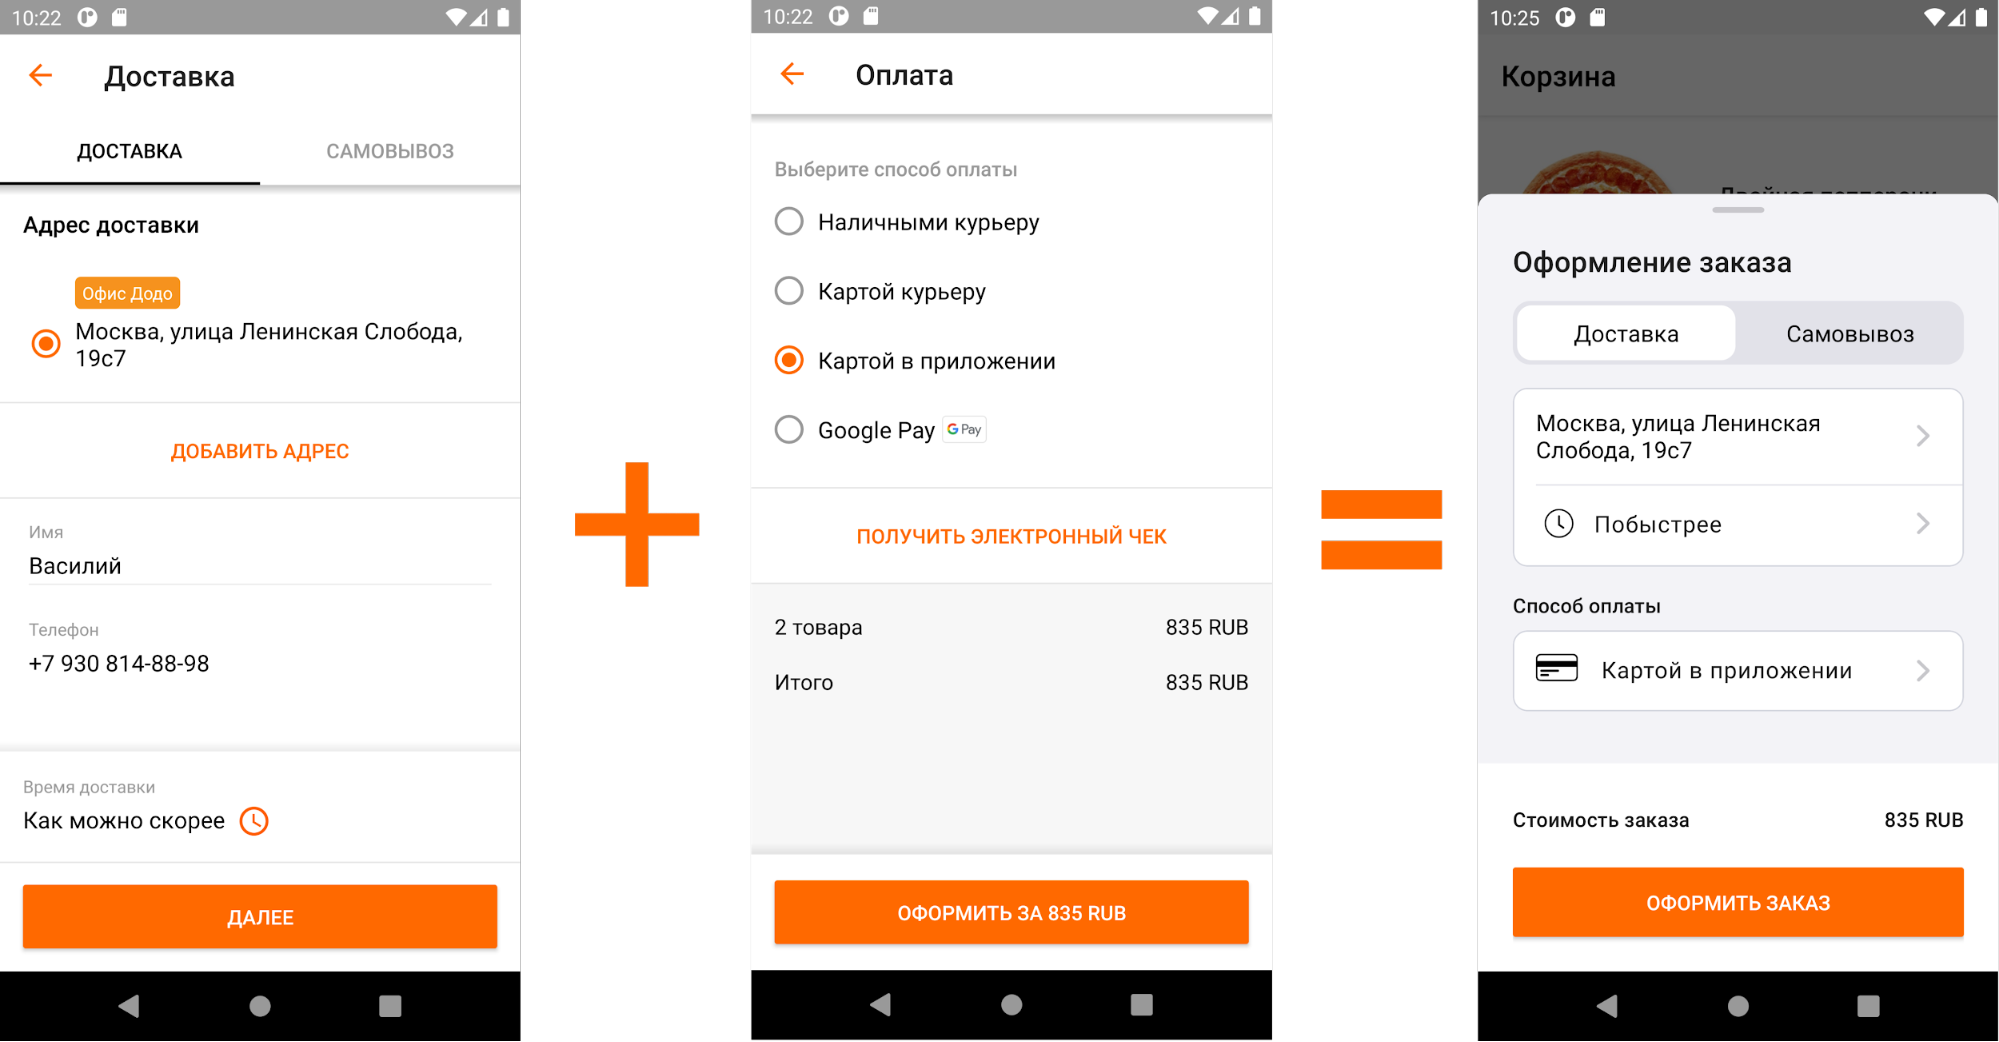
Comparison of the old and new checkout
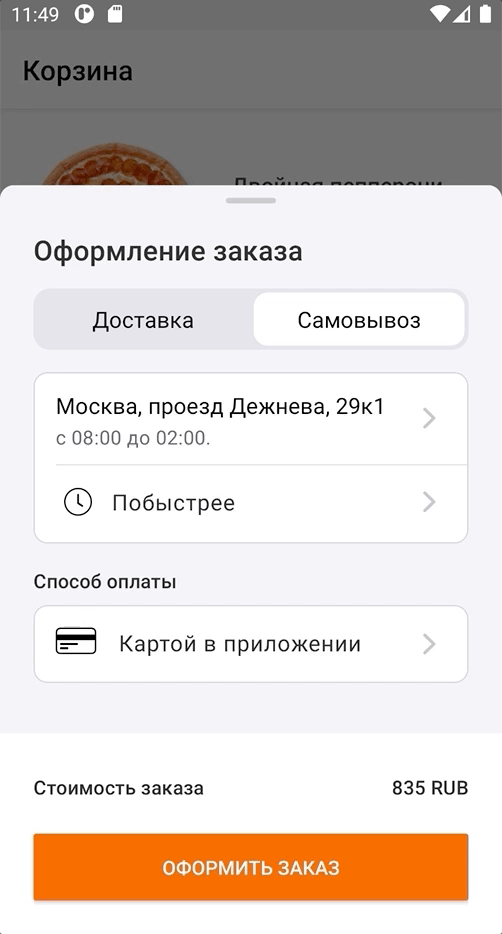
We call the new screen "curtain" between ourselves. In the picture you can see how we received the task from the designers. This design solution is standard, it is known under the name Bottom Sheet, described in Material Design (including for Android) and is used in various variations in many applications. Google offers us two ready-made implementation options: Modal and Persistent. The difference between these approaches has been described in many , many articles.

We decided that our curtain would be modal and were close to a happy ending, but the design team was on their guard and did not let this happen so easily.
See what awesome animations on iOS . Let's do the same?
We could not refuse such a challenge! Okay, just kidding about "the designers suddenly came up with an offer to make animation", but the part about iOS is true.
The standard transitions between screens (that is, the absence of transitions) looked, though not too clumsy, but did not reach the title of "diamond checkout". Although, who am I kidding, it really was terrible:

What we have "out of the box"
Before proceeding to the description of the implementation of the animation, I'll tell you how the transitions looked before.
- The client clicked on the address field of the pizzeria -> in response, the "Pickup" fragment was opened. It opened in full screen (as it was intended) with a sharp jump, while the list of pizzerias appeared with a slight delay.
- When the client pressed "Back" -> the return to the previous screen occurred with a sharp jump.
- When I clicked on the payment method field -> from the bottom, the "Payment Method" fragment opened with a sharp jump. The list of payment methods appeared with a delay; when they appeared, the screen increased with a jump.
- When you press "Back" -> return back with a sharp jump.
The delay in displaying data is caused by the fact that it is loaded onto the screen asynchronously. It will be necessary to take this into account in the future.
What, in fact, is the problem: where the client feels good, there we have limitations
Users don't like it when there are too many abrupt movements on the screen. It is distracting and confusing. In addition, you always want to see a smooth response to your action, and not convulsions.
This led us to a technical limitation: we decided that we should not close the current bottom sheet and show a new one for each screen change, and it would also be bad to show several bottom sheets one above the other. So, within the framework of our implementation (each screen is a new fragment), you can make only one bottom sheet, which should move as smoothly as possible in response to user actions.
This means that we will have a fragment container that is dynamic in height (since all fragments have different heights), and we must animate its height change.
Preliminary markup
The root element of the "curtain" is very simple - it is just a rectangular background with rounded corners at the top and a container in which the fragments are placed.
<?xml version="1.0" encoding="utf-8"?>
<FrameLayout xmlns:android="http://schemas.android.com/apk/res/android"
    android:layout_width="match_parent"
    android:layout_height="wrap_content"
    android:background="@drawable/dialog_gray200_background"
    >

  <androidx.fragment.app.FragmentContainerView
      android:id="@+id/container"
      android:layout_width="match_parent"
      android:layout_height="match_parent"
      />

</FrameLayout>
And the dialog_gray200_background.xml file looks like this:
<?xml version="1.0" encoding="utf-8"?>
<selector xmlns:android="http://schemas.android.com/apk/res/android">
  <item>
    <shape android:shape="rectangle">
      <solid android:color="@color/gray200" />
      <corners android:bottomLeftRadius="0dp" android:bottomRightRadius="0dp" android:topLeftRadius="10dp" android:topRightRadius="10dp" />
    </shape>
  </item>
</selector>
Each new screen is a separate fragment, the fragments are replaced using the replace method, everything is standard here.
First attempts to implement animation
animateLayoutChanges
Let's remember the ancient elven magic animateLayoutChanges , which is actually the default LayoutTransition. Although animateLayoutChanges is not designed for changing fragments at all, it is hoped that this will help with height animation. Also FragmentContainerView does not support animateLayoutChanges, so we change it to good old FrameLayout.
<?xml version="1.0" encoding="utf-8"?>
<FrameLayout xmlns:android="http://schemas.android.com/apk/res/android"
    android:layout_width="match_parent"
    android:layout_height="wrap_content"
    android:background="@drawable/dialog_gray200_background"
    >

  <FrameLayout
      android:id="@+id/container"
      android:layout_width="match_parent"
      android:layout_height="match_parent"
      android:animateLayoutChanges="true"
      />

</FrameLayout>
Run:

animateLayoutChanges
As you can see, changing the height of the container is really animated when changing fragments. Going to the Pickup screen looks fine, but the rest leaves a lot to be desired.
Intuition suggests that this path will lead to a twitching eye of the designer, so we roll back our changes and try something else.
setCustomAnimations
FragmentTransaction allows you to set animation described in xml format using the setCustomAnimation method . To do this, in the resources, create a folder called "anim" and add four animation files there:
to_right_out.xml
<?xml version="1.0" encoding="utf-8"?>
<set xmlns:android="http://schemas.android.com/apk/res/android"
    android:duration="500"
    android:interpolator="@android:anim/accelerate_interpolator"
>
  <translate android:toXDelta="100%" />
</set>
to_right_in.xml
<?xml version="1.0" encoding="utf-8"?>
<set xmlns:android="http://schemas.android.com/apk/res/android"
    android:duration="500"
    android:interpolator="@android:anim/accelerate_interpolator"
>
  <translate android:fromXDelta="-100%" />
</set>
to_left_out.xml
<?xml version="1.0" encoding="utf-8"?>
<set xmlns:android="http://schemas.android.com/apk/res/android"
    android:duration="500"
    android:interpolator="@android:anim/accelerate_interpolator"
>
  <translate android:toXDelta="-100%" />
</set>
to_left_in.xml
<?xml version="1.0" encoding="utf-8"?>
<set xmlns:android="http://schemas.android.com/apk/res/android"
    android:duration="500"
    android:interpolator="@android:anim/accelerate_interpolator"
>
  <translate android:fromXDelta="100%" />
</set>
And then we set these animations into a transaction:
fragmentManager
    .beginTransaction()
    .setCustomAnimations(R.anim.to_left_in, R.anim.to_left_out, R.anim.to_right_in, R.anim.to_right_out)
    .replace(containerId, newFragment)
    .addToBackStack(newFragment.tag)
    .commit()
We get the following result:

setCustomAnimation
What we have with this implementation:
- It has already become better - you can see how the screens replace each other in response to user action.
- But there is still a jump due to the different heights of the fragments. This is due to the fact that when you move fragments in the hierarchy, there is only one fragment. It is he who adjusts the height of the container for himself, and the second one displays "how it happened".
- There is still a problem with asynchronous loading of data on payment methods - the screen appears at first blank, and then fills with content.
This is no good. Conclusion: you need something else.
Or maybe try something sudden: Shared Element Transition
Most Android developers know about Shared Element Transition. However, although this tool is very flexible, many people face problems using it and therefore are not very fond of using it.

Its essence is quite simple - we can animate the transition of elements from one fragment to another. For example, we can move the element on the first fragment (let's call it the “initial element”) with animation to the place of the element on the second fragment (we will call this element “the final element”), while fading the rest of the elements of the first fragment and showing the second fragment with fade. The element that needs to animate from one fragment to another is called Shared Element.
To set the Shared Element, we need:
- mark the start element and the end element with the transitionName attribute with the same value;
- specify sharedElementEnterTransition for the second chunk.
What if you use the root View of the fragment as the Shared Element? Perhaps Shared Element Transition was not invented for this. Though, if you think about it, it is difficult to find an argument why this solution will not work. We want to animate the starting element to the ending element between two fragments. I see no ideological contradiction. Let's try this!
For each fragment that is inside the "curtain", for the root View, specify the transitionName attribute with the same value:
<?xml version="1.0" encoding="utf-8"?>
<androidx.constraintlayout.widget.ConstraintLayout
    xmlns:android="http://schemas.android.com/apk/res/android"
    xmlns:app="http://schemas.android.com/apk/res-auto"
    xmlns:tools="http://schemas.android.com/tools"
    android:layout_width="match_parent"
    android:layout_height="wrap_content"
    android:transitionName="checkoutTransition"
    >
Important: This will work as we are using REPLACE in the chunk transaction. If you're using ADD (or using ADD and hiding the previous snippet with previousFragment.hide () [don't do this]), then transitionName will have to be set dynamically and cleared after the animation finishes. This has to be done, because at one point in time in the current View hierarchy there cannot be two Views with the same transitionName. This can be done, but it will be better if you can do without such a hack. If you really need to use ADD, you can find inspiration for implementation in this article.
Next, you need to specify the Transition class, which will be responsible for how our transition will proceed. First, let's check what is out of the box - use AutoTransition .
newFragment.sharedElementEnterTransition = AutoTransition()And we have to set the Shared Element we want to animate in the fragment transaction. In our case, this will be the root View of the fragment:
fragmentManager
    .beginTransaction()
    .apply{
      if (Build.VERSION.SDK_INT >= Build.VERSION_CODES.LOLLIPOP) {
        addSharedElement(currentFragment.requireView(), currentFragment.requireView().transitionName)
        setReorderingAllowed(true)
      }
    }
    .replace(containerId, newFragment)
    .addToBackStack(newFragment.tag)
    .commit()
Important: Please note that transitionName (like the entire Transition API) is available starting with Android Lollipop.
Let's see what happened:

AutoTransition
Transition worked, but it looks so-so. This is because during a chunk transaction, only the new chunk is in the View hierarchy. This fragment stretches or shrinks the container to its size and only after that it begins to animate using a transition. It is for this reason that we see animation only when the new fragment is higher in height than the previous one.
Since the standard implementation did not suit us, what should we do? Of course, you need to
Writing your Transition
Transition is a class from the Transition API that is responsible for creating animation between two scenes (Scene). The main elements of this API:
- Scene is the arrangement of elements on the screen at a certain point in time (layout) and the ViewGroup in which the animation takes place (sceneRoot).
- The Start Scene is the Scene at the start time.
- The End Scene is the Scene at the end point in time.
- Transition is a class that collects the properties of the start and end scenes and creates an animator to animate between them.
We will use four methods in the Transition class:
- fun getTransitionProperties (): Array. This method should return a set of properties that will be animated. From this method, you need to return an array of strings (keys) in a free form, the main thing is that the captureStartValues and captureEndValues methods (described below) write properties with these keys. An example will follow.
- fun captureStartValues(transitionValues: TransitionValues). layout' . , , , .
- fun captureEndValues(transitionValues: TransitionValues). , layout' .
- fun createAnimator(sceneRoot: ViewGroup?, startValues: TransitionValues?, endValues: TransitionValues?): Animator?. , , . , , .
Transition
- , Transition.
@TargetApi(VERSION_CODES.LOLLIPOP) class BottomSheetSharedTransition : Transition { @Suppress("unused") constructor() : super() @Suppress("unused") constructor( context: Context?, attrs: AttributeSet? ) : super(context, attrs) } - getTransitionProperties.
View, PROP_HEIGHT, ( ) :
companion object { private const val PROP_HEIGHT = "heightTransition:height" private val TransitionProperties = arrayOf(PROP_HEIGHT) } override fun getTransitionProperties(): Array<String> = TransitionProperties - captureStartValues.
View, transitionValues. transitionValues.values ( Map) c PROP_HEIGHT:
override fun captureStartValues(transitionValues: TransitionValues) {
  transitionValues.values[PROP_HEIGHT] = transitionValues.view.height
}
, . , . , - . « » , , . , . :
override fun captureStartValues(transitionValues: TransitionValues) { // View... transitionValues.values[PROP_HEIGHT] = transitionValues.view.height // ... transitionValues.view.parent .let { it as? View } ?.also { view -> view.updateLayoutParams<ViewGroup.LayoutParams> { height = view.height } } } - captureEndValues.
, View. . . , . . , , , . — view, , . :
override fun captureEndValues(transitionValues: TransitionValues) {
  //     View
  transitionValues.values[PROP_HEIGHT] = getViewHeight(transitionValues.view.parent as View)
}
getViewHeight:
private fun getViewHeight(view: View): Int {
  //
  val deviceWidth = getScreenWidth(view)

  //  View
  val widthMeasureSpec = MeasureSpec.makeMeasureSpec(deviceWidth, MeasureSpec.EXACTLY)
  val heightMeasureSpec = MeasureSpec.makeMeasureSpec(0, MeasureSpec.UNSPECIFIED)

  return view
      //
      .apply { measure(widthMeasureSpec, heightMeasureSpec) }
      //
      .measuredHeight
      //  View       ,
      .coerceAtMost(getScreenHeight(view))
}

private fun getScreenHeight(view: View) =
  getDisplaySize(view).y - getStatusBarHeight(view.context)

private fun getScreenWidth(view: View) =
  getDisplaySize(view).x

private fun getDisplaySize(view: View) =
  Point().also {
    (view.context.getSystemService(
        Context.WINDOW_SERVICE
    ) as WindowManager).defaultDisplay.getSize(it)
  }

private fun getStatusBarHeight(context: Context): Int =
  context.resources
      .getIdentifier("status_bar_height", "dimen", "android")
      .takeIf { resourceId -> resourceId > 0 }
      ?.let { resourceId -> context.resources.getDimensionPixelSize(resourceId) }
      ?: 0
, , — . - . Fade in.
, . . «BottomSheetSharedTransition», :
private fun prepareFadeInAnimator(view: View): Animator = ObjectAnimator.ofFloat(view, View.ALPHA, 0f, 1f) - . .
, :
private fun prepareHeightAnimator(
    startHeight: Int,
    endHeight: Int,
    view: View
) = ValueAnimator.ofInt(startHeight, endHeight)
    .apply {
        val container = view.parent.let { it as View }

        //
        addUpdateListener { animation ->
            container.updateLayoutParams<ViewGroup.LayoutParams> {
                height = animation.animatedValue as Int
            }
        }
    }
ValueAnimator . , . , . , , . , WRAP_CONTENT. , :
private fun prepareHeightAnimator(
    startHeight: Int,
    endHeight: Int,
    view: View
) = ValueAnimator.ofInt(startHeight, endHeight)
    .apply {
        val container = view.parent.let { it as View }

        //
        addUpdateListener { animation ->
            container.updateLayoutParams<ViewGroup.LayoutParams> {
                height = animation.animatedValue as Int
            }
        }

        //      WRAP_CONTENT
        doOnEnd {
            container.updateLayoutParams<ViewGroup.LayoutParams> {
                height = ViewGroup.LayoutParams.WRAP_CONTENT
            }
        }
    }
, . - . createAnimator.
override fun createAnimator( sceneRoot: ViewGroup?, startValues: TransitionValues?, endValues: TransitionValues? ): Animator? { if (startValues == null || endValues == null) { return null } val animators = listOf<Animator>( prepareHeightAnimator( startValues.values[PROP_HEIGHT] as Int, endValues.values[PROP_HEIGHT] as Int, endValues.view ), prepareFadeInAnimator(endValues.view) ) return AnimatorSet() .apply { interpolator = FastOutSlowInInterpolator() duration = ANIMATION_DURATION playTogether(animators) } } - .
Transititon'. , . , . «createAnimator» . ?
- Fade' , .
- «captureStartValues» , , WRAP_CONTENT.
, . : , , Transition'. :
companion object {
    private const val PROP_HEIGHT = "heightTransition:height"
    private const val PROP_VIEW_TYPE = "heightTransition:viewType"

    private val TransitionProperties = arrayOf(PROP_HEIGHT, PROP_VIEW_TYPE)
}

override fun getTransitionProperties(): Array<String> = TransitionProperties

override fun captureStartValues(transitionValues: TransitionValues) {
    //    View...
    transitionValues.values[PROP_HEIGHT] = transitionValues.view.height
    transitionValues.values[PROP_VIEW_TYPE] = "start"

    // ...
    transitionValues.view.parent
        .let { it as? View }
        ?.also { view ->
            view.updateLayoutParams<ViewGroup.LayoutParams> {
                height = view.height
            }
        }

}

override fun captureEndValues(transitionValues: TransitionValues) {
    //     View
    transitionValues.values[PROP_HEIGHT] = getViewHeight(transitionValues.view.parent as View)
    transitionValues.values[PROP_VIEW_TYPE] = "end"
}
, «PROP_VIEW_TYPE», «captureStartValues» «captureEndValues» . , ! - Transition.
newFragment.sharedElementEnterTransition = BottomSheetSharedTransition()
In order for the animation to start on time and look good, you just need to postpone the transition between fragments (and, accordingly, the animation) until the data is loaded. To do this, call the postponeEnterTransition method inside the fragment . Remember to call startPostponedEnterTransition when you're done with long data loading tasks . I'm sure you knew about this trick, but it doesn't hurt to remind you once again.
All together: what happened in the end
With the new BottomSheetSharedTransition and using postponeEnterTransition when loading data asynchronously, we got the following animation:
Under the spoiler there is a ready-made class BottomSheetSharedTransition
package com.maleev.bottomsheetanimation

import android.animation.Animator
import android.animation.AnimatorSet
import android.animation.ObjectAnimator
import android.animation.ValueAnimator
import android.annotation.TargetApi
import android.content.Context
import android.graphics.Point
import android.os.Build
import android.transition.Transition
import android.transition.TransitionValues
import android.util.AttributeSet
import android.view.View
import android.view.ViewGroup
import android.view.WindowManager
import android.view.animation.AccelerateInterpolator
import androidx.core.animation.doOnEnd
import androidx.core.view.updateLayoutParams

@TargetApi(Build.VERSION_CODES.LOLLIPOP)
class BottomSheetSharedTransition : Transition {

    @Suppress("unused")
    constructor() : super()

    @Suppress("unused")
    constructor(
        context: Context?,
        attrs: AttributeSet?
    ) : super(context, attrs)

    companion object {
        private const val PROP_HEIGHT = "heightTransition:height"

        // the property PROP_VIEW_TYPE is workaround that allows to run transition always
        // even if height was not changed. It's required as we should set container height
        // to WRAP_CONTENT after animation complete
        private const val PROP_VIEW_TYPE = "heightTransition:viewType"
        private const val ANIMATION_DURATION = 400L

        private val TransitionProperties = arrayOf(PROP_HEIGHT, PROP_VIEW_TYPE)
    }

    override fun getTransitionProperties(): Array<String> = TransitionProperties

    override fun captureStartValues(transitionValues: TransitionValues) {
        //    View...
        transitionValues.values[PROP_HEIGHT] = transitionValues.view.height
        transitionValues.values[PROP_VIEW_TYPE] = "start"

        // ...
        transitionValues.view.parent
            .let { it as? View }
            ?.also { view ->
                view.updateLayoutParams<ViewGroup.LayoutParams> {
                    height = view.height
                }
            }

    }

    override fun captureEndValues(transitionValues: TransitionValues) {
        //     View
        transitionValues.values[PROP_HEIGHT] = getViewHeight(transitionValues.view.parent as View)
        transitionValues.values[PROP_VIEW_TYPE] = "end"
    }

    override fun createAnimator(
        sceneRoot: ViewGroup?,
        startValues: TransitionValues?,
        endValues: TransitionValues?
    ): Animator? {
        if (startValues == null || endValues == null) {
            return null
        }

        val animators = listOf<Animator>(
            prepareHeightAnimator(
                startValues.values[PROP_HEIGHT] as Int,
                endValues.values[PROP_HEIGHT] as Int,
                endValues.view
            ),
            prepareFadeInAnimator(endValues.view)
        )

        return AnimatorSet()
            .apply {
                duration = ANIMATION_DURATION
                playTogether(animators)
            }
    }

    private fun prepareFadeInAnimator(view: View): Animator =
        ObjectAnimator
            .ofFloat(view, "alpha", 0f, 1f)
            .apply { interpolator = AccelerateInterpolator() }

    private fun prepareHeightAnimator(
        startHeight: Int,
        endHeight: Int,
        view: View
    ) = ValueAnimator.ofInt(startHeight, endHeight)
        .apply {
            val container = view.parent.let { it as View }

            //
            addUpdateListener { animation ->
                container.updateLayoutParams<ViewGroup.LayoutParams> {
                    height = animation.animatedValue as Int
                }
            }

            //      WRAP_CONTENT
            doOnEnd {
                container.updateLayoutParams<ViewGroup.LayoutParams> {
                    height = ViewGroup.LayoutParams.WRAP_CONTENT
                }
            }
        }

    private fun getViewHeight(view: View): Int {
        //
        val deviceWidth = getScreenWidth(view)

        //  View
        val widthMeasureSpec =
            View.MeasureSpec.makeMeasureSpec(deviceWidth, View.MeasureSpec.EXACTLY)
        val heightMeasureSpec =
            View.MeasureSpec.makeMeasureSpec(0, View.MeasureSpec.UNSPECIFIED)

        return view
            // :
            .apply { measure(widthMeasureSpec, heightMeasureSpec) }
            //   :
            .measuredHeight
            //  View       ,     :
            .coerceAtMost(getScreenHeight(view))
    }

    private fun getScreenHeight(view: View) =
        getDisplaySize(view).y - getStatusBarHeight(view.context)

    private fun getScreenWidth(view: View) =
        getDisplaySize(view).x

    private fun getDisplaySize(view: View) =
        Point().also { point ->
            view.context.getSystemService(Context.WINDOW_SERVICE)
                .let { it as WindowManager }
                .defaultDisplay
                .getSize(point)
        }

    private fun getStatusBarHeight(context: Context): Int =
        context.resources
            .getIdentifier("status_bar_height", "dimen", "android")
            .takeIf { resourceId -> resourceId > 0 }
            ?.let { resourceId -> context.resources.getDimensionPixelSize(resourceId) }
            ?: 0
}
When we have a ready-made Transition class, its application comes down to simple steps:
Step 1. In a fragment transaction, add a Shared Element and set the Transition:
private fun transitToFragment(newFragment: Fragment) {
    val currentFragmentRoot = childFragmentManager.fragments[0].requireView()

    childFragmentManager
        .beginTransaction()
        .apply {
            if (Build.VERSION.SDK_INT >= Build.VERSION_CODES.LOLLIPOP) {
                addSharedElement(currentFragmentRoot, currentFragmentRoot.transitionName)
                setReorderingAllowed(true)

                newFragment.sharedElementEnterTransition = BottomSheetSharedTransition()
            }
        }
        .replace(R.id.container, newFragment)
        .addToBackStack(newFragment.javaClass.name)
        .commit()
}
Step 2. In the markup of the fragments (the current fragment and the next), which should be animated inside the BottomSheetDialogFragment, set the transitionName:
<?xml version="1.0" encoding="utf-8"?>
<androidx.constraintlayout.widget.ConstraintLayout
    xmlns:android="http://schemas.android.com/apk/res/android"
    xmlns:app="http://schemas.android.com/apk/res-auto"
    xmlns:tools="http://schemas.android.com/tools"
    android:layout_width="match_parent"
    android:layout_height="wrap_content"
    android:transitionName="checkoutTransition"
    >
That's all, the end.
Could it have been done differently?
There are always several options for solving a problem. I want to mention other possible approaches that we have not tried:
- Ditch fragments, use one fragment with many Views, and animate specific Views. This gives you more control over the animation, but you lose the benefits of fragments: native navigation support and out-of-the-box lifecycle handling (you'll have to implement this yourself).
- MotionLayout. MotionLayout , , , .
- . , , . Bottom Sheet Bottom Sheet .
- Bottom Sheet . — .
GitHub. Android- ( ) .