Introduction
Hello! We are the team of the Amperka YouTube channel, in the studio and we saw videos on projects and pieces of iron. However, at some point everything changed.

Under the cut - the history of the construction of our rocket.
It was spring 2020 and the self-isolation
Since it will not be possible to make such a serious project in one go, we will divide it for convenience into its component parts (the list will be updated as we work):
- Part 1. The theory of rocket engines. Candy fuel
- Part 2: Motor housing, nozzle calculation
- Part 3: Turning, stand finishing, electronics
We also ask you to take into account that articles, as well as series, are released not according to the stages completed, but according to the time, that is, what we have done in a week is what we write / show.
Rocket science, in general, is a complex, complex and multifaceted science. We had no relevant experience, we did not graduate from institutions in this direction, but we have hands, a head, a desire - and this is already a lot, so, as Yuri Alekseevich used to say, let's go.
TTRD theory
What is jet propulsion (for those who, suddenly, do not know) we will not say much: in a nutshell, this is movement due to the throwing away of the mass in the opposite direction from the direction of movement. We will not talk about all sorts of exotic designs of engines such as nuclear, ion and others like them - one is not designed to work in the atmosphere, others are too complex and not reproducible in amateur conditions, etc., so we will focus on simple designs, but accessible to a simple layman , which, if desired, can be repeated almost at home, namely, chemical. In such engines, the jet stream is obtained due to the chemical reaction of the fuel and the oxidizer (in some cases, atmospheric oxygen can play the role of the oxidant).
So, chemical engines (CRD), according to the aggregate state of the fuel, are classified into liquid (LPRE) and solid fuel (TTRD), so we will choose from them. LPREs are very convenient, since they allow you to control the thrust, but they require the use of complex systems of nozzles in the combustion chamber and no less complex fuel supply systems in their design. Designing a liquid rocket engine alone, even the most primitive, will take us months, and therefore, this is not our option. An alternative can be a turbojet engine due to the simplicity of its design and significantly lower fuel requirements. Yes, we will not be able to accurately dose cravings. More precisely, we will not be able to dose it at all. However, there are some aspects on which we can play, and this will be discussed further.
Mixed fuels
The very first, and, accordingly, primitive fuel for rockets was gunpowder: first smoky, and then smokeless. The Chinese, having come up with this combustible mixture, quickly realized that it can not only make a bang and a lot of light, but also push the projectile, gradually burning inside it. Of course, there is little sense from it, it is suitable only for fireworks, and the specific impulse leaves much to be desired. The evolution of smokeless powder has become homogeneous (one-component) nitrocellulose-based formulations. They are quite unpretentious in storage and operation, and are also quite environmentally friendly, but they still have the same disadvantage in the form of a weak specific impulse.
Mixed compositions of fuel and oxidizer show much better results. Most often, as such a pair, oxidizers from perchlorates with a fuel made of metal and polymer powder or “caramel fuel”, widely known in the circles of amateur modellers, where nitrates (saltpeter) and complex carbohydrates (sugar, sorbitol) are used as an oxidizing agent are used as fuel ... It is precisely the last two options (perchlorate and caramel) fuel that we chose as test subjects for our rocket.
Engine calculation
The most important characteristic of solid fuel is its combustion rate; often this value is a constant for a certain fuel composition. Combustion spreads over the surface. If we simply set fire to the end of the cylindrical fuel stick, then we get end-to-end combustion, which will give long-term uniform combustion, however, it will not work to obtain sufficient thrust to lift the rocket into the air. To increase efficiency, it is necessary to make a channel in the fuel through which combustion will propagate, thereby increasing its area. It should also be borne in mind that as the channel burns out, the channel profile will change, therefore, the effective area will change. You can, of course, experiment with different profiles for a long time, however, all this has already been done before us and is packaged in a convenient software toolkit.

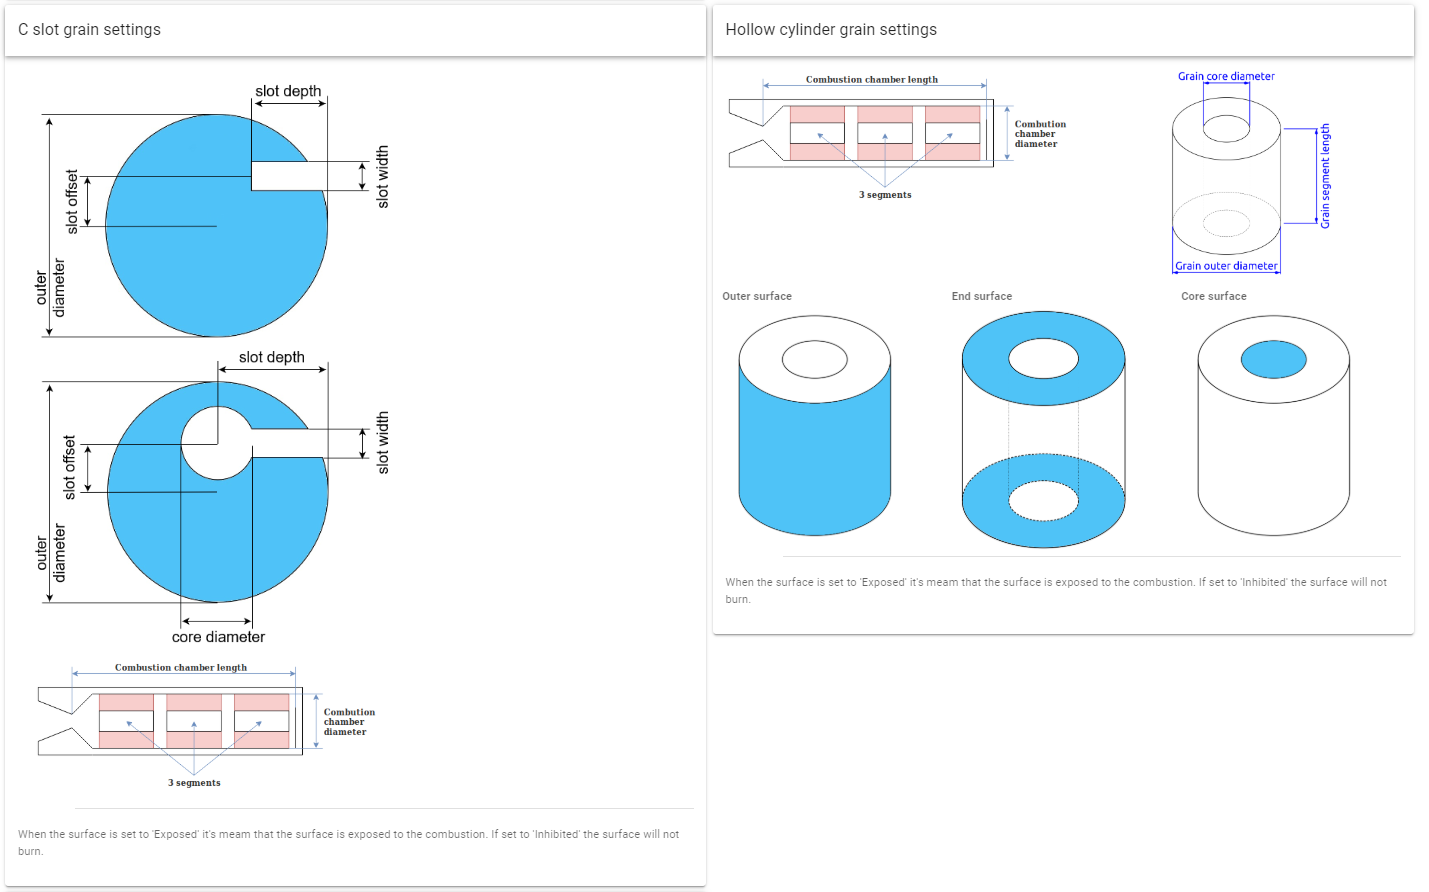
You can enter all the necessary parameters into the program and get the thrust graphs that the rocket will develop. In the Grain configuration column, under the question mark, there is a descriptive manual on various channel profiles.
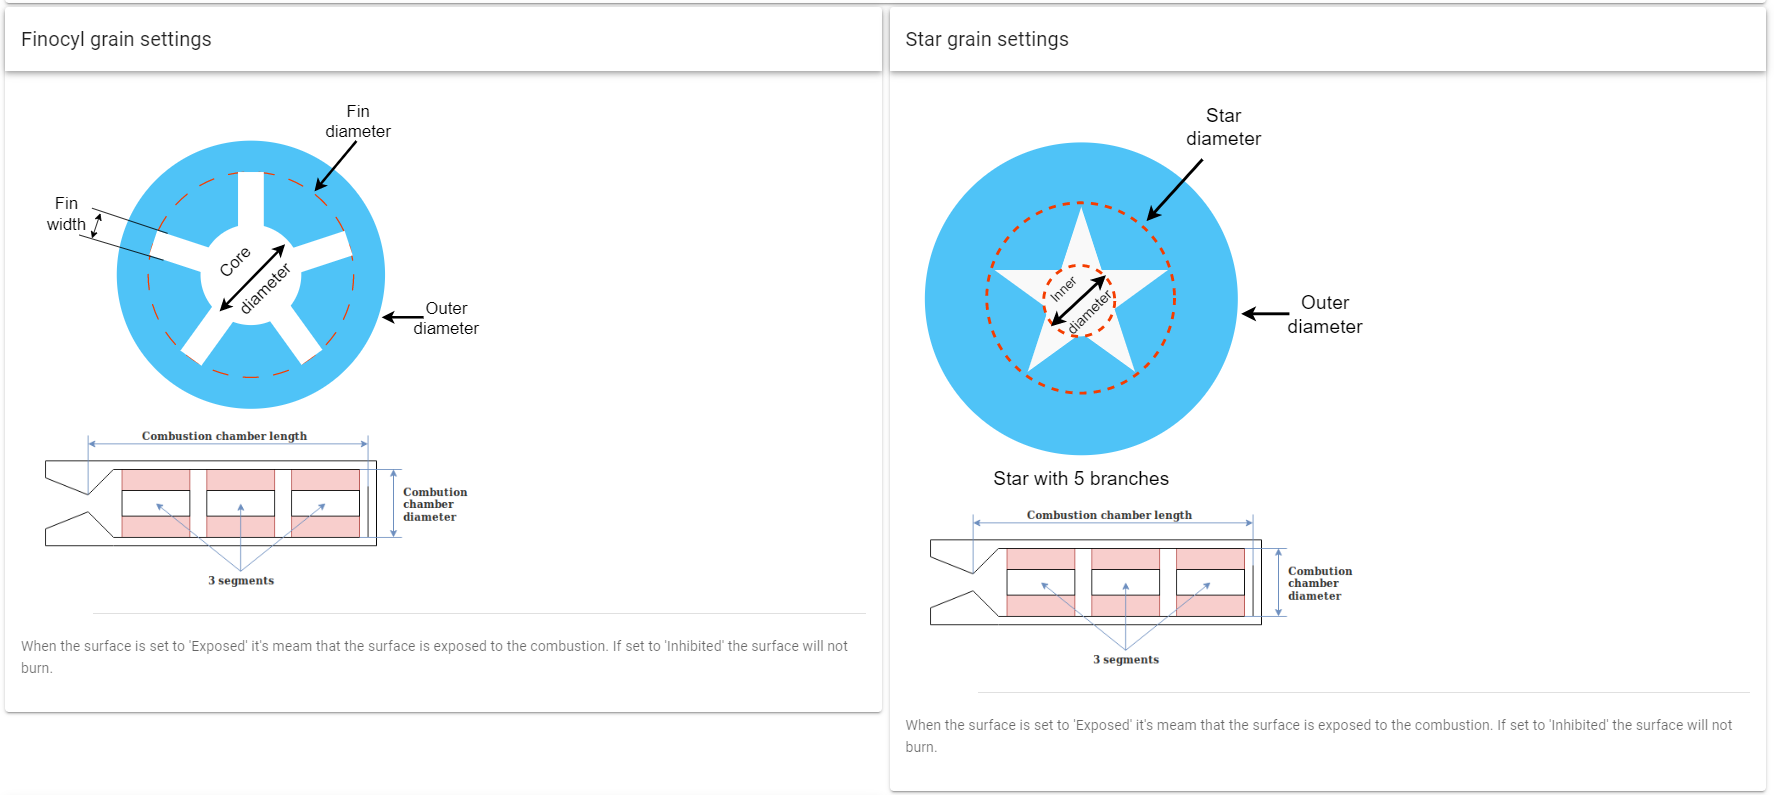
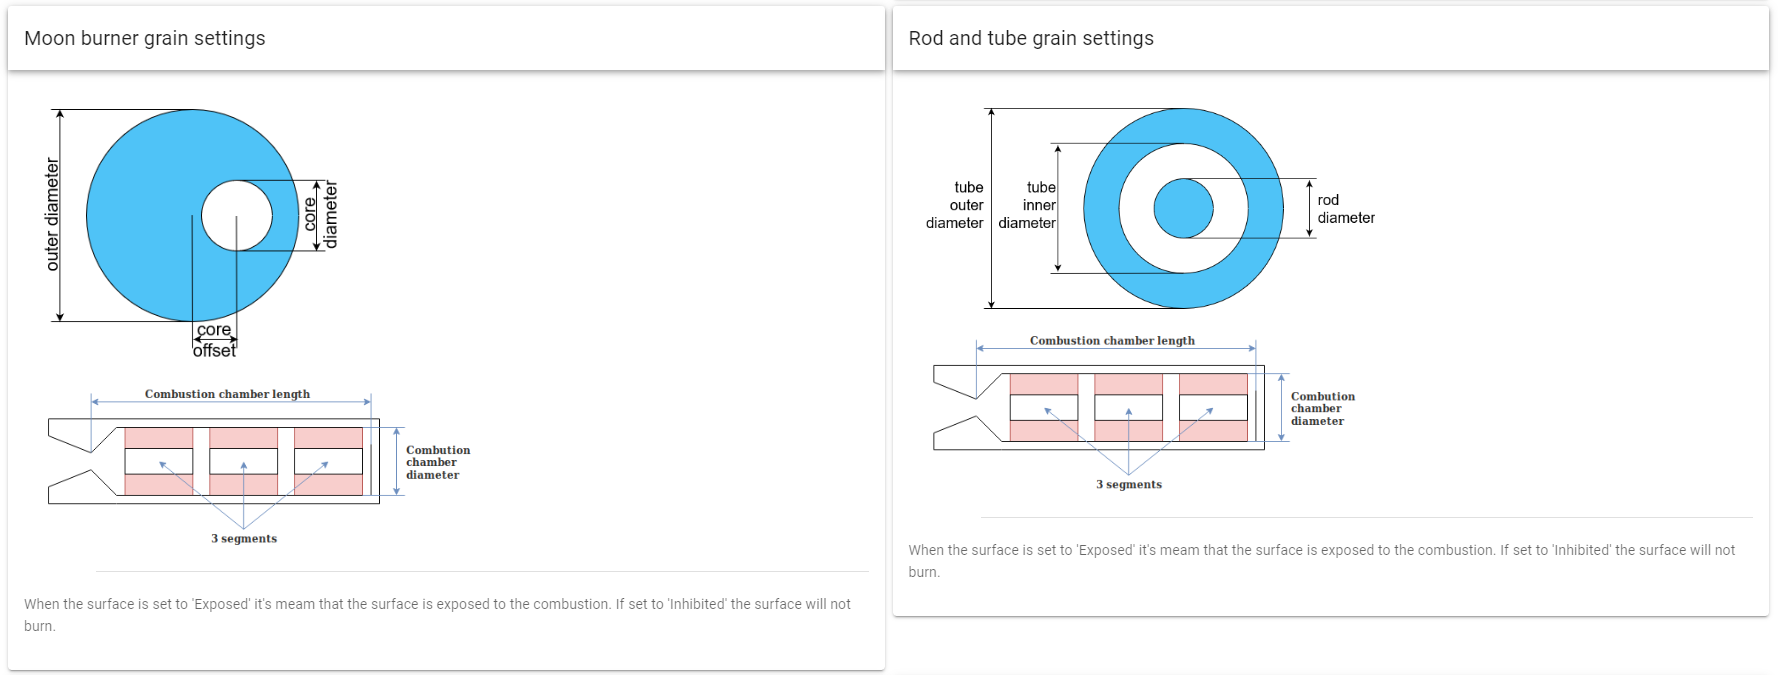
Empirically, using various channel configurations, we found the optimal parameters for our rocket. To obtain the same indicators, you need to enter the following values:
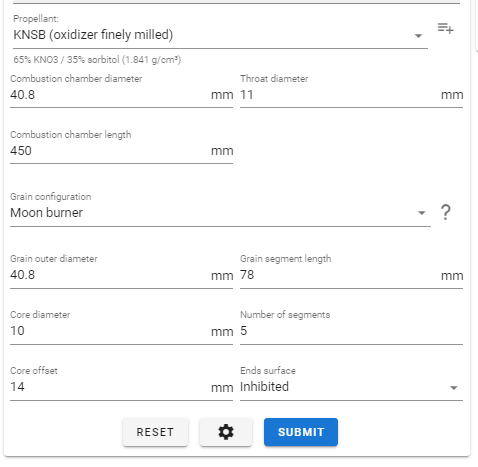
We chose the shape of the channel Moon burner. Smart Meteor, taking into account the entered data, built the following graph for us:
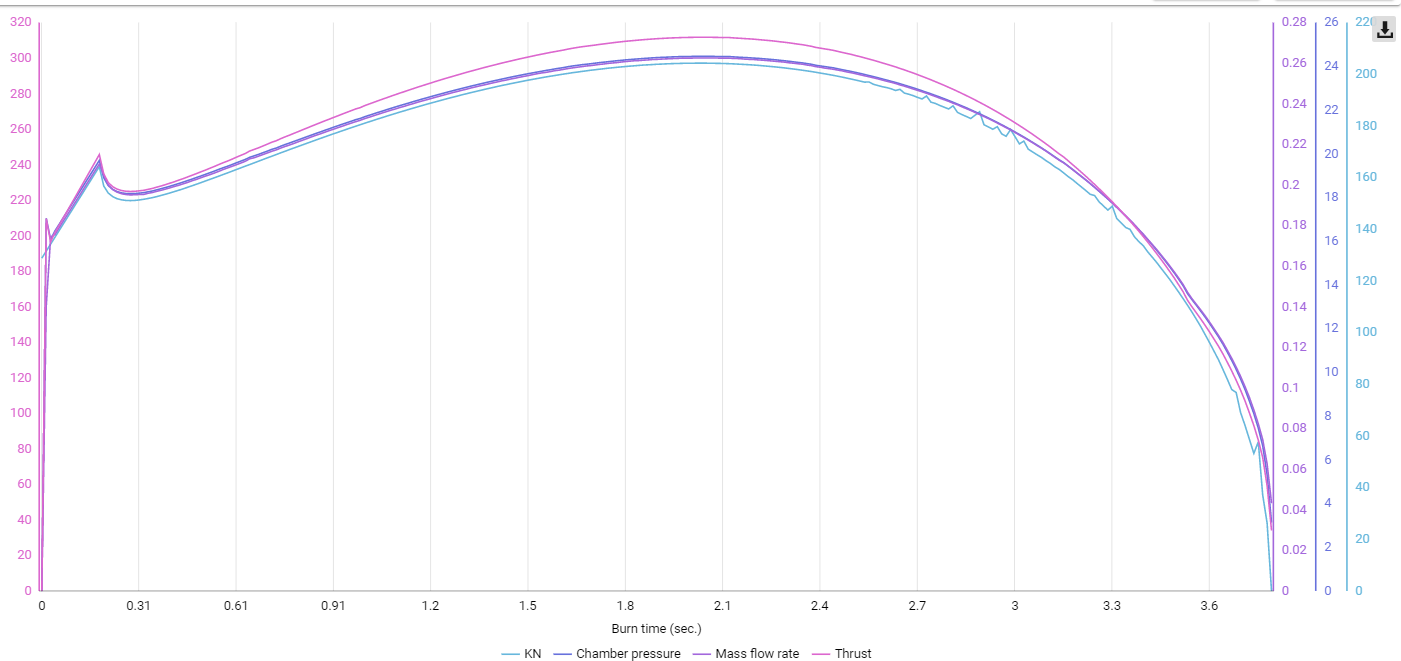
From this diagram, we understand that the engine will get a good kick from the start and will develop a very good thrust throughout the entire operation time. According to the program's calculations, the peak thrust value was almost 312 N at a peak pressure of 24.5 bar. The average values were found to be about 265 N and 19.5 bar, respectively.
Another indisputable advantage of the program is the ability to directly export the calculated values into another program that is no less useful for us - OpenRocket , with which we will calculate the stability of the rocket, tail, balancing and other important indicators, but this will be in the next series.
However, a novice rocket scientist is not living with fuel alone. The nozzle is equally important. According to this principle, taxiways are divided into nozzle and nozzleless ones. The latter, technically, have a subsonic nozzle, which is essentially just a hole or cone in the bottom of the engine. It is called subsonic for the reason that the gases flowing through it cannot reach, and even more so, exceed the speed of sound, no matter how much the pressure in the combustion chamber increases, hydrodynamics tells us about this. And physics, as you know, cannot be trampled on. Nevertheless, due to their simplicity, such nozzles are used in small amateur rockets, as well as in fireworks. But we are making a rocket, which means that subsonic nozzles are not our way.
An alternative solution is the supersonic nozzle or, as it is also called by the name of the inventor, the Laval nozzle. In a simplified version, it is represented by two truncated cones, conjugated by narrow ends. The interface is called the critical point.

The principle of its operation resembles the principle on which the refrigerator works: gases passing through a "narrow neck" and getting into a large volume are sharply cooled, due to which their volume decreases, which leads to an increase in the rate of their outflow. As a result, due to the difference in the diameter of the outlet, we get at the outlet a jet of gas moving at a supersonic speed. Thus, using the Laval nozzle, we significantly increase the efficiency of the rocket.
By the way, Meteor makes calculations, assuming that a supersonic nozzle is installed on the engine, the calculation and manufacture of which will also be left for the next release.
So, we have the characteristics, parameters and dimensions of the engine, we can start cooking fuel.
Making fuel sticks
Our first fuel will be caramel, we will cook from sorbitol and potassium nitrate. Sorbitol is available over the counter and is used as a sweetener. Potassium nitrate can be found in the gardening department, but it is rather dirty there, so we bought a h / chda in Ruskhim .
The simplest way is to grind the components to a state of fine powder and mix, but then the fuel remains free-flowing and will not keep its shape. Decided to fuse the components together. Some fearless amateurs do it in pans, on an open fire, even on a fire, but our fingers and eyes are dear to us. We'll have to make a temperature controlled heater and a sand bath, for which we need:
- the cheapest electric stove from Leroy
- solid-state relays
- K-type thermocouple module
- arduino
- potentiometer
- display
- evaporation bowl
- baking dish from FixPrice
sandsalt
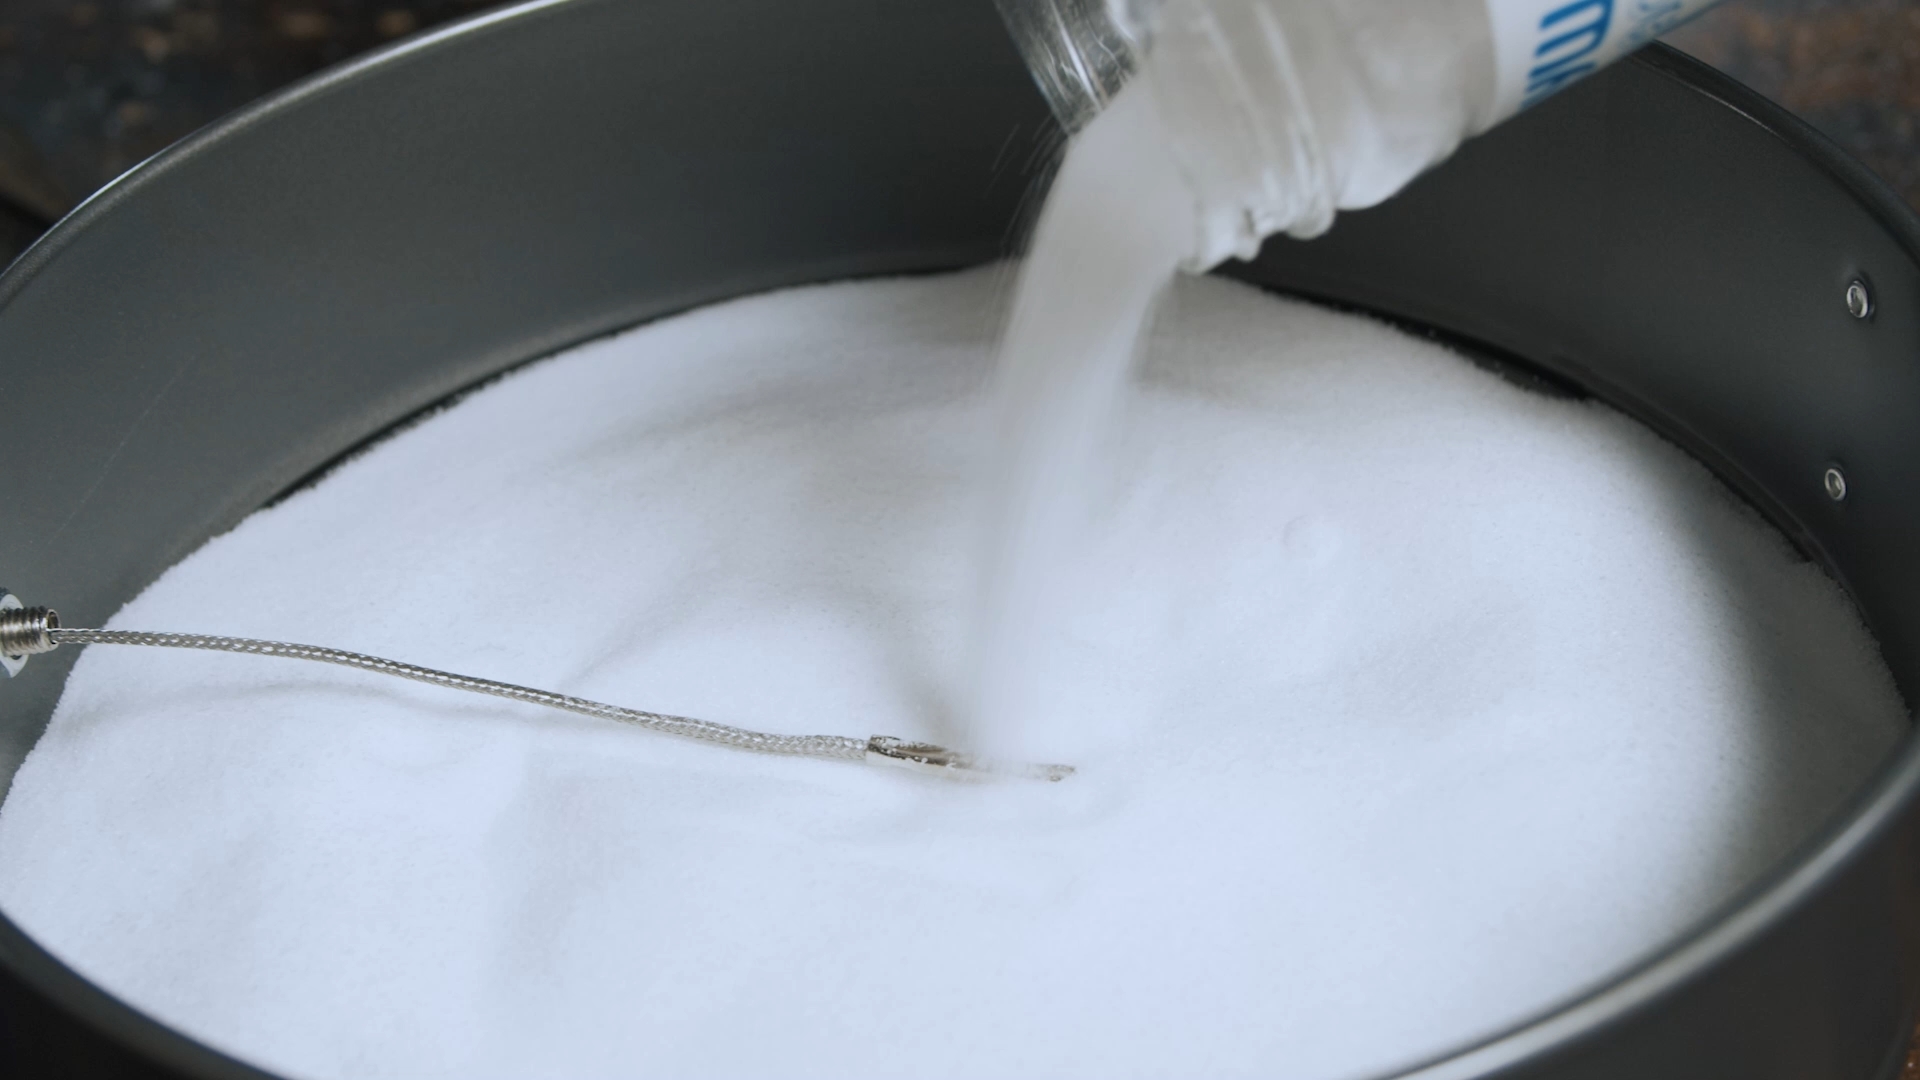
We throw out its native regulator from the stove and put a solid-state relay in the cut, which we will control through Arduino, to which we connect a display and a potentiometer in order to see the current temperature and be able to adjust it. Make a hole in the baking dish and insert the thermocouple. Fill the shape about halfway
Meteor carefully calculated the mass of fuel, which was 838g, let's take it with a margin, it will still come in handy. It was decided to make a fuel charge from several pieces for ease of manufacture. Then you can simply glue them together and insert them into the engine housing.
Do not forget about safety precautions : there should not be any sources of open fire, hot objects or anything near the fuel that can cause a fire.
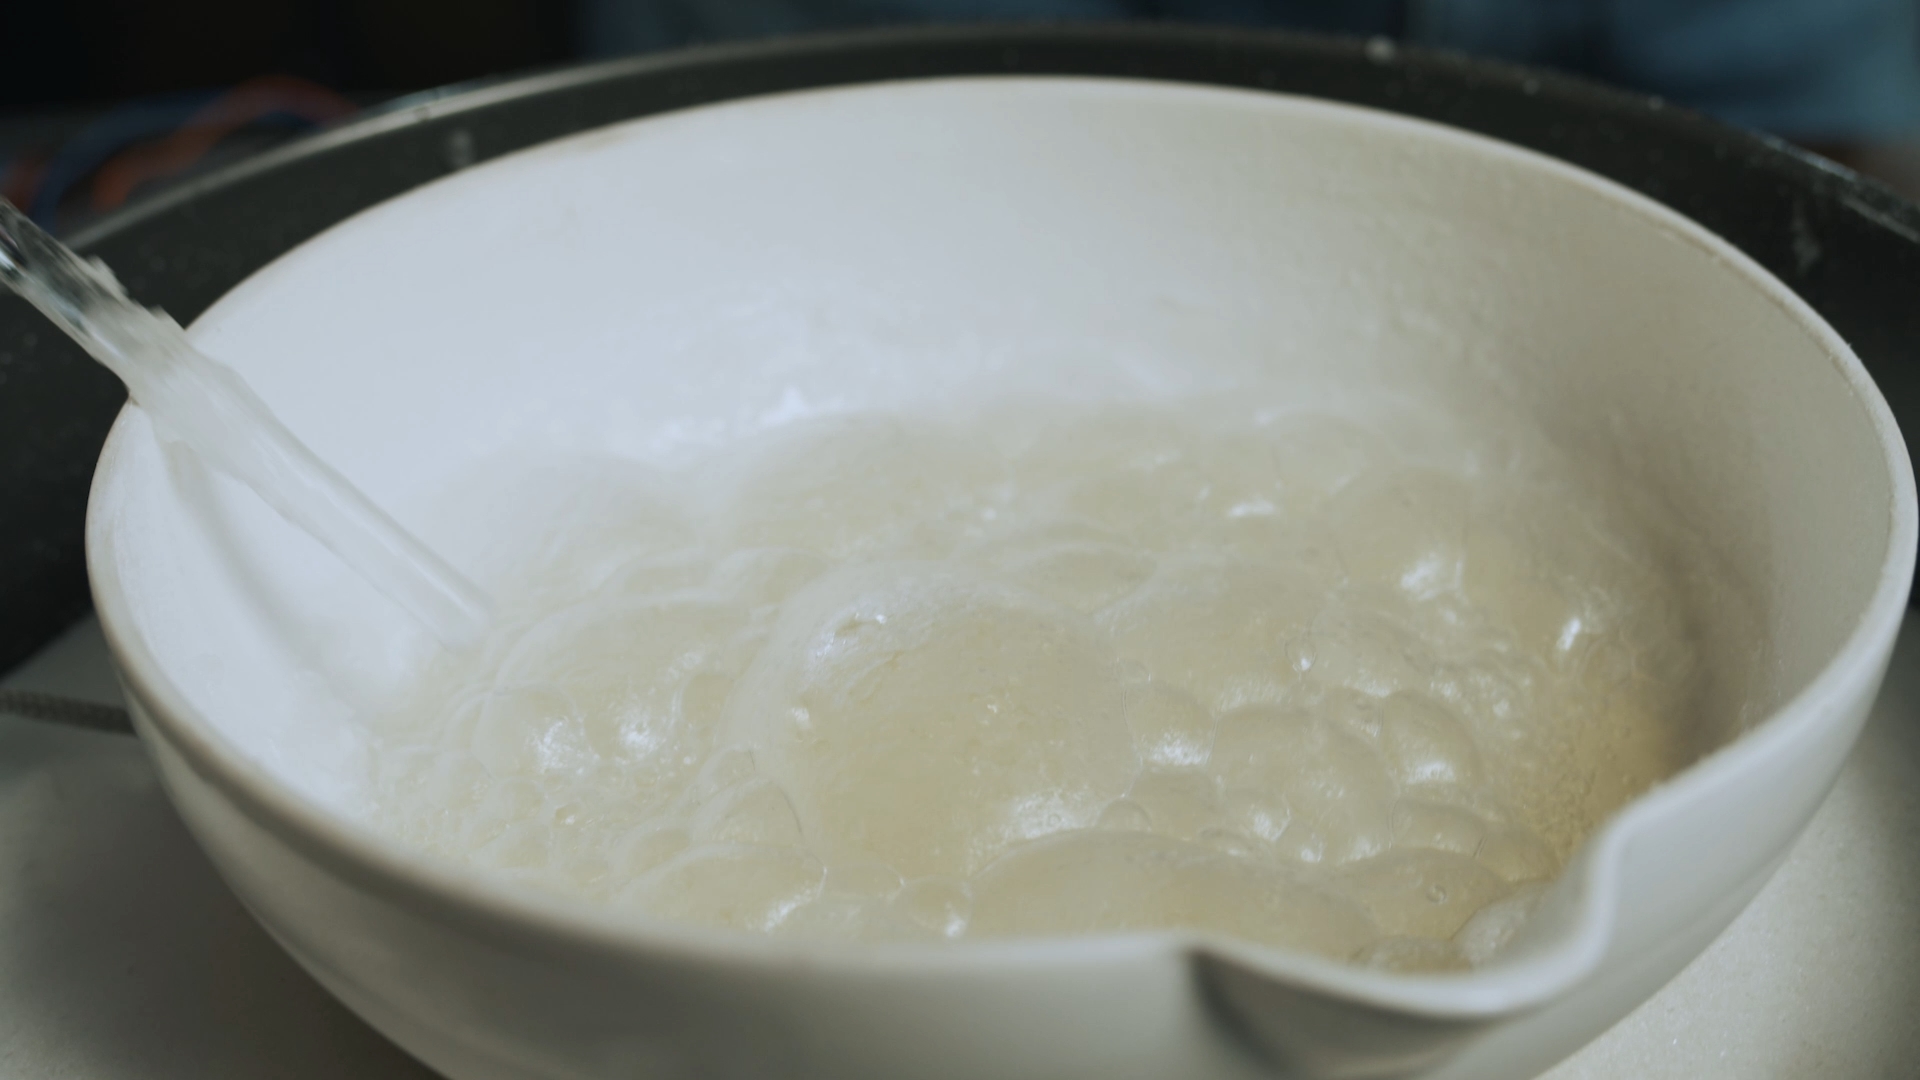
We take by weight 65% potassium nitrate and 35% sorbitol, carefully pour into a bowl and add a little water. This will calm the nerves and eliminate the need to grind the components into dust, since they will already dissolve and mix well in water. We put it on the fire, set the temperature and wait, stirring constantly. Gradually, the resulting porridge will melt and become like oatmeal. It is necessary to wait until all excess water evaporates (this can be understood by the ceased release of boiling bubbles).
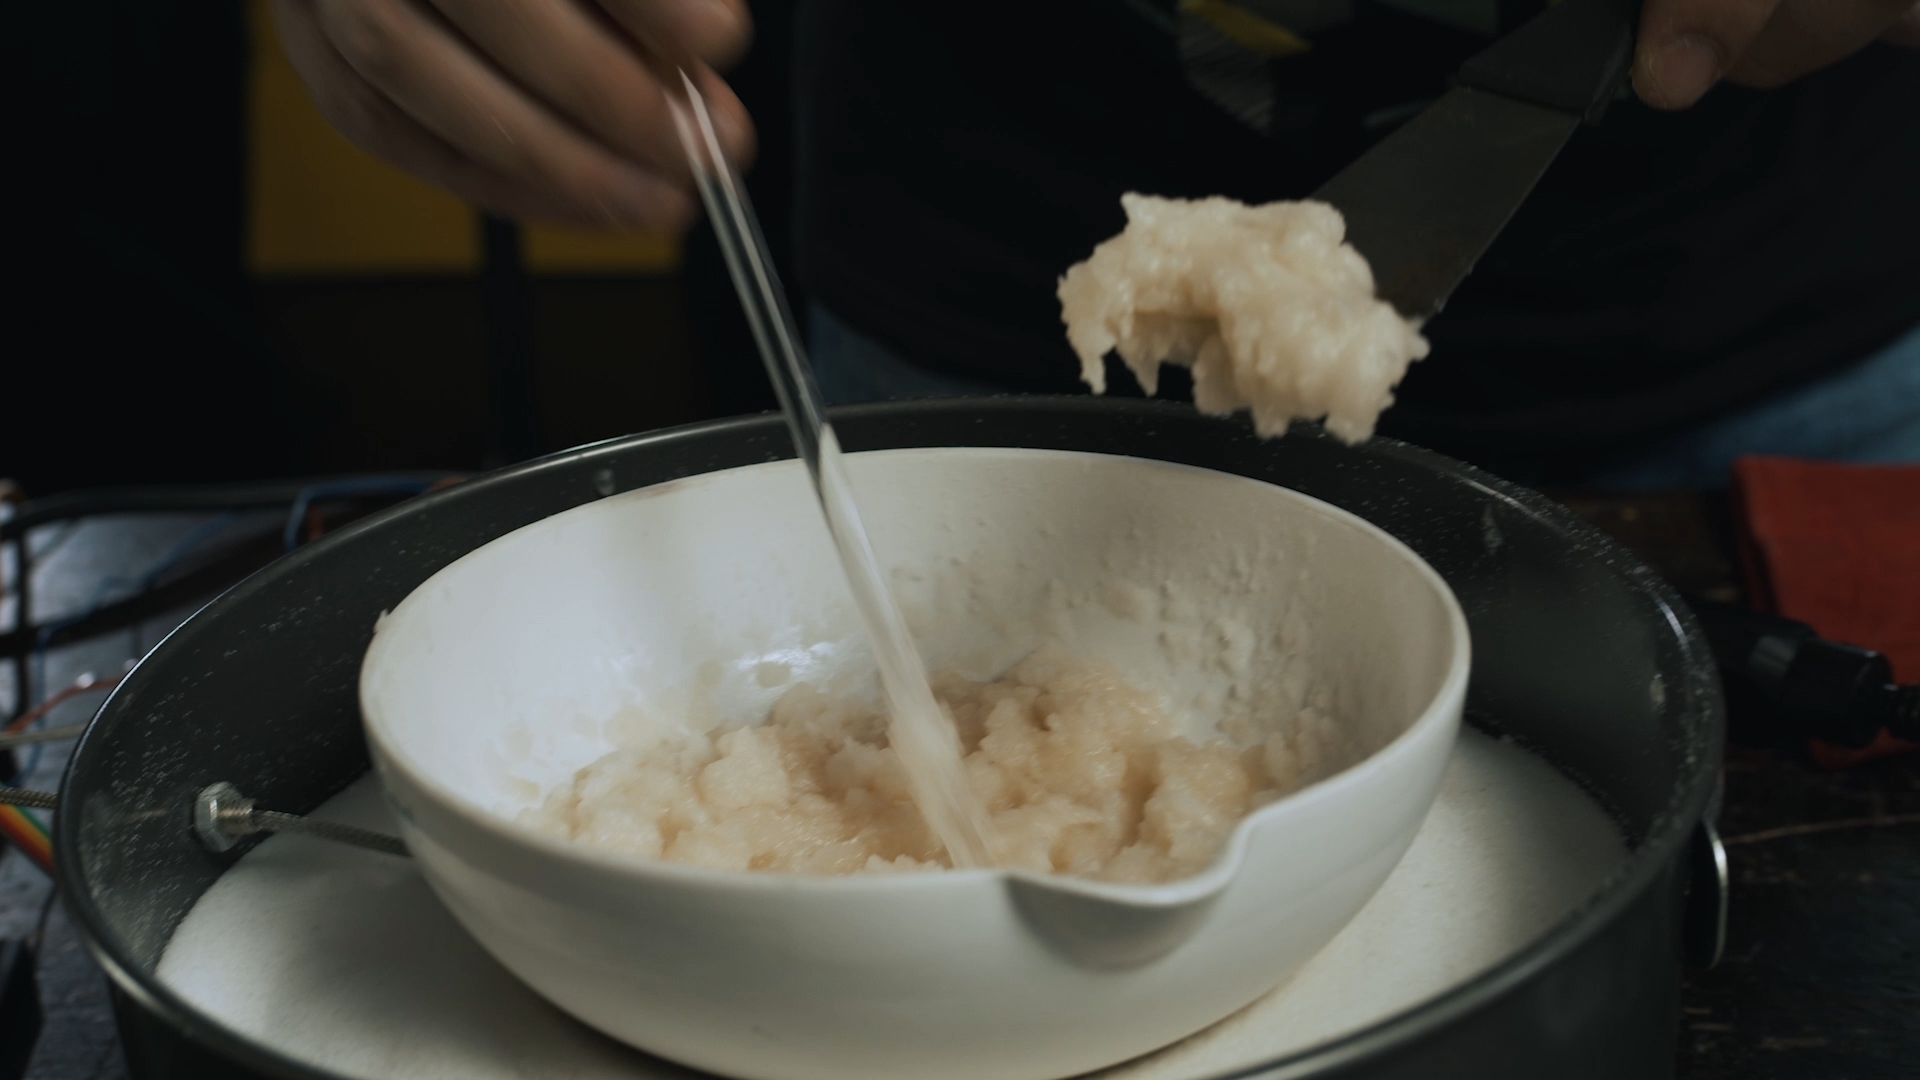
Then we need to act decisively: we will press fuel into a pre-prepared water supply PVC pipe fixed in a holder with an internal fastening for a round axle.
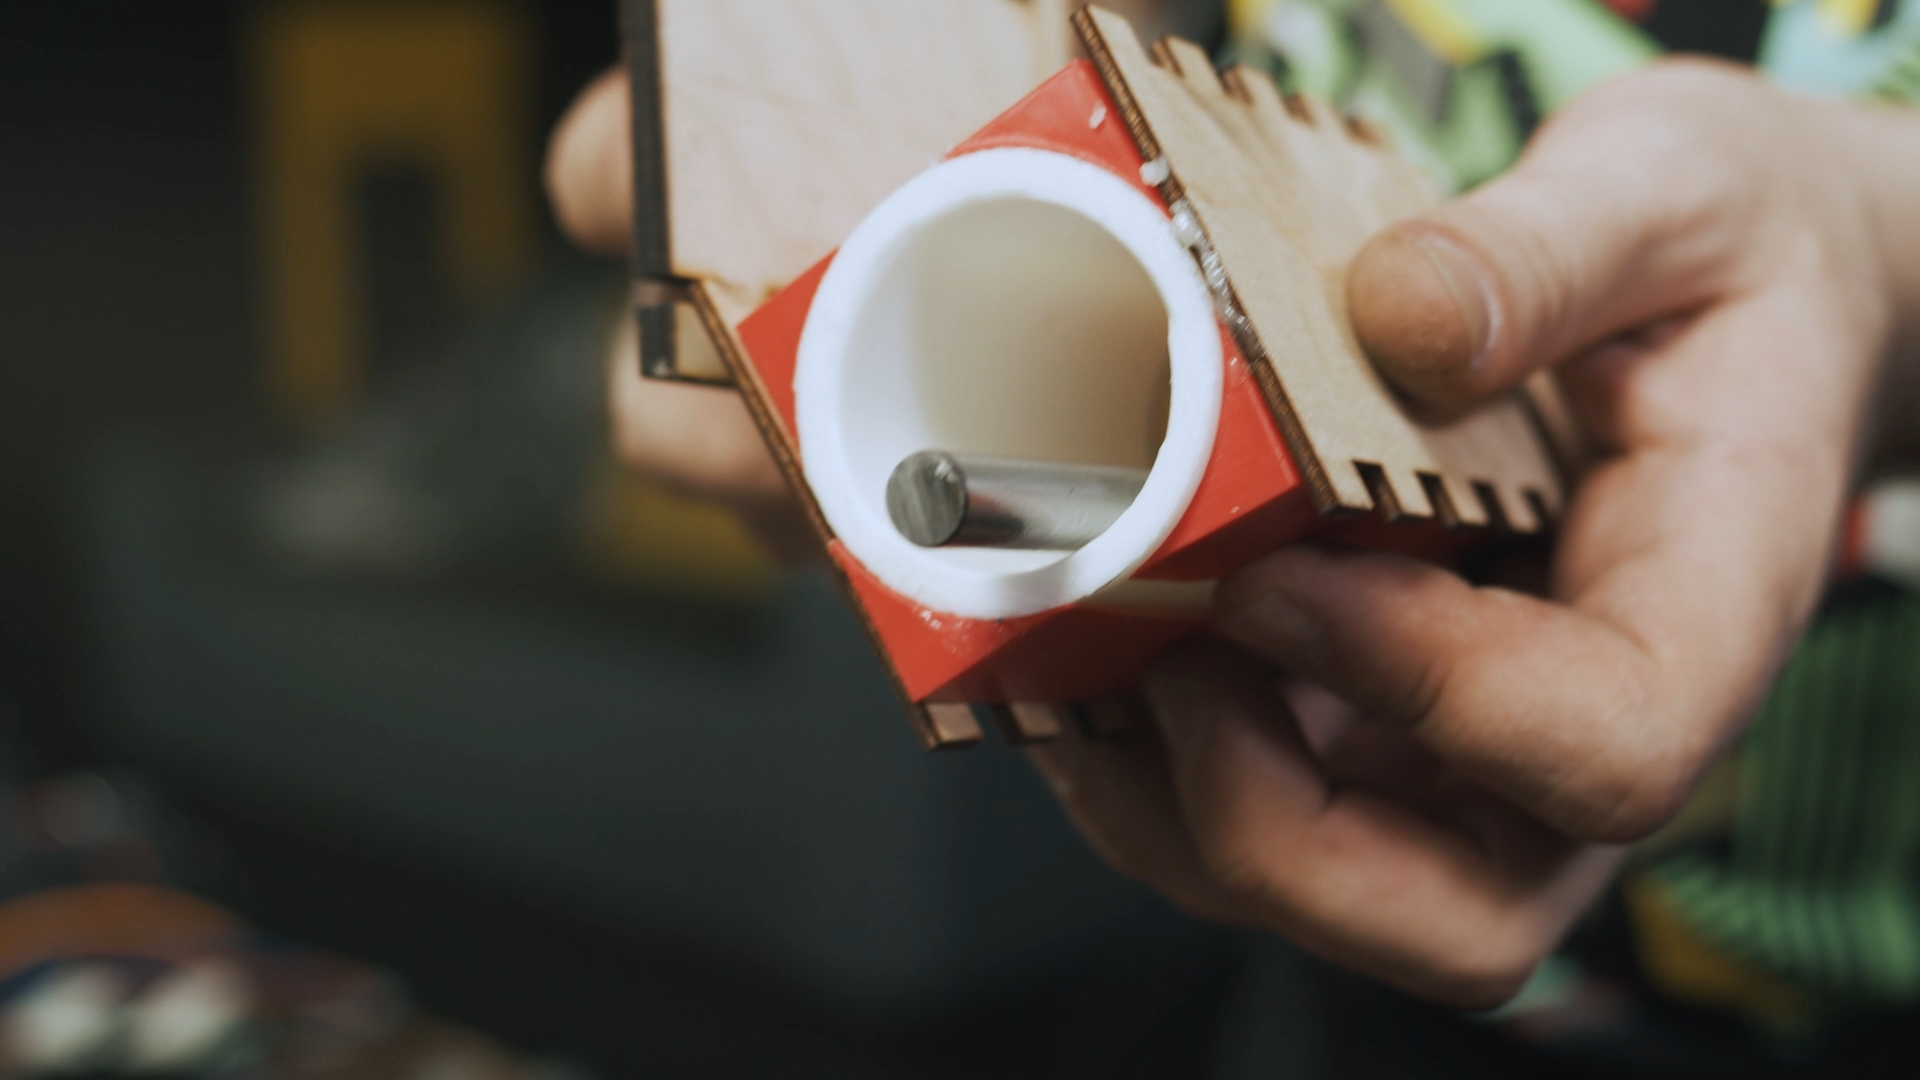
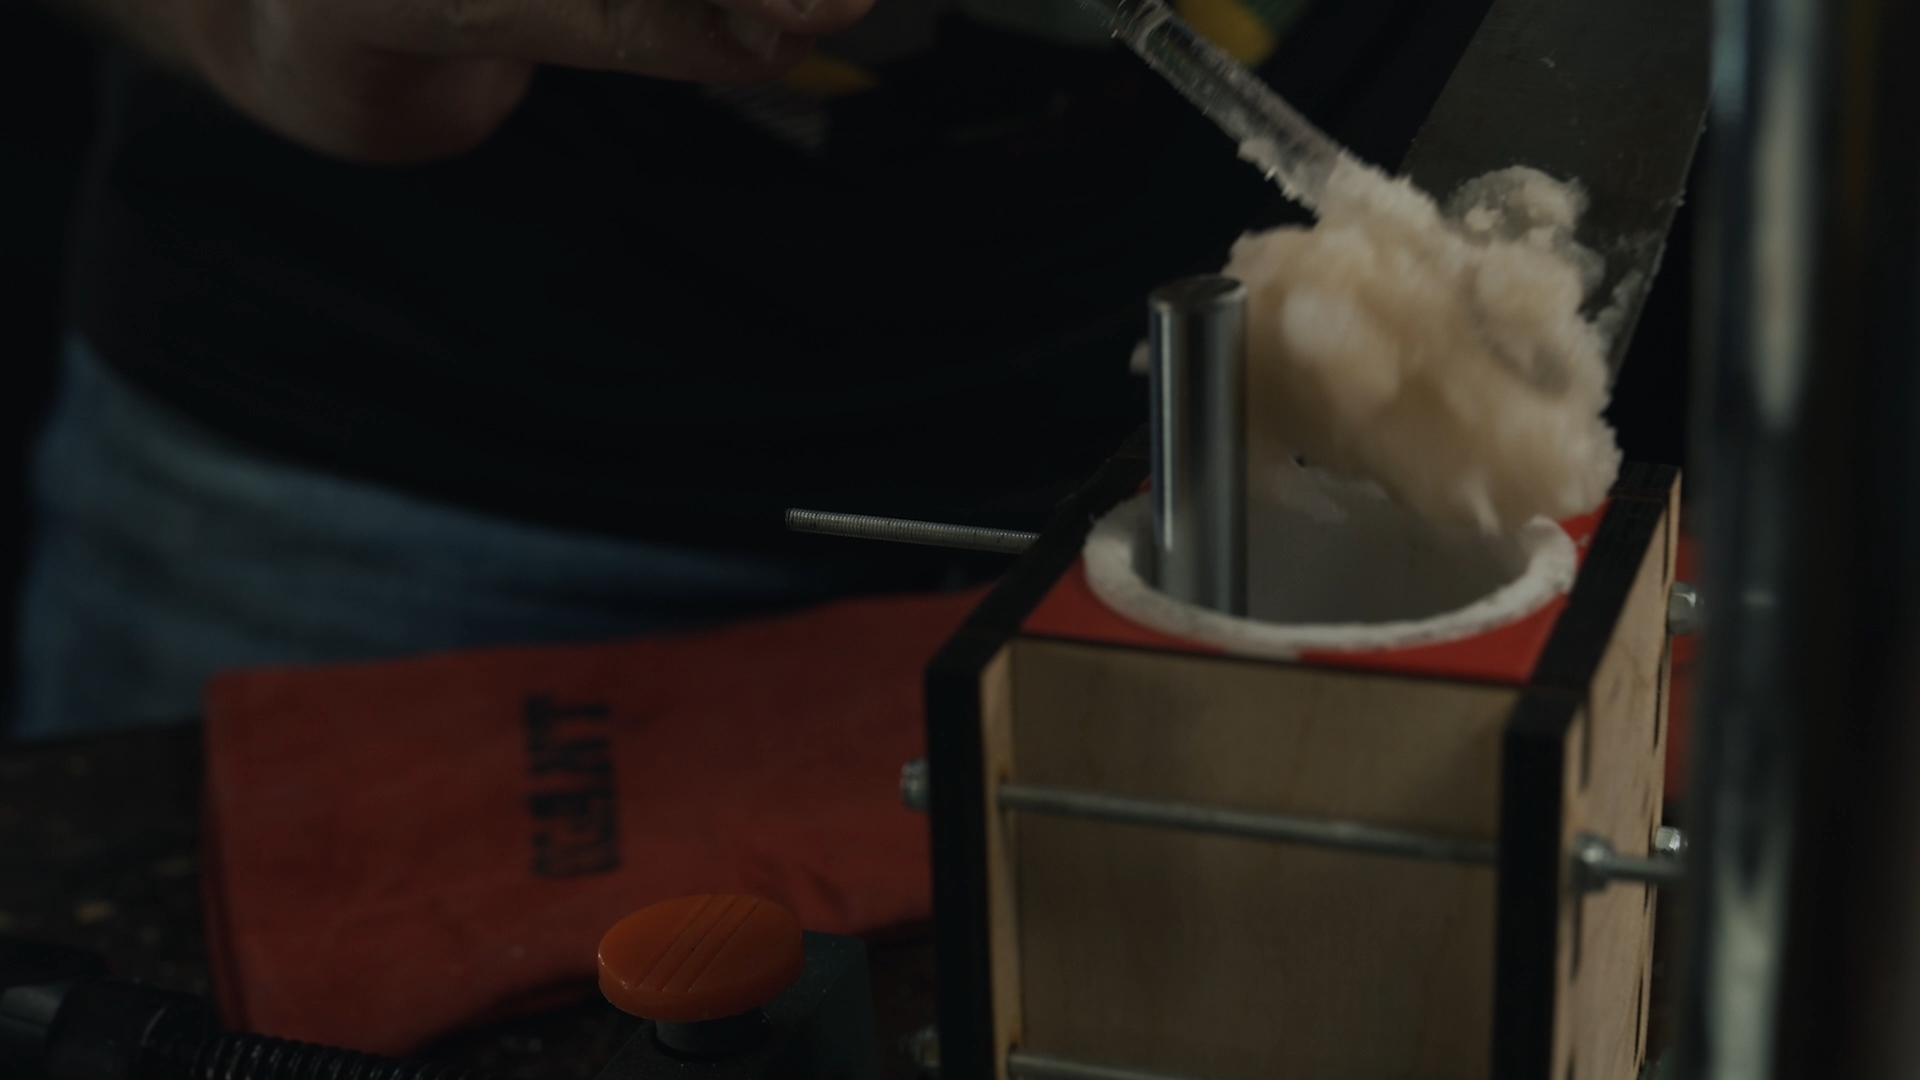


After removing the axle, we will just have a fuse channel along the entire length of the checker. It is convenient to press in with a drill holder, this one was very well found in the studio. It is important to press in the fuel in such a way that there are no bubbles and cavities inside the checker, otherwise this will later adversely affect combustion.
We put aside the pipe with fuel and leave it to cool down. Then it can be sawed and the checker can be taken out. We made several pieces, we will burn one of them for experiment purposes.
In the next installment, we will deal with the motor housing, nozzle and test bench.
In the meantime, we are preparing it, I recommend reading the following book about designing missiles. Most of the information was gleaned from it.
The whole series as a whole: