
Problem: Submitting homework requires navigating a maze of web pages so complex that I have submitted the assignment to the wrong place several times. In addition, although this process only takes 1–2 minutes, it sometimes seems like an insurmountable obstacle (for example, when I finished a task too late at night and can hardly remember my password).
Solution: Use Python to submit completed assignments automatically! Ideally, I could save the assignment, type in a few keys, and load my work in seconds. It sounded too good to be true at first, but then I discovered Selenium, a tool that can be used with Python to navigate the web.

Every time we repeat tedious actions on the Internet with the same sequence of steps, this is a great chance to write a program to automate the process. With Selenium and Python, we just need to write the script once, and then we can run it as many times as we want and save ourselves from repeating repetitive tasks (and in my case, it is impossible to send the job to the wrong place)!
Here, I'll go over a solution I developed to automatically (and correctly) submit my assignments. Along the way, we'll cover the basics of using Python and selenium for programmatic web control. While this program works (I use it every day!), It is quite individual, so you won't be able to copy and paste the code for your application. However, the general methods here can be applied to an unlimited number of situations. (If you'd like to see the complete code, it's available on GitHub ).
An approach
Before we get into the fun part of automation, we need to figure out the overall structure of our solution. Getting started coding without a plan is a great way to waste hours and get frustrated. I want to write a program to send completed class assignments to the correct place in Canvas ( my university's “learning management system” ). First, I need a way to tell the program the job name to submit and the class. I took a simple approach and created a folder to store completed assignments with child folders for each class. In the child folders, I put a finished document named for a specific job. The program can find out the class name by the folder and the task name by the document name.
Here is an example where the class name is EECS491 and the task is Task 3 - Output in large graphics models. "
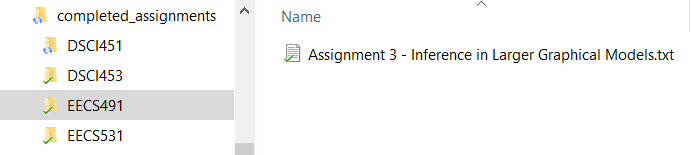
File structure (left) and Complete Assignment (right).
The first part of the program is a loop that loops through the folders to find the job and class we store in a Python tuple:
# os for file management
import os
# Build tuple of (class, file) to turn in
submission_dir = 'completed_assignments'
dir_list = list(os.listdir(submission_dir))
for directory in dir_list:
    file_list = list(os.listdir(os.path.join(submission_dir,
directory)))
    if len(file_list) != 0:
        file_tup = (directory, file_list[0])

print(file_tup)
('EECS491', 'Assignment 3 - Inference in Larger Graphical Models.txt')
This takes care of file management and now the program knows the class and assignment to include. The next step is to use Selenium to navigate to the correct web page and load the job.
Web Control with Selenium
To get started with Selenium, we import the library and create a web driver, which is a browser controlled by our program. In this case, I will use Chrome as my browser and post the driver to the Canvas website where I submit jobs.
import selenium
# Using Chrome to access web
driver = webdriver.Chrome()
# Open the website
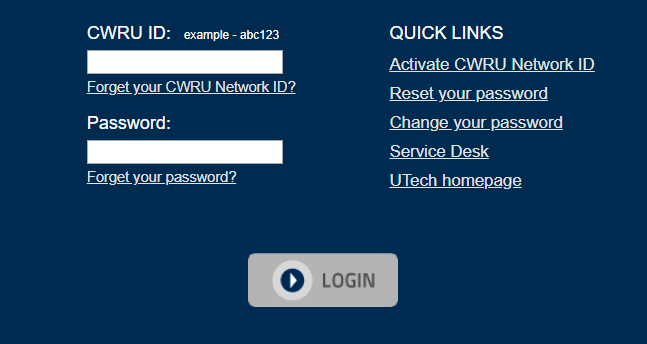
driver.get('https://canvas.case.edu')When we open the Canvas web page, we are faced with the first obstacle - the login box! To get around this, we will need to enter the ID and password and hit the login button.
Imagine a web driver is someone who has never seen a web page before: we need to tell exactly where to click, what to print, and which buttons to click. There are several ways to tell our web driver which elements to find, and they all use selectors. A selector is a unique identifier for an element on a web page. To find a selector for a specific element, say the “CWRU ID” field, we need to look at the code of the web page. In Chrome, this can be done by pressing Ctrl + Shift + I or by right-clicking on any element and choosing View Code. This opensChrome Developer Tools , an extremely useful application that displays the HTML underlying any web page .
To find the selector for the "CWRU ID" field, I right clicked in the field, clicked View Code, and saw the following in the developer tools. The highlighted line corresponds to the id_box element (this line is called the HTML tag).

This HTML may look overwhelming, but we can ignore most of the information and focus on parts
id = "username"and name = "username". (these are known as HTML tag attributes).
To select a field
idusing our web driver, we can use the attribute idor namewhich we found in developer tools. Selenium web drivers have many different ways to select elements on a web page, and often there are several ways to select the same element:
# Select the id box
id_box = driver.find_element_by_name('username')
# Equivalent Outcome!
id_box = driver.find_element_by_id('username')
Our program now has access to
id_box, and we can interact with it in various ways, such as entering keys or pressing (if we have selected a button).
# Send id information
id_box.send_keys('my_username')
We go through the same process for the password input field and the login button, choosing each one depending on what we see in the Chrome developer tools. We then send information to the items or click on them as needed.
# Find password box
pass_box = driver.find_element_by_name('password')
# Send password
pass_box.send_keys('my_password')
# Find login button
login_button = driver.find_element_by_name('submit')
# Click login
login_button.click()
As soon as we are logged in, we are greeted by this slightly intimidating toolbar:
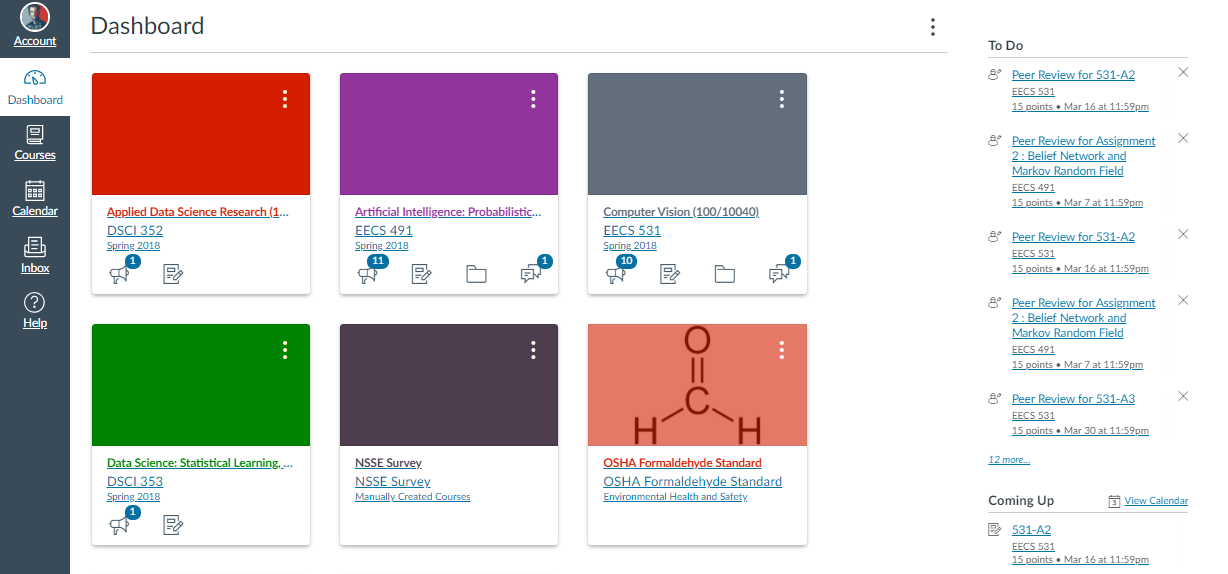
We again need to navigate the program through the web page, specifying the exact items to click on and the information to enter. In this case, I tell the program to select courses from the menu on the left, and then the class corresponding to the assignment I need to pass:
# Find and click on list of courses
courses_button = driver.find_element_by_id('global_nav_courses_link')
courses_button.click()
# Get the name of the folder
folder = file_tup[0]

# Class to select depends on folder
if folder == 'EECS491':
    class_select = driver.find_element_by_link_text('Artificial Intelligence: Probabilistic Graphical Models (100/10039)')
elif folder == 'EECS531':
    class_select = driver.find_element_by_link_text('Computer Vision (100/10040)')
# Click on the specific class
class_select.click()
The program finds the correct class using the folder name that we saved in the first step. In this case, I use the select method
find_element_by_link_textto find a specific class. The "link text" for an element is just another selector we can find by looking at the page:

This workflow may seem a little tedious, but remember that we only have to do this once when we write our program! After that, we can click "Run" as many times as we want, and the program will go to all these pages for us.
We use the same process of validating a page - selecting an element - interacting with an element to go through a couple more screens. Finally, we reach the job submit page:
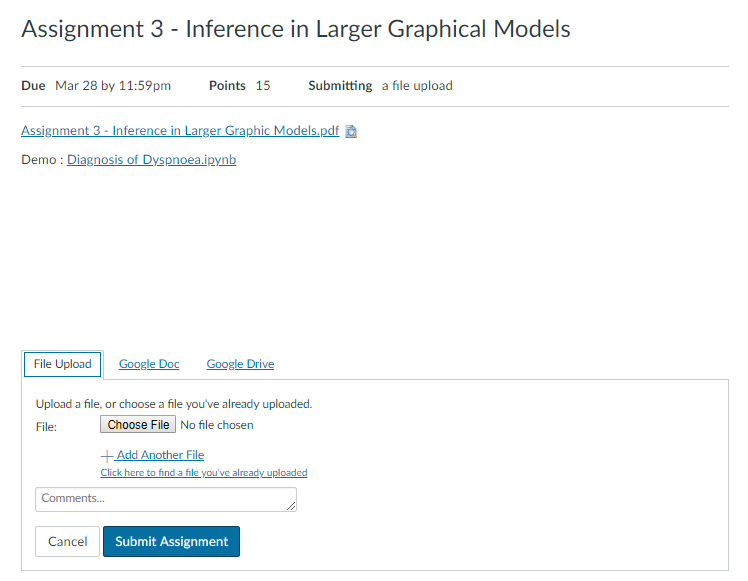
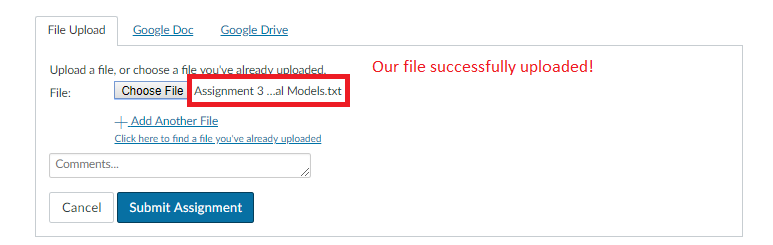
At this point, I could see the finish line, but initially this screen puzzled me. I could have clicked on the Select File field quite easily, but how was I supposed to select the file I want to upload? The answer turns out to be incredibly simple! We find the field
Choose Fileusing a selector and use a method send_keysto pass the exact file path (named file_locationin the code below) to the block:
# Choose File button
choose_file = driver.find_element_by_name('attachments[0][uploaded_data]')
# Complete path of the file
file_location = os.path.join(submission_dir, folder, file_name)
# Send the file location to the button
choose_file.send_keys(file_location)
By submitting the exact file path, we can skip the entire folder navigation process to find the file we want. After submitting the path, we get the following screen showing that our file is loaded and ready to be sent.
Now we select the "Submit task" button, click, and our task is sent!
# Locate submit button and click
submit_assignment = driver.find_element_by_id('submit_file_button')
submit_assignent.click()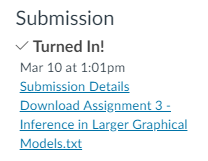
Cleaning
File management is always a critical step, and I want to make sure I don't resubmit or lose old jobs. I figured the best solution would be to save the file to be placed in a folder
completed_assignmentsand move the files to the folder submitted_assignmentsas soon as they are downloaded. The last bit of code uses the os module to move the completed job to the correct location.
# Location of files after submission
submitted_file_location = os.path.join(submitted_dir, submitted_file_name)
# Rename essentially copies and pastes files
os.rename(file_location, submitted_file_location)
All source code is packaged into one script that I can run from the command line. To limit the possibility of errors, I only submit one job at a time, which is not a big deal considering that it only takes about 5 seconds to start the program!
This is what it looks like when I run the program:

The program gives me the opportunity to make sure that this is the correct job before loading. After the program finishes, I get the following output:

While the program is running, I can observe Python running for me:

conclusions
Automation techniques with Python are great for many tasks, both general and in my data science field. For example, we could use Selenium to automatically download new data files every day (assuming the website does not have an API ). While scripting may seem tedious at first glance, the advantage is that we can force the computer to repeat this sequence as many times as we want in exactly the same way. The program will never lose focus and go to Twitter. It will follow the steps exactly in a perfect sequence (the algorithm will work fine until the site changes).
I must mention that you must be careful before automating critical tasks. This example is a relatively low risk since I can always go back and resubmit tasks, and I usually double-check the program to work. Websites change, and if you don't change the program in return, you might end up with a script that does something completely different from what you originally intended!
In terms of ROI, this program saves me about 30 seconds per task and takes 2 hours to write. So if I use it to complete 240 assignments, I’ll get a plus in time! However, the payoff of this program lies in developing a cool solution to the problem and teaches a lot in the process. While my time could have been more efficiently spent completing assignments rather than figuring out how to automatically turn them in, I thoroughly enjoyed the challenge. There are a few things as satisfying as problem solving, and Python turns out to be a pretty good tool for that. ...

Find out the details of how to get a high-profile profession from scratch or Level Up in skills and salary by taking SkillFactory's paid online courses:
- Machine Learning Course (12 weeks)
- Data Science (12 )
- (9 )
- «Python -» (9 )
- Data Sciene 2020
- Data Science . Business Science
- Data Scientist
- Data Scientist -
- Data Science
- Data Science : «data»
- Data Sciene : Decision Intelligence