But first, a brief historical excursion: Apple WWDC (WorldWide Developers Conference), or simply dub-dub, is a conference that Apple has been holding in California since the late 1980s. This year, the conference was held online for the first time. And if earlier tickets were raffled off in a lottery, and those who did not receive the desired email had to be content with the video from the site https://developer.apple.com/videos/ , this year, for obvious reasons, there were no other options: everyone watched the video ...
So, what could you see from testing there?
I'll make a reservation right away that at WWDC 2020 there was no big general session dedicated to testing in the Apple ecosystem, as in previous years (Testing in Xcode 2019 and What's new in testing 2018 ,2017 ). Testing novelties in 2020 were smeared into six mini-sessions. Go!
XCTSkip for your tests
Xcode 11.4 added a new API to control the launch of tests based on conditions - XCTSkip.
Often in tests, especially integration tests, there are conditions or requirements that are not easy to obfuscate. For example, an application has some specific functionality for an iPad that does not work on an iPhone. Or some features for a specific version of the operating system.
And before, when tests came to such cases (checking the iPad-only functionality on the iPhone), there was a choice:
- End the test case;
- Mark the test as passed and move on;
- Fail the test.
We now have an error whereby the current test stops running and is marked as skipped.
Thus, now XCTest has three statuses for the passed test instead of two:
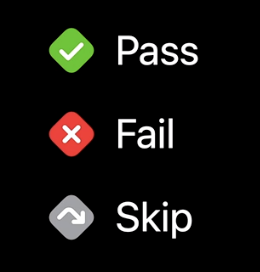
More details here and here .
Interrupt and alert handling in UI tests
Interrupt and alert handling was in XCTest before, but in the session the mechanism of its operation was revealed in more detail. I found it interesting new functionality added in Xcode 11.4, iOS / tvOS 13.4 and macOS 10.15.4, namely, resetting permissions (aka protected resources).
The bottom line is this: if earlier, for example, in test # 1 you gave the application access to the camera or contacts, then later, in test # 2, this access is not so easy to take away. To do this, you will have to reinstall the application.
Now, using the API for resetting authorization for protected resources, you can select the previously granted access:
Class XCUIApplication {

	open func resetAuthorizationStatus(for: XCUIProtectedResource)

}
Resetting permissions makes the application behave as if it had never asked the user to access protected resources before.
This allows you to go all the way with the issuance and collection of permissions for contacts, calendar, photo, microphone, camera and geolocation. On iOS, you can additionally reset access to Bluetooth and Keyboard network access, and starting with Xcode 12 / iOS 14, to Health data. On Mac OS, you can reset access to the Desktop and Downloads directories.
Below is an example of how to reset app access to photos:
// Example
func testAddingPhotosFirstTime() throws {
	let app = XCUIApplication()
	app.resetAuthorizationStatus(for: .photos)

	app.launch()

	// Test code...
}
It is important to remember that often (but not always) when resetting permissions, the application is killed.
More details here , here and here .
Eliminating animation lags with XCTest
Animation lags, or hitches, are behaviors where a frame appears later than expected.
The lecture describes how to prevent the appearance of lags in the animation of your application by measuring and testing using Performance XCTests.
It also highlights the best practices and identifies which lags are tolerable and which ones are worth looking out for:

Describes why Critical lags deserve careful investigation and fix. The topic of testing animation itself is quite extensive and worthy of a separate article, so we will confine ourselves to the introductory part and a link to the source .
Triage and diagnosis of fallen tests
Often times fixing failed tests is a pain that takes a lot of time and resources.
Xcode 12 will have a new API that should make it easier to fix failed tests. The API should help to quickly answer the questions: what, how, why and most importantly - where did it fall?
If earlier, after the test fell, you had to look for the crash site in the
Issue navigator or report navigator, then with Xcode 12 the search process has become easier: now the crash site is highlighted in the test itself.
An error with gray highlighting appears if the line refers to some other line in the future:

And in red if the error occurred directly in this line:
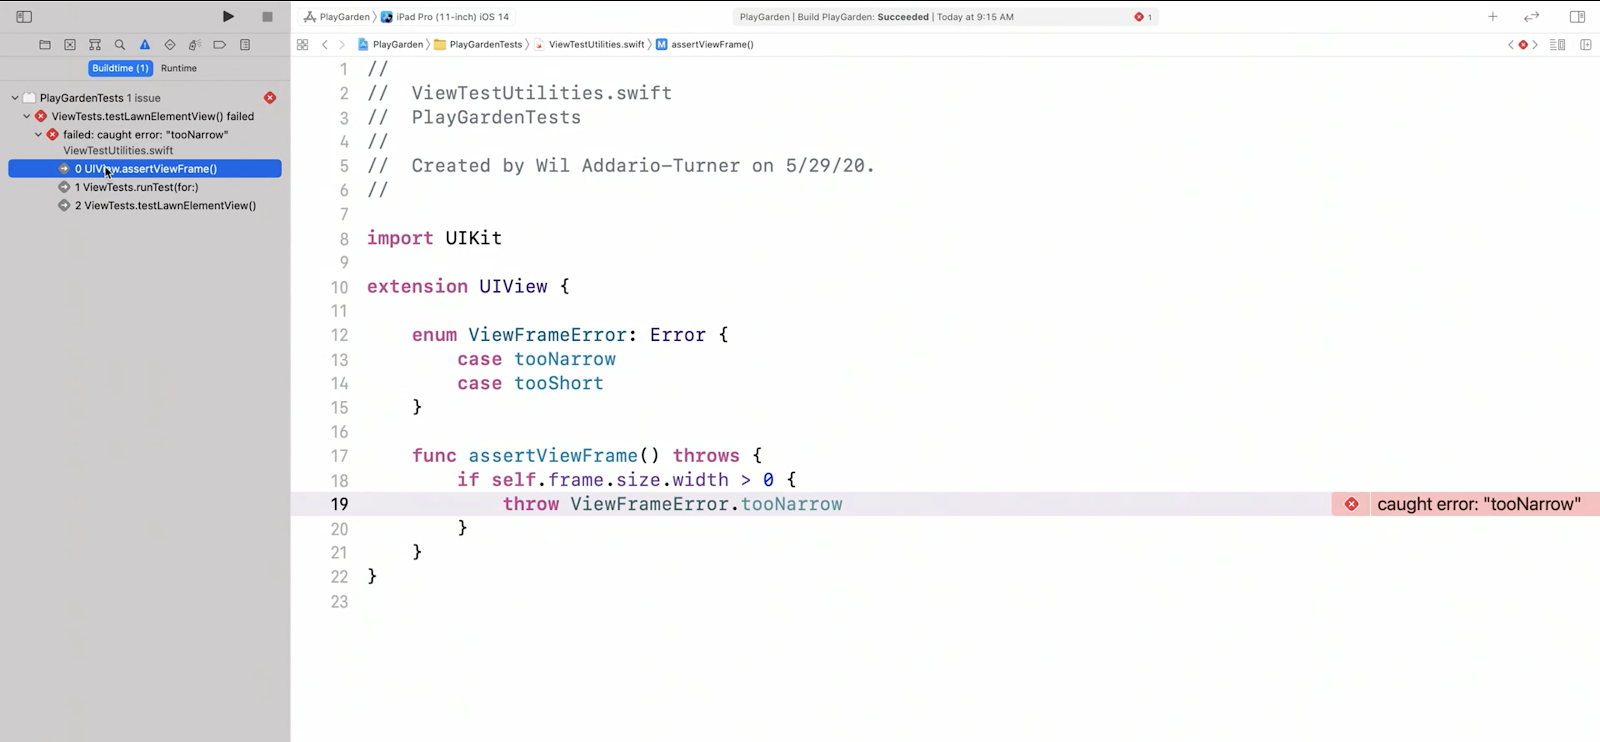
A convenient new feature - opening the code editor not in a separate window, but directly in the report navigator:

In addition, a new XCTIssue object was added in Xcode 12, which, in addition to encapsulating the error data that XCTest previously collected in itself (message, path, line number and the "Expected" flag), now adds:
- Distinct types;
- Detailed description;
- Associated error;
- Attachments.
More details here and here .
Write tests to make them fail
The goal of testers is to write tests to see them pass green, which means the product can be shipped to end users. Nevertheless, writing tests to see them fail is also necessary, because a failed test is most likely a found bug. Thus, we need to write tests with an eye to the fact that in case they fail, we would have enough information to investigate.
So what is suggested:
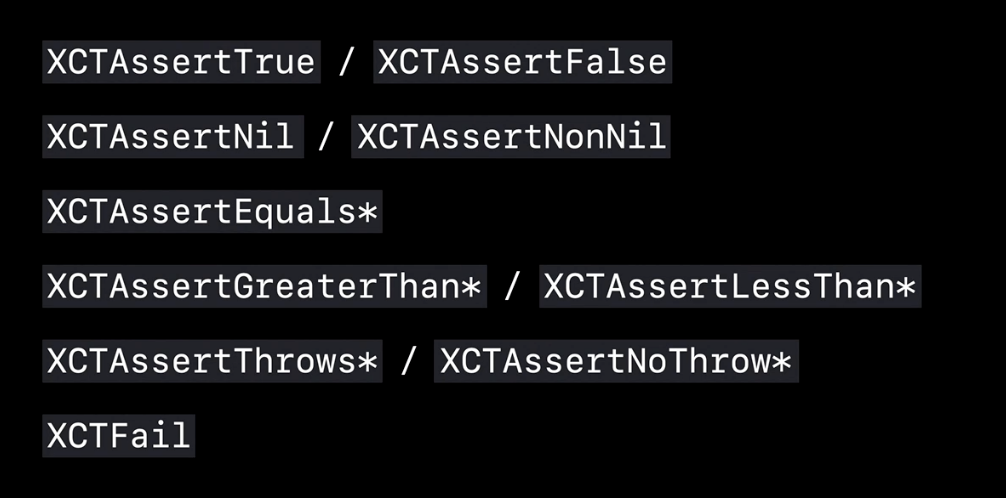
Use human readable messages in asserts:

Make sure to use the type of asserts appropriate for your situation:
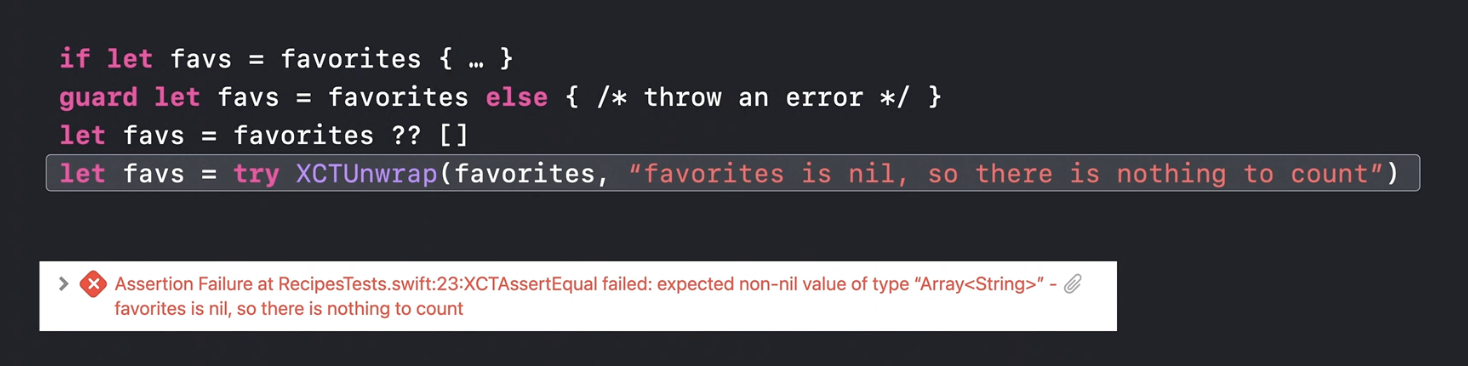
Unwrap optional's to make your tests crash throwing an error rather than crashing. Swift provides several ways to do this, but tests tend to use XCTUnwrap, which is a simplification of the guard let construct.
Use waitForExistence () instead of sleep () for asynchronous waits.
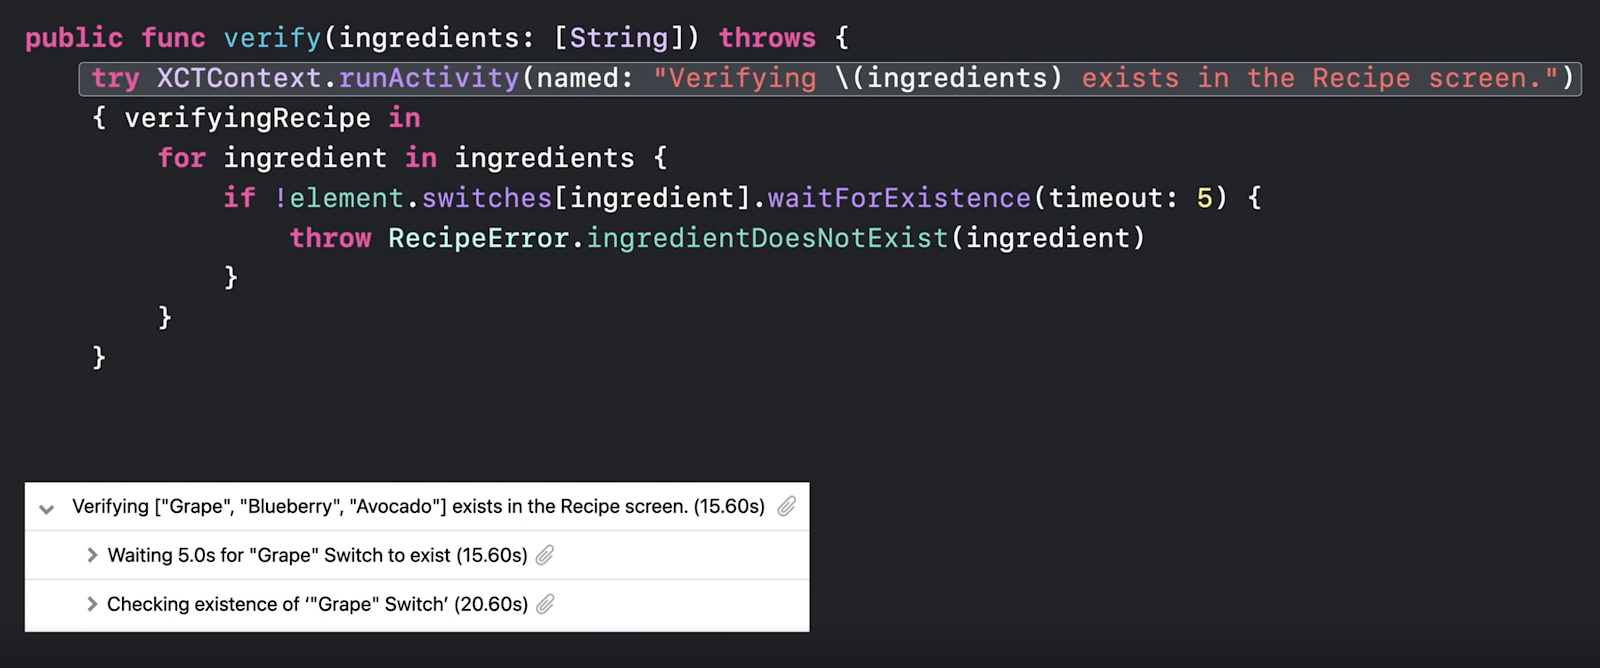
Use XCTContext.runActivity () to increase the readability of the test execution log:
And if you want to add additional logging, you can add an attachment, attach a screenshot or a debugger output like here. This feature is especially useful if your tests run in CI / CD.

More details here .
Get test run results faster
It's a shame when on Monday morning you find out that the long job launched on Friday evening has not worked to the end, hanging in the middle or even at the very beginning. And you have to start your work week with a debriefing: why did this happen? How can you avoid this situation in the future?
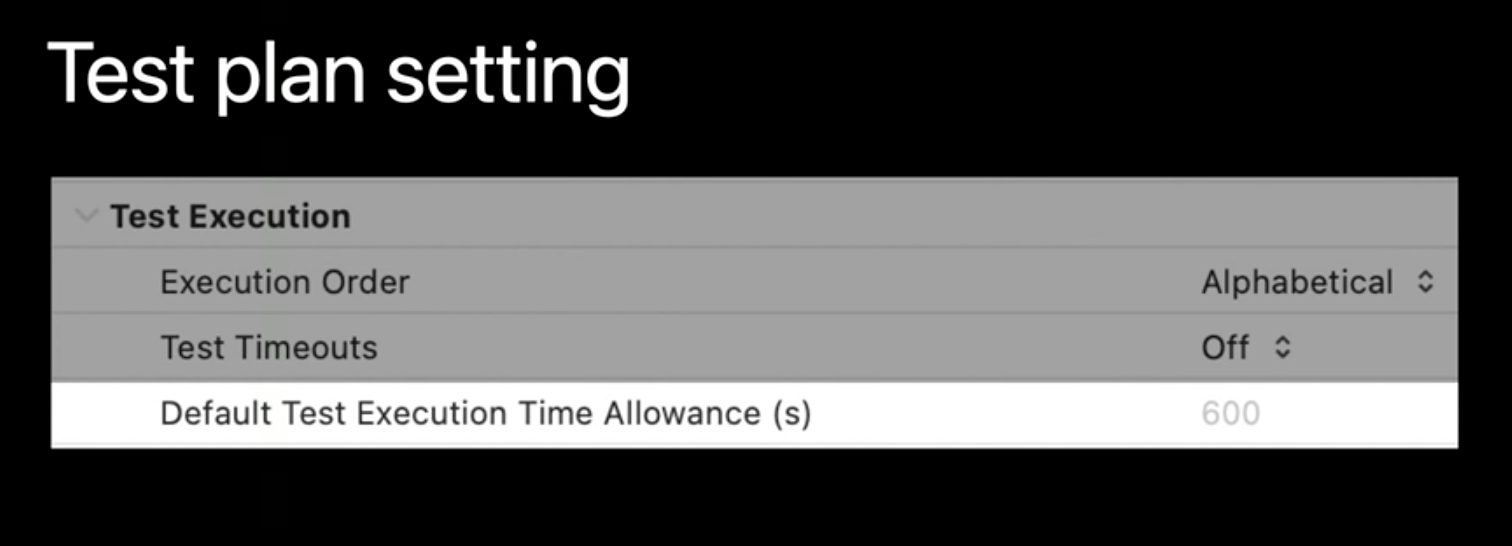
Xcode 12 introduces anti-freeze tools. This is a new option for the Execution Time Allowance plan test.
When enabled, Xcode sets a time limit on how each test runs.
If the limit is exceeded, Xcode does the following:
- Collects a report (spindump);
- Kills a hung test;
- Restarts the test runner so that the rest of the suite can run.
The report (spindump) displays which of the threads, which function spent the most time. This will allow you to see the bottleneck of your tests with your eyes even before your morning coffee / tea has cooled.
By default, 10 minutes are allocated for each test, and if the test is completed faster, then the timer is reset to zero for the next test. If you need more / less time for each test in your test suite, you can change the default value in the test plan settings.
You can also do this using the xcodebuild command option:
xcodebuild option
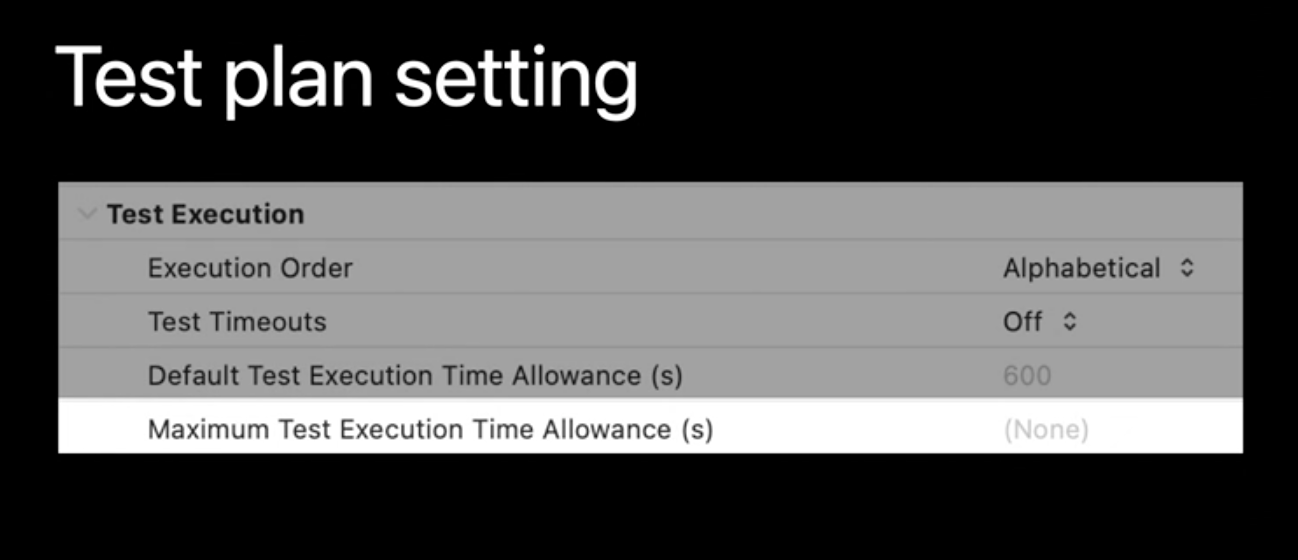
-default-test-execution-time-allowance <seconds>Similarly, you can set the maximum test execution time:
xcodebuild option
-maximun-test-execution-time-allowance <seconds>
Even if you need to set the execution time for a specific test or test class, this is also possible using the executionTimeAllowance API:
Class XCTestCase: XCTest {
	var executionTimeAllowance: TimeInterval //
}
Fine-tuning the execution of a particular test will save you time, but this is not all that can be done to speed up the passage of a long test suite.
Xcode 12 allows you to run tests on multiple devices at the same time. This feature is called Parallel Distributed Testing. The benefits of running tests on multiple devices are obvious - a decent time saving.
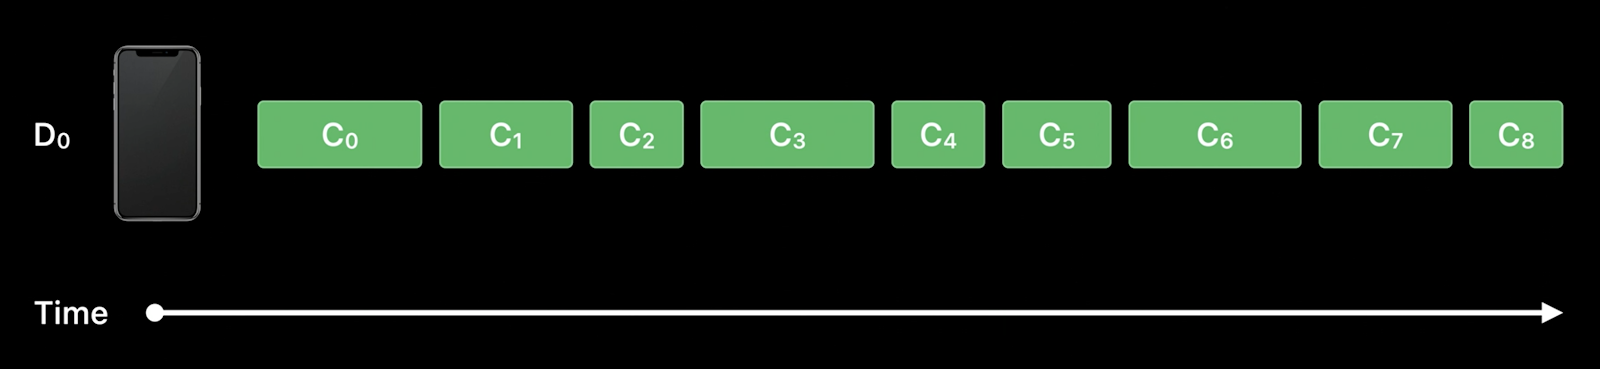
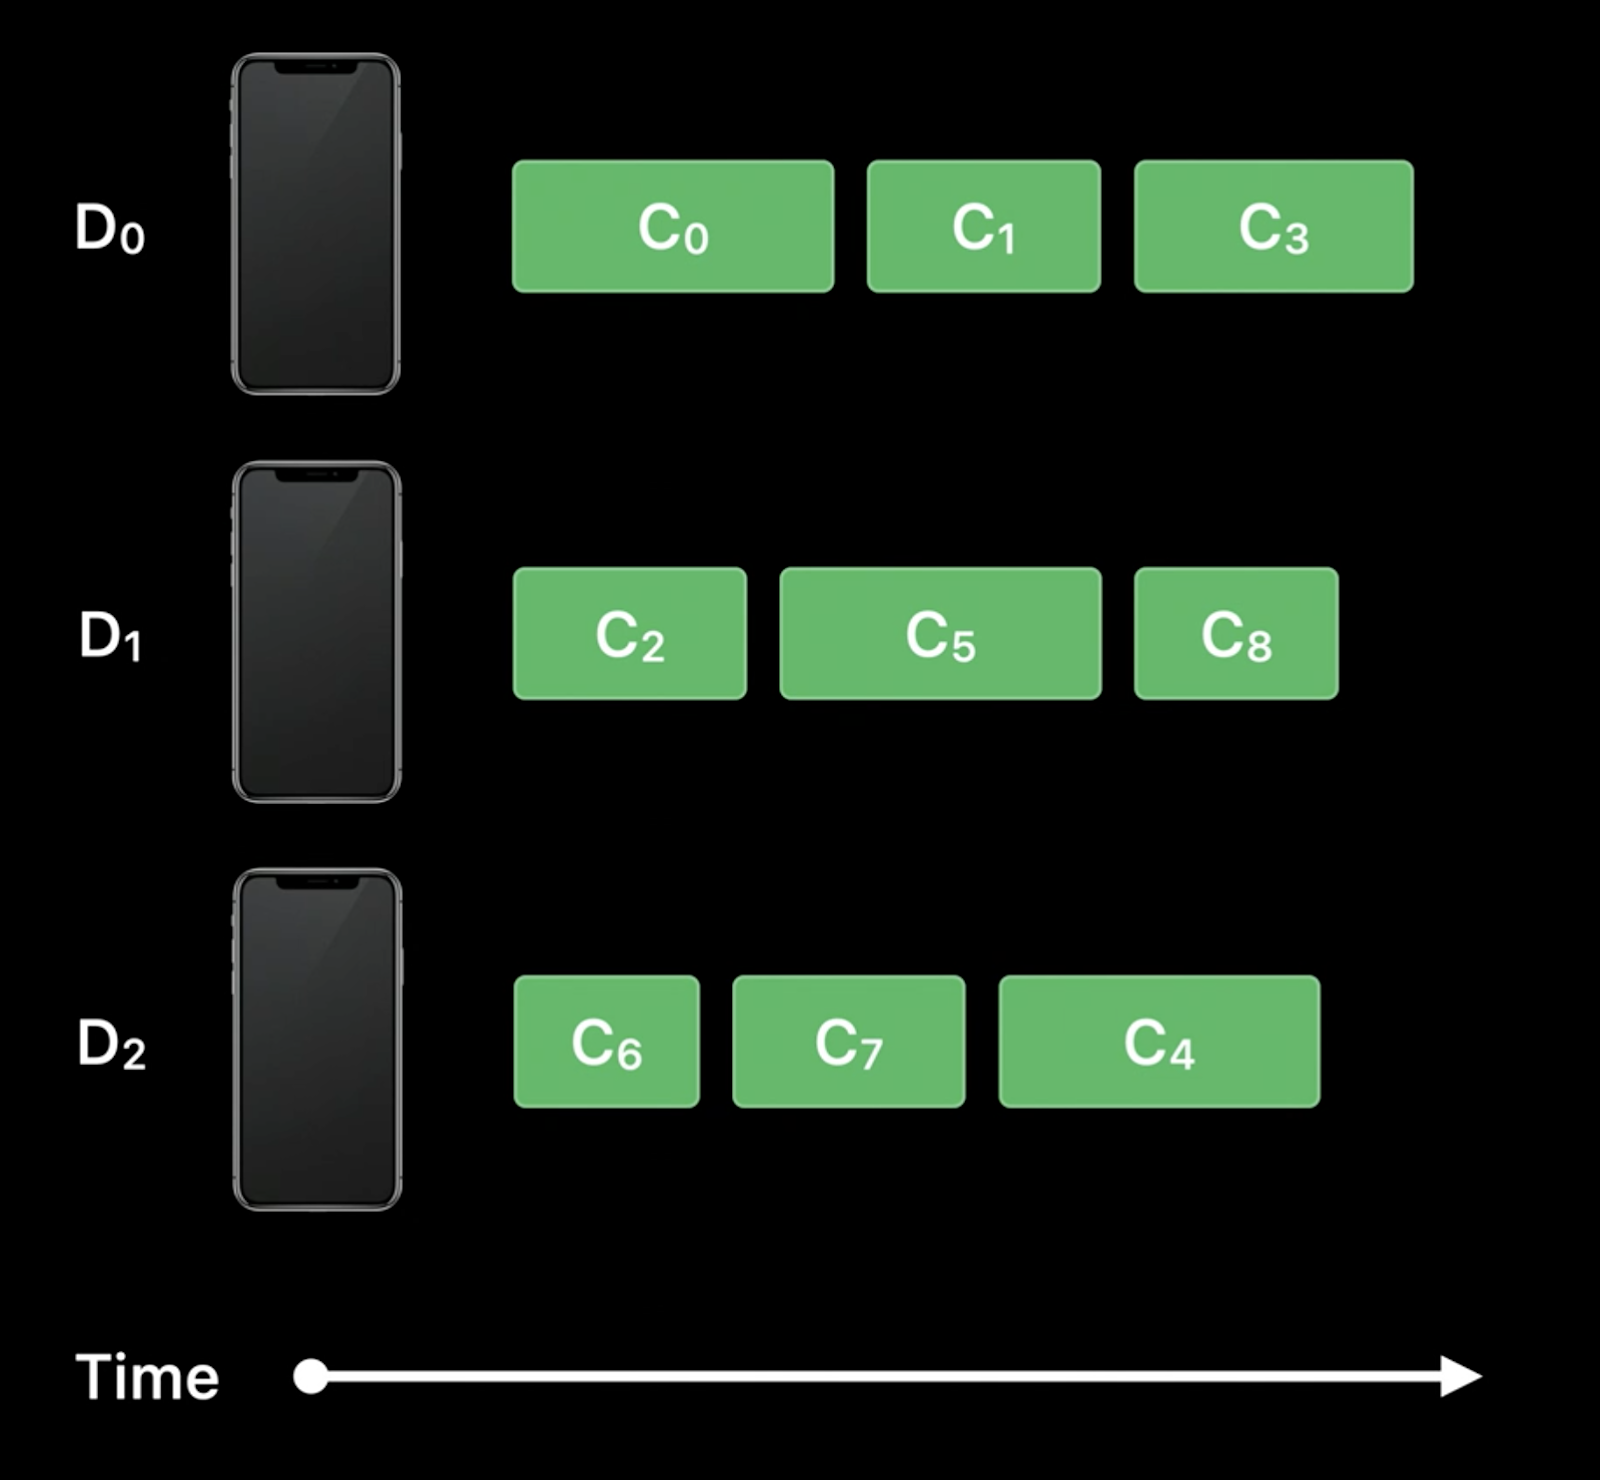
But, unfortunately, there are also pitfalls: the order of launching tests in parallel is not deterministic, there is no guarantee that test number 6 will be executed on device # 1 after test number 5. This fact must be taken into account when planning tests launching using Parallel Distributed Testing.
In general, the idea of running tests in parallel is not new. There was such an opportunity before Xcode 12, but it was in Xcode 12 that it became possible to run tests on real devices (so far only using xcodebuild).
The command for running parallel distributed tests is as follows:
xcodebuild test
    -project MyProject.xcodeproj
    -scheme MyProject
    -parallel-testing-enabled YES
    -parallelize-test-among-desinations
    -destination 'platform=iOS,name=iPhone 11'
    -destination 'platform=iOS,name=iPad pro'
More details here .
This concludes the review of new test features from WWDC 2020. Thanks for reading to the end.
I hope you find this article helpful. Happy testing!