Remembering Dijkstra's algorithm
Dijkstra's algorithm is one of the most popular graph theory algorithms. It is used to find the shortest path between nodes on a directed graph. We'll start with the original node and the known edge lengths between the nodes.
First, we assign the distance from the source to all the nodes. Node s gets the value 0 because it is the source; the rest get ∞ values to begin with.
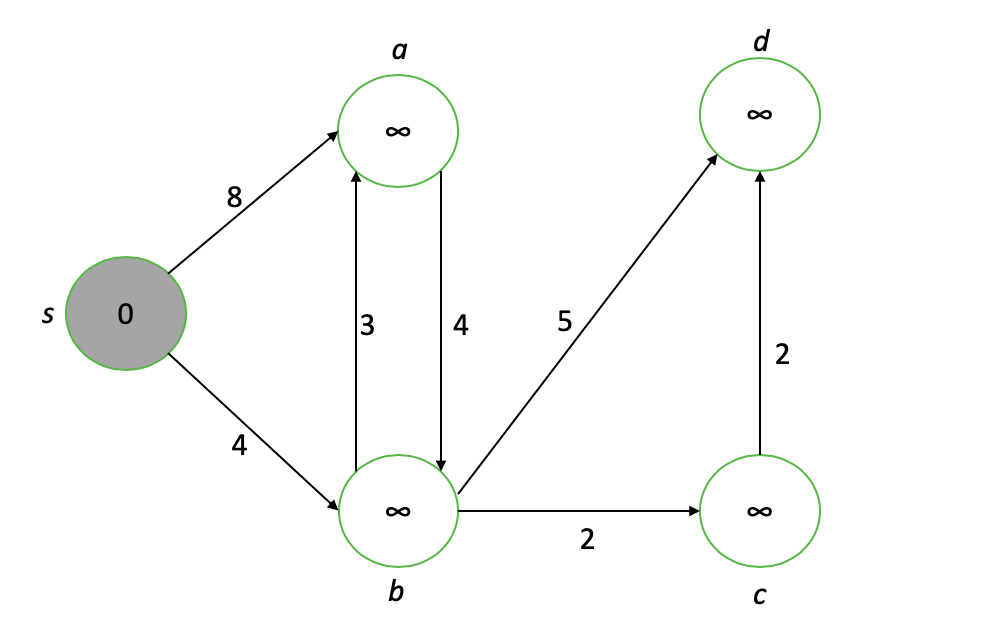
Our node of interest is the raw node with the lowest value (shown in gray), i.e. s. First, we “weaken” each adjacent vertex to our node of interest, updating their values to the minimum of their current value or the value of the node of interest plus the length of the connecting edge ...

Node s is now complete (black), and its neighbors a and b have taken on new values. The new node of interest is b, so we repeat the process of “weakening” the neighboring nodes of b and finalizing the value of the shortest path for b.

After going through each node, we end up with a graph showing the shortest path length from the source to each node.
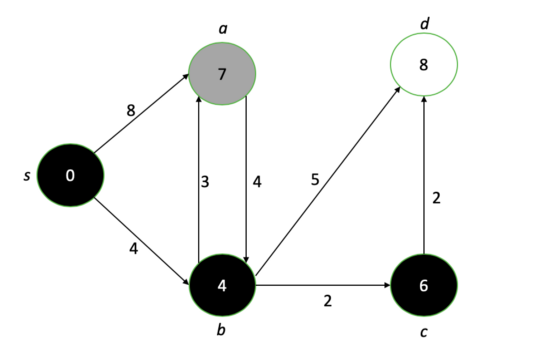


Our final diagram after running Dijkstra's algorithm. The numbers at each node represent the shortest possible distance from the original node.
Conceptualizing maze images

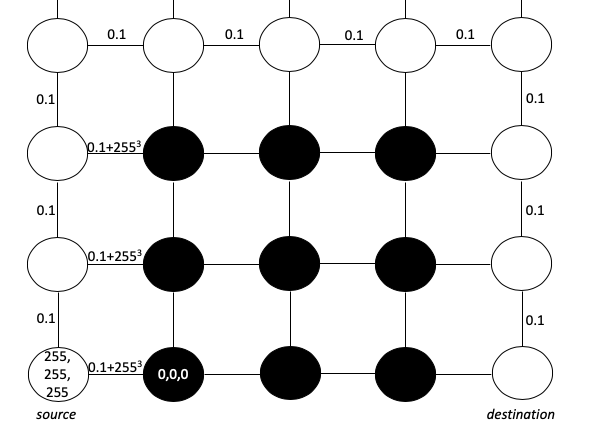
We can imagine the image as a matrix of pixels. Each pixel (for simplicity) has an RGB value of 0,0,0 (black) or 255,255,255 (white). Our goal is to create a shortest path that starts on white and does not cross over to black borders. To represent this goal, we can treat each pixel as a node and draw edges between adjacent pixels with edge lengths based on the difference in RGB values. We will use the Euclidean square distance formula and add 0.1 to ensure there is no path length 0 - (requirement for Dijkstra's algorithm):

This formula makes the intersection distance across the maze boundary excessively large. As we see, the shortest path from the source to the destination will clearly pass around the barrier, and not through it.
Implementation
We can use OpenCV, the popular Python vision library for Python, to extract pixel values and display our maze images. Let's also determine the coordinates of our start and end locations by adding points to our maze.
import cv2
import matplotlib.pyplot as plt
import numpy as np
img = cv2.imread('maze.png') # read an image from a file using
cv2.circle(img,(5,220), 3, (255,0,0), -1) # add a circle at (5, 220)
cv2.circle(img, (25,5), 3, (0,0,255), -1) # add a circle at (5,5)
plt.figure(figsize=(7,7))
plt.imshow(img) # show the image
plt.show()
We create a Vertex class to help us track coordinates. We also want to keep track of the parent node so that we can reconstruct the entire path once we find the distance values.
class Vertex:
    def __init__(self,x_coord,y_coord):
        self.x=x_coord
        self.y=y_coord
        self.d=float('inf') #current distance from source node
        self.parent_x=None
        self.parent_y=None
        self.processed=False
        self.index_in_queue=None
We need to create a vertex matrix representing the two-dimensional arrangement of pixels in the image. This will be the basis for Dijkstra's algorithm. We also maintain a low priority queue to keep track of unprocessed nodes.
def find_shortest_path(img,src,dst):
    pq=[] #min-heap priority queue
    imagerows,imagecols=img.shape[0],img.shape[1]
    matrix = np.full((imagerows, imagecols), None)
    #access matrix elements by matrix[row][col]
    #fill matrix with vertices
    for r in range(imagerows):
        for c in range(imagecols):
            matrix[r][c]=Vertex(c,r)
            matrix[r][c].index_in_queue=len(pq)
            pq.append(matrix[r][c])
    #set source distance value to 0
    matrix[source_y][source_x].d=0
    #maintain min-heap invariant (minimum d Vertex at list index 0)
    pq = bubble_up(pq, matrix[source_y][source_x].index_in_queue)
We need a few helper functions to help us find edges and the length of edges between vertices:
#Implement euclidean squared distance formula
def get_distance(img,u,v):
    return 0.1 + (float(img[v][0])-float(img[u][0]))**2+(float(img[v][1])-float(img[u][1]))**2+(float(img[v][2])-float(img[u][2]))**2
#Return neighbor directly above, below, right, and left
def get_neighbors(mat,r,c):
    shape=mat.shape
    neighbors=[]
    #ensure neighbors are within image boundaries
    if r > 0 and not mat[r-1][c].processed:
         neighbors.append(mat[r-1][c])
    if r < shape[0] - 1 and not mat[r+1][c].processed:
            neighbors.append(mat[r+1][c])
    if c > 0 and not mat[r][c-1].processed:
        neighbors.append(mat[r][c-1])
    if c < shape[1] - 1 and not mat[r][c+1].processed:
            neighbors.append(mat[r][c+1])
    return neighbors
Now we can implement Dijkstra's algorithm and assign distance values (d) to all vertices of pixels in the maze image:
while len(pq) > 0:
    u=pq[0] #smallest-value unprocessed node
    #remove node of interest from the queue
    pq[0]=pq[-1]
    pq[0].index_in_queue=0
    pq.pop()
    pq=bubble_down(pq,0) #min-heap function, see source code

    u.processed=True
    neighbors = get_neighbors(matrix,u.y,u.x)
    for v in neighbors:
        dist=get_distance(img,(u.y,u.x),(v.y,v.x))
        if u.d + dist < v.d:
            v.d = u.d+dist
            v.parent_x=u.x #keep track of the shortest path
            v.parent_y=u.y
            idx=v.index_in_queue
            pq=bubble_down(pq,idx)
            pq=bubble_up(pq,idx)
Now we can call the shortest path function and draw a solution in our maze:
img = cv2.imread('maze.png') # read an image from a file using opencv (cv2) library
p = find_shortest_path(img, (25,5), (5,220))
drawPath(img,p)
plt.figure(figsize=(7,7))
plt.imshow(img) # show the image on the screen
plt.show()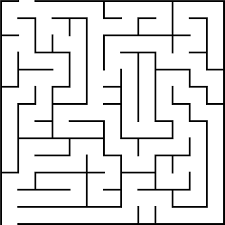

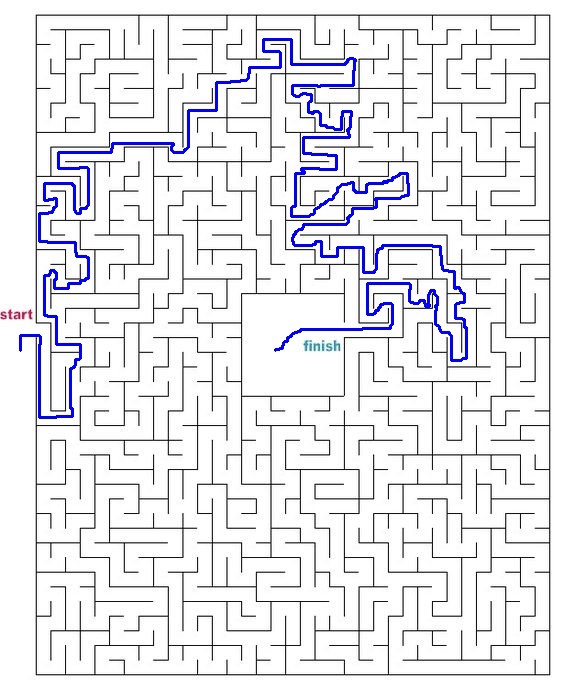
Let's try other mazes from all over the internet.


The complete source code is available on GitHub here .
Continuation: A Python training project: an interface with 40 lines of code (part 2)

Learn more about how to get a sought-after profession from scratch or Level Up in skills and salary by taking SkillFactory paid online courses:
- Machine Learning Course (12 weeks)
- Learning Data Science from scratch (12 months)
- Analytics profession with any starting level (9 months)
- «Python -» (9 )