Godot as a whole has a reputation rather as a 2D engine, which has been worked out pretty well, but not so long ago the 3D capabilities that have appeared allow you to make three-dimensional games. Especially if you are able to optimize some things on your own, do not make a too heavy and complex game, and you are also satisfied with the current rendering options. Well, or you can wait for future optimizations and the appearance of vulkan.
“Out of the box” in the engine there is some physics, including joints and wheeled vehicles. There is no built-in terrain editor, but you can use a plugin, import from specialized programs or just as a mesh from a 3D package. In the latter case, for the sake of productivity, you will have to independently cut the landscape into chunk fragments, and most likely make them separate meshes for collisions. As for the meshes under the form of landscape collision - in order to avoid visual inconsistencies, you need to triangulate the model during export from a 3D package. For example, one of the simplest ways to do this in Blender is to export the mesh in collada format (.dae), there is a default triangulate checkmark.
Sometimes the Blender model will have to be flipped 180 degrees inside Godot, so don't be surprised if your terrain is not visible - most likely it is rotated by the normals in the wrong direction.
Godot practices the “everything is a scene” approach and is tailored to the tree structure of elements. In practice, this means that new objects are added to the level as branches to nodes already existing on it, they can be turned into prefabs and opened separately, as if it were their separate small local world. Thus, it is very convenient to edit all sorts of saved composite objects, the only thing is that if light was exposed at your level, then, for example, going inside the character, into his local scene, you will not see this lighting and setting up his materials you will not understand how they look on light. This problem can be solved in different ways, for example, by switching to the level window and evaluating the changes taking place with the character, after saving his scene there. Or just temporarily throw the light source inside the prefab with the character.
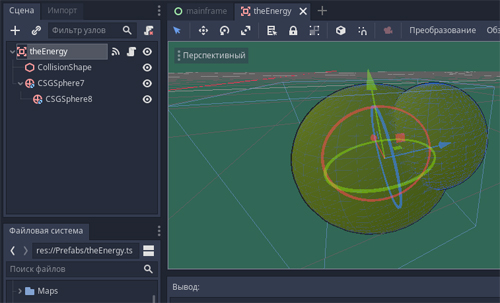
theEnergy, . Area, , , .
As for languages, apart from the low-level method, the most common options are the scripting languages GDScript and C #, as well as visual scripting for something simple. GDScript is better integrated into the engine, has more examples, does not require the launch of an external environment, and in terms of the general structure, everything will happen here as in the C # version - declaring variables, calling an initialization function, a process loop, a physical process loop, and so on. So choosing GDScript as your primary development scripting language makes sense. Changing to local C #, we will only get greater accuracy and detail of the record, losing in conciseness, but increasing intelligibility and control over the situation - curly braces instead of using tabs, end-of-line markers, more formal typing.
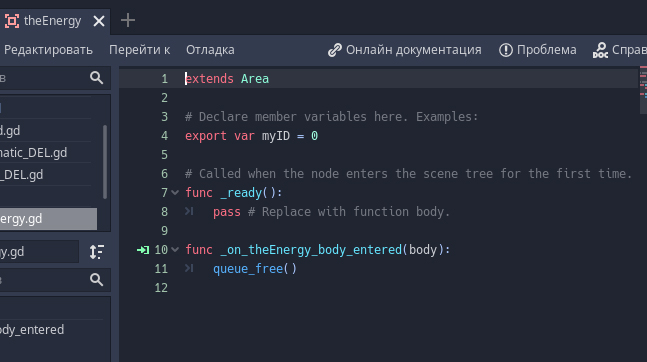
Code attached to the above object (in GDScript language). An identifier variable is set up, the value of which can be set in the editor. Next, a one-time initialization function in which nothing special happens (and it was possible to erase it). The following describes a signal handler method that should delete an object.
As for global variables, to use them both in GDScript and in C #, you need to add a global script / scripts to startup in the project parameters, the variables of which can be accessed globally.
Also in Godot there is a limitation - there can be no more than one script on each object. But this moment can be circumvented, for example, by hanging the second script on the child object.
Signals
You can also use a hierarchy to exchange data between nodes in Godot, because objects are attached to each other, like branches to a tree. True, this approach has its pitfalls, because in our game the hierarchy can be dynamically changeable. In addition, referring to the hierarchy within the same scene is one thing, but when you have a scene within a scene within a scene, then some difficulties arise with this, even if only purely in understanding what is happening.
One way to manage all this and not get too attached to a specific current hierarchy is through signals. A certain number of common signals are already preset - you can look into the object signals panel to attach a line with the processing of receiving one of them to the script of the same object or another object with a script, within the scene. If you need to make your own signal, you can do it like this:

We start the signal. We emit

it in the same script when you click a button or other conditions.
Everything is fine with this, until you need to transfer signals from one scene to another. For example, because you code the level from the scenes and you need to know when you need to destroy the current level and, say, collect the next.
In this case, you can attach a signal handler to the object that will send a signal to the root scene right at the moment of constructing the level by the code. Thus, we, so to speak, get a spy agent in this generated thread and listen to what he tells us.

At the time of level assembly, we find a spaceship on it and attach a signal listener to it, indicating the method in which we will process the messages of this signal.
You can also attach some variables to the signal, which can be quite useful. For example, instead of generating different signals on the object, we can get by with one, but we will send it with different parameters and additionally process it upon receipt.

And here is the description of the method itself, which we started above. Receiving a signal, it processes the variable sent with it.
Another useful thing that reduces the number of unnecessary signals is that instead of sending a personal signal, one object can knock on another, so that he himself can send the signal already in it. For example, an explosion receives a signal that it touched a player, and in the signal handler finds out if the player has a self-destruct method, launching it if it is found. The player, in this called method of his, sends a signal to the root scene that he has died. In the script of the root scene, the player’s death signal handler erases the world and collects the game menu.

An event occurs and we look to see if the object that entered the zone has the right method.

, , . , , .
CSG-
One of the useful 3D tools in Godot is the constructive solid geometry primitives. Simply put, these are objects that support boolean operations - intersection, exclusion, union. In addition to the set of primitives, there is a universal CSG Mesh, for which an arbitrary mesh can be set as a shape.

The CSG Combiner dummy will be required for use in a hierarchy to control the priority of operations when it is necessary to assemble some complex structure.
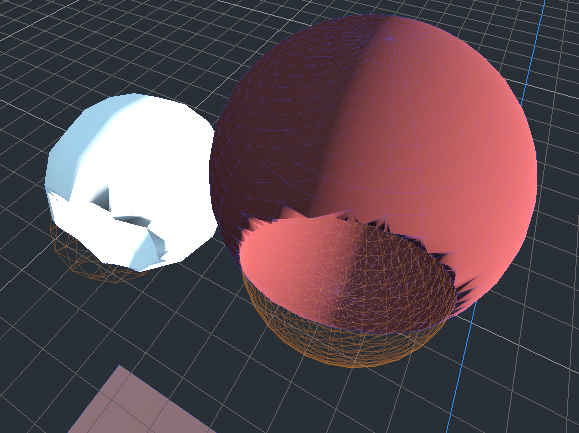
A pair of spheres from which child spheres are carved.
The main application of CSG is convenience and simplicity of prototyping level static and some of its elements. In fact, you can make a mesh in a 3D package, and repeat the same resulting shapes in it, unless you have to do this outside the game editor.
The next use of static CSG is to simulate destructibility and damage. to do this, you need to arrange CSG primitives in the exclusion mode, like holes, "stubs" and dents, and then temporarily hide, including visibility at the right time. The limitation here is that we can only “damage” the surface of the CSG object; moreover, the “damage” must be initially attached to it as a child, or attached through code as a child. But this option in terms of configuration flexibility already wins significantly in comparison with the destructible object prepared in the 3D package.

3 cylinders are built into the bridge in exception mode. While they are hidden the whole bridge.

If enabled, the area they exclude is cut out.
Next we have CSG moving. Through code, or recorded animation. In general, through this method, you can implement some kind of effects, but it is very desirable that such animations do not spin on the stage in a loop. Multiple animated CSGs can significantly impact performance, besides, Godot does not optimize all things, and if you do not disable animated CSGs yourself, they will continue to waste performance outside the camera's view.
Nevertheless, the effects of animated CSGs are already difficult to replace with 3D package solutions, so you may be interested in using them (at least if you are not going to draw advanced 3D through code). The main thing is to find them the correct application, it is best to use them pointwise, in certain places, including trigger animation. As the effect of opening the passage or other one-time special effect. Naturally, the simpler the form of CSG objects - the better. And they exert the main computational load precisely in the process of contact in motion, moreover, there is no particular difference which object is moved relative to another.
There is a moment in the video where the car falls through a hole in the bridge, when an animated CSG capsule passes through a CSG Mesh with a model of the bridge.
Multimesh
If you need to replicate a mesh in huge quantities, for example, scattering stones or trees across the level, then the MultimeshInstance node is useful here.
After adding to the scene, the multimash needs to be specified on which object to scatter copies of and what to take as a model for clones. Along the way, you can choose the size of the clones and their number. When the multi-mix is “baked”, it represents a lot of clones, and the goals that he used for his generation can be deleted if they are no longer needed.

A button for selecting multimedia targets appears in the editor window at the top right when it is selected. If you press it, then this window with the settings for generation will drop out.

Here we have two objects added to the scene as MeshInstance nodes. Next, we will clone the left object to the right.
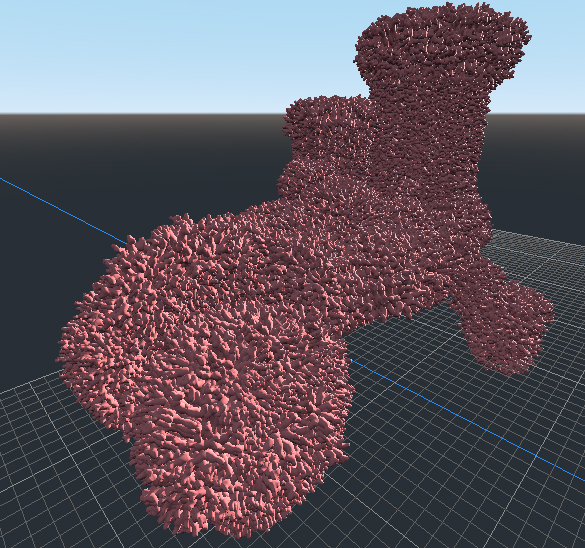
We get multimesh. In this situation, 10,000 clones were set in the settings. By the way, if there were 3-4 thousand of them, then visually the result would not differ much.
The "baked" multimesh can be moved anywhere, and besides, it has a Visible Instance parameter that initially displays the number of clones specified during generation. By changing this value, you can control how many clones are currently displayed. By default, it is -1, but this is a special value for displaying the maximum clones. If you put 10, there will be 10 clones. If 100, then 100. If the maximum was 50, then at 100, and at 1000, and at -1 there will be 50 of them.
You can use this multimesh capability to create special effects by animating the Visible Instance parameter through code or recorded animation. For finer control over the density of clones, you can use the 3D package to make a separate mesh with a solid mesh exactly in those places where the maximum density of clones is needed, and those places where they should not be should not be covered with polygons, or made gaps in them.
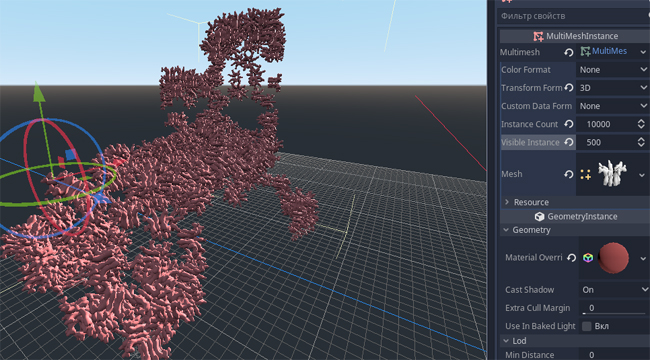
We set the Visible Instance to 500 and the fill density drops dramatically.
Miscellaneous
Control in Godot can be configured by opening the Project item in the top panel of the editor. Next Project Settings , Action List tab .
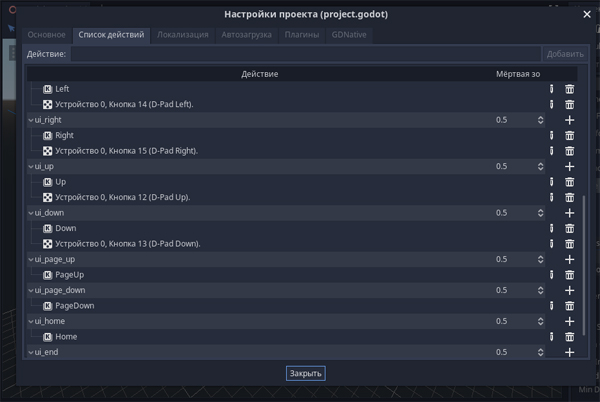
You can see how the default buttons are called so that you know what names to refer to them through the code. And also add your own.
For example, the default name for the PgUP button is “ui_page_up”, and you can handle its pressing in the code by writing the following line in GDScript - if Input.is_action_pressed (“ui_page_up”):
If an action is required for a single press, then is_action_pressed should be replaced with is_action_Just_pressed. The end of pressing - pressed changes to released.
#
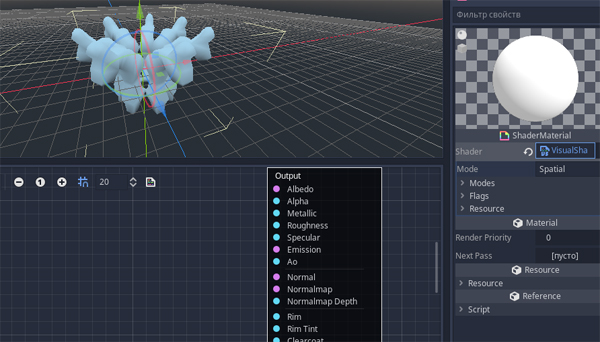
If you need to animate the flickering of a material, you can do it through a custom shader. To do this, select New ShaderMaterial as the object material.

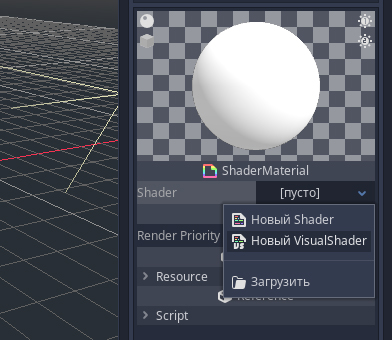
Next, select VisualShader in the empty field.
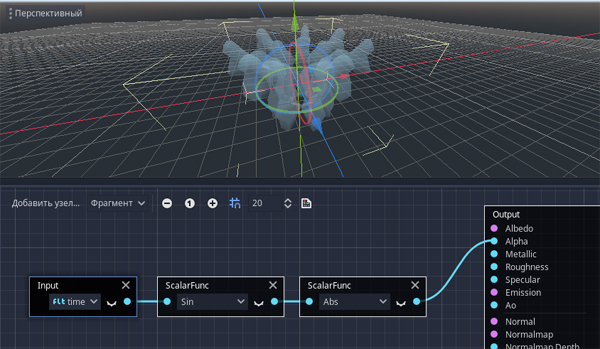
Click on it, the visual editor opens below the editor.
Add a pair of nodes, first Input - All - Time , then Scalar - Common - ScalarFunc , setting it in its drop-down list, for example, Sin. In principle, such a design will already give something like a flicker between black and white, but for better, add another Scalar node - Common - ScalarFuncand choose Abs there. We connect the nodes together (note that by clicking on the closed eye of each node you can open it and see how the picture changes at each stage) and connect to the Alpha, Emission or Albedo channel. That's it, our object is now flickering.
Naturally, this is far from the only way, but one of the very simple options. And if you want the flicker to be colored, then you will need to make a couple of nodes with color, mix them in a special node (going to Albedo) and attach the output of the chain of nodes to it that we collected above. Thus, this chain will act as a mixing factor for these colors.
#
To turn the selected node into a separate scene, you need to right-click on it and select "Save branch as scene". Then set a name for this scene. After that, the “Open in editor” icon will appear next to the node name, from where you can proceed to editing the resulting scene in a new window.
To perform the reverse manipulation, if, for example, we need to get the objects of the saved branch to the current scene in order to somehow rebuild or modify them, click on the node that hides the scene in it, right-click and select "Make local". The saved scene, which he was, is not destroyed at the same time.
#
To use global variables, you need to create a script and drop it into autoload: Project -Project Settings - Startup . The "singleton" checkbox should be checked.
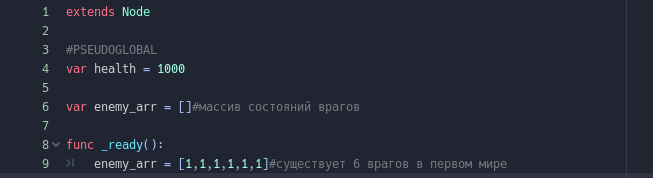
The contents of the SaveTheWorld script, the variables of which we want to use as global. At the moment, a certain indicator of health and an array of enemies' states are announced here, filling in at the initialization step.
To access these global variables from the code, you first need to get a reference to the singleton, then use its variables:
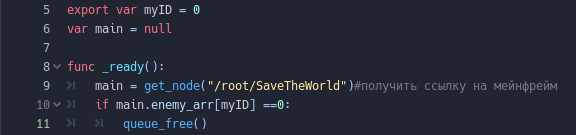
Find our SaveTheWorld, and then check if the state of this particular enemy is zero. If so, the enemy is removed.
UPD. You can access the variables of a singleton directly through its name, that is, in the example above, we would not have to take a link, and instead of main.enemy_arr [myID] we would refer to SaveTheWorld.enemy_arr [myID]. But you must be sure that this node has a check mark in the "singleton" column in its startup.
#
An AnimationPlayer node is added to the scene to record and play animations. It can be located anywhere in the hierarchy. In order to give him the opportunity to record animation, you need to click on the "Animation" button, above the opened timeline and create a new animation.
After that, on each selectable node in the current scene, key icons will appear on the right in the inspector. If you click on the key, the animator will offer to add a new animation track.

Next, move the timeline slider to the desired points, and in each of them we change that animated value in the object inspector, again pressing the key so that this point appears on the timeline. You can expand the available timelane in the field with the clock, on the right, by default there is 1 second. To the right of the clock is the animation loop button. Below, the first in the line is one of the frequently-used options that sets the twitchy discrete or continuous smooth character of the animation.
To the right of the central panel with the name of the animation is the autorun button, if you press it, the selected animation will play when the application starts. If you need several animated objects that are played in a loop constantly, then you can make their tracks in one AnimationPlayer by creating one common animation for them. If you need to switch animations for a specific object, you can create a separate AnimationPlayer for it and create several animations for different states there, while only one of them can be marked as starting automatically.
#
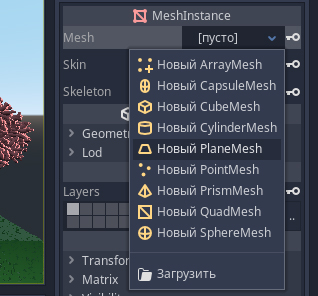
For various nodes, for example MeshInstance or CollisionShape, in the Mesh (Shape) field, you can choose from a prepared list of primitives (including loading your custom model, in the case of MeshInstance).
For MeshInstance, one of the most expensive primitives will be the sphere and the capsule, since they will most likely contain a lot of polygons. Therefore, for 3D particles, it is better to choose something like a polygon, cube or prism. For collisions, on the contrary, the shape of the sphere will be most quickly readable, since of the parameters it has only one radius. Actually, the above applies not only to Godot, but also to other game engines.
Godot can also make a collision shape for MeshInstance automatically by clicking on the Array button that appears at the top right in the editor when MeshInstance is selected. Next, choose from the proposed options, but as a rule, for the same terrain, this will be the first item - “Create a concave static body” (after which the StaticBody node will be attached to the object with the exact collision nested into it). In all other cases, when especially precise collisions are not required, you can dispense with the independently exposed CollisionShape primitives, or collect optimal meshes for collisions in the 3D package, then add them through MeshInstance and also create a collision in their form via the Array button.
#
If in any of the numeric fields in the inspector it is required, for example, to add a certain number to the parameter, multiply the value, and so on, then you can knock out this way: "315-180", "20 + 40", "64 * 5" ... the editor will calculate and substitute the final result of the operation in the field.