Although with the advent of SwiftUI, the relevance of autolayout is rapidly decreasing, while this mechanism is still actively used, and the library can be useful for those who create (or change) UI directly in code.
This way of constructing an interface has a number of disadvantages that limit its use:
- The creation of NSLayoutConstraint elements is very inconvenient.
- Poor visibility - looking at the code makes it difficult to understand how the UI will look.
- A lot of routine code. To place each view, an average of about 3 constraints is required, i.e. three lines of the same type of code.
- The complexity of creating dynamically changing interfaces: you need to save constraints in separate variables so that you can then change them, and often create redundant constraints and turn off unnecessary constraints.
The first problem can be easily solved by wrapping the standard methods for creating constraints in something more humane. And this is already well implemented, for example, in SnapKit , TinyConstraints and other similar libraries.
But you still have to write a lot of the same type of code, and there remain problems with visibility and dynamic changes to the layout. UIStackView cleverly solves these problems, but unfortunately, UIStackView has very limited customization of the position of individual elements. Therefore, the idea arose of a container UIView that controls the stack layout of its subviews, but with the ability to individually customize the location of each subview.
It is this approach that underlies BoxView, and it has proven to be very effective. BoxView allows you to almost completely eliminate the manual creation of constraints, almost the entire user interface is formed as a system of nested BoxView. As a result, the code became much shorter and clearer, the benefits are especially noticeable for dynamic UIs.
BoxView is in many ways similar to the standard UIStackView, but it uses different rules for placing subviews: in it you can set indents and sizes for each subview individually. To create a layout, BoxView uses an array of elements of the BoxItem type, which contains all the views to be displayed, and information on how to arrange them. And this does not require much code at all - most of the layout parameters are taken by default, and only the necessary values are explicitly specified.
The essential property of BoxView is that it only creates the specified constraints for the added subviews, and nothing else. Therefore, it can be used without any restrictions in conjunction with any other libraries and layout methods.
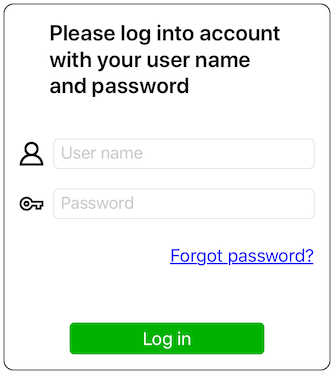
As an example, consider creating a simple login form using BoxView (The full example code with a step-by-step description is available in the BoxViewExample project on github ).

To create such a layout on BoxView, a few lines of code are enough:
        nameBoxView.items = [nameImageView.boxed.centerY(), nameField.boxed]
        passwordBoxView.items = [passwordImageView.boxed.centerY(), passwordField.boxed]
        boxView.insets = .all(16.0)
        boxView.spacing = 20.0
        boxView.items = [
            titleLabel.boxed.centerX(padding: 30.0).bottom(20.0),
            nameBoxView.boxed,
            passwordBoxView.boxed,
            forgotButton.boxed.left(>=0.0),
            loginButton.boxed.top(30.0).left(50.0).right(50.0),
        ]
The BoxItem element is created from any UIView using the boxed variable, after which it can be set to padding on 4 sides, alignment, and absolute or relative sizes.
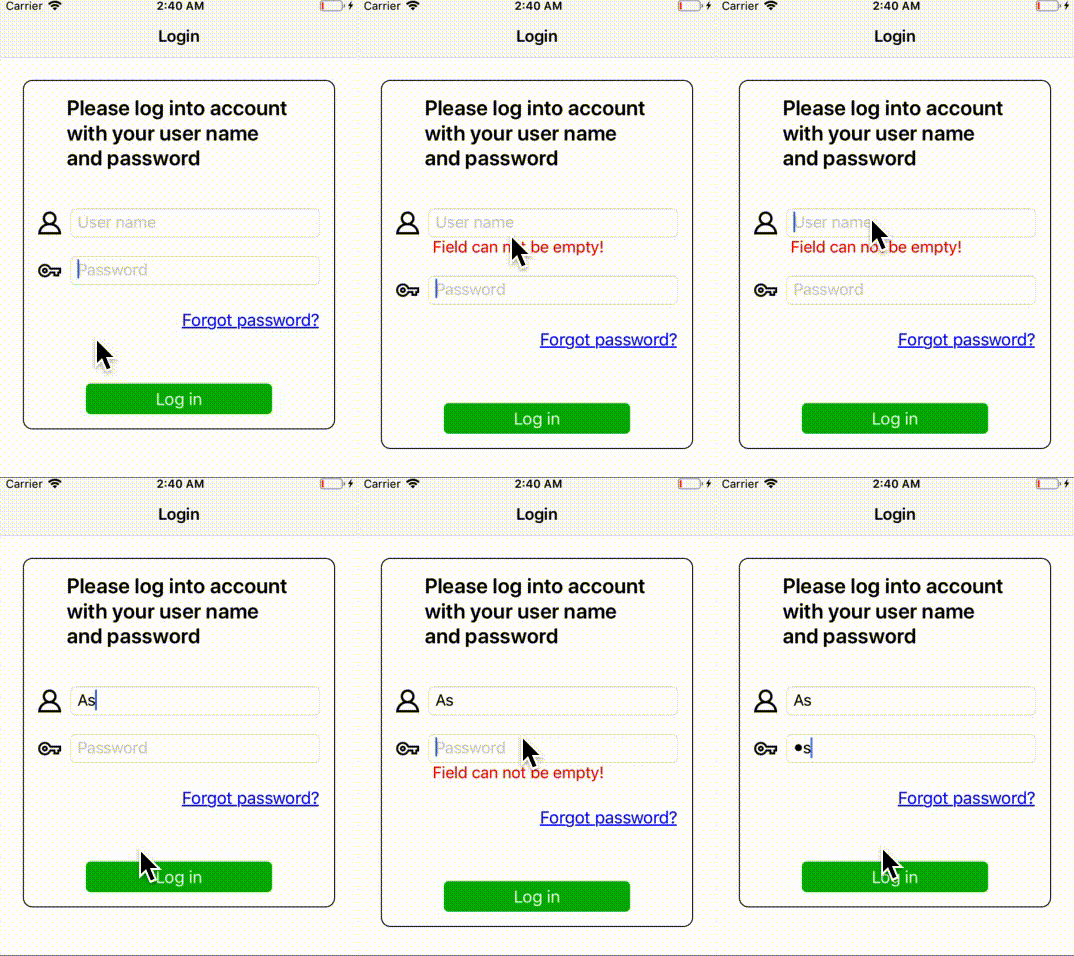
Any layout elements can be freely added and removed (including with animation) without affecting the placement of the rest. As an example, let's add a check for empty input fields and, in case of an error, we will display a message directly below the empty field:

And although the message should be "embedded" into the existing layout, it doesn't even require changing the existing code!
    func showErrorForField(_ field: UITextField) {
        errorLabel.frame = field.convert(field.bounds, to: boxView)
        let item = errorLabel.boxed.top(-boxView.spacing).left(errorLabel.frame.minX - boxView.insets.left)
        boxView.insertItem(item, after: field.superview, z: .back)
        boxView.animateChangesWithDurations(0.3)
    }

    @objc func onClickButton(sender: UIButton) {
        for field in [nameField, passwordField] {
            if field.text?.isEmpty ?? true {
                showErrorForField(field)
                return
            }
        }
        // ok, can proceed with login
    }

    @objc func onChangeTextField(sender: UITextField) {
        errorLabel.removeFromSuperview()
        boxView.animateChangesWithDurations(0.3)
    }
BoxView supports all autolayout toolkit: distances between elements, absolute and relative sizes, priorities, RTL language support. In addition to UIView, invisible objects - UILayoutGuides can also be used as layout elements. Flex layout can also be used. Of course, the layout scheme itself, in the form of a system of nested UIView stacks, does not 100% cover all conceivable options for the relative arrangement of elements, but this is not required. It is just fine for the vast majority of typical user interfaces, and for more exotic cases, you can always add the corresponding additional constraints in any other way. Several utility methods, for example, to create aspect ratio constraints, are also included in the library.
Another small exampleavailable on github (~ 100 lines of code!) illustrates the use of the BoxView nested system in conjunction with other constraint setting methods, as well as an animated change in BoxView settings.

BoxView project on github