We continue to update Voximplant Kit with JointJS . And we are pleased to announce the appearance of live logs of calls. How much they are alive and whether they are dangerous for ordinary users, read under the cut.
Previously, only call recordings were available to users to analyze calls in Voximplant Kit. In addition to audio, we wanted to make not just a text log, but a more convenient tool for viewing call details and analyzing errors. And since we are dealing with a low-code / no-code product, the idea of visualizing logs came up.
What's the salt? / New concept
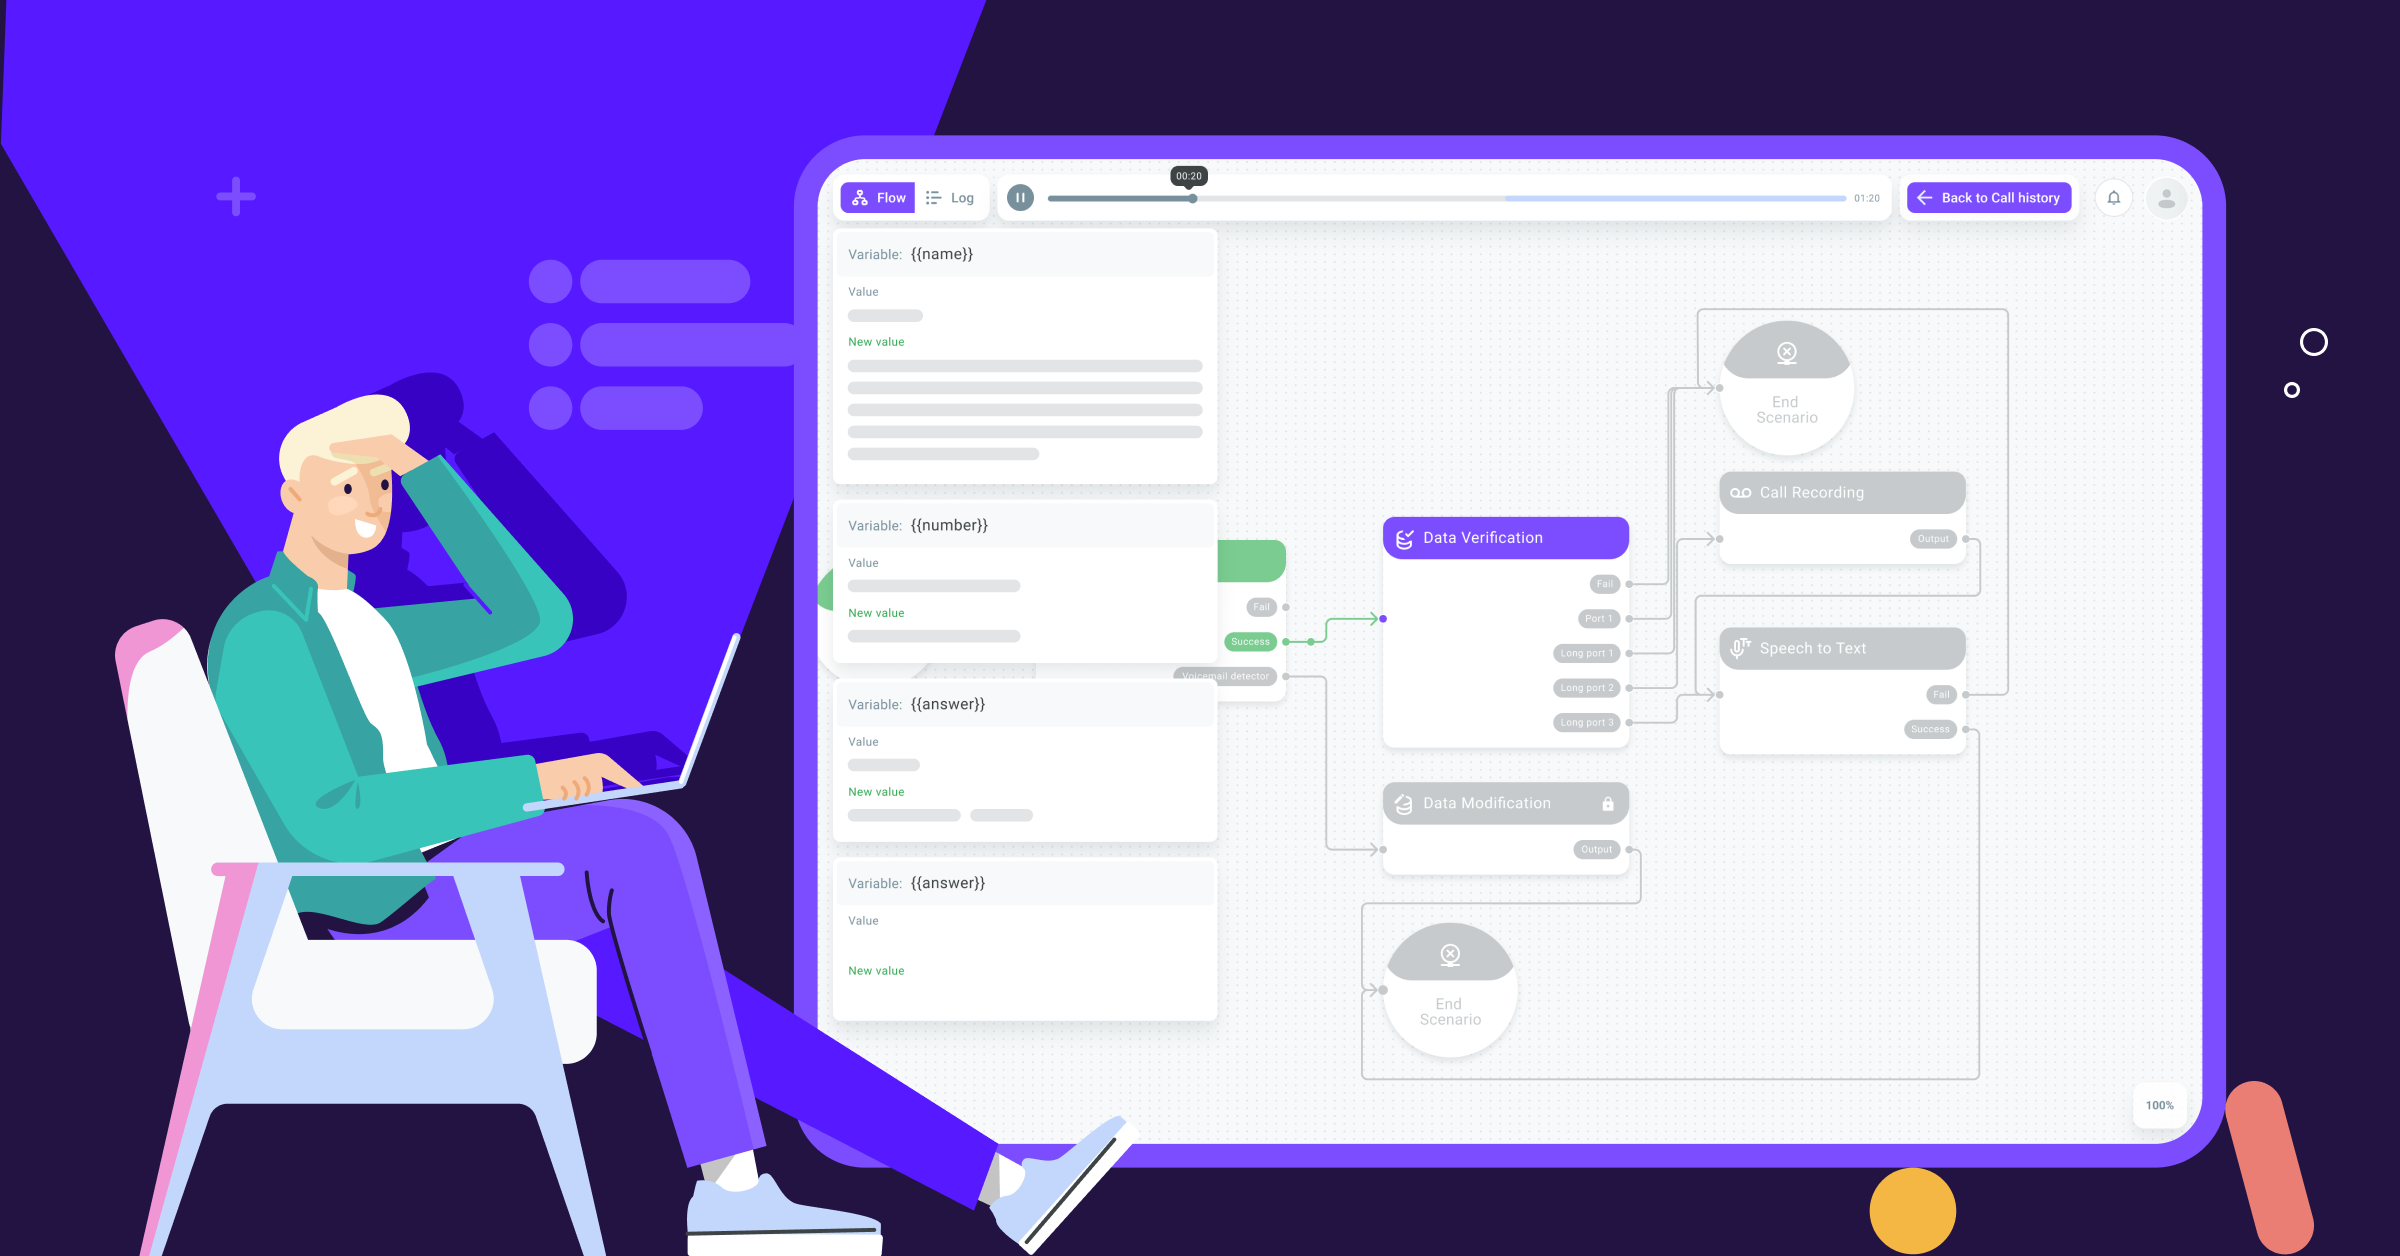
All call results are now available as a chain of completed blocks, animated by analogy with the demo mode. Only the path is highlighted here in advance: you can visually trace how the client moved through the script.
To do this, go to the tab of the history of outgoing or incoming calls or in the report of the selected campaign and click "View log". And then the editor will demonstrate what happened in the call step by step.

Control
Controls stop / start (1) stop / resume playback, and back / next (2) move the user pointwise to the beginning of the previous / next block. You can also just click on the timeline to start playback from a specific point in time, just like playing a song.
If the scenario includes a recording of a conversation, then it will be played in parallel with moving through the blocks. Audio recording on the timeline is highlighted in a separate color (3).

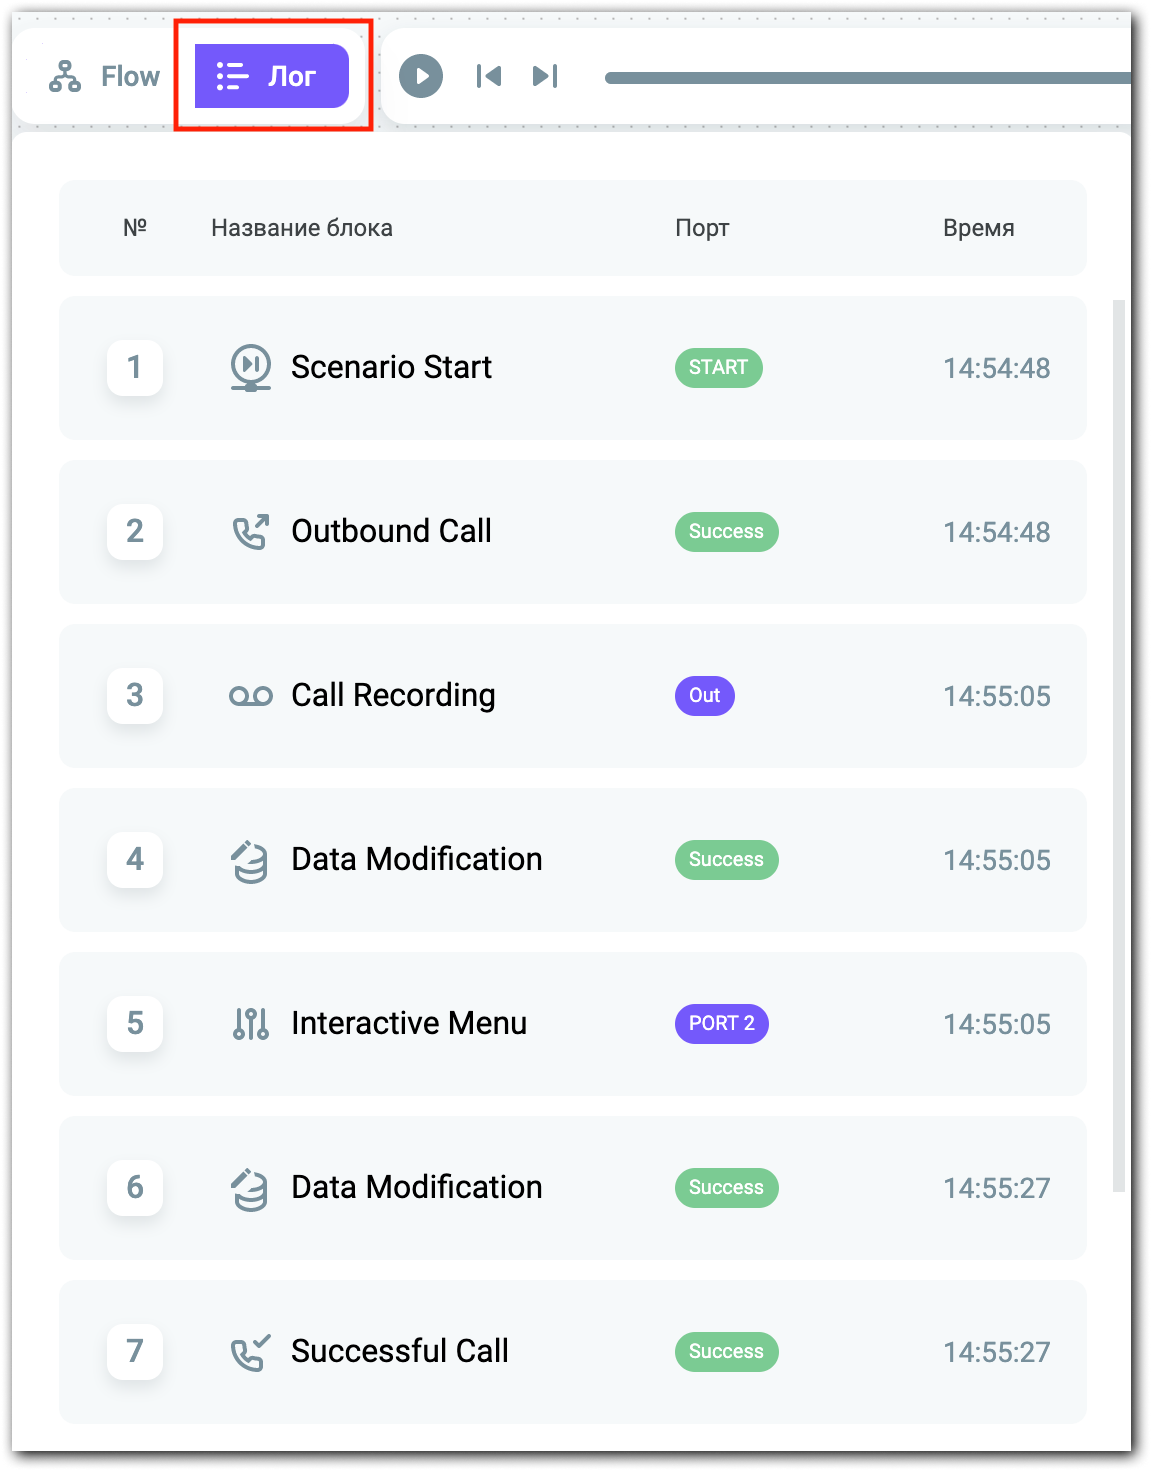
For the convenience of the user, a list of passed blocks with timestamps is also available ("Log"):
Spoiler:
In the "Log" tab, we plan to show the details of the blocks. They will help us understand why a certain port exited the block and whether there were errors. For example, for the recognition unit, we will see the results and recognition errors.
Complex blocks such as DialogFlowConnector, IVR, ASR, etc. will be of the greatest interest here.
Variables
Changed variables are displayed on the left in the form of notifications pop-up according to the chronology. That is, if we move to the “Change data” block, the variables that changed there will pop up. Let's go far from it (more than 4s on the timeline) - the variables will disappear until we again find ourselves in the interval where the change occurred:

Life hack
Call logs are kept in their original form even after script changes or deletions. This means that there will be no problems with restoring the script logic: if necessary, you can always refer to the log.
You can feel the logs yourself on the Voximplant Kit .
So, what's inside?
Let's see how dynamic logs are implemented in the code. Let's say right away, from Joint JS we took only animation and block allocation, as in demo mode. The rest (what can be done on the basis of this) is our imagination.
By the way, to learn more about the internals of the demo mode, read our previous article .
We get timepoints
When you go to view the log, the server sends data, which contains a list of all blocks passed, the date and time of entry into them and a list of variables that changed during the call. In other words, on the front, we get two arrays of objects: log_path and log_variables.
Also, the server response contains a link to the audio and its duration, if the conversation was recorded.

Based on the time of entry into the blocks, we calculate timepoints in milliseconds and write them for each block and variables. Reference point (0 ms) - time of entry into the first block. So, if we entered the second block 5 seconds after the start of the call, then the timepoint of the second block = 5000 ms. Using these timepoints, we calculate the total duration of the log.
Updating the timeline
After pressing the play button, the timeline starts updating every 10 ms. During each update, we check if the current time coincides with one of the timepoints:
const found = this.timePoints.find((item) => item === this.playTime);If there is a match, we will search for all blocks whose timepoint = current time + 600 ms (the time during which the animation of movement between blocks occurs).
UpdatePlayTime () method code:
updatePlayTime(): void {
    const interval = 10;
    let expected = Date.now() + interval;

    const tick = () => {
        const drift = Date.now() - expected;
        const found = this.timePoints.find((item) => item === this.playTime);
        this.$emit('update', {
            time: this.playTime,
            found: found !== undefined
        });

        if (this.playTime >= this.duration) {
            this.isPlay = false;
            this.playTime = this.duration;
            clearTimeout(this.playInterval);
            this.$emit('end', this.playTime);
            return;
        }

        expected += interval;

        this.playTime += 0.01;
        this.playTime = +this.playTime.toFixed(2);

        this.updateProgress();

        this.playInterval = window.setTimeout(tick, Math.max(0, interval - drift));
    };

    this.playInterval = window.setTimeout(tick, 10);
}
Also, every 90 ms we check the coincidences for the current time and timepoints for the changed variables + 4000 ms (the time during which the notification about the change of the variable hangs).
Select the blocks
After all matches are found, add blocks to the queue for selection and start animation of links.
If there are several blocks with timepoint = current time + 600 ms, then the transition is animated only to the last one:
if (i === blocks.length - 1) {
    await this.selectBlock(blocks[i], 600, true, true);
}
This is necessary because there are blocks that are processed very quickly. For example, "Checking data", "Changing data", etc. - several blocks can be traversed in 1 second. If you animate them sequentially, there will be a lag from the timeline time.
OnUpdateTimeline method code:
async onUpdateTimeline({
    time,
    found
}) {
    this.logTimer = time * 1000; //
    this.checkHistoryNotify();

    if (!found) return;

    //        + 600
    const blocks = this.callHistory.log_path.filter((item) => {
        return item.timepoint >= this.logTimer && item.timepoint < this.logTimer + 600;
    });

    if (blocks.length) {
        this.editor.unselectAll();

        for (let i = 0; i < blocks.length; i++) {

            if (i === blocks.length - 1) {
                await this.selectBlock(blocks[i], 600, true, true);

                const cell = this.editor.getCellById(blocks[i].idTarget);
                this.editor.select(cell);
            } else {
                await this.selectBlock(blocks[i], 0, false, true);
            }
        }
    }
}
And so in a circle, there is a coincidence - we select blocks, if the block is already in the queue - we do nothing.
The selectBlock () method helps us with this:
async selectBlock(voxHistory, timeout = 700, animate = true, animateLink = true) {
    const inQueue = this.selectQueue.find((item) => item[0].targetId === voxHistory.idTarget);

    if (!inQueue) this.selectQueue.push(arguments);

    return this.exeQueue();
}
Rewind
When rewinding, the same principle: when the timeline is moved, we get the time for which we need to rewind and remove from the selected blocks with timepoints longer than the current time:
const forSelect = this.callHistory.log_path.filter((item) => {
        const time = accurate ? item.accurateTime : item.timepoint;
        return time <= this.logTimer;
    });
We make an animated transition to the last one.
OnRewind () method code:
async onRewind({
    time,
    accurate
}, animation = true) {
    this.editor.unselectAll();
    this.stopLinksAnimation();
    this.checkHistoryNotify(true);

    const forSelect = this.callHistory.log_path.filter((item) => {
        const time = accurate ? item.accurateTime : item.timepoint;
        return time <= this.logTimer;
    });

    for (let i = 0; i < forSelect.length; i++) {
        if (i === forSelect.length - 1) {
            await this.selectBlock(forSelect[i], 600, animation, false);
            const cell = this.editor.getCellById(forSelect[i].idTarget);
            this.editor.select(cell);
        } else {
            await this.selectBlock(forSelect[i], 0, false, false);
        }
    }

    if (this.isPlay) this.restartAnimateLink();

    this.onEndTimeline();
}
Playing audio
Turning on / off audio recording is even easier. If the timeline coincides with the start of the recording, it starts playing and then the time is synchronized. The updatePlayer () method is responsible for this:
updatePlayer() {
    if (this.playTime >= this.recordStart && this.player.paused && !this.isEndAudio) {
        this.player.play();
        this.player.currentTime = this.playTime - this.recordStart;
    } else if (this.playTime < this.recordStart && !this.player.paused) {
        this.player.pause();
    }
}
That's all! This is how live logs appeared based on Joint JS methods and the creativity of our developers. Be sure to test them yourself if you haven't already :)
Great if you enjoy our series of articles on Keith Updates. We will continue to share with you the freshest and most interesting!