The time frame is significant and begs to be dealt with. There are several ways to fight, the main ones:
- Saw applications into smaller products with their release cycles.
- Coating the product with tests according to the test pyramid.
The last point became the topic of my article.

Testing Pyramid
As we know, there are three levels in the testing pyramid: unit tests, integration tests, and e2e tests. I think many are familiar with units, as well as with e2e, so I will dwell on integration tests in more detail.
As part of integration testing, we test the operation of the entire application through interaction with the UI, however, the main difference from e2e tests is that we do not make real requests for backing. This is done in order to check only the interaction of all systems at the front in order to reduce the number of e2e tests in the future.
To write integration tests, we use Cypress. In this article I will not compare it with other frameworks, I will only say why it turned out to be with us:
- Very detailed documentation.
- Easy debugging of tests (Cypress has a special GUI for this with time-travel steps in the test).
These points were important for our team, since we did not have experience in writing integration tests and a very simple start was needed. In this article I want to talk about the path we have traveled, about which bumps we have filled, and to share recipes for implementation.
The beginning of the way
In the beginning, I used Angular Workspace with one application to organize the code. After installing the Cypress package, a cypress folder with configuration and tests appeared in the root of the application, we stopped at this option. When trying to prepare a script in package.json that is required to run the application and run tests on top of it, we encountered the following problems:
- Index.html contains some scripts that are not needed in integration tests.
- To run the integration tests, it was necessary to make sure that the server with the application was running.
The problem with index.html was solved through a separate assembly configuration — let's call it cypress — in which we specified custom index.html. How to implement this? Find the configuration of your application in angular.json, open the build section, add a separate configuration for Cypress there, and do not forget to specify this configuration for the serve-mode.
Example configuration for build:
"build": {
 ...
 "configurations": {
   … //
   "cypress": {
     "aot": true,
     "index": "projects/main-app-integrations/src/fixtures/index.html",
     "fileReplacements": [
       {
         "replace": "projects/main-app/src/environments/environment.ts",
         "with": "projects/main-app/src/environments/environment.prod.ts"
       }
     ]
   }
 }
}
Serve integration:
"serve": {
 ...
 "configurations": {
   … //
   "cypress": {
     "browserTarget": "main-app:build:cypress"
   }
 }
}
From the main: for cypress configuration, we specify aot assembly and replace files with environment - this is necessary to create prod-like assemblies during testing.
So, we figured out the index.html, it remains to raise the applications, wait for the build to finish and run tests on top of it. To do this, use the start-server-and-test library and write scripts based on it:
 "main-app:cy:run": "cypress run",
 "main-app:cy:open": "cypress open",
 "main-app:integrations": "start-server-and-test main-app:serve:cypress http://localhost:8808/app/user/ main-app:cy:run",
 "main-app:integrations:open": "start-server-and-test main-app:serve:cypress http://localhost:8808/app/user/ main-app:cy:open"
As you can see, there are two types of scripts: open and run. The open mode opens the GUI of Cypress itself, where you can switch between tests and use time-travel. The run mode is just a test run and the final result of that run, great for running in CI.
Based on the results of the work done, we were able to get a starting frame for writing the first test and running it in CI.
Monorepository
The described approach has a very noticeable problem: if there are two or more applications in the repository, then the one-folder approach is not viable. And so it happened with us. But it happened in a rather interesting way. At the time of the introduction of Cypress, we moved to NX, and this handsome man out of the box makes it possible to work with Cypress. What is the principle of work in it:
- You have an application, for example main-app, the main-app-e2e application is created next to it.
- Rename main-app-e2e to main-app-integrations - you're amazing.
Now you can run integration tests with one command - ng e2e main-app-integrations. NX will automatically bring up main-app, wait for a response, and run the tests.
Unfortunately, those who are currently using Angular Workspace, but it's okay, I have a recipe for you as well. We will use the file structure as in NX:
- Create a main-app-integrations folder next to your application.
- Create a src folder in it and add the contents of the cypress folder to it.
- Do not forget to move cypress.json (initially it will appear in the root) into the main-app-integrations folder.
- Edit cypress.json, specifying paths to new folders with tests, plugins and auxiliary commands (parameters integrationFolder, pluginsFile and supportFile).
- Cypress can work with tests in any folders, the
project parameter is used to specify the folder , so we change the command from cypress run / open to cypress run / open -–project ./projects/main-app-integrations/src .
The solution for Angular Workspace is most similar to the solution for NX, except that we create the folder by hand and it is not one of the projects in your mono-repository. Alternatively, you can directly use the NX builder for Cypress ( an example of the NX repository with Cypress, you can see the final use of the nx-cypress builder there - focus on angular.json and the
cart-e2e and products-e2e project).
Visual regressing
After the first five tests, we thought about screenshot testing, because, in fact, there are all the possibilities for this. I’ll say in advance that the word “screenshot-testing” causes great pain within the team, since the path to obtaining stable tests was not the easiest. Next, I will describe the main problems that we encountered and their solution.
The cypress-image-snapshot library was taken as a solution . The implementation did not take much time, and now after 20 minutes we received the first screenshot of our application with a size of 1000 × 600 px. There was a lot of joy because the integration and use were too easy, and the benefits could be huge.
After generating five reference screenshots, we launched a test in CI, as a result, the build fell apart. It turned out that the screenshots taken with the open and run commands are different. The solution was quite simple: take screenshots only in CI mode, for this we removed taking screenshots in local mode, for example:
Cypress.Commands.overwrite(
   'matchImageSnapshot',
   (originalFn, subject, fileName, options) => {
       if (Cypress.env('ci')) {
           return originalFn(subject, fileName, options);
       }

       return subject;
   },
);
In this solution we are looking at the env parameter in Cypress, it can be set in different ways.
Fonts
Locally, the tests began to pass upon restarting, we are trying to run them again in CI. The result can be seen below:
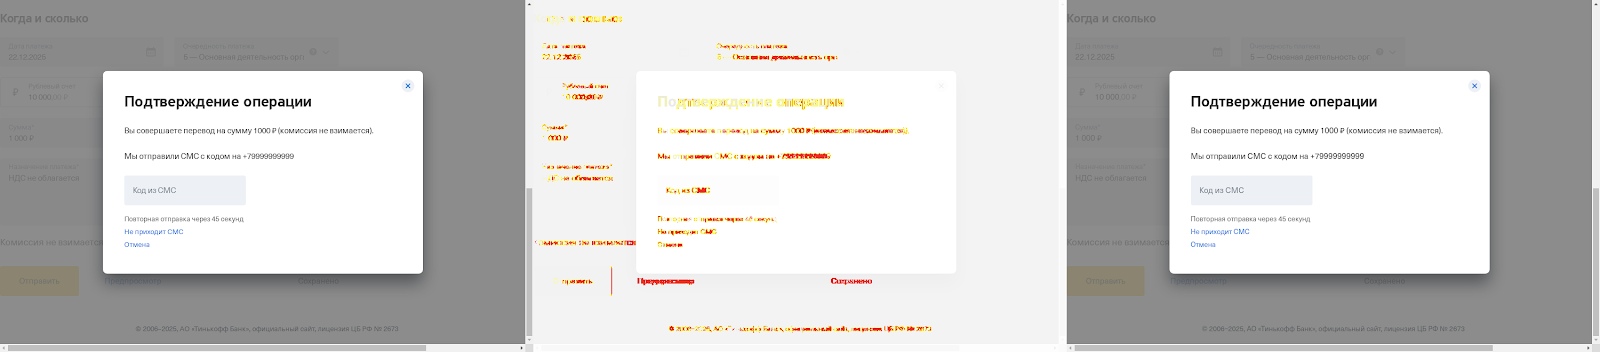
It is quite simple to notice the difference in the fonts in the diff screenshot. A reference screenshot was generated on macOS, and Linux was installed on the agents in CI.
Wrong decision
We picked up one of the standard fonts (like it was Ubuntu Font), which gave a minimal per-pixel diff, and applied this font for text blocks (made in
index.html, which was intended only for cypress tests). Then we increased the overall diff to 0.05% and the per-pixel diff to 20%. With these parameters, we spent a week - until the first time when it was necessary to change the text in the component. As a result, the build remained green, although we did not update the screenshot. The current solution has proven useless.
Correct solution
The original problem was in different environments, the solution, in principle, suggests itself - Docker. There are already ready-made docker images for Cypress . There are different variations of the images, we are interested in included, since Cypress is already included in the image and will not download and unpack the Cypress binary every time (the Cypress GUI runs through a binary file , and downloading and unpacking takes longer than downloading docker image).
Based on the included docker image, we make our own docker container, for this we have made an integration-tests.Dockerfile file with similar content:
FROM cypress:included:4.3.0
COPY package.json /app/
COPY package-lock.json app/
WORKDIR /app
RUN npm ci
COPY / /app/
ENTRYPOINT []
I would like to note the zeroing of ENTRYPOINT, this is due to the fact that it is set by default in the cypress / included image and points to the cypress run command, which prevents us from using other commands. We also break our dockerfile into layers so that every time you restart the tests you don’t have to run npm ci again.
Add the .dockerignore file (if it does not exist) to the root of the repository and in it, be sure to specify node-modules / and * / node-modules /.
To run our tests in Docker, let's write a bash script integration-tests.sh with the following content:
docker build -t integrations -f integration-tests.Dockerfile .
docker run --rm -v $PWD/projects/main-app-integrations/src:/app/projects/main-app-integrations/src integrations:latest npm run main-app:integrations
Short description: We build our integration-tests.Dockerfile docker container and point volume to the tests folder so that we can get the generated screenshots from Docker.
Fonts again
After solving the problem described in the previous chapter, there was a lull in the builds, but about a day later we faced the following problem (on the left and right - screenshots of the same component taken at different times):
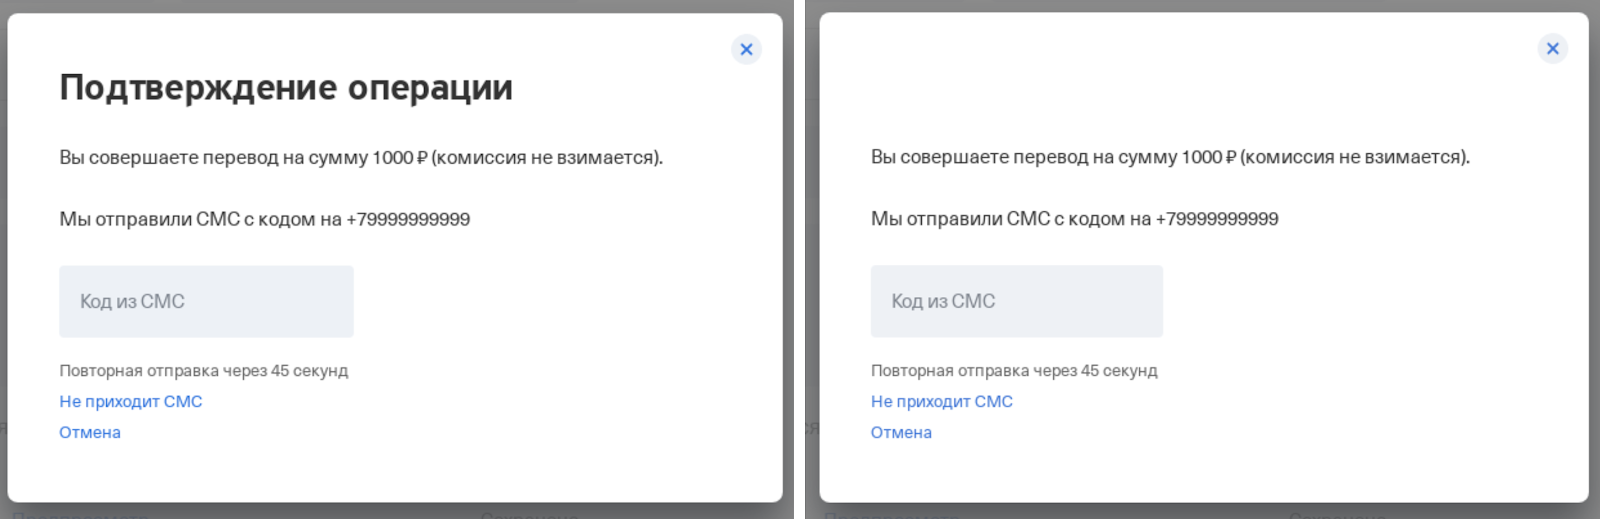
I think the most attentive noticed that there was not enough title in the pop-up . The reason is very simple - the font did not have time to load, since it was not connected via assets, but was located on the CDN.
Wrong decision
Download fonts from CDN, drop them into assets for cypress configuration, and in our custom
index.html for integration tests we connect them. With this decision, we lived a decent time until we changed the corporate font. There was no desire to play the same story a second time.
Correct solution
It was decided to start preloading all the necessary fonts for the test in
index.html for the cypress configuration, it looked something like this:
<link
      rel="preload"
      href="...."
      as="font"
      type="font/woff2"
      crossorigin="anonymous"
/>
The number of test crashes due to fonts that did not have time to load dropped to a minimum, but not to zero: all the same, sometimes the font did not have time to load. A solution from KitchenSink of Cypress itself came to the rescue - waitForResource.
In our case, since the preloading of fonts was already connected, we simply redefined the visit command in Cypress, as a result, it not only navigates to the page, but also waits for the specified fonts to load. I would also like to add that waitForResource solves the problem not only of fonts, but also of any loaded statics, for example, images (because of them, screenshots were also broken, and waitForResource helped a lot). After applying this solution, there were no problems with fonts and any loading statics.
Animations
Our headache is connected with animations, which remains to this day. At some point, screenshots will start appearing on which the element is animated, or a screenshot is taken before the animation starts. Such screenshots are unstable, and with each next comparison with the standard there will be differences. So which way did we go when solving the issue related to animations?
First solution
The simplest thing that came to our mind at the initial stage: before creating a screenshot, stop the browser for a certain time so that the animations have time to complete. We went along the chain 100ms, 200ms, 500ms and as a result 1000ms. Looking back, I understand that this decision was initially terrible, but I just wanted to warn you against the same decision. Why awful? The animation times are different, agents in CI can also dull sometimes, which is why any waiting time for page stabilization from time to time was different.
Second solution
Even with a wait of 1 second, the page did not always manage to become stable. After a little research, we found a tool from Angular - Testability. The principle is based on tracking the stability of ZoneJS:
Cypress.Commands.add('waitStableState', () => {
   return cy.window().then(window => {
       const [testability]: [Testability] = window.getAllAngularTestabilities();

       return new Cypress.Promise(resolve => {
           testability.whenStable(() => {
               resolve();
           }, 3000);
       });
   });
});
Thus, when creating screenshots, we called two commands: cy.wait (1000) and cy.waitStableState ().
Since then, there hasn't been a single randomly dropped screenshot, but let's count together how much time was spent on idle browser. Suppose you have 5 screenshots in your test, for each there is a stable waiting time of 1 second and some random time, let's say 1.5 seconds on average (I did not measure the average in reality, so I took it from my head according to my own feelings) ... As a result, we spend an additional 12.5 seconds to create screenshots in the test. Let's say you have already written 20 test scenarios, where each test contains at least 5 screenshots. We get that the overpayment for stability is ~ 4 minutes with the available 20 tests.
But even this is not the biggest problem. As discussed above, when running tests locally, screenshots are not chased, but in CI they are chased, and because of expectations, callbacks in the code, for example, on debounce Time, were triggered for each screenshot, which already created randomization in tests, because in CI and locally they passed in different ways.
Current solution
Let's start with Angular animations. Our favorite framework during animation on the DOM element hangs the ng-animating class. This was the key to our solution, because now we need to make sure that there is no animation class on the element now. As a result, it resulted in such a function:
export function waitAnimation(element: Chainable<JQuery>): Chainable<JQuery> {
   return element.should('be.visible').should('not.have.class', 'ng-animating');
}
It seems nothing complicated, but it was this that formed the basis of our decisions. What you want to pay attention to in this approach: when taking a screenshot, you must understand the animation of which element can make your screenshot unstable, and add an assertion before creating the screenshot, which will verify that the element is not animating. But animations can also be in CSS. As Cypress himself says, any assertion on an element is waiting for the animation to finish on it - more info here and here . That is, the essence of the approach is as follows: we have an animated element, add assertion to it - should ('be.visible') / should ('not.be.visible')- and Cypress itself will wait for the animation to finish on the element (perhaps, by the way, a solution with ng-animating is not needed and only Cypress checks are enough, but for now we use the utility - waitAnimation).
As stated in the documentation itself, Cypress checks for a change in the position of an element on a page, but not all animations about changing a position, there are also fadeIn / fadeOut animations. In these cases, the solution principle is the same: we check that the element is visible / invisible on the page.
When moving from cy.wait (1000) + cy.waitStableState () to waitAnimation and Cypress Assertion, we had to spend ~ 2 hours to stabilize old screenshots, but as a result we got + 20-30 seconds instead of +4 minutes for the test execution time . At the moment, we are carefully approaching the review of screenshots: we check that they were not executed during the animation of DOM elements and added checks in the test for waiting for animation. For example, we often add the display of "skeletons" to the page before the data has loaded. Accordingly, the review immediately receives a requirement that when creating screenshots, a skeleton should not be present in the DOM, since there is a fade animation on it.
The problem with this approach is one: it is not always possible to foresee everything when creating a screenshot and it can still fall into CI. There is only one way to deal with this - go and immediately edit the creation of such a screenshot, you cannot postpone, otherwise it will accumulate like a snowball and ultimately you will simply turn off the integration tests.
Screenshot Size
You may have noticed an interesting feature: the default resolution of screenshots is 1000 × 600 px. Unfortunately, there is a problem with the size of the browser window when starting up in Docker: even if you change the size of the viewport through Cypress, this will not help. We found a solution for the Chrome browser (for Electron, we could not quickly find a working solution, and we did not get the one proposed in this issue ). First you need to change the browser to run tests on Chrome:
- Not for NX we do it using the --browser chrome argument when starting the cypress open / run command and for the run command we specify the --headless parameter.
- For NX, in the project configuration in angular.json with tests, we specify the browser: chrome parameter, and for the configuration that will run in CI, we specify headless: true.
Now we make edits in plugins and get screenshots with a size of 1440 × 900 px:
module.exports = (on, config) => {
   on('before:browser:launch', (browser, launchOptions) => {
       if (browser.name === 'chrome' && browser.isHeadless) {
           launchOptions.args.push('--disable-dev-shm-usage');
           launchOptions.args.push('--window-size=1440,1200');

           return launchOptions;
       }

       return launchOptions;
   });
};
Dates
Everything is simple here: if somewhere the date associated with the current is displayed, the screenshot taken today will fall tomorrow. Fixim is simple:
cy.clock(new Date(2025, 11, 22, 0).getTime(), ['Date']);Now the timers. We did not bother and use the blackout option when creating screenshots, for example:
cy.matchImageSnapshot('salary_signing-several-payments', {
   blackout: ['.timer'],
});
Flaky tests
Using the recommendations above, you can achieve maximum test stability, but not 100%, because tests are affected not only by your code, but also by the environment in which they are run.
As a result, a certain percentage of tests will occasionally fall, for example, due to sagging agent performance in CI. First of all, we stabilize the test from our side: we add the necessary assertions before taking screenshots, but for the period of repairing such tests, you can retry the failed tests using cypress-plugin-retries.
We pump CI
In the previous chapters, we learned how to run tests with one command and learned about working with screenshot testing. Now you can look in the direction of CI optimization. Our build will definitely run:
- Npm ci command.
- Raising the application in aot mode.
- Run integration tests.
Let's take a look at the first and second points and understand that similar steps are performed in your other build in CI - the build with the application assembly.
The main difference is not running ng serve, but ng build. Thus, if we can get an already assembled application in a build with integration tests and raise the server with it, then we can reduce the execution time of the build with tests.
Why did we need it? It's just that our application is large and fulfillment
npm ci + npm start in aot mode on the agent in CI took ~ 15 minutes, which in principle required a lot of effort from the agent, and integration tests were also run on top of that. Suppose you have already written 20+ tests and on the 19th test the browser in which the tests are run crashes due to the heavy load on the agent. As you know, restarting the build is again waiting for dependencies to be installed and the application to start.
From now on, I will only talk about application-side scripts. You will need to solve the problem of transferring artifacts between tasks to CI yourself, so we keep in mind that a new build with integration tests will have access to the assembled application from the task for your application build.
Server with static
We need a replacement for ng serve to raise the server with our application. There are many options, I'll start with our first one - angular-http-server . There is nothing complicated in its configuration: we install the dependency, indicate in which folder our statics are located, indicate on which port to raise the application, and are happy.
This solution was enough for us for as much as 20 minutes, and then we realized that we want to proxy some requests to the test circuit. Connect proxying for angular-http-server failed. The final solution was raising the server to Express . To solve the problem, we used express and express-http-proxy itself. We will distribute our statics using
express.static, as a result, we get a script similar to this:
const express = require('express');
const appStaticPathFolder = './dist';
const appBaseHref = './my/app';
const port = 4200;
const app = express();

app.use((req, res, next) => {
   const accept = req
       .accepts()
       .join()
       .replace('*/*', '');

   if (accept.includes('text/html')) {
       req.url = baseHref;
   }

   next();
});
app.use(appBaseHref, express.static(appStaticPathFolder));
app.listen(port);
The interesting point here is that before listening to the route on the baseHref of the application, we also process all requests and look for a request for index.html. This is done for cases when the tests go to the application page, the path of which is different from baseHref. If you do not do this trick, then when you go to any page of your application, except for the main page, you will receive a 404 error. Now let's add a pinch of proxying:
const proxy = require('express-http-proxy');

app.use(
   '/common',
   proxy('https://qa-stand.ru', {
       proxyReqPathResolver: req => '/common' + req.url,
   }),
);
Let's take a closer look at what is happening. There are constants:
- appStaticForlderPath is the folder where your application's statics are located.
- appBaseHref - perhaps your application has baseHref, if not - you can specify '/'.
We proxy all requests starting with / common, and when proxying we save the same path that the request had using the proxyReqPathResolver setting. If you do not use it, then all requests will simply go to https://qa-stand.ru.
Index.html customization
We needed to solve the problem with the custom index.html that we used when ng serve the application in Cypress mode. Let's write a simple script in node.js. We had index.modern.html as the initial parameters, we needed to turn it into index.html and remove unnecessary scripts from there:
const fs = require('fs');
const appStaticPathFolder = './dist';

fs.copyFileSync(appStaticPathFolder + '/index.modern.html', appStaticPathFolder + '/index.html');

fs.readFile(appStaticPathFolder + '/index.html', 'utf-8', (err, data) => {
   const newValue = data
       .replace(
           '<script type="text/javascript" src="/auth.js"></script>',
           '',
       )
       .replace(
           '<script type="text/javascript" src="/analytics.js"></script>',
           '',
       );

   fs.writeFileSync(appStaticPathFolder + '/index.html', newValue, 'utf-8');
});
Scripts
I really didn't want to do npm ci of all dependencies again to run tests in CI (after all, this was already done in the task with the application build), so the idea came up to create a separate folder for all these scripts with our own package.json. Let's name the folder, for example, integration-tests-scripts and drop three files there: server.js, create-index.js, package.json. The first two files were described above, now let's analyze the contents of package.json:
{
 "name": "cypress-tests",
 "version": "0.0.0",
 "private": true,
 "scripts": {
   "create-index": "node ./create-index.js",
   "main-app:serve": "node ./server.js",
   "main-app:cy:run": "cypress run --project ./projects/main-app-integrations ",
   "main-app:integrations": "npm run create-index && start-server-and-test main-app:serve http://localhost:4200/my/app/ main-app:cy:run"
 },
 "devDependencies": {
   "@cypress/webpack-preprocessor": "4.1.0",
   "@types/express": "4.17.2",
   "@types/mocha": "5.2.7",
   "@types/node": "8.9.5",
   "cypress": "4.1.0",
   "cypress-image-snapshot": "3.1.1",
   "express": "4.17.1",
   "express-http-proxy": "^1.6.0",
   "start-server-and-test": "1.10.8",
   "ts-loader": "6.2.1",
   "typescript": "3.8.3",
   "webpack": "4.41.6"
 }
}
The package.json contains only the dependencies required to run integration tests ( with support for typescript and screenshot testing) and scripts for starting the server, creating index.html and the start-server-and-test known from the chapter on running integration tests in Angular Workspace ...
Running
We wrap the execution of integration tests in a new Dockerfile - integration-tests-ci.Dockerfile :
FROM cypress/included:4.3.0
COPY integration-tests-scripts /app/
WORKDIR /app
RUN npm ci
COPY projects/main-app-integrations /app/projects/main-app-integrations
COPY dist /app/dist
COPY tsconfig.json /app/
ENTRYPOINT []
The bottom line is simple: copy and expand the integration-tests-scripts folder to the root of the application and copy everything that is needed to run the tests (this suite may differ for you). The main differences from the previous file are that we do not copy the entire application inside the docker container, just minimal optimization of the test execution time in CI.
Create a file integration-tests-ci.sh with the following content:
docker build -t integrations -f integration-tests-ci.Dockerfile .
docker run --rm -v $PWD/projects/main-app-integrations/src:/app/projects/main-app-integrations/src integrations:latest npm run main-app:integrations
When you run the command with tests, package.json from the integration-tests-scripts folder will become root and the main-app: integrations command will run in it. Accordingly, since this folder will expand to the root, then the paths to the folder with the statics of your application must be specified with the thought that everything will be launched from the root, and not from the integration-tests-scripts folder.
I also want to make a small remark: I called the final bash script for running integration tests as it evolved differently. You don’t need to do this, it was done only for the convenience of reading this article. You should always have one file left, for example integration-tests.sh, which you are already developing. If you have several applications in the repository and their preparation methods differ, you can either use the variables in bash, or different files for each application - depending on your needs.
Outcome
There was a lot of information - I think now it's worth summing up based on what was written above.
Preparing tools for local writing and running tests with a pinch of screenshot testing:
- Add dependency for Cypress.
- Preparing a folder with tests:
- Angular Single Application - leave everything in the cypress folder.
- Angular Workspace - create a folder application name-integrations next to the application that the tests will run against, and move everything from the cypress folder to it.
- NX - rename the project from the name of the application-e2e to the name of the application-integrations.
- cypress- — build- Cypress, aot, index.html, environment prod- serve- Cypress ( , - prod-, ).
- :
- Angular Single Application — serve- cypress- , start-server-and-test.
- Angular Workspace — Angular Single Application, cypress run/open.
- NX — ng e2e.
- -:
- cypress-image-snapshot.
- CI.
- In the tests, we do not take screenshots on the random. If the screenshot is preceded by animation, be sure to wait for it - for example, add Cypress Assertion to the animated element.
- We mock the date through cy.clock or use the blackout option when taking a screenshot.
- We expect any loaded statics at runtime via the cy.waitForResource custom command (images, fonts, etc.).
- We wrap it all up in Docker:
- Preparing the Dockerfile.
- We create a bash file.
Run the tests on top of the assembled application:
- In CI, we learn to throw artifacts of the assembled application between builds (it's up to you).
- Preparing the integration-tests-scripts folder:
- A script for raising the server of your application.
- The script to change your index.html (if you are satisfied with the original index.html - you can skip it).
- Add to the package.json folder with the necessary scripts and dependencies.
- Preparing a new Dockerfile.
- We create a bash file.
useful links
- Angular Workspace + Cypress + CI — Angular Workspace CI , ( typescript).
- Cypress — trade-offs.
- Start-server-and-test — , .
- Cypress-image-snapshot — -.
- Cypress recipes — Cypress, .
- Flaky Tests — , Google.
- Github Action — Cypress GitHub Action, README , — wait-on. docker.